Adding a source subscription
DM
Source subscriptions enable you to configure data loads into Network for matching and merging with Customer Master data
Prerequisite
Reference aliases - If the source system uses code values that are different from Network's values, add reference aliases to map the codes.
For more information, see Reference aliases.
Choose subscription type
- In the Admin console, click System Interfaces > Source Subscriptions.
- Click Add Subscription.
-
In the list, choose how to create the subscription:
-
Use Wizard Mode - Use the wizard to simplify the process of defining the advanced properties, field normalization, and model map.
After these settings have been configured, the classic subscription opens so you can continue defining match rules, Network expression rules, and so on.
If you choose this option, follow the steps in the Source subscription wizard topic.
-
Use Classic Mode - Manually define all of the settings, field normalization, and model map.
If you choose this option, continue with the steps below.
-
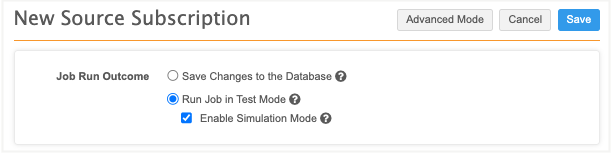
Choose the job outcome
You can run a job and immediately save the changes or you can test the outcome first.
-
Save Changes to the Database - Commit the data updates to the database.
-
Run Job in Test Mode (Default) - Stop the job after the matching stage so no changes will be applied to the database. You can review the job statistics on the Job Details page.
-
Enable Simulation Mode - Preview the changes to the production data. No changes are committed to the database.
For more information, see Simulating data updates.
-
Define subscription details
The Details section of the source subscription defines basic information for the subscription.
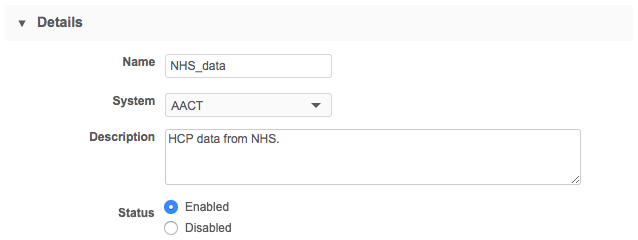
Provide the following information:
-
Name: This value is mandatory and must be short. Special characters and spaces are not supported; use underscores in place of spaces.
-
System: Select the system name for the data source that will be linked to the subscription.
-
Description: Provide meaningful information about this subscription. A maximum of 200 characters is supported.
-
Status: New subscriptions are Enabled by default. They can be disabled when they are no longer needed. For more information, see Inactive subscriptions.
Settings
Use the controls in the Settings section to manage the job outcomes, logging levels, and match outcomes.
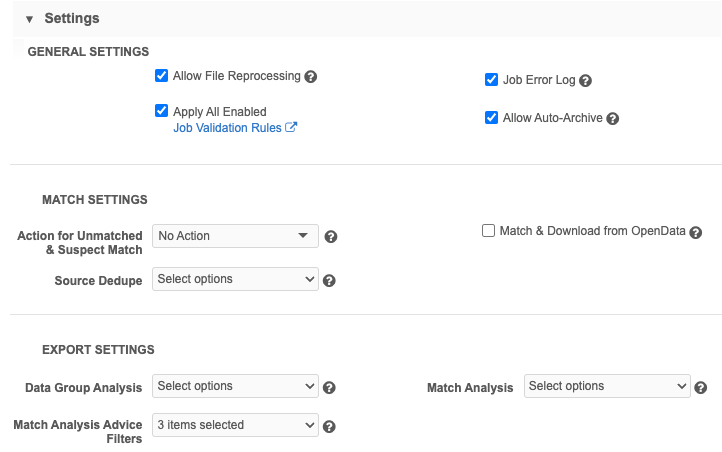
In the Settings section for the subscription, you can configure the following controls, depending on the source system:
General settings
-
Allow File Reprocessing: Controls whether the subscription job re-reads files in the feed that were previously processed.
-
Enabled (default) - Process all files in the source folder, regardless of whether or not they have previously been loaded.
-
Disabled - Process only new files in the feed.
Requirements when disabled
If this setting is turned off, running the subscription a second time against the same files will cause the job to fail. To successfully reload data, do one of the following actions:
- Update the FTP Path to another folder containing the new feed files
- Change the System defined for the subscription
- Toggle the setting on to reprocess the existing feed.
Note: The feed can contain only one file for each defined alias ( Source Files section), for example, hcp*. If multiple files match a single alias definition, the subscription job will fail.
-
-
Job Error Log: Export the error log to your FTP server.
If the job produces errors and this setting is on, you can retrieve the .csv file from Network MDM FTP.
Note: This setting does not need to be on to download the log from the Job Error Log tab (Job Details page). The log is always available on the tab.
Choose where the logs should be stored:
-
Default - The default error log path is logs/<source system>.
-
Custom - Define a custom directory.
The folders will be created in your FTP when the subscription runs. For details, see Custom error log directory.
-
-
Enable All Job Validation Rules - Run job validation rules to ensure that critical changes do not occur on a large number of records.
Click the link to navigate to the Job Validation Rules page to review the enabled rules.
-
Allow Auto-Archive - Automatically archive the source files when a job completes.
The source files are automatically moved from the inbound folder to the auto-archive folder on your Network MDM FTP server if the job completes or completes with warnings. Source files are not archived if the job fails.
For information, see Archiving source files.
Match settings
-
Action for Unmatched & Suspect Match: The action to perform for unmatched records or suspect matches
 The identification of multiple records that are suspected to be duplicates of one another, but without high enough confidence for automatic resolution..
 Option Results for Suspect Matches Results for Unmatched Records Create Valid Records - All incoming records are created as new valid records in your Network MDM instance; each record is assigned a Network ID.
- Suspect match tasks are created with these records and are sent to the local inbox.
- Valid records can be exported to downstream systems while suspect match tasks are pending.
Any unmatched records are created as new valid records. Create Candidate Records Displays only if the Candidate records feature is enabled in your instance. - Incoming records that are part of those tasks are created as new valid, candidate records.
- Suspect match tasks are created with those records and are sent to the local inbox.
- Candidate records cannot be sent to downstream systems while suspect match tasks are pending.
Any unmatched records are created as new valid, candidate records. No Action No suspect match tasks are created. Incoming records that match using ASK match rules are discarded. Unmatched records are discarded. - Source Dedupe: Choose whether to deduplicate The process of merging duplicate records. objects or sub-objects that loaded in this source subscription. All Veeva standard objects and sub-objects and custom objects and sub-objects are supported. For information, see Deduplicating source data.
-
DCR Response File Provided: Displays only when a third-party system is selected for the subscription.
Select to import DCRs. The DCR response files will be processed. The DCR file names must start with “DCR_” and must be stored in the inbound FTP folder of your Network MDM instance.
For information about the DCR response file, see Importing DCRs for third party systems.
-
Match & Download from OpenData: Automatically matches (ACT
A high confidence match between two records. ACT matches result in a merge without any human review. only) the records in your Network MDM instance with Veeva OpenData. For more information, see Match & Download from Veeva OpenData.Note: Matching with Veeva OpenData only occurs if it is enabled (General Settings) for a Network MDM instance that subscribes to Veeva OpenData for a country.
Export settings
-
Data Group Analysis: Export the data group details from this source subscription to your FTP server. Select the object to log. All Veeva standard objects and custom objects are supported. For more information, see Export data group analysis.
Note: The resulting candidate records will be searchable locally; however, they will not be synchronized with or be searchable from downstream systems.
- Match Analysis: Match results to output for your FTP server. Select the object or sub-object to log. All Veeva standard objects and sub-objects and custom objects and sub-objects are supported. Do not use this option if you are loading more than 100,000 records. For more information, see Match analysis log and Sub-object match logs.
- Match Analysis Advice Filters: Filter exported match log by result type: ACT, ASK, or Unmatched results (no matches). Selecting the type of match records enables you to focus on the match results that you care about, and reduces the size of the file. All options are enabled by default.
Tip: By default, opted-out HCP records are excluded from matching. To match incoming records with these records, see Opt out matching settings.
Provide source files
Define an FTP path to a source file, for example: SRC_System/SRC_File.
Note: If you specify a folder name, append an asterisk (*) to include all files in that folder, for example, SRC_System/*.
Use subfolders
Use a subfolder to contain incoming files (and separate inbound file sets). The loader examines the FTP Path folder and one level of subfolders to find files to process. Consider the hierarchy you use carefully so that file sets are easily identifiable.
Using this practice, you maintain a complete record of all data loaded, and previously loaded file sets are not overwritten on subsequent loads.

The FTP path that you identify is not validated, so ensure that it is correct so that your source subscription job does not fail.
For information about accessing the files in your Network MDM file system, see File Explorer.
File limit
A maximum of 128 files, or feeds, can be processed in each job.
If more than 128 files are found in the specified FTP folder, the job will fail and a Data loading configuration error message displays on the page.
Source subscriptions look for unprocessed files, or if you have the Allow File Reprocessing option selected, all of the files in the specified FTP path can be considered. Each file starts an independent job, so only a limited number of jobs can run to avoid issues. Users are responsible for managing the files in their FTP folders.
User access to FTP directories
When you define the FTP Path for each subscription, you can use directories that users only with explicit need can access. In user profiles, administrators can identify specific FTP folders that each user can access. This protects your data in other FTP directories.
For more information, see Add a user profile.
Add file definitions
To add source files, click the Add File link and provide the following in the File Definitions section:
-
File Name: Provide the name of a source file.
The name can contain only numbers, letters, and underscores (_). Do not include the file extension; for example, .csv.
-
Alias: The simplified name of the file that is used to reference it in the model map code. The alias should be a simple term using only letters, numbers, and underscores (_).
Example
If you include a file in the feed called hcp_DAT_vids_20190305.csv, create an alias called HCPdata with a value of hcpdata* so you can refer to the simplified name in your model map.
Tip: Avoid using file aliases that match object names; for example, HCO, because it can be confusing in the model map. use a unique name that will not be misunderstood; for example, XHCO.
-
Key Columns: Type keys from the external system, delimited by commas. This should include columns used for keys, anchors, and joins.
- Text Qualifier: Select a qualifier to use for the beginning and end of text.
- Format: Select Delimited or Fixed Length to indicate the file format.
- Delimiter: Identify how the data in the file is separated.
- Header Row?: Select the Header Row checkbox to indicate that a comma separated list of headers exists for the header row.
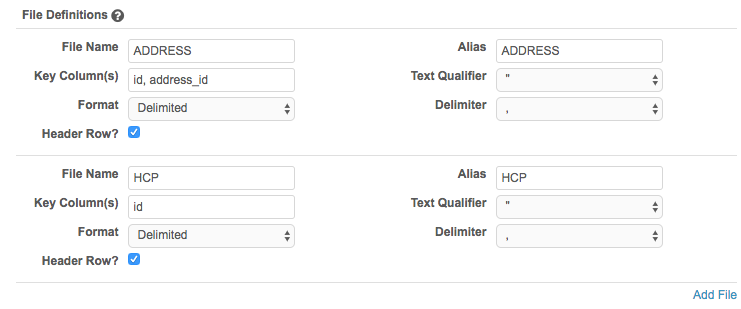
To add more files for processing, click the Add File link again.
Source file column headers
Column headers for source subscriptions are case-sensitive which can cause data loading issues. To format the column headers that are loaded to use either lowercase (default) or uppercase letters, add the following property to Advanced Mode:
"parser.attribute.rules": "network:force_lowercase_attributes"
or
"parser.attribute.rules": "network:force_uppercase_attributes"
When the subscription runs and the files are loaded, the column header values will be formatted to lowercase or uppercase letters.
Considerations for attributes
If you reference column headers in the source subscription configuration (for example, in Network Expression Rules, Model Map, Field Normalization, or Transformation Queries sections), manually edit those references so they use the same case as the column headers in the file (uppercase or lowercase).
Avoiding special characters in source files
Because some characters are used as parser values for processing the source file, they should not be used in source files.
Avoid using the following characters:
- comma (,)
- quote (")
- pipe (|) - This is often reconfigured to a comma (,) using the advanced subscription property
"parser.csv.separator" : ",".
Create a model map
The model map defines the objects and sub-objects and how the data is provided in the incoming files, along with instructions on how to use them. The following samples illustrate model maps for two different sources.
Note: Unless they are anchored from an address file, licenses should be modeled against the HCP or HCO.
Examples
Sample model map: NPI
NPI source is flat source that contains HCP and HCO information in a single file. HCPs can have up to two addresses (business and practice) distributed in columns, including columns for other information in the addresses. The following samples show declarations for each entity, followed by descriptions of each sample.
For the following source, the alias "NPI" is configured in the job properties.
HCP entity:
[
   {
      "entity": "HCP",
      "from": "NPI WHERE NPI.ENTITY_TYPE_CODE = '1'",
      "attributes": [
         "NPI.*",
         "NPI.VDM_* AS *"
      ],
      "customkeys": [
         {
            "source": "NPI",
            "item": "HCP",
            "value": "NPI.NPI"
         }
      ]
   },
In this sample, a possible HCP custom key stored in Network MDM would be NPI:HCP:1750384707.
| Property | Value | Description |
|---|---|---|
| "entity" | "external_data_model_entity" | This is the Network MDM external data model entity that is being loaded (for example, "HCP" or "HCO"). It extracts them based on the "ENTITY_TYPE_CODE" column from the file. |
| "from" | "SQL_statement" | This is similar to a MySQL statement, containing a WHERE clause that extracts entity data based on the column you specify in the statement. |
| "attributes" |
"NPI.*", "NPI.VDM_* AS *" |
This is an array for each entity being modeled. The array contains important information that the loader uses to extract the proper columns for each file. |
| "customkeys" | "value", "item", or "source" |
This is an array for the required keys, which the loader stores in the "value" represents the column within the flat file that contains the required value. "item" represents the object that the custom key belongs to. If you do not specify an item, the loader uses the "entity" value. "source" represents the source that the custom key belongs to. If you do not specify the source, the loader uses the "system" value assigned to the subscription. |
HCO entity:
   {
      "entity": "HCO",
      "from": "NPI WHERE NPI.ENTITY_TYPE_CODE = '2'",
      "attributes": [
         "NPI.*",
         "NPI.VDM_* AS *"
      ],
      "customkeys": [
         {
            "source": "NPI",
            "item": "HCO",
            "value": "NPI.NPI"
         }
      ]
   },
In this sample, a possible HCO custom key stored in Network MDM would be NPI:HCO:1750384709.
| Property | Value | Description |
|---|---|---|
| "entity" | "external_data_model_entity" | This is the Network MDM external data model entity that is being loaded (for example, "HCP" or "HCO"). It extracts the HCOs based on the "ENTITY_TYPE_CODE" column from the file. |
| "from" | "SQL_statement" | This is similar to a MySQL statement, containing a WHERE clause that extracts entity data based on the column you specify in the statement. |
| "attributes" |
"NPI.*", "NPI.VDM_* AS *" |
This is an array for each entity being modeled. The array contains important information that the loader uses to extract the proper columns for each file. |
| "customkeys" | "value", "item", or "source" |
This is an array for the required keys, which the loader stores in the "value" represents the column within the flat file that contains the required value. "item" represents the object that the custom key belongs to. If you do not specify an item, the loader uses the "entity" value. "source" represents the source that the custom key belongs to. If you do not specify the source, the loader uses the "system" value assigned to the subscription. |
Address entity
   {
      "entity": "ADDRESS",
      "from": "NPI",
      "anchors": [
         {
            "anchor": "NPI.PROVIDER_FIRST_LINE_BUSINESS_PRACTICE_LOCATION_ADDRESS",
            "attributes": [
               "NPI.PROVIDER_FIRST_LINE_BUSINESS_PRACTICE_LOCATION_ADDRESS",
               "NPI.PROVIDER_SECOND_LINE_BUSINESS_PRACTICE_LOCATION_ADDRESS",
               "NPI.PROVIDER_BUSINESS_PRACTICE_LOCATION_ADDRESS_CITY_NAME",
               "NPI.PROVIDER_BUSINESS_PRACTICE_LOCATION_ADDRESS_STATE_NAME",
               "NPI.PROVIDER_BUSINESS_PRACTICE_LOCATION_ADDRESS_POSTAL_CODE",
               "NPI.PROVIDER_BUSINESS_PRACTICE_LOCATION_ADDRESS_COUNTRY_CODE__IF_OUTSIDE_U_S__"
            ],
            "customkeys": [
               {
                  "source": "NPI",
                  "item": "ADDRESS",
                  "value": "NPI.NPI"
               }
            ]
         }
      ],
      "attributes": [
         "NPI.VDM_* AS *",
         "NPI.VDM_ENTITY_ID AS VDM_FKENTITY_ID",
         "VDM_ENTITY_ID=@NEW_ENTITY_ID"
      ]
   },
In this sample, a possible address custom key stored in Network MDM would be NPI:NPI_ADDRESS:1750384709.
| Property | Value | Description |
|---|---|---|
| "entity" | "external_data_model_entity" | This is the Network MDM external data model entity that is being loaded. |
| "from" | "SQL_statement" |
For this entity declaration, this represents the file (or alias) name, since address information is in the same file and addresses are extracted using anchors. As a result, a |
| "anchors" | "first_address_column" |
The anchor represents a column in the file (preferably non-empty) used for creation of the sub-object. |
| "attributes" |
"entity_array_column" |
This is an array for each entity being modeled. The array contains important information that the loader uses to extract the proper columns for each file. |
| "customkeys" | "value", "item", or "source" |
This is an array for the required keys, which the loader stores in the "value" represents the column within the flat file that contains the required value. "item" represents the object that the custom key belongs to. If you do not specify an item, the loader uses the "entity" value. "source" represents the source that the custom key belongs to. If you do not specify the source, the loader uses the "system" value assigned to the subscription. |
| "attributes" |
"NPI.VDM_* AS *", "NPI.VDM_ENTITY_ID AS VDM_FKENTITY_ID", "VDM_ENTITY_ID=@NEW_ENTITY_ID" |
These attributes store the address of the ID of the extracted HCO or HCP as a foreign key, and create a new entity for the extracted address information. These are internal attributes used by the loader and should not be changed. |
License entity
   {
      "entity": "LICENSE",
      "from": "NPI",
      "anchors": [
         {
            "anchor": "NPI.PROVIDER_LICENSE_NUMBER_%s",
            "index": [
               "1",
               "2",
               "3",
               "4",
               "5",
               "6",
               "7",
               "8",
               "9",
               "10",
               "11",
               "12",
               "13",
               "14",
               "15"
            ],
            "attributes": [
               "LIC_LICENSE_NUMBER=@ANCHOR_VALUE",
               "NPI.PROVIDER_LICENSE_NUMBER_STATE_CODE_%s AS LIC_LICENSE_NUMBER_STATE_CODE",
               "LIC_TYPE='STATE'"
            ]
         }
      ],
      "attributes": [
         "NPI.VDM_* AS *",
         "NPI.VDM_ENTITY_ID AS VDM_FKENTITY_ID",
         "VDM_ENTITY_ID=@NEW_ENTITY_ID"
      ]
   }
]
| Property | Value | Description |
|---|---|---|
| "entity" | "external_data_model_entity" | This is the Network MDM external data model entity that is being loaded. |
| "from" | "SQL_statement" |
For this entity declaration, this represents the file (or alias) name, since license information is in the same file and licenses are extracted using anchors. As a result, a |
| "anchors" | "anchor_array" |
This represents the relevant columns from which to extract license records from the file used for extraction. |
| "anchor" | "first_anchor_column" |
The anchor represents a column in the file (preferably non-empty) used for creation of the sub-object. |
| "index" | "index_number" |
This represents multiple anchor declaration for the license. |
| "attributes" |
"entity_array_column" |
The attributes array contains all of the license columns required for extraction. The Network MDM external model requires the loader to use variables such as |
| "attributes" |
"NPI.VDM_* AS *", "NPI.VDM_ENTITY_ID AS VDM_FKENTITY_ID", "VDM_ENTITY_ID=@NEW_ENTITY_ID" |
These attributes store the license of the ID of the extracted HCO or HCP as a foreign key, and create a new entity for the extracted license information. These are internal attributes used by the loader and should not be changed. |
Veeva CRM source is more normalized than NPI source. It provides a single file for both HCPs and HCOs, and separate files for addresses (including licenses) and relationships.
For the following source, the alias "ACCOUNT" is configured in the job properties.
HCP entity:
[
   {
      "entity": "HCP",
      "from": "ACCOUNT WHERE ACCOUNT.ISPERSONACCOUNT = 'TRUE'",
      "attributes": [
         "ACCOUNT.*",
         "ACCOUNT.VDM_* AS *"
      ],
      "customkeys": [
         {
            "source": "CRM",
            "item": "HCP",
            "value": "ACCOUNT.ID"
         },
         {
            "source": "CRM",
            "item": "EXTERNAL"
            "value": "ACCOUNT.EXTERNAL_ID_VOD__C"
         }
      ]
   },
In this sample, a possible HCP custom key stored in Network MDM would be NPI:HCP:1750384707.
| Property | Value | Description |
|---|---|---|
| "entity" | "external_data_model_entity" | This is the Network MDM external data model entity that is being loaded (for example, "HCP" or "HCO"). It extracts the HCPs based on the "ENTITY_TYPE_CODE" column from the file. |
| "from" | "SQL_statement" | This is similar to a MySQL statement, containing a WHERE clause that extracts entity data based on the column you specify in the statement. ISPERSONACCOUNT is set to TRUE because HCPs are being extracted. |
| "attributes" |
"ACCOUNT.*", "ACCOUNT.VDM_* AS *" |
This is an array for each entity being modeled. The array contains important information that the loader uses to extract the proper columns for each file. These are internal attributes that the loader uses to store the attributes in the file and the internal VDM (internal loader) attributes in the intermediate store. These are internal attributes used by the loader and should not be changed. |
| "customkeys" | "value", "item", or "source" |
This is an array for the required keys, which the loader stores in the "value" represents the column within the flat file that contains the required value. "item" represents the object that the custom key belongs to. If you do not specify an item, the loader uses the "entity" value. "source" represents the source that the custom key belongs to. If you do not specify the source, the loader uses the "system" value assigned to the subscription. |
HCO entity
   {
      "entity": "HCO",
      "from": "ACCOUNT WHERE ACCOUNT.ISPERSONACCOUNT = 'FALSE'",
      "attributes": [
         "ACCOUNT.*",
         "ACCOUNT.VDM_* AS *"
      ],
      "customkeys": [
         {
            "source": "CRM",
            "item": "HCO",
            "value": "ACCOUNT.ID"
         },
         {
            "source": "CRM",
            "item": "EXTERNAL",
            "value": "ACCOUNT.EXTERNAL_ID_VOD__C"
            }
      ]
   },
In this sample, a possible HCP custom key stored in Network MDM would be VCRM:HCO:1750384758.
| Property | Value | Description |
|---|---|---|
| "entity" | "external_data_model_entity" | This is the Network MDM external data model entity that is being loaded (for example, "HCP" or "HCO"). It extracts the HCOs based on the "ENTITY_TYPE_CODE" column from the file. |
| "from" | "SQL_statement" | This is similar to a MySQL statement, containing a WHERE clause that extracts entity data based on the column you specify in the statement. ISPERSONACCOUNT is set to FALSE because HCOs are being extracted. |
| "attributes" |
"ACCOUNT.*", "ACCOUNT.VDM_* AS *" |
This is an array for each entity being modeled. The array contains important information that the loader uses to extract the proper columns for each file. These are internal attributes that the loader uses to store the attributes in the file and the internal VDM (internal loader) attributes in the intermediate store. These are internal attributes used by the loader and should not be changed. |
| "customkeys" | "value", "item", or "source" |
This is an array for the required keys, which the loader stores in the "value" represents the column within the flat file that contains the required value. "item" represents the object that the custom key belongs to. If you do not specify an item, the loader uses the "entity" value. "source" represents the source that the custom key belongs to. If you do not specify the source, the loader uses the "system" value assigned to the subscription. |
Address entity
   {
      "entity": "ADDRESS",
      "from": "ADDRESS JOIN ACCOUNT ON ACCOUNT.ID = ADDRESS.ACCOUNT_VOD__C",
      "attributes": [
         "ADDRESS.*",
         "ADDRESS.VDM_* AS *",
         "ACCOUNT.VDM_ENTITY_ID AS VDM_FKENTITY_ID"
      ],
      "customkeys": [
         {
            "source": "CRM",
            "item": "ADRRESS",
            "value": "ADDRESS.ID"
         }
      ]
   },
| Property | Value | Description |
|---|---|---|
| "entity" | "external_data_model_entity" | This is the Network MDM external data model entity that is being loaded. |
| "from" | "SQL_statement" |
This is similar to a MySQL statement, containing a |
| "anchors" | "first_address_column" |
The anchor represents a column in the file (preferably non-empty) used for creation of the child entity. |
| "customkeys" | "value", "item", or "source" |
This is an array for the required keys, which the loader stores in the "value" represents the column within the flat file that contains the required value. "item" represents the object that the custom key belongs to. If you do not specify an item, the loader uses the "entity" value. "source" represents the source that the custom key belongs to. If you do not specify the source, the loader uses the "system" value assigned to the subscription. |
| "attributes" |
"ADDRESS.*", "ADDRESS.VDM_* AS *", "ACCOUNT.VDM_ENTITY_ID AS VDM_FKENTITY_ID" |
This is an array for each entity being modeled. The array contains important information that the loader uses to extract the proper columns for each file. These are internal attributes that the loader uses to store the attributes in the file and the internal VDM (internal loader) attributes in the intermediate store. They also store the ID of the account extracted as a foreign key in the address. These are internal attributes used by the loader and should not be changed. |
License entity
   {
      "entity": "LICENSE",
      "from": "ADDRESS JOIN ACCOUNT ON ACCOUNT.ID = ADDRESS.ACCOUNT_VOD__C",
      "anchors": [
         {
            "anchor": "ADDRESS.DEA_VOD__C",
            "attributes": [
               "LIC_TYPE='ADDRESS'",
               "LIC_VALUE=@ANCHOR_VALUE",
               "LIC_BODY='DEA'",
               "LIC_TYPE_VALUE='DEA'",
               "ADDRESS.DEA_EXPIRATION_DATE_VOD__C AS LIC_EXPIRATION",
               "ADDRESS.DEA_STATUS_VOD__C AS LIC_STATUS"
            ],
            "addresskey": {
               "source": "CRM",
               "item": "ADRRESS",
               "value": "ADDRESS.ID"
            }
         },
         {
            "anchor": "ADDRESS.LICENSE_VOD__C",
            "attributes": [
               "LIC_TYPE='STATE'",
               "LIC_VALUE=@ANCHOR_VALUE",
               "ADDRESS.STATE_VOD__C AS LIC_TYPE_VALUE",
               "ADDRESS.LICENSE_EXPIRATION_DATE_VOD__C AS LIC_EXPIRATION",
               "ADDRESS.LICENSE_STATUS_VOD__C AS LIC_STATUS"
            ]
         }
      ],
      "attributes": [
         "ADDRESS.VDM_* AS *",
         "ACCOUNT.VDM_ENTITY_ID AS VDM_FKENTITY_ID",
         "VDM_ENTITY_ID=@NEW_ENTITY_ID"
      ]
   },
| Property | Value | Description |
|---|---|---|
| "entity" | "external_data_model_entity" | This is the Network MDM external data model entity that is being loaded. |
| "from" | "SQL_statement" |
This is similar to a MySQL statement, containing a With Veeva CRM, the license information is in the address file, but joining against the account creates a link between the license record and the HCP or HCO account that holds the license. |
| "anchors" | "anchor_array" |
This represents the relevant columns from which to extract license records from the file used for extraction. |
| "anchor" | "first_anchor_column" |
The anchor represents a column in the file (preferably non-empty) used for creation of the child entity. |
| "attributes" |
"entity_array_column" |
The attributes array contains all of the license columns required for extraction. The Network MDM external model requires the loader to use variables such as |
| "addresskey" | "value", "item", or "source" |
This is an array for the required keys, which the loader stores in the "value" represents the column within the flat file that contains the required value. "item" represents the object that the custom key belongs to. If you do not specify an item, the loader uses the "entity" value. "source" represents the source that the custom key belongs to. If you do not specify the source, the loader uses the "system" value assigned to the subscription. |
| "anchor" | first_anchor_column |
This represents the first column of the state license within the file used for extraction. |
| "attributes" |
"LIC_TYPE='STATE'", "LIC_VALUE=@ANCHOR_VALUE", "ADDRESS.STATE_VOD__C AS LIC_TYPE_VALUE", "ADDRESS.LICENSE_EXPIRATION_DATE_VOD__C AS LIC_EXPIRATION", "ADDRESS.LICENSE_STATUS_VOD__C AS LIC_STATUS" |
These attributes assign each column to a corresponding variable. |
| "attributes" |
"ADDRESS.VDM_* AS *", "ACCOUNT.VDM_ENTITY_ID AS VDM_FKENTITY_ID", "VDM_ENTITY_ID=@NEW_ENTITY_ID" |
These attributes store the parent and child account IDs of the extracted PARENTHCO as a foreign key, store the internal VDM (internal loader) attributes in the intermediate store, and store all attributes in the file in the intermediate storage. These are internal attributes used by the loader and should not be changed. |
Parent HCO entity
   {
      "entity": "PARENTHCO",
      "from": "CHILDACCOUNT JOIN ACCOUNT CHILD ON CHILDACCOUNT.CHILD_ACCOUNT_VOD__C = CHILD.ID LEFT JOIN ACCOUNT PARENT ON CHILDACCOUNT.PARENT_ACCOUNT_VOD__C = PARENT.ID",
      "attributes": [
         "CHILDACCOUNT.*",
         "CHILDACCOUNT.VDM_* AS *",
         "CHILD.VDM_ENTITY_ID AS VDM_FKENTITY_ID",
         "PARENT.VDM_ENTITY_ID AS VDM_FKENTITY2_ID"
      ],
      "customkeys": [
         {
            "source": "CRM",
            "item": "CHILDACCOUNT",
            "value": "CHILDACCOUNT.ID"
            }
      ],
      "parentkey": {
            "source": "CRM",
            "item": "ACCOUNT",
            "value": "CHILDACCOUNT.PARENT_ACCOUNT_VOD__C"
      }
   }
]
In this sample, a possible parent HCO custom key stored in Network MDM would be VCRM:CHILDACCOUNT:1750384707.
| Property | Value | Description |
|---|---|---|
| "entity" | "external_data_model_entity" | This is the Network MDM external data model entity that is being loaded. |
| "from" | "SQL_statement" |
This is similar to a MySQL statement, containing a |
| "attributes" |
"CHILDACCOUNT.*", "CHILDACCOUNT.VDM_* AS *", "CHILD.VDM_ENTITY_ID AS VDM_FKENTITY_ID", "PARENT.VDM_ENTITY_ID AS VDM_FKENTITY2_ID" |
These attributes store the parent and child account IDs of the extracted PARENTHCO as a foreign key, store the internal VDM (internal loader) attributes in the intermediate store, and store all attributes in the file in the intermediate storage. These are internal attributes used by the loader and should not be changed. |
| "customkeys" | "value", "item", or "source" |
This is an array for the required keys, which the loader stores in the "value" represents the column within the flat file that contains the required value. "item" represents the object that the custom key belongs to. If you do not specify an item, the loader uses the "entity" value. "source" represents the source that the custom key belongs to. If you do not specify the source, the loader uses the "system" value assigned to the subscription. |
Define Network Expression Rules
Use rule expressions (NEX rules) to enforce data quality standards when you process externally sourced data through source subscriptions. Configure the rule expressions using a set of functions and operators to define specific rules for a particular stage of the data load.
Example
This NEX rule uses the CLEANSE_STRING function to cleanse and standardize the incoming data for the Company Name field on the Company object. The rule is applied to the Transformation stage so the data is cleansed before matching and merging begins in the job.
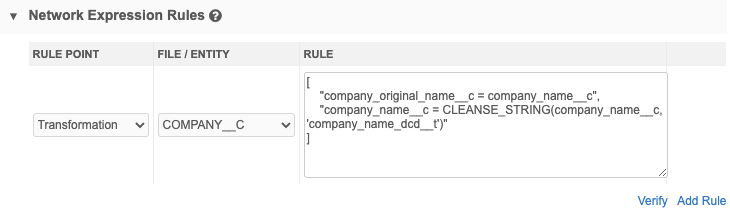
To add a NEX rule:
-
Click Add Rule.
-
Expand the Rule Point and choose the stage of the job that the rule should be applied.
-
Expand File / Entity to select the object.
-
Create the NEX rule here or in the NEX Tester feature (System Interfaces > NEX Tester).
The NEX Tester includes syntax highlighting and formatting to help you to easily create the rule. You can test the rule using a valid Network ID and then copy the expression and paste it directly in this source subscription configuration. For details, see NEX tester.
NEX rules must be created using specific formats in order to be valid.
-
Click Verify. If the rule syntax is valid, the message NEX is valid displays.
Multiple rules can be created.
For detailed information about the data loading stages and valid formats for NEX rules, see Using rule expressions.
Define normalization rules
The normalization rules define field mappings from columns in an incoming source file to the attributes in the Network MDM data model.
These mappings are divided into arrays, which correspond to entities in the Network MDM external data model (HCP, HCO, ADDRESS, LICENSE, PARENTHCO, and CUSTOMKEYS).
Considerations
- Field normalizations are case-sensitive. For example, if you configure the field normalization "HCP.city": "locality__v"," city is case sensitive. The column name in the UI must match exactly.
- If aliases are used in the model map (* AS *), do not prefix the entity in the field normalization. For example, if "HCP.* AS *" is defined in the model map, the field normalization for HCP should be "LASTNAME" instead of "HCP.LASTNAME". This does not apply to the VDM attributes (for example, "HCP.VDM_* AS *").
Examples
The following are examples of properties for two sources, in JSON format.
NPI
{
   "HCP": {
      "NPI.NPI": "npi_num__v",
      "NPI.PROVIDER_LAST_NAME__LEGAL_NAME_": "last_name__v",
      "NPI.PROVIDER_FIRST_NAME": "first_name__v",
      "NPI.PROVIDER_MIDDLE_NAME": "middle_name__v",
      "NPI.PROVIDER_NAME_PREFIX_TEXT": "prefix__v",
      "NPI.PROVIDER_NAME_SUFFIX_TEXT": "suffix__v",
      "NPI.PROVIDER_CREDENTIAL_TEXT": "medical_degree_1__v",
      "NPI.PROVIDER_GENDER_CODE": "gender__v"
   },
   "HCO": {
      "NPI.NPI": "npi_num__v",
      "NPI.PROVIDER_ORGANIZATION_NAME__LEGAL_BUSINESS_NAME_": "corporate_name__v"
   },
   "ADDRESS": {
      "NPI.PROVIDER_FIRST_LINE_BUSINESS_MAILING_ADDRESS": "address_line_1__v",
      "NPI.PROVIDER_SECOND_LINE_BUSINESS_MAILING_ADDRESS": "address_line_2__v",
      "NPI.PROVIDER_BUSINESS_MAILING_ADDRESS_CITY_NAME": "locality__v",
      "NPI.PROVIDER_BUSINESS_MAILING_ADDRESS_STATE_NAME": "administrative_area__v",
      "NPI.PROVIDER_BUSINESS_MAILING_ADDRESS_POSTAL_CODE": "postal_code__v",
      "NPI.PROVIDER_BUSINESS_MAILING_ADDRESS_COUNTRY_CODE": "country__v",
      "NPI.PROVIDER_FIRST_LINE_BUSINESS_PRACTICE_LOCATION_ADDRESS": "thoroughfare__v",
      "NPI.PROVIDER_SECOND_LINE_BUSINESS_PRACTICE_LOCATION_ADDRESS": "thoroughfare_post_direction__v",
      "NPI.PROVIDER_BUSINESS_PRACTICE_LOCATION_ADDRESS_CITY_NAME": "locality__v",
      "NPI.PROVIDER_BUSINESS_PRACTICE_LOCATION_ADDRESS_STATE_NAME": "administrative_area__v",
      "NPI.PROVIDER_BUSINESS_PRACTICE_LOCATION_ADDRESS_POSTAL_CODE": "postal_code__v",
      "NPI.PROVIDER_BUSINESS_PRACTICE_LOCATION_ADDRESS_COUNTRY_CODE": "country__v"
   },
   "LICENSE": {
      "LIC_TYPE": "type__v",s
      "LIC_LICENSE_NUMBER_STATE_CODE": "type_value__v",
      "LIC_LICENSE_NUMBER": "license_number__v"
	}
}
{
   "HCO": {
      "ACCOUNT.NAME": "corporate_name__v",
      "ACCOUNT.Type": "hco_type__v",
      "ACCOUNT.PHONE": "phone_1__v",
      "ACCOUNT.FAX": "fax_1__v",
      "ACCOUNT.WEBSITE": "URL_1__v",
      "ACCOUNT.NUMBEROFEMPLOYEES": "count_medstaff__v",
      "ACCOUNT.GROUP_SPECIALTY_1_VOD__C": "specialty_1__v",
      "ACCOUNT.GROUP_SPECIALTY_2_VOD__C": "specialty_2__v",
      "ACCOUNT.DO_NOT_CALL_VOD__C": "do_not_contact__v",
      "ACCOUNT.STATUS__C": "hco_status__v",
      "ACCOUNT.TEACHING_HOSPITAL__C": "training_facility__v"
   },
   "HCP": {
      "HCP.LASTNAME": "last_name__v",
      "HCP.FIRSTNAME": "first_name__v",
      "HCP.PHONE": "phone_1__v",
      "HCP.FAX": "fax_1__v",
      "HCP.WEBSITE": "URL_1__v",
      "HCP.PERSONOTHERPHONE": "phone_2__v",
      "HCP.PERSONEMAIL": "email_1__v",
      "HCP.credentials_vod__c": "medical_degree_1__v",
      "HCP.SPECIALTY_1_VOD__C": "specialty_1__v",
      "HCP.SPECIALTY_2_VOD__C": "verteo_specialty__c",
      "HCP.GENDER_VOD__C": "gender__v",
      "HCP.PDRP_OPT_OUT_VOD__C": "pdrp_optout__v",
      "HCP.PDRP_OPT_OUT_DATE_VOD__C": "pdrp_optout_date__v",
      "HCP.SUFFIX_VOD__C": "suffix__v",
      "HCP.NPI_VOD__C": "npi_num__v",
      "HCP.ME__C": "me_id__v"
   },
   "LICENSE": {
      "LICENSE.STATE_VOD__C": "type_value__v",
      "LICENSE.LICENSE_VOD__C": "license_number__v",
      "LICENSE.LICENSE_EXPIRATION_DATE_VOD__C": "expiration_date__v",
      "LICENSE.LICENSE_STATUS_VOD__C": "license_status__v",
      "LICENSE.type__v": "type__v",
      "LICENSE.drug_schedule__v": "drug_schedule__v"
   },
   "ADDRESS": {
      "ADDRESS.NAME": "address_line_1__v",
      "ADDRESS.ADDRESS_LINE_2_VOD__C": "address_line_2__v",
      "ADDRESS.CITY_VOD__C": "locality__v",
      "ADDRESS.STATE_VOD__C": "administrative_area__v",
      "ADDRESS.ZIP_VOD__C": "postal_code__v",
      "ADDRESS.country__v": "country__v"
   },
   "PARENTHCO": {
      "RELATIONSHIP.Primary": "is_primary_relationship__v"
   }
}
Define match rules
Network MDM includes a pre-built set of match rules for each country that has been tested and tuned. These match rules should be the starting point for any additional configuration and are included by default in each new source subscription.
The regular match process loads external data into Network MDM and manages incoming records as follows:
- Records that confidently match a Network MDM record are automatically merged with that record.
- Records that possibly match a Network MDM record, but aren’t confident The degree to which a record comparison is considered a potential or true match. matches, are sent to Data Stewards for a suspect match The identification of multiple records that are suspected to be duplicates of one another, but without high enough confidence for automatic resolution. review.
-
The action for records that do not match any Network MDM records are determined using the Action for Unmatched & Suspect Match setting value.
Possible actions:
-
Create valid records (local records)
-
Create candidate records
-
No action
-
Define the match configuration
The Match Configuration section contains two options:
-
Use Match Configuration - Define specific match rules by country for this source subscription. Default for new subscriptions.
The Basic and Advanced tabs display after the Country Group is defined.
If this option is selected and match rules are not defined, the default match configuration is used.
-
Use Match Rule Collection - Use an existing match rule collection.
Match collections can be created and applied to multiple subscriptions that have common match configurations. Using a match rule collection simplifies match configurations.
Match rule collections are created in System Interfaces > Match Rule Collections. For more information, see Match rule collections.
Note: Match rules can be configured for custom objects using the Advanced mode only.
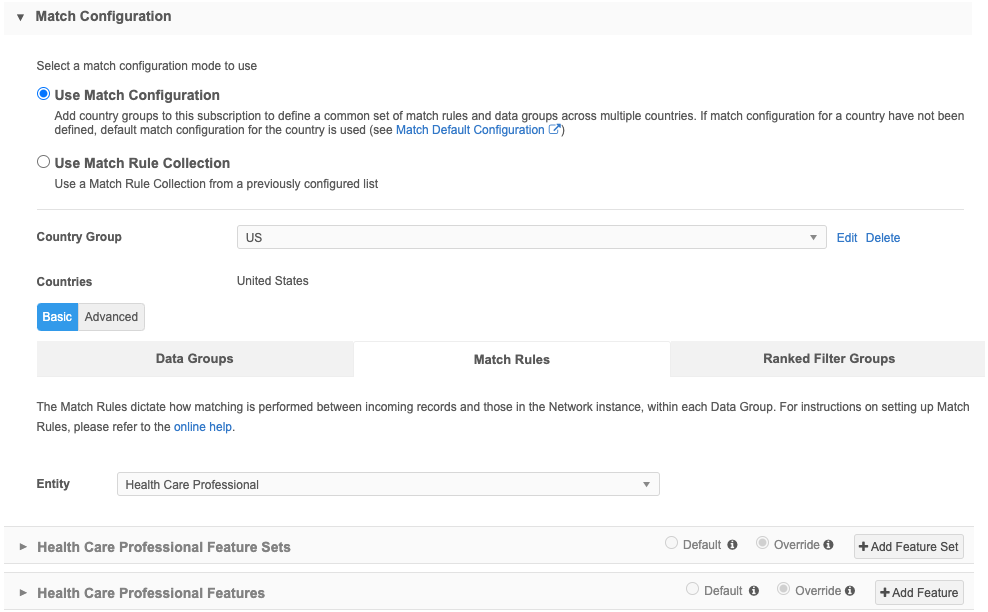
Match configurations contain the following tabs:
-
Data Groups - Restrict the set of records to compare.
Data groups should be generic enough to include all possible matches, but cannot include more than 1,000 records.
-
Match rules- Provides detailed rules to compare records.
-
Match filters - Conditions that apply to all defined match rules to include or exclude specific records from being considered for match pairs.
-
Ranked filter groups - Match conditions that are applied to the subscription to include or exclude records that are considered for matching.
For detailed information, refer to Match configuration.
Applying filters to incoming records
If filters are configured for individual match rules or all match rules, the rules can consider incoming records even if they are missing the field value of the filter.
- Apply match rules whether incoming records have a value in a filtered field or not - Select to allow incoming records with empty or missing field values to be considered for match rules.
-
Apply match rules only if incoming records have a value in a filtered field - Select if the incoming data is robust and has values in filtered fields
This is the default for match rules since it is existing behavior.
These options are supported when the filter function is Include. Exclude functions require the records to have the specified field and value.
Add transformation queries
Define the transformation queries to pre-process data before it is loaded by the source subscription. For example, if a source system provides a single file containing many entities, use transformation queries to split the data into individual files so the model map can be simplified.
Transformation queries are SQL based (SELECT statements). They should be thoroughly tested before they are added to the source subscription.
-
Upload source files as custom tables so you can test your query.
-
Write and test your query in the SQL Query Editor (Reports).
-
Create a transformation query (System Interfaces). Copy and paste the tested SQL query from the SQL Query Editor into the transformation query configuration.
-
Link the transformation query to a source subscription.
When the source subscription runs, the following process occurs:
-
Apply queries - Transformation queries pre-process the source files from the inbound FTP folder.
-
Process files - The source files and query output file are processed by the source subscription, as defined by the source subscription, and the data is loaded into Network MDM.
For detailed information, see Transforming inbound data.
-
To apply transformation queries:
-
Click Add Query to add a transformation query to the subscription. Only inbound queries display in the list.
You can apply multiple queries to each subscription. The queries will always run in sequence as they are listed in the subscription. Change the order of the queries using the Handle![]() icon.
icon.
![]()
Schedule subscriptions
In the Job Schedule & Triggers section, define the schedule for the job and any subsequent actions that will start when this job finishes.
Job Schedule
You can run subscriptions manually or on a scheduled basis. If you select Manual, the subscription only runs when you click the Start Job button on the subscription page.

The Schedule section defines the schedule settings for the subscription, based on the timezone in your user profile settings. For more information, see Job schedules.
You can schedule the subscription for the following intervals:
-
Hour: Runs the subscription every hour. Specify the number of minutes past the hour.
-
Day: Runs the subscription every day. Specify the time of day (hour and minutes).
-
Week: Runs the subscription every week. Specify the days of the week and time of day (hours and minutes).
-
Month: Runs the subscription monthly. Specify the day of the month and time of day (hours and minutes). Note that if you specify a day value that doesn’t exist for all months (for example, 31), the schedule will not run for those months.
-
Year: Runs the subscription every year. Specify the month, the day of the month, and time of day (hours and minutes). As with a monthly schedule, ensure that the day you choose falls within the month you choose.
To define another schedule for the job to run, click Add Schedule.
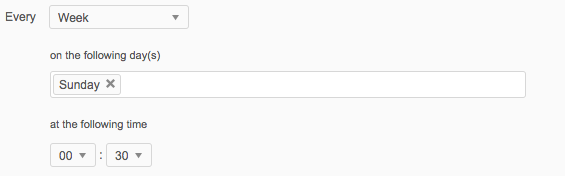
Tip: To run a job at month end, select Month and 1st as the day.
Considerations for defining multiple schedules
If jobs are scheduled to run close together, the following situations might occur:
- If there are no changes, the job does not run.
- If a job has not finished, and a second job is scheduled to begin, the second job will not run.
Job Triggers
You can choose to trigger other actions to start after a job runs.
Available triggers:
- Send email - Specify users that should be notified for successful and unsuccessful job outcomes.
-
Start a job - Start a subsequent job when this job successfully completes.
Important: Source subscriptions that are run in Test Mode or Simulation Mode cannot trigger another job. Ensure that the source subscription configuration is set to Save Changes to the Database if you want it to trigger another job to start.
For more information, see Subscription job triggers.
Save subscriptions
When you have completed the source subscription configuration, save your changes.
For all new subscriptions, a dialog displays that requires answers to questions about the origin of the data.
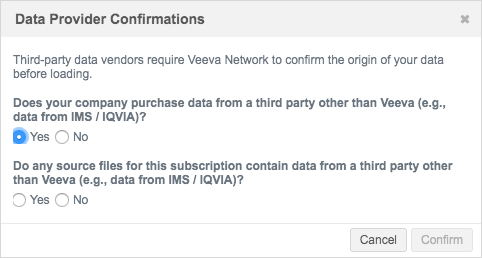
Select either Yes or No for each question.
- Does your company purchase data from a third party other than Veeva (for example, data from IQVIA)?
- If you answer No to this question, click Confirm.
If you answer Yes to this question, another confirmation is required.
Important: The TPA response is logged for audit purposes. Ensure that the correct third-party system is selected in the System field.
Select the appropriate response:
-
I have confirmed that a third party access agreement (TPA) is in place that allows Veeva to receive this data. (Note: this is required for any IQVIA data.)
-
I have confirmed that my company's agreement with the applicable third-party data supplier does not require a TPA in order for Veeva to receive this data. (Note: this is not applicable to IQVIA data.)
The answers to the questions are auditable and are logged in the System Audit History. For information, see Confirming third-party agreements.
Data Flow View
After you save a source subscription, a new Data Flow View is added to the Details section to visualize all of the steps of the job.
Click the Data Flow View thumbnail to open the view.
These stages of the job are defined:
-
Start - Indicates if the job has been triggered by another job.
-
Files in Inbound Folder - The file path of the inbound folder. Click the link to open the File Explorer in a new tab.
-
Apply Transformation Queries - Details about each query that is applied to the subscription. If there are multiple queries, they are listed in the order that they run. Click the query name to open the transformation query configuration. Click View Query to see the query. This step does not display if transformation queries are not applied.
-
Import Files - The file definitions for each file that is loaded. The Import Options section defines the options that are set in the source subscription configuration.
-
End - Indicates if this job triggers email notification or another job.
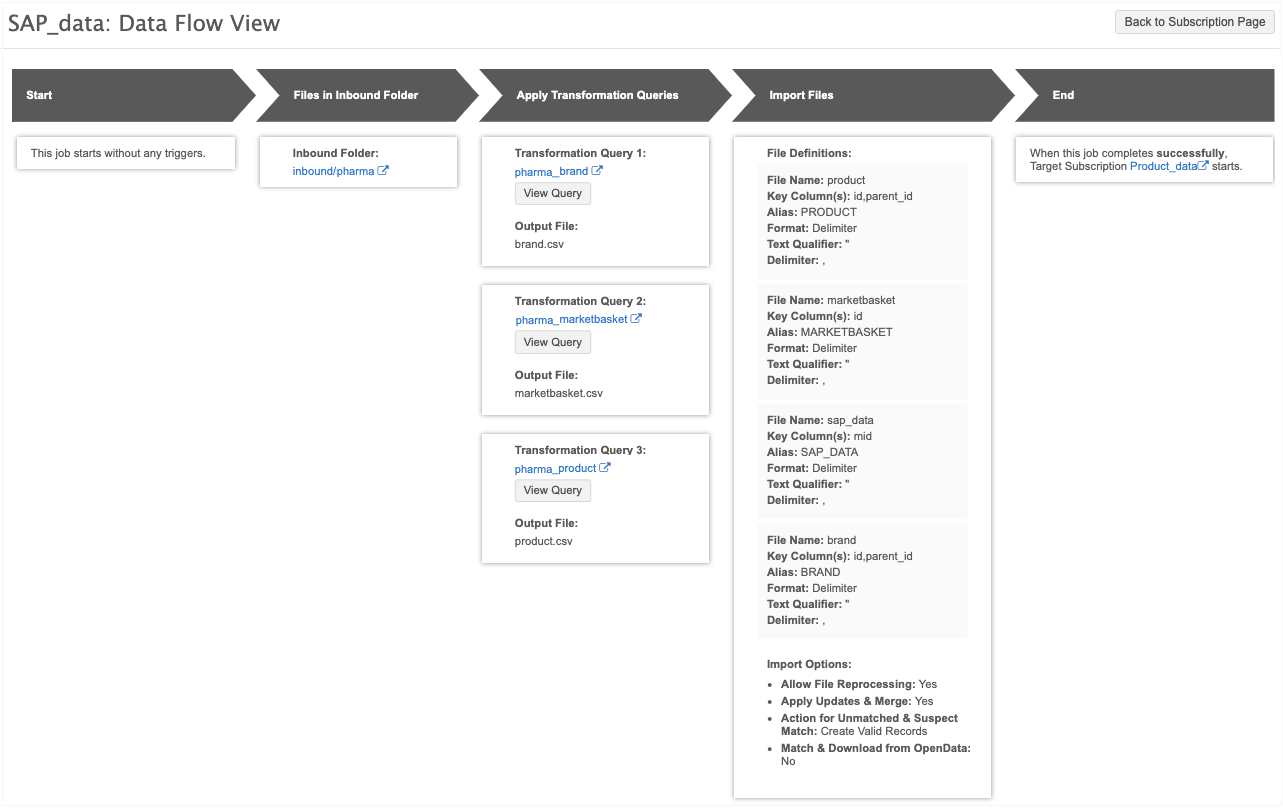
To return to the job configuration, click Back to Subscription Page.
Unsaved changes
If you have made changes to the source subscription configuration, the Data Flow View does not reflect those changes until the subscription is saved. A message displays if you open the view before saving the subscription.
Run subscription jobs
After a source subscription runs, an overview of each job can be viewed from the Job History section.
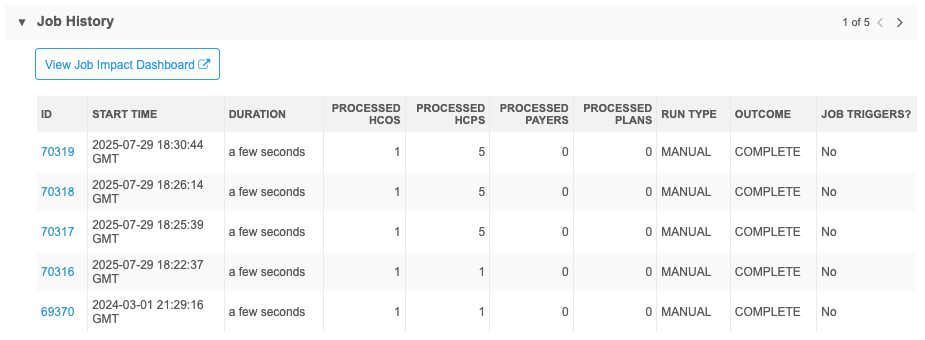
Use the Outcome column to identify jobs that completed with errors or warnings or that failed.
-
 Completed (green icon) - The job completed with no issues.
 -
 Completed (yellow icon) - The job completed with errors, warnings, or both.
 -
 Failed
(red icon) - The job did not complete.
Failed
(red icon) - The job did not complete.
Actions
-
View Job Impact Dashboard - Click the link to open the dashboard and view counts for the records that were added and changed by the subscription.
The dashboard will be filtered automatically to show updates made by the subscription for the past week.
For more information, see Job Impact Dashboard.
-
View job details - Each job is assigned an ID. Click the ID to open the Job Details page.
For detailed information, see Viewing source subscription job details.
Source Subscriptions view
After a subscription is configured, it displays on the Source Subscriptions page (System Interfaces).

The details identify the name, source system and schedule for each subscription. There are also details about the current configuration:
-
Match Configuration - Identifies if the subscription uses the defined match configuration or uses a match rule collection.
The match rule collection name displays as a link. Click the link to open the match rule collection configuration for more details.
-
Last Job Status - The status of the job that most recently ran.
-
Completed
-
Completed with warnings
-
Completed with errors
-
Completed with errors and warnings
-
Failed
For detailed information, see Viewing source subscription job details.
-
-
Save Changes - Indicates if the data was saved to the Network MDM database.
-
YES - The subscription is configured to commit changes to the database.
-
NO - The subscription is configured to run in test mode. No changes will be committed to the database.
-
-
Simulation Mode - Indicates if the job was run to test the data and simulate the updates.
-
ON - The subscription is configured to simulate the job output. No changes will be committed to the database.
-
OFF - The subscription is configured to run in test mode. No changes will be committed to the database.
-
-
Status - The subscription state (Enabled / Disabled).