Source subscription wizard
DM
Use the wizard to simplify the process of creating a source subscription. Using a sample file of data, the wizard guides you through the steps to define the advanced properties, field normalization, and model map. At the end of the wizard, the classic subscription configuration page opens so you can continue the setup by defining match rules, Network expression rules, and so on.

Prerequisite
Before you begin the wizard, create one or more sample files of the data you will load using the subscription. These files are typically much smaller than you would use for the data load; the maximum file size is 30MB. Only the first 50 rows of each file are read.
Add a subscription
To create a subscription using the wizard:
- In the Admin console, click System Interfaces > Source Subscriptions.
-
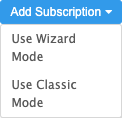
On the Source Subscriptions page, click Add Subscription.
-
Choose Use Wizard Mode from the list.
Step 1: Define subscription
The new source subscription wizard displays.
You can click Switch to Classic Mode to go to the classic subscription configuration page. If you choose to stay in the wizard, the option to Switch to Classic Mode is not available after you save your changes on this step. When you complete the wizard, the classic subscription page opens so you can continue the setup.
On the Define Subscription step, provide the following information:
- Subscription Name - Type a unique name.
-
Third party data - Indicate if the file that you are uploading contains third party data.
Important: The TPA response is logged for audit purposes. Ensure that the correct third-party system is selected in the Source System field.
If you answer Yes to this question, another confirmation is required.
Select the appropriate response:
-
I have confirmed that a third party access agreement (TPA) is in place that allows Veeva to receive this data. (Note: this is required for any IQVIA data.)
-
I have confirmed that my company's agreement with the applicable third-party data supplier does not require a TPA in order for Veeva to receive this data. (Note: this is not applicable to IQVIA data.)
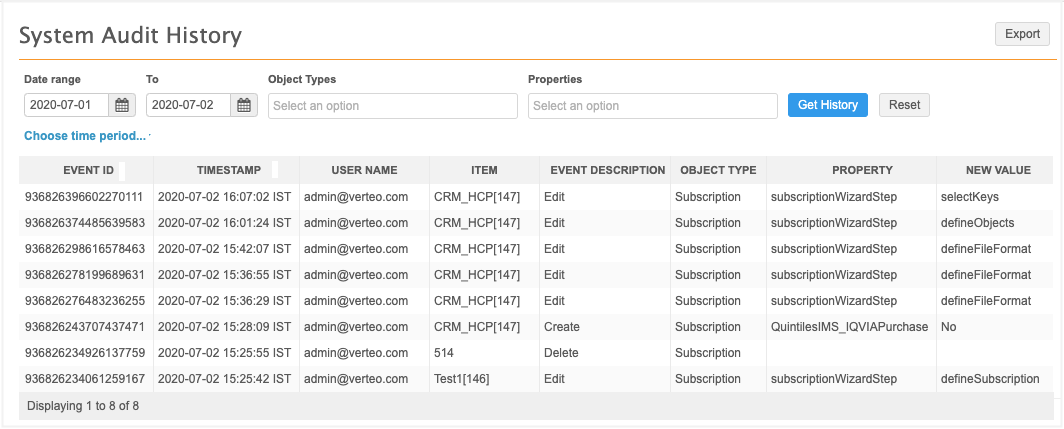
The answers to the questions are auditable and are logged in the System Audit History. For information, see Confirming third-party agreements.
-
- Source System - Choose the source that is providing the data. Sources are defined in System Interfaces > Systems.
- Countries - Choose the countries that the subscription data applies to. The countries that you select determine the field values that are available throughout the wizard.
- Description - Provide meaningful information about this subscription. A maximum of 200 characters is supported.
-
Upload Sample Files - Drag your sample files to the box or click Upload Sample File to choose it from your local computer.
The file is scanned and validated when it is being uploaded. If any issues are found, warnings or a failed message displays.
The upload will fail if any of the following issues are found:
- Cannot process file - The file is not formatted correctly.
- File size limit exceeded - The file size maximum is 30MB.
- Invalid file format - The file format is not supported. Files must be in .csv, .txt, .xlsx, .gz, .tgz, or .zip format.
- Invalid header format - Spaces or special characters were found in columns.
- Something went wrong - An unknown issue occurred.
-
When the upload is successful, the files display. Click Save & Continue.
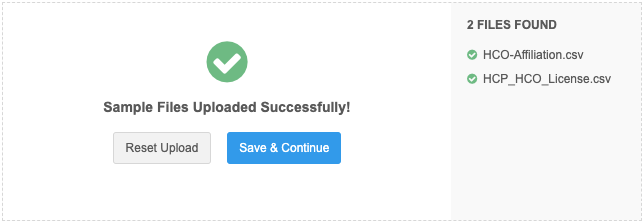
If you mistakenly loaded a file, click Reset Upload to choose your files again.
Draft mode
The subscription is now created in draft mode. If you navigate away from the wizard or if your user session times out, the draft will be saved. You can return to it from the Source Subscriptions page. Ensure that Show Incomplete Subscriptions is selected on the Source Subscriptions page so you can view draft subscriptions.
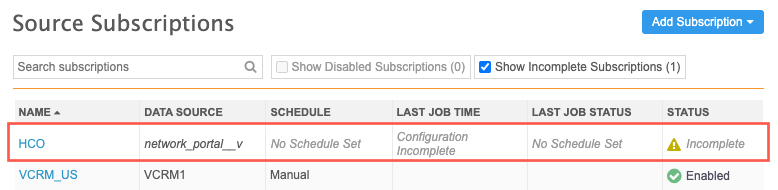
Updates were made to Wizard Mode in Network MDM version 21R2.0. Draft subscriptions that were created before 21R2.0 must be re-configured. If you open a draft, a message advises that Wizard Mode will open in Step 1 (Define Subscription) so you can configure the subscription settings using the updated wizard.
Wizard step options
Each wizard step contains the following buttons:
- Save & Continue - Save your changes and open the next wizard step.
- Back - Return to the previous step. Any changes that you made on the current step could be lost. For example, if you are on Step 3 and click Back, the information on Step 3 could be lost, but the information on Step 2 is preserved.
- Cancel - The draft will be removed from your Network MDM instance.

Step 2: Define file format
Each wizard step displays the files that you have uploaded in the left pane.
Define the format for each file.
-
File name prefix on the FTP server - The prefix of the file that you will regularly use for this subscription. For example, the file name might change to indicate a date but the beginning of the file name will always be the same.
The field is automatically populated with the prefix of the file that you loaded. Edit the prefix if this is not correct for future files. The file name must be unique; the subscription cannot contain multiple files with the same name.
-
File Format - Indicate how the fields in the file are separated. Choose Fixed Length or Delimited. Delimited is selected by default.
-
If you choose Fixed Length, type the allowed character lengths for each column into the Fixed Length Widths field.
For an example of this configuration, see Example - Fixed length file.
- If you choose Delimited, Network MDM tries to identify how the file is formatted. Ensure that the following settings are correct:
- Delimiter - Identify how the data in the file is separated.
- File Text Qualifier - The characters that identify separate fields.
Note: If you uploaded an .xlsx file, these settings do not display. Network MDM automatically identifies the format.
-
-
Headers - Confirm if your file includes headers. If you choose No, type the headers that should be used in the field below. Use the following format Column_A_Name,Column_B_Name,Column_C_Name, and so on.
A preview of the file displays in the format that you identified.

- Click the next file in the left pane to define its format.
- When each file format has been defined, click Save & Continue.
Step 3: Define objects
On this step, identify the objects and how they are organized in your files. Network MDM uses these settings to extract and model the data so each file can be loaded.
Supported object types for each file
Each file can include:
-
up to 10 objects in each file
-
any combination of main objects, sub-objects, and relationship objects
-
multiple objects of the same type
Defining the file structure
To identify the objects in each file, provide the following information:
-
Objects - Expand the list and select the object that is included the file. Click Add Object to include more objects.
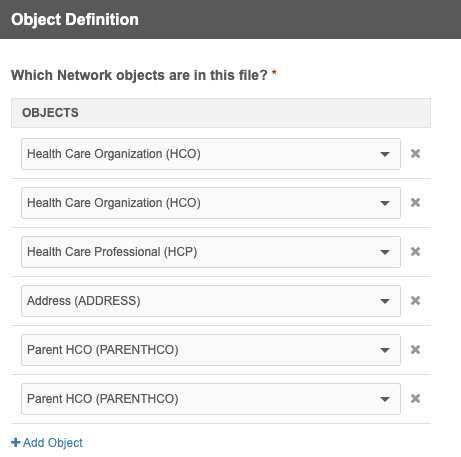
Note: When there is more than one of each object type in a file, an alias is created with an incremental number to distinguish each object in the subsequent wizard steps; for example, HCO_1, HCO_2.
-
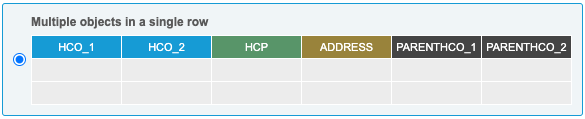
File structure - If there is more than one object in the file, identify how the objects are organized.
-
Multiple objects in a single row - Each row contains the included objects. This structure is available for any supported combination of objects in the file.
-
Multiple objects in multiple rows - Objects are organized by row. This structure is available to choose if the file contains more than one main object or more than one sub-object (no main object) in the file.

If this file structure is selected, at least one filtering criteria is mandatory.
-
-
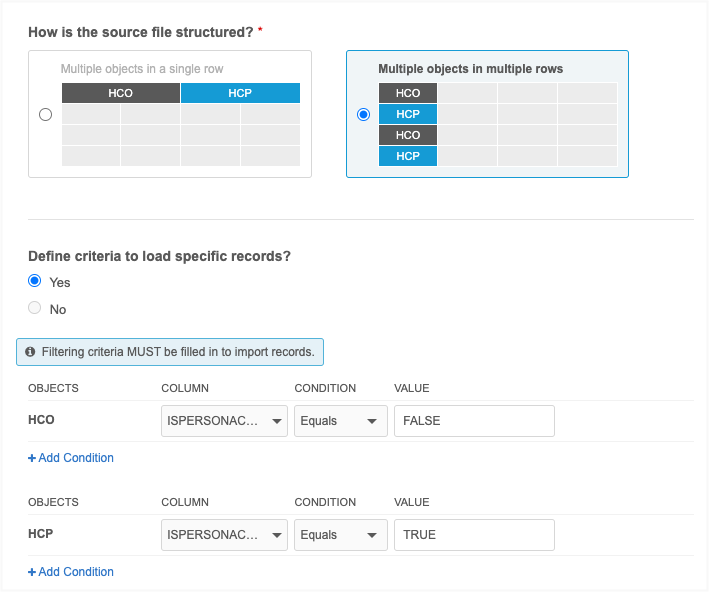
Filtering criteria - Use filters to skip records from being loaded or to differentiate records if there are multiple objects in the file. If the file is organized with multiple objects in multiple rows, at least one filter criteria must be used so Network MDM knows the criteria to use to differentiate the records on each row.
 Example 1 - Skip records from being loaded
Use the filters to tell Network MDM to load the objects if they are HCPs AND they are not from Chicago.
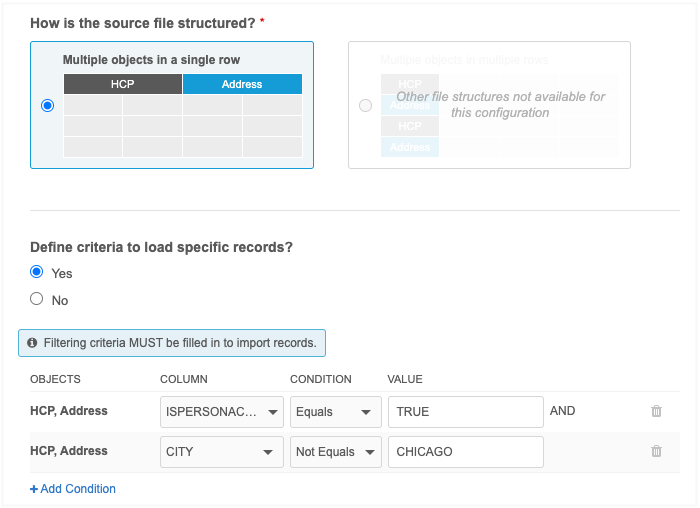
The objects are grouped because they are on a single row. Only rows can be filtered; not each object within the row. Sub-objects are never filtered on their own.
If multiple filters are defined, they are treated as an AND condition.
Example 2 - Differentiate main objects in multiple rows
If a file has more than one main object in multiple rows, ensure that the file contains a field that can be used to differentiate the objects. For example, if the file contains HCOs and HCPs, a field called ISPERSONACCOUNT can identify which row contains an HCO or HCP based on its TRUE or FALSE value.
Sample file
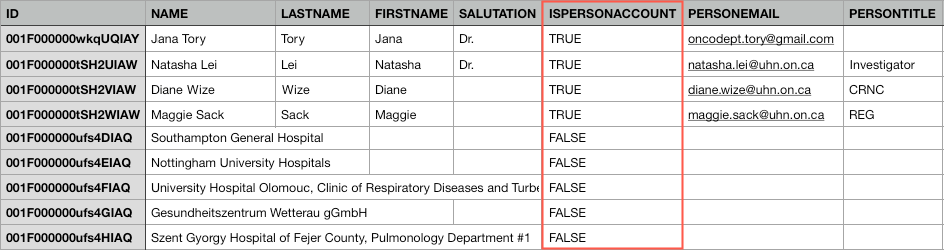
Use the filtering criteria to tell Network MDM that the field, ISPERSONACCOUNT, is used to differentiate HCOs from HCPs.
 Example 3 - Differentiate main objects in multiple rows
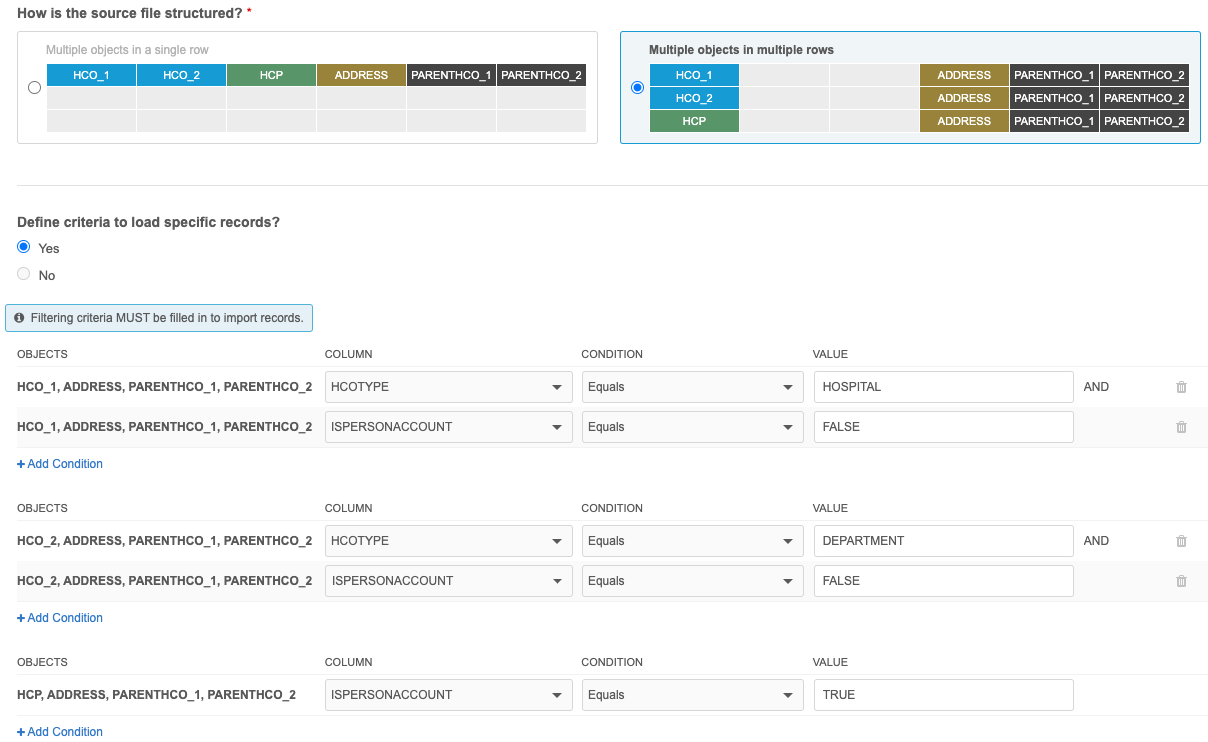
In a file for Veeva CRM, you might have more than one HCO (hospital and hospital department) and an HCP in multiple rows. To differentiate the object types, in your file you can use an HCO type field to identify the hospital and department and the ISPERSONACCOUNT field to identify HCPs.
- Define these settings for each of the files in the subscription.
- Click Save & Continue.
Object owner validation
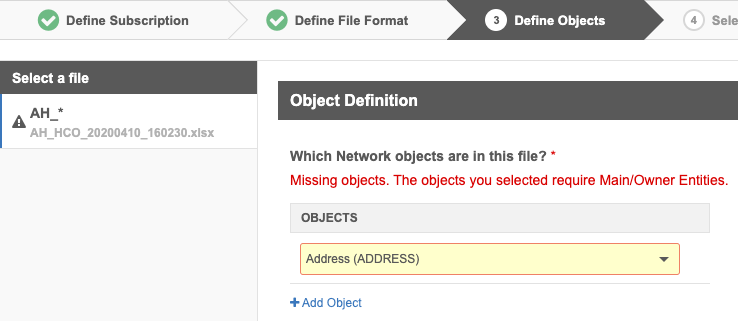
The Define Objects tab validates that the subscription includes a corresponding main/owner object for sub-objects and relationship objects. After you define the objects in each file and click Save & Continue, an error occurs if a main/owner object isn't defined in one of the files. A main/owner object is always required.
Example
Step 4: Select Keys
On this step, a tab displays for each object in the file. On each object tab, configure the custom key and identify the required primary keys and foreign keys.
-
Primary Key - always required.
-
Foreign Key and Foreign Key Object - depends on the objects in your file.
Sub-objects and relationship objects can be associated to more than one main entity. To avoid duplicate key errors when the subscription runs, provide a custom key for each associated main object.
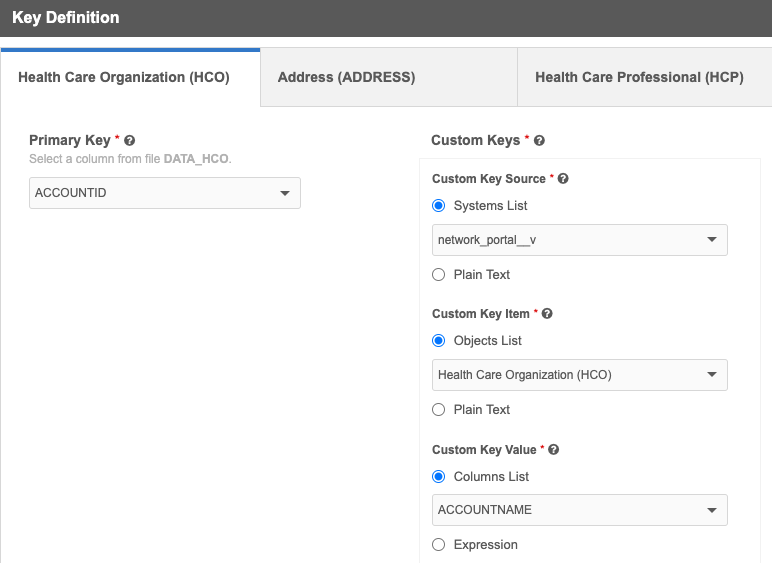
Custom keys
Custom keys must be unique for each object based on the system name, object, and external ID; for example, ERP:HCP:47783849.
Use the three sections to define a custom key on each object tab.
-
Source - The source system for this subscription.
-
Systems List - (Default) The value is the system that you selected for this subscription on the Define Subscription tab.
Expand the list to choose any system that is defined in your Network MDM instance.
-
Plain Text- Type a source. For example, for a CRM custom key, you might type ACCOUNT.
-
-
Item - A value that can distinguish this key from other keys.
-
Objects List - (Default). Objects are typically used for the Item value. The value is the object of the current tab.
Expand the list to choose any of the objects that you defined for this subscription.
-
Plain Text - Type a unique value.
-
-
Value - Typically, the custom key value is an external ID.
-
Columns List - (Default) A list of the columns in the file. No value is specified.
Expand the list to choose any of the columns in this file.
-
Expression - Use a Network Expression to create the value. This works exactly how a NEX rule works in a custom field. The expression will be validated.
The syntax is not validated here but it is validated when the subscription runs.
-
Click through each object tab to define the keys for each object in the file.
When the data is loaded into Network MDM, the records will have a custom key.
Tip: To ensure that high quality keys are created, do not use name fields if your source system allows accented characters. For more information, see Supported characters.
Main object keys
Main objects require the following keys:
- Primary Key - A primary key identifies the object.
- Custom Key - A cross reference to an external system ID.
Sub-object keys
Sub-objects can require the following keys:
-
Primary Key Required - Choose the column from the file that will be used to identify the object and is used to join to another object.
-
Foreign Key - Choose a column from the file for the associated main object that will be used to reference (JOIN) the main object.
If the sub-object is associated to another main object using a different foreign key, click Add Foreign Key to define the field for the other objects. Only one foreign key can be created for each main object.
If more than one foreign key has been added, click Remove Foreign Key to adjust the configuration. One foreign key is mandatory.
-
Foreign Key Objects - Select the main objects that are associated to the sub-object. All main objects across all files in the subscription display unless it has been used by the same object type.
- Notes:
-
If sub-objects are configured with only one main object in the same file, the Foreign Key and Foreign Key Objects do not display; they are automatically calculated by Network MDM.
-
If sub-objects are configured with two or more main objects in the same file, the Foreign Key does not display because a JOIN is not needed to another file.
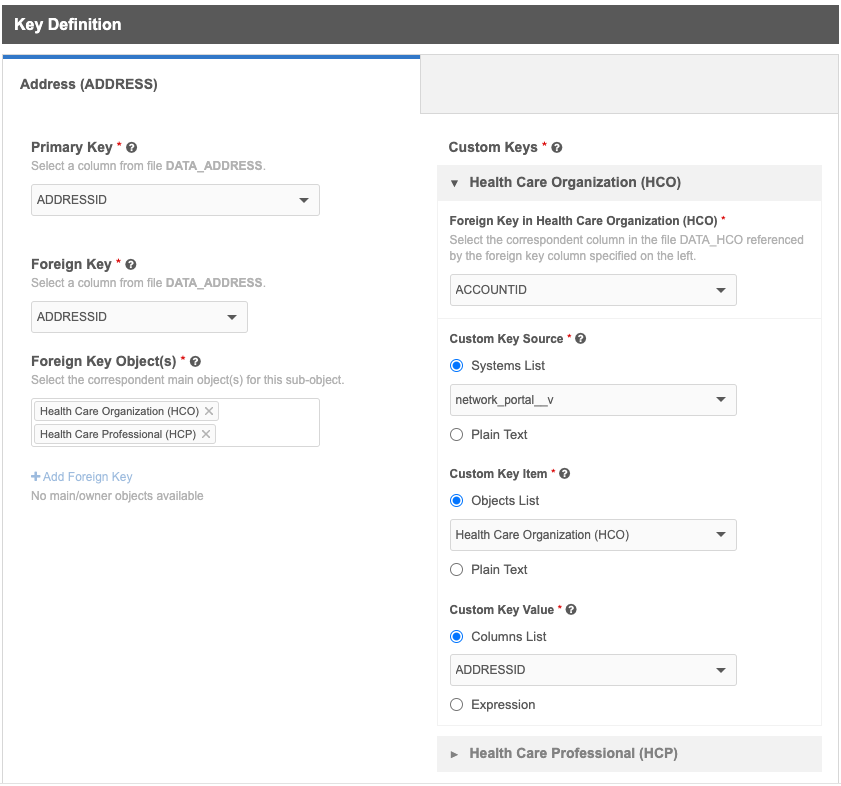
-
- Address Foreign Key (Licenses) Optional - Select the field on the address to use as the foreign key. This is used when configuring licenses that should be linked to specific address records for compliance. For example, State licenses in the United States must be linked to the address where the HCP practices.
- Custom Keys - Define a custom key for the sub-object for each main object.
Expand the section and define the following settings:
Foreign Key in <Object> - Choose the column on the main object file that is used to JOIN the sub-object.
Custom Key Source - Choose Systems List to select the source system for this subscription or select Plain Text to type a value. For example, for a CRM custom key, you might type ACCOUNT.
Custom Key Item - Choose Object List to select the main object for the value or choose Plain Text to type a unique value.
Custom Key Value - Typically, the custom key value is an external ID. Choose Columns List to select a column from the file or choose Expression to use a Network Expression to create the value.
Expand the next main object and define the custom key settings for that object.
Unique custom keys
If you have multiple main objects of the same type; for example, two HCOs as main objects, a warning will display if the defined custom keys are identical. To ensure the custom keys are unique, you might choose to type a plain text value for the Custom Key Item setting instead of using the default object name. For example, you could type HCO_1_ADDRESS.
Example custom keys for an address object:
CRM:HCP_ADDRESS:ID
CRM:HCO_1_ADDRESS:ID
CRM:HCO_2_ADDRESS:ID
Relationship object keys
Relationship objects associate two main objects, so foreign keys are required for the owner object and related object in the relationship.
These objects can require the following keys:
-
Primary Key Required - Choose the column from the file that will be used to identify the object and is used to join to another object.
-
Foreign Key Owner - Choose the column that will be used to reference (JOIN) the owner object in the relationship. Columns for any main entity identified in the subscription files display unless the main entity has already been used by the same object type.
If the relationship object has more than one owner object, click Add Foreign Key to define the column for the other objects. Only one foreign key can be created for each main object. If more than one foreign key has been added, click Remove Foreign Key to adjust the configuration. One foreign key is mandatory.
-
Foreign Key Owner Objects - Identify the owner object in the relationship. All main entities identified in the subscription files display unless it has already been used by the same object type.
- Notes:
-
If a relationship object is configured with only one main object in the same file, the Foreign Key Owner and Foreign Key Owner Objects do not display; they are automatically calculated by Network MDM.
-
If a relationship object is configured with two or more main objects in the same file, the Foreign Key Owner does not display because a JOIN is not needed to another file.
-
-
Foreign Key Related Object Column - Choose the column that will be used to reference (LEFT JOIN) the related object in the relationship.
Note: If a relationship object is configured with two or more main objects in the same file, the Foreign Key Related Object Column does not display because a JOIN is not needed to another file.
-
Foreign Key Related Object - Identify the related object in the relationship. The lists displays the main objects from the data model that could be non-owner objects for this relationship object. If multiple non-owner objects are configured in the file with the relationship object, they are included in the list.
Example
In this example, the relationship object (Parent HCO) is configured with multiple main objects (HCO and HCP) in the same file, so the Foreign Key Owner and Foreign Key Related Object Column settings do not display because a JOIN is not required with another file.
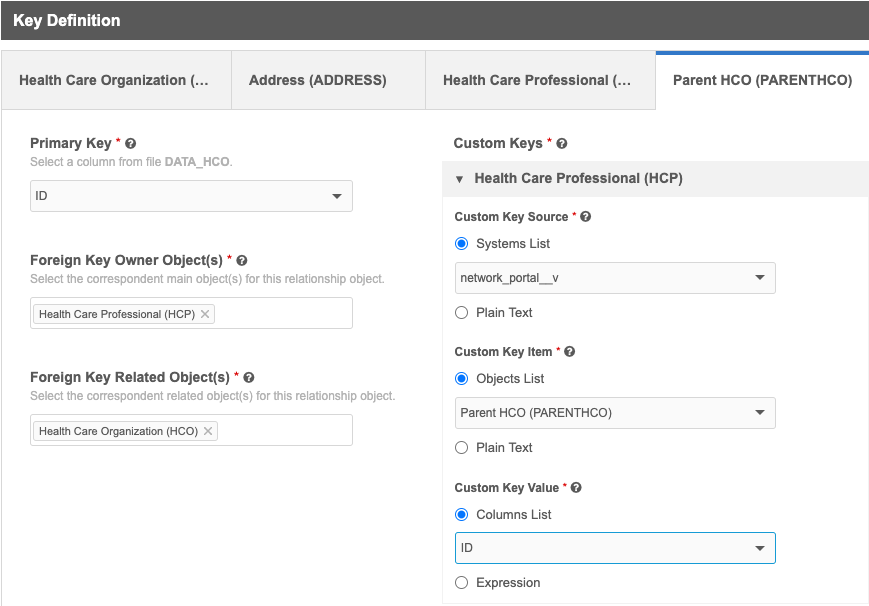
-
Custom Keys - Expand the section and define the following settings for each corresponding main object:
-
Foreign Key in <Object> - Choose the column on the owner object file that is used to JOIN the relationship object.
-
Custom Key Source - Choose Systems List to select the source system for this subscription or select Plain Text to type a value. For example, for a CRM custom key, you might type ACCOUNT.
-
Custom Key Item - Choose Object List to select the main object for the value or choose Plain Text to type a unique value.
-
Custom Key Value - Typically, the custom key value is an external ID. Choose Columns List to select a column from the file or choose Expression to use a Network Expression to create the value.
Files with one relationship object and one main object
When a file contains one main object and a relationship object, the Foreign Key Owner Object setting does not display because Network MDM identifies the owner as the main object in the file. Only one custom key is required for the relationship object.
-
Step 5: Map fields
Map the fields for the objects that you defined in each file to Network MDM fields. If the files do not contain headers, the headers you identified on the Define File Format tab are used. This information is used to create the Field Normalization section in the subscription configuration.
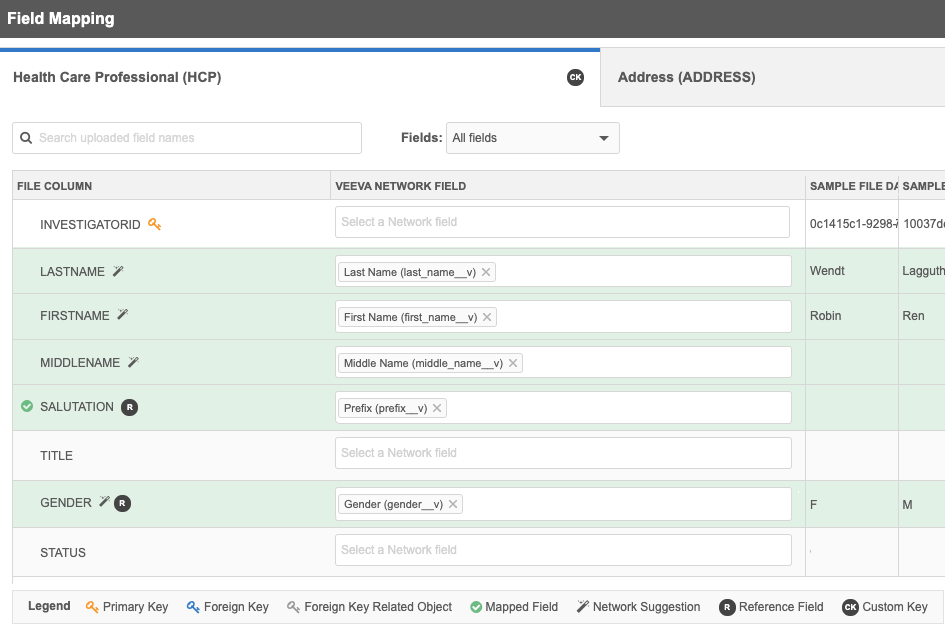
View sample data
Three columns of data from your sample file display to help you map the fields. Hover your cursor over the Sample File Data section to expand it so you can view the full data.
About field mapping
In some cases, columns in your file are automatically mapped to Network MDM fields, contain Network MDM field suggestions, or do not need to be mapped at all.
-
No field mapping required - The following columns do not need to be mapped:
-
Key fields - Columns that you have selected as primary and foreign keys on the Select Keys tab do not need to be mapped. Icons for Primary and Foreign Key fields display beside the Sample File Field name (see the Legend).
- Columns that do not map to Network MDM fields - Your file might contain columns that can't be mapped to a Network MDM field; for example, if you used a field to distinguish HCPs and HCOs for the wizard (ISPERSONACCOUNT).
-
- Fields mapped by Network MDM - If the field names in your file match Network MDM fields exactly, the Network MDM fields are automatically populated. The mapped field is highlighted in green and display a green checkmark
 beside the column name.
 -
Field suggestion provided - Network MDM analyzes the incoming headers and content in your file and suggests Network MDM fields that will map if the suggestion is useful. The column rows with suggested fields are highlighted in green and display a Wand
 icon beside the column name.
Review the suggestion and decide to use, change, or remove the suggestion.
-
Use - No action required. The row remains highlighted and the Wand
icon remains. -
Change - If you change the suggested field, the row remains highlighted and a green checkmark
displays. -
Remove - If you remove the suggested field and do not select another field, the row highlighting and the Wand
icon are removed.
More information about suggested fields
-
Suggested fields are based on the country and object that you defined earlier in the wizard.
-
Suggested fields cannot be reused. For example,
first_name__vcannot be suggested for use in multiple fields. -
When multiple suggested field mappings are found, the highest ranked match is chosen. For example, if the column header is Country and it matches to Network MDM's
country__vandbirth_country__vfields, thecountry__vfield displays because it is the highest ranked match. -
Standard fields (
__v) and custom fields (__c) are treated equally as potential matches to column headers. -
System fields and disabled fields are not supported for field suggestions.
-
If you define your own column headers in the wizard, field mapping suggestions are not provided.
-
Only useful suggestions display; fields are only suggested if they are good matches.
-
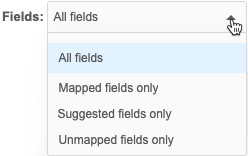
Filter fields
To quickly find a specific field, type the field name in the search box. You can also use the Fields list to filter the Sample File Field column to display only Mapped fields, Unmapped fields, or Suggested fields only.
Mapping the fields
To map the fields:
-
Beside each File Column, choose the appropriate Veeva Network MDM Field name from the list.
The available fields are filtered for the object in the tab and the countries you defined for the subscription.
Click through each tab to map the fields for each object. When a field is mapped, it is highlighted in green and displays a green checkmark ![]() beside the column name.
beside the column name.
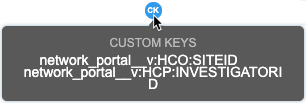
Custom key
The CK icon displays beside the object name on the tab. Click the icon to preview the custom key for the object that you defined in Step 4. If a Network expression was configured, the preview includes the expression syntax.
![]()
For sub-objects and relationship objects, the preview displays all of the custom keys that you've defined for each main object. Hover over the icon to view the custom keys.
Reference fields
If you map a column to a reference type field, an R icon displays beside the column name. When you hover over the icon, a reminder to create reference aliases displays. Click the link in the message to navigate to the reference alias page for that system and reference type for the field mapped. If you load data with Network MDM reference codes, aliases are not required.
![]()
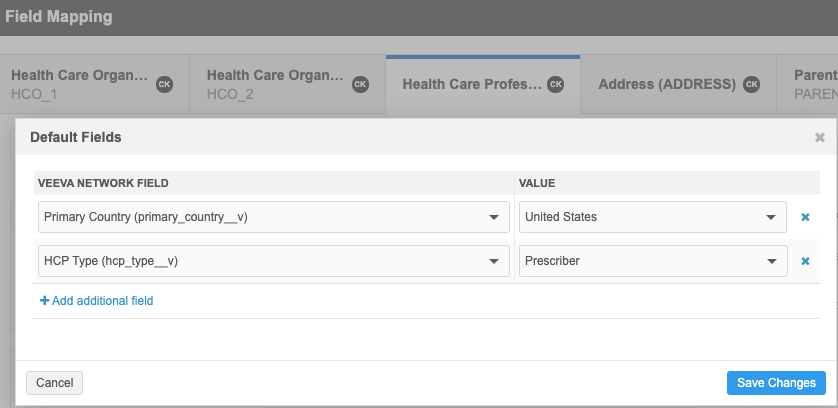
Default field values
In case there is no data for a field, you can set default values for fields on each object in the file. For example, to ensure that all HCP records have the HCP type of prescriber and have a primary country defined, add those field values on the HCP object tab.
Generate subscription
When the mapping is complete, click Save Subscription.
Important: When the subscription is saved; it is no longer considered a draft.
The subscription opens in Classic Mode so you can review the model map and field normalization, define match rules, and make any other changes.
Configure classic subscription settings
When the classic subscription page opens, it is disabled by default. The settings that you configured are passed into the source subscription to populate the file definitions, advanced properties, model map, and field normalization sections.
Continue configuring the subscription by defining match rules, Network expression rules, FTP folder, schedules, and any other settings that should be enabled.
When you are finished, the subscription is ready to run.
For more information about the classic subscription configuration, see Add a source subscription.
Example - Fixed length file
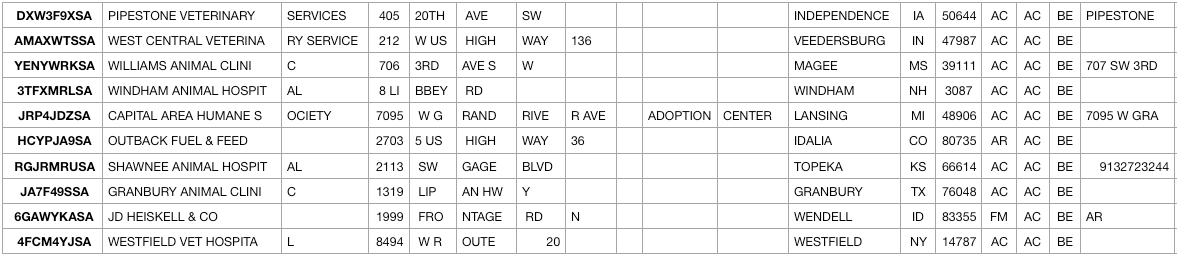
The instructions above used denormalized .csv sample files that included multiple objects of the same type. In this example, we'll upload a fixed length .csv for animal health HCOs. Addresses and licenses are also included in the file.
Sample file
Step 1: Define subscription
On this step, we'll define the required information and upload a small sample file in .csv format. The file does not contain third party data and the records are for the United States only.
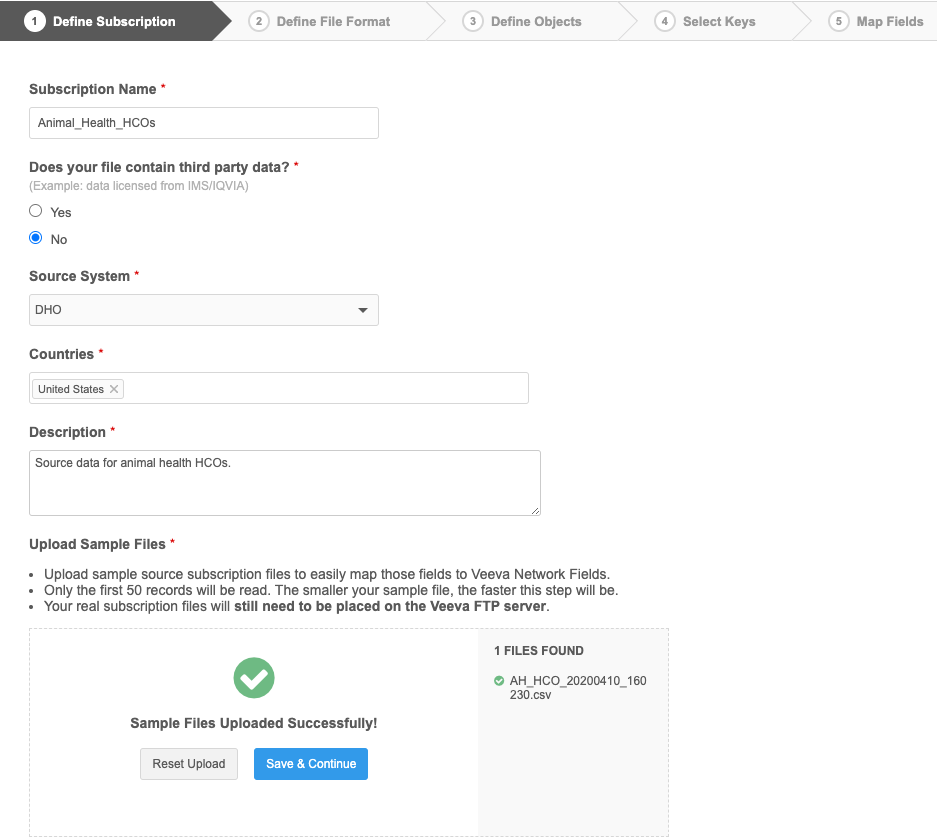
Click Save & Continue to move to the next tab in the wizard.
Step 2: Define file format
On this step, we'll provide the following information:
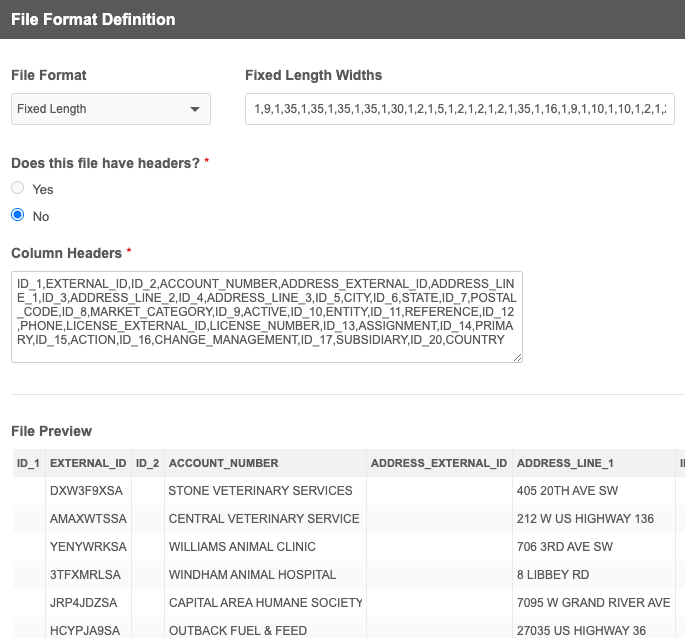
- Filename prefix on the FTP server - In this example, the filename is AH_HCO_20200410_160230. The data and time that the file was created is appended to the filename, so the prefix is AH_*.
- File format - Choose Fixed Length.
- Fixed Length Widths - Type the number of characters allowed for each column in the file. Use commas (,) to separate each value; for example, 1,9,1,35,1,35.
- File headers - This file does not contain column headers, so we'll choose No.
- Column Headers - Type the column headers in the field. Use commas (,) to separate each value; for example, ID_1,EXTERNAL_ID,ID_2,ACCOUNT_NUMBER,ADDRESS_EXTERNAL_ID.
The File Preview section displays the format that is provided in the settings. If this preview section is empty, the configuration was not completed correctly.
Click Save & Continue.
Step 3: Define objects
Choose the objects and file structure for this file.
- Objects - This file contains HCO information, so choose Health Care Organization, Address and License.
- Structure - The address and license information for each HCO is contained in the same row, so choose Multiple objects in a single row.
-
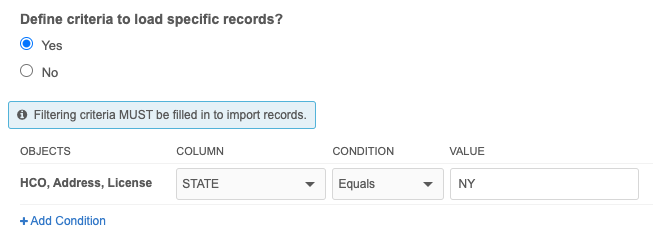
Criteria to load records - This file contains one main object, so criteria is not required to differentiate main objects.
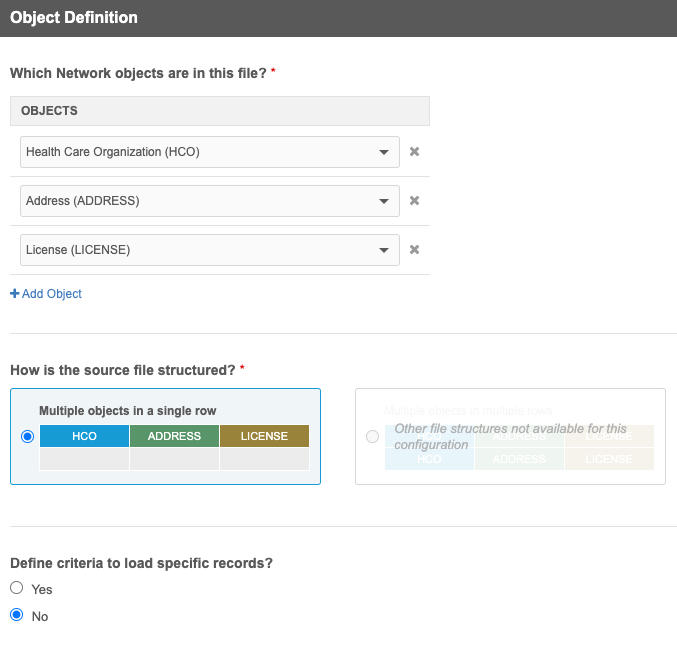
However, we can filter the records that are loaded; for example, load records for HCOs in New York only .
Click Save & Continue.
Step 4: Select keys
On this step, choose the field that will be used as the primary key for each object. In this example, the external_id field is used for all objects.
In the file structure, the address and license sub-objects are in the same row as the HCO, so a Foreign Key and Foreign Key Object for the related main object is not required; it is automatically calculated by Network MDM. On the License tab, the Address Foreign Key is optional but we can define the key to link the license to an address for compliance.
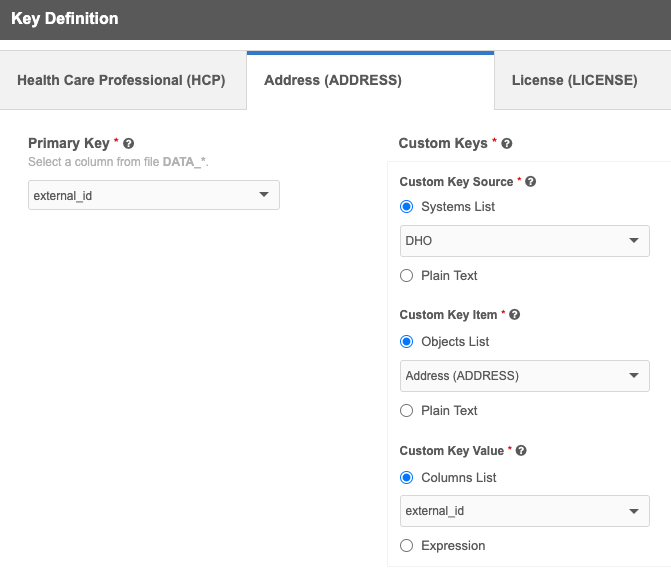
Click Save & Continue.
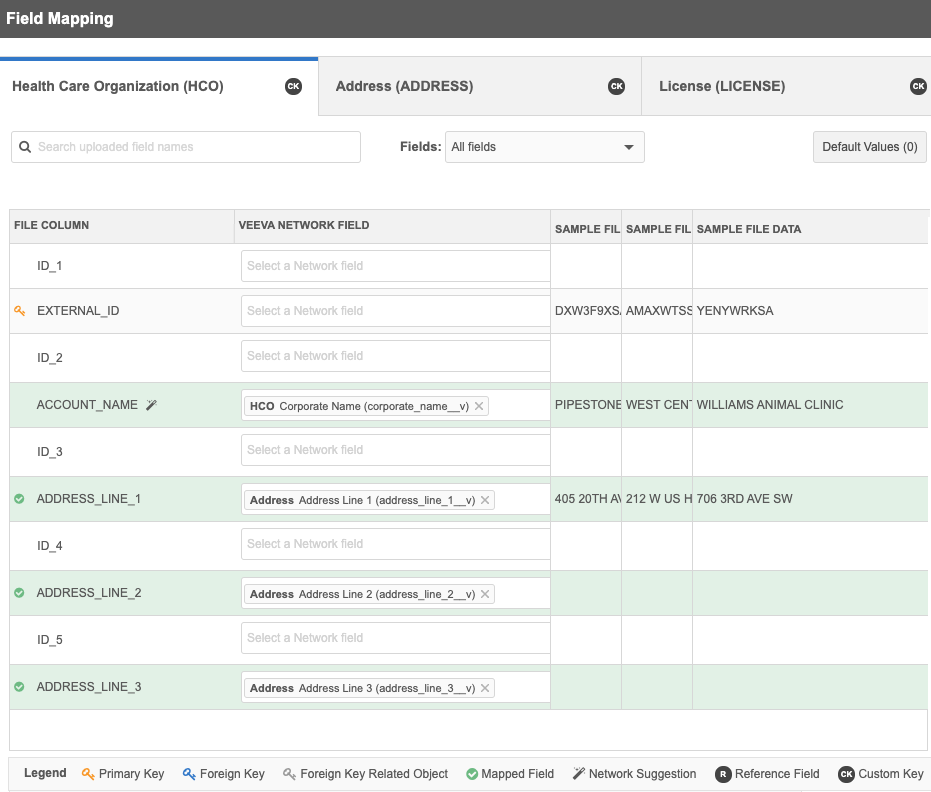
Step 5: Map fields
On this step, map the source fields from the sample file to Network MDM fields. For each object tab, the Veeva Network Field lists contain only the fields for that object for the United States (the country we defined in Step 1.
Fields that do not need to be mapped:
- Fields that do not map to Network MDM fields (for example, the ID fields).
- Fields that we chose for the Primary Key.
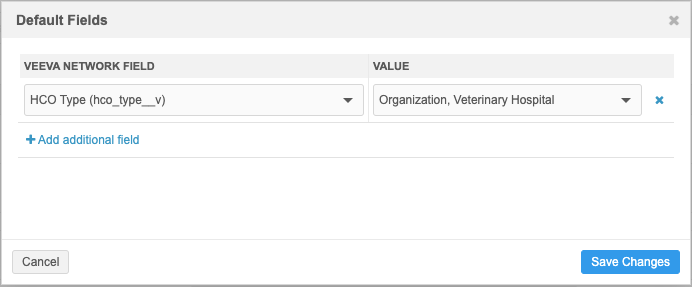
Default values
Create a default value for a field if the data is missing from the file. For example, to identify each HCO record as a veterinary clinic, we could add the HCO_type__v field with the default value Organization, Veterinary Hospital on the HCO object tab.
When the draft subscription is complete, click Generate Subscription. The subscription opens in Classic Mode so you can continue the setup by defining match rules, NEX rules, and any subscription options that are required.
Configuration management
Draft subscriptions cannot be exported to a target environment.
Logs
Administrators can track updates to subscriptions using the System Audit Log. For traceability and troubleshooting purposes, the logs track each action (create, edit, and delete) that users make in the source subscription wizard.