Adding systems
DM
A system is one of the following:
-
Data source - A source system that Network receives data from. Network relies on various data sources to provide verified, reliable records and relationships.
When you define a system, you determine the treatment of data from this source. In addition to determining the visibility and usage data from the source, you can also define a source as a third-party data provider.
-
Downstream system - A system that receives data from Network.
Anytime data is loaded into Network or sent from Network, a system must be defined.
Add a system
-
In the Admin console, click System Interfaces > Systems.
-
Click Add System.
-
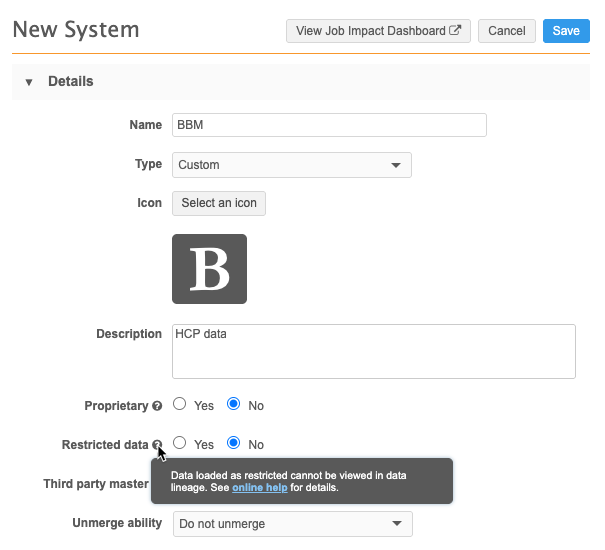
Type a Name and Description.
-
Type - Identify the system as one of the following types:
- Concur®
- Custom (default)
- Veeva CRM
- Veeva Nitro
- Veeva Vault
-
Icon - Add an icon to help identify the system (optional).
Click Select Icon and choose an icon from the library.
-
Proprietary or Restricted - These settings apply to locally managed data. Select the setting if it applies to the data for this system.
-
Proprietary
The proprietary flag applies to data change requests only. Defining local data as proprietary ensures that add and change requests that are submitted through the Network API will not be sent to Veeva OpenData.
Proprietary settings are tracked by system rather than field.
For more information about the behavior of proprietary data, see Sources of data.
-
Restricted
When a system is defined as restricted, data loaded from that system cannot be viewed in data lineage. The field values that were loaded by the restricted source system are hidden so users cannot see and compare the values between the sources that contributed to the record. This protects data agreements with third-party vendors.
If this setting value is No, restricted data is treated like regular (non-proprietary) data.
For more information about the behavior of data for restricted systems, see Sources of data.
-
-
Third party master - Select if the data will be externally managed and stewarded by a third-party data provider.
Note: This only applies if DCRs should be routed to a third party for external resolution of the DCRs.
When this setting is selected, the following behavior occurs:
-
Record ownership - Records loaded using this system will be owned by the third party master. In the Network UI, third party master data is identified by blue icons and fields.
-
Data change requests (DCRs) - Changes to data are assigned to this system within Network. DCRs must be exported to the third party using the API or a target subscription.
Changes are never routed to Veeva OpenData or to local data stewards for processing.
If the source is a third party master, additional configuration settings are required. See the Add a third-party master system section below.
Note: Systems that are not defined as a Third Party master are considered local. Updates to local data are sent to customer data stewards for processing.
For more information about the behavior of third-party mastered data, see Integrating with third party systems.
-
-
Unmerge ability - Set the desired behavior when unmerging records for this system.
-
Unmerge and retain source keys - Unmerge records by copying everything, including the source keys, from the record.
This the standard behavior for systems that support unmerge.
Note: Unmerge can only restore affiliations that were loaded with a custom key.
-
Do not unmerge - Do not allow records for this system to be unmerged.
-
Unmerge without source keys - Unmerge records by copying everything except the source keys from the record.
Considerations for CRM systems
This option must be set to Do not unmerge (do not allow unmerging of records) or Unmerge without source keys (which effectively unmerges records by copying everything except the source keys from the record).
-
-
Save your changes.
When you load or export data, select this system so these settings are applied to the data.
Next step
Rank the source for survivorship. New systems are added to the Source Rankings page without a rank. Rank the source to define its trust level for source survivorship when records and fields are updated or merged.
Unranked sources are treated lower than any ranked source, but they are treated equally among themselves.
Note: Not required for third-party master systems. The third party system supersedes all sources for a country.
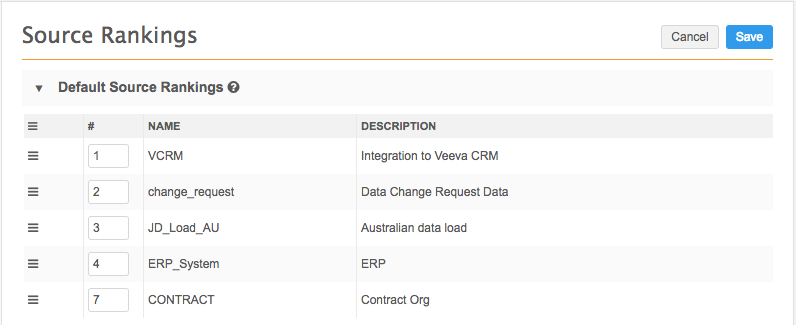
For more information, see Configure source rankings.
Add a third-party master system
Data that you load into Network that will be externally managed and stewarded by the data provider is considered third party master data. Any data change requests for the data must be exported to the third party to process.
Create a third party master system to load this data. When the data is loaded, the system identifies the records and fields as third party master data. In the Network UI, this data displays with blue field labels and blue icons.
Add and change requests submitted for the defined objects and fields will be managed outside of Network by the third party data provider.
Best practices
-
System - Create one third party system for each data provider. It should include all countries for which the provider sends data.
If the fields that will be managed by the third party master (defined in the DCR routing criteria section below) are different across those countries, then create different third party systems for that provider.
-
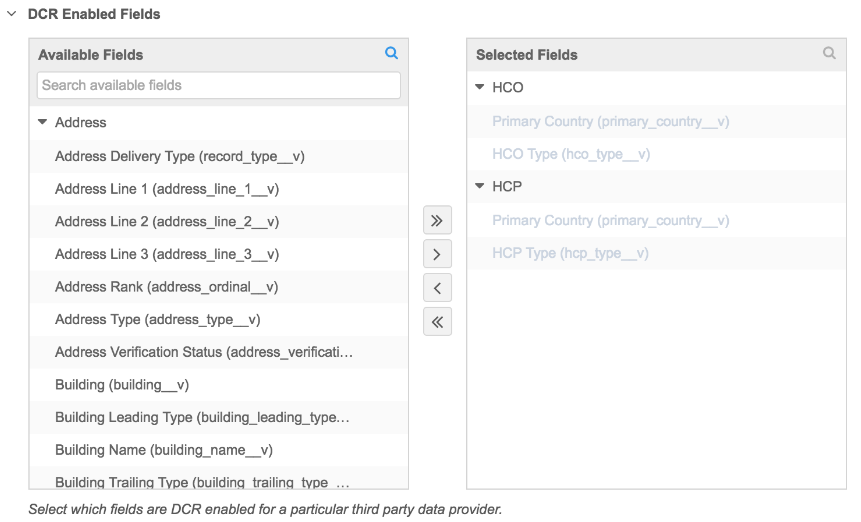
DCR routing criteria - This defines the fields that are locally managed (Available Fields pane) and the fields that are managed by the third party system (Selected Fields pane).
After data is loaded for this system, carefully consider any changes to this section. For example, if you move a field from the Available Fields pane to the Selected Fields pane, you are changing the field from being locally managed to being externally mastered. These changes can impact existing data and must be carefully assessed.
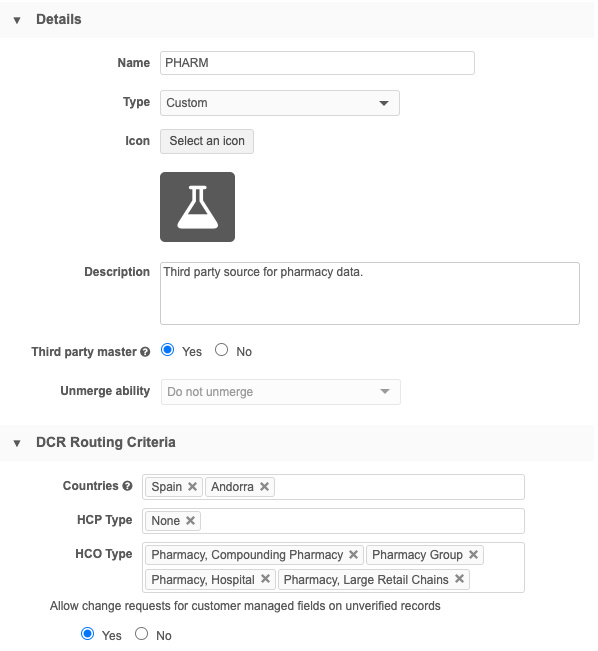
To create a third party system:
-
Type a Name and Description.
-
Type - Choose Custom.
-
Icon - Add an icon to help identify the system (optional).
Click Select Icon and choose an icon from the library.
-
Proprietary and Restricted data - Ignore. These settings do not apply to third party systems.
-
Third party master - Choose Yes.
-
Unmerge ability - This setting is set to Do not merge for third party systems. It cannot be changed.
-
DCR Routing Criteria - Define the countries and records that will be owned and managed by this third-party master.
-
Countries - Add all countries that will be managed by the third party.
Note: Only if the list of fields that will be managed by the third party are different for some countries, create a different system for those countries.
-
HCP Type and HCO Type - Identify the HCP and HCO types managed by the third party. Data change requests for these types must be exported to the third-party data provider for processing.
-
All HCP Types or All HCO Types - All data change requests (DCRs) for HCPs and HCOs for the selected countries will be sent to this third party for stewarding.
-
None - No HCP/HCO DCRs for the selected countries will be sent to this third party for stewarding.
-
No Value - Any HCP or HCO DCRs submitted that do not specify a type will be routed to this third party for stewarding.
-
Select individual types; for example, Business Professional (HCP), Pharmacy, Retail (HCO).
-
-
-
Allow change requests for customer managed fields on unverified records - Route DCRs for customer managed fields on unverified third party records to be sent to local data stewards.
This is helpful when users want to add information to a new third-party record but the record is still pending approval from the third-party data provider.
Example
If you add an email address on an unverified third-party HCP record, the DCR is rejected because the third-party data provider is still processing the add request.
When this setting is enabled, the email address can be processed and accepted by local data stewards. When the third-party record is approved, the local updates are merged to the third party record.
Choose one of the options:
-
No - Change requests for customer managed fields on unverified records will be automatically rejected.
The resolution note that is applied to the rejected task is R-00014 System rejected - you are trying to update an Under Review record that is currently locked. Please resubmit your change request when the record is open for changes.
-
Yes - Route change requests for customer-managed fields on unverified records to local data stewards.
The DCR must be processed by local data stewards unless the field is set to automatically accept change requests. You can set the Change Procedure setting to automatically accept change requests on each field configuration (Data Model).
When you allow the change requests, the following behavior can occur depending on the outcome of the third-party add request:
-
Third-party add request is approved
When local data stewards approve a DCR for customer-managed fields, an unverified (Under_Review) local record is created. When the add request is approved by third-party data stewards, the unverified local record is merged into the newly created third-party record.
Tip: To ensure that local DCRs are processed quickly, configure the Change Procedure on the data model field to automatically Accept customer-managed field changes.
When auto-accept isn't enabled, the following issues can occur:
-
Local tasks that are not processed in chronological order could overwrite newer data with older change requests. These local DCRs are not In Queue tasks so they might not be processed in order by local data stewards.
-
If the local task is processed after the add request is approved by third-party stewards, the local task will be routed to the new third-party record.
-
-
Third-party add request is rejected
If the add request is not approved, any pending local DCR tasks are rejected (Invalid and Merged_Into records cannot be updated). If the local DCRs have already been approved, the unverified (Under_Review) local record is invalidated and any record profile changes are removed.
-
-
DCR enabled fields - Move all fields that are managed by the third-party data provider into the Selected Fields pane. In the Network UI, these fields are identified using the color blue. Changes to the fields must be exported so they can be processed by third party data stewards.
Fields that remain in the Available Fields pane will be managed locally.
Automatically selected fields
Some fields are automatically moved to the Selected Fields pane when the objects are defined as DCR Enabled fields.
-
HCO Type (
hco_type__v) -
HCP Type (
hcp_type__v) -
Primary Country (
primary_country__v) -
Parent Affiliation (
parent_hco_vid__v)When any Parent HCO field is selected as a DCR Enabled Field, the
parent_hco_vid__vfield is automatically moved to the Selected Fields pane. This field is mandatory for the Parent HCO object integration. It cannot be removed unless the other Parent HCO fields are moved back to the Available Fields pane.
HCO Type, HCP Type, and Primary Country are automatically moved to the Selected Fields pane when a country is added to the DCR Routing Criteria.
Recommended fields
-
Formatted address (
formatted_address__v)This field contains the summarized address data for HCOs and HCPs. The field itself cannot be included in a DCR, but adding it enables a third-party data provider to have full control of the value of the field. If the field is not enabled for DCRs, customer source subscriptions could override the formatted address of the third-party data provider.
Customers with existing third-party systems should add this field to their systems. It is not added by default.
For more information, see Formatted addresses.
-
-
Save your changes.
Next steps
When you load data from this third party source, choose this system so the data will be identified as third party master data. Any changes to the data must be exported using this system so it can be processed by the third party data stewards and then loaded back into Network.
For details, see Integrating with third party masters.
Viewing systems
All defined systems display on the Systems page (System Interfaces).
You can sort the systems using any of the columns in the table. If you sort the systems, the order of systems is retained for you the next time you access the page.
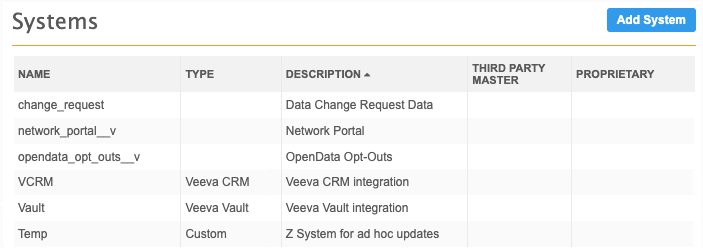
Tip: For systems that are rarely or no longer used, assign a "Z" to the description so those systems remain at the bottom of the list.
Job Impact Dashboard
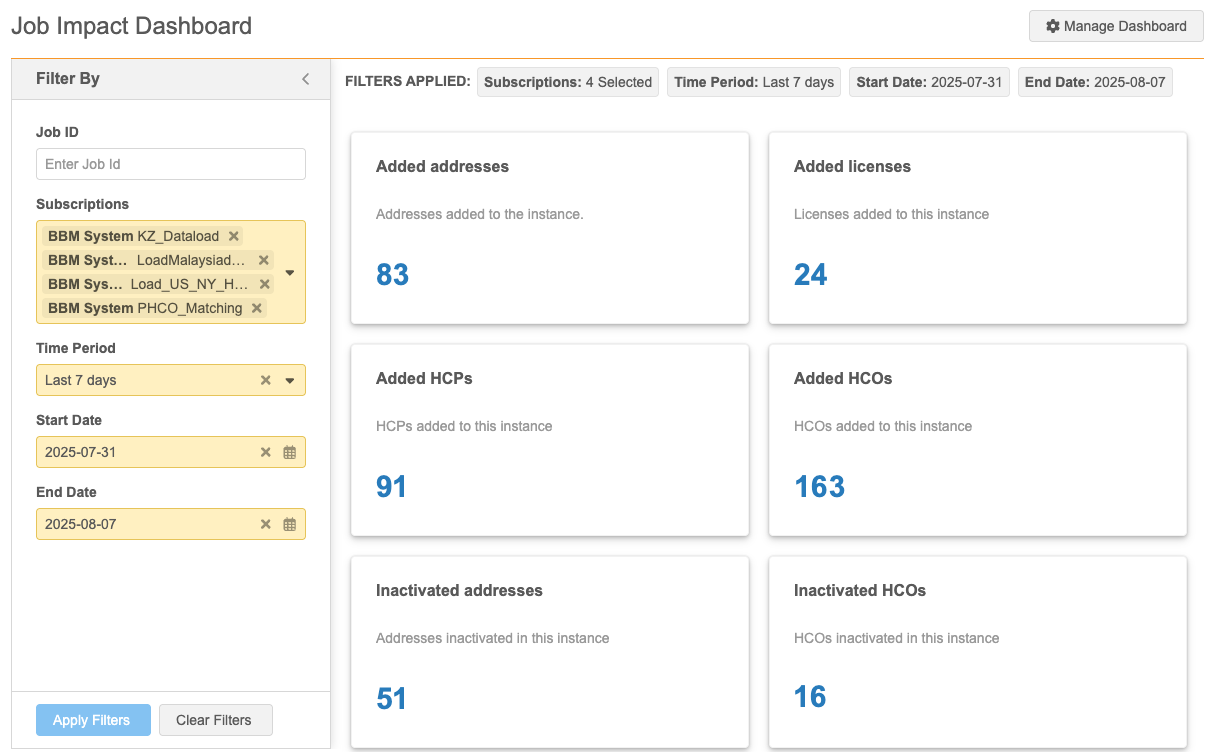
After a system is created and is used to load data, you can click the Job Impact Dashboard button to understand the records that have been added or changed by subscriptions used by the system.

Filters
When the Job Impact Dashboard opens, the following filters are automatically applied:
-
Subscriptions - Subscriptions used by the system to load or change data.
For example, source subscriptions, data maintenance subscriptions, and Data Updater jobs.
-
Time Period - Last 7 days.
-
Start Date - The date seven days ago.
-
End Date - Today's date.
For detailed information, see Job Impact Dashboard.