Managing cluster data
DM
Addresses in Network MDM can be enriched by adding cluster codes from third-party providers. Clusters are proprietary codes that are assigned to geographical areas. They are owned and managed by third-party providers.
When cluster codes are added to addresses in Network MDM, you can use the data to understand your market share and to link your HCP and HCO records to the sales and performance data you receive from third-party providers. Adding cluster information to Network MDM also enables you to use it in your downstream systems.
Enabling cluster data
This feature is not enabled by default.
Requirements
Before the feature can be enabled in your Network MDM instance, you must request and sign a third-party agreement (TPA) with the cluster provider.
Third-party agreements (TPA)
You must request a TPA from the cluster provider before the feature can be enabled in your Network MDMinstance.
The TPA is a request to obtain the cluster definition files for the applicable country and to share and use that data in Network MDM. The cluster definition files are used to calculate the cluster data for the applicable addresses in your Network MDM instance.
The TPA is required for each country; it must state the country where the third-party cluster data can be used.
After a TPA is signed, you can obtain cluster definitions files from the third-party cluster provider and share them with Network MDM.
For customers using Network MDM Delivery Manager, this feature is available and can be implemented by Veeva Professional Services. Contact Veeva Support for more information.
Supported countries and cluster providers
Network MDM's cluster calculation is supported for these countries and providers.
Version
Cluster providers can release a new version of their cluster hierarchy. The latest version for each country by cluster provider is listed.
| Country | Cluster Provider | Latest Cluster Version | Version Date |
|---|---|---|---|
| Austria | Insight Health | 1.0 | October 2023 |
| IQVIA | 1.0 | February 2020 | |
| Australia | IQVIA | 1.0 | March 2022 |
| Belgium | IQVIA | 2.0 | April 2024 |
| Canada | IQVIA | 1.0 | May 2019 |
| Czechia | IQVIA | 2.0 | April 2024 |
| Finland | IQVIA | 1.0 | November 2025 |
| France | GERS | 2.0 | April 2019 |
| IQVIA | 2.0 | March 2023 | |
| Germany | Insight Health | 4.0 | December 2025 |
| IQVIA | 7.0 | August 2025 | |
| Greece | IQVIA | 1.0 | March 2020 |
| Ireland | IQVIA | 1.0 | July 2021 |
| Italy | IQVIA | 5.0 | March 2023 |
| Italy - Micro-Bricks | IQVIA | 2.0 | July 2024 |
| Mexico | IQVIA | 1.0 | June 2019 |
| Monaco | GERS | 1.0 | February 2020 |
| Netherlands | FarmInform | 2.0 | November 2025 |
| IQVIA | 1.0 | August 2021 | |
| Norway | Farmastat | 1.0 | June 2019 |
| Poland | IQVIA | 1.0 | May 2019 |
| Portugal | HMR | 4.0 | July 2024 |
| IQVIA | 1.0 | April 2022 | |
| Russia | IQVIA | 1.0 | July 2021 |
| Slovakia | IQVIA | 2.0 | April 2024 |
| South Korea | IQVIA | 2.0 | September 2023 |
| Spain | IQVIA | 6.0 | June 2026 |
| Switzerland | IQVIA | 2.0 | July 2022 |
| SM Service Marketing | 1.0 | August 2021 | |
| United Kingdom | IQVIA | 4.0 | June 2026 |
Cluster code support for Belgium
For Belgium, Network MDM offers two types of cluster codes:
- General cluster code structure - Codes are mapped at the address level using postal codes.
- Customized Doctor Groups (CDG) - Codes are mapped at the HCP level and are only available for HCPs.
Network MDM supports the general cluster codes structure for Belgium only; CDG cluster codes are not supported.
Cluster code support for Spain
Network MDM supports only the location-based sanibricks provided by IQVIA. Influence-based sanibricks are not supported.
Supported records
All records in your Network MDM instance can be supplemented with cluster codes for applicable countries.
-
Veeva OpenData (orange) records
-
third-party provider (blue) records
-
local (gray) records
Supported fields
The Network MDM data model contains a set of fields to support cluster management.
The fields are disabled by default. When cluster management is enabled for a country in your Network MDM instance, the fields are also enabled so that they are ready for use.
To view the fields used for cluster management:
-
in the Admin console, click Data Model and choose the Customer Master domain.
-
Select the Address object to view the cluster fields.

Changes to codes
Cluster codes are stored in locally managed (grey) fields, so changes to cluster codes will never be sent as a data change request to Veeva OpenData or a third-party provider.
Cluster codes that are calculated by Network MDMcan only be changed using a source subscription.
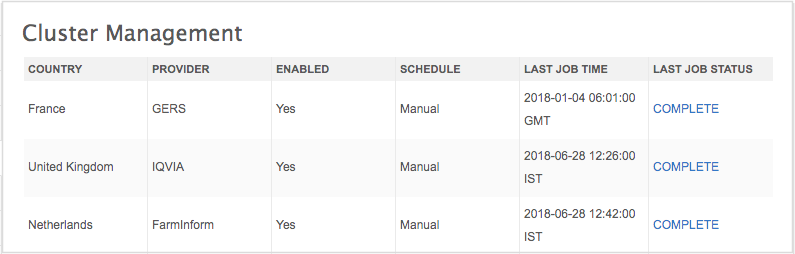
Managing cluster settings
When cluster management is enabled for a country in your Network MDM instance, administrators can configure the settings for the country.
- In the Admin console, click Data Model > Cluster Management.
- On the Cluster Management page, select the country/provider combination to configure. Only the countries that have been enabled for cluster management in your instance will display.
For example, click the row for France / GERS.
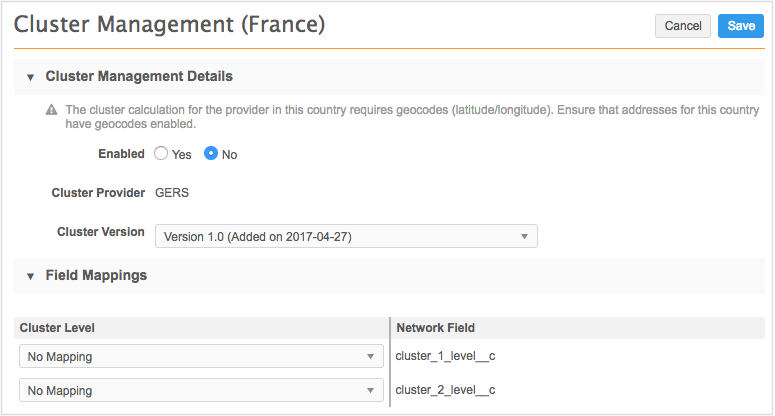
- In the Cluster Management Details section, you can manage the following settings:
- Enabled - The country is disabled by default. Select Yes to enable the calculation of cluster codes for the country.
- Cluster Version - The version of the cluster definition file sent by the cluster provider for the cluster codes.
New versions might be periodically provided by cluster providers. When you receive a new version of the cluster definition file, send the file to Veeva Support. The file will be added to Network MDM and will be available in a subsequent release.
If the cluster codes rely on geocodes, a warning message displays to remind administrators that geocodes (latitude and longitude) are required for this cluster provider. Geocodes are supported for all countries.
Tip: Use the GeoAccuracy code to troubleshoot inaccurate cluster calculations.
-
In the Field Mappings section, map the cluster levels from the provider to the available data model fields. Each third-party cluster provider defines their own cluster levels.

-
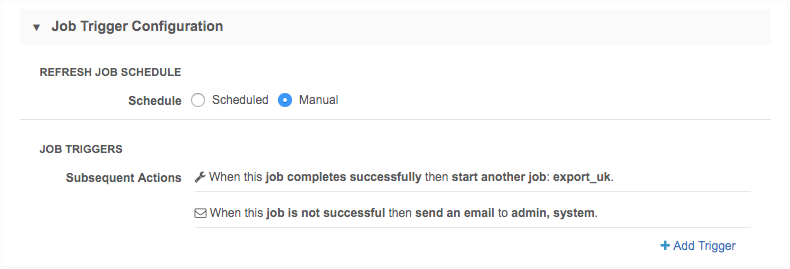
In the Job Trigger Configuration section, define the schedule for the job and any subsequent actions that will start when this job finishes.
- Refresh Schedule - Choose whether addresses will refresh on a schedule, or manually.
-
Job Triggers - Trigger other actions to start after a job runs. For example, start a target subscription to export the updated addresses to downstream systems.
Available triggers:
- Send email - Specify users that should be notified for successful and unsuccessful job outcomes.
- Start a job - Start a subsequent job when this job successfully completes.
For more information, see Subscription job triggers.
- Save your changes.
Manually refreshing addresses
Administrators can update all of the addresses for a country with cluster codes using a data maintenance job. At the top of the Cluster Management page for a country, click Refresh Addresses.
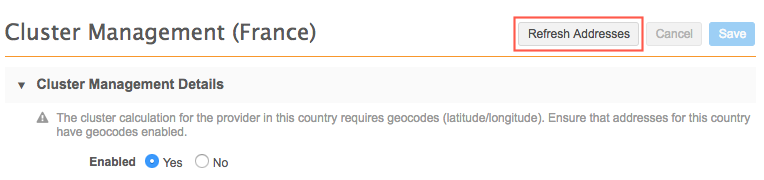
Running this data maintenance job is helpful and recommended in the following circumstances:
- After you have initially enabled and configured cluster management. Running the Refresh Addresses job will backfill all of the addresses for that country with cluster codes.
- When the cluster provider has released a new version of their cluster hierarchy. Running the job ensures that all of the addresses for the country have the latest cluster codes. In the Cluster Version list, select the new version and save the configuration before running the job.
Job details
After running a data maintenance job to refresh addresses, administrators can view the job details to see the counts of addresses that were updated. To open the Job Details page, in the Job History section on the Cluster Management page for the country, click the Job ID.
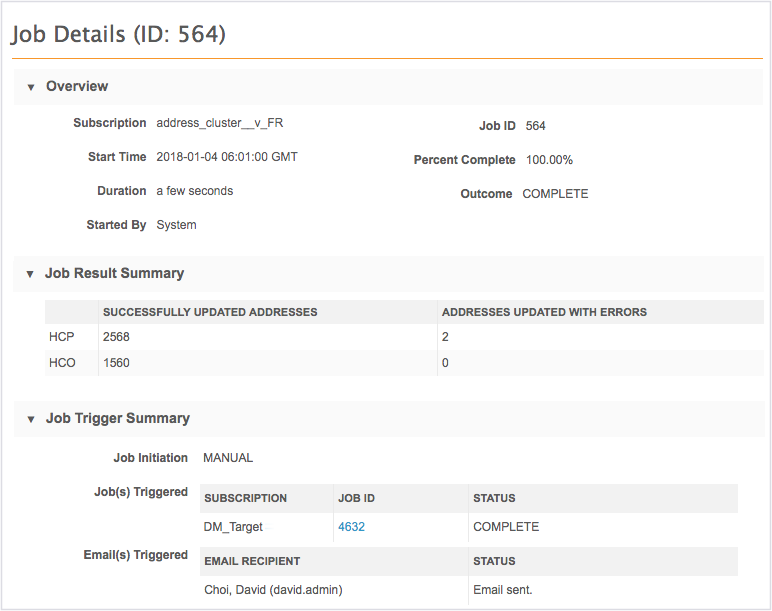
Successful jobs
For jobs that completed, the Job Result Summary section displays a count of addresses that were updated successfully with calculated cluster codes and addresses that were updated with errors. If updates with errors occurred, it means that errors occurred during the cluster calculation.
Addresses updated with errors
Errors typically occur because individual addresses have data issues (for example, a postal code is missing, is incomplete, or it has a typo).
Correct the address and the cluster code will be calculated again when the DCR for the updated address is processed.
Errors can also occur if there is a problem with Network MDM's calculation algorithm or the cluster data that was obtained by the third-party cluster provider. First, always verify that the address is correct. If the address is correct and the problem persists, contact Veeva Support for assistance.
Failed jobs
For jobs that did not successfully complete, the Job Details page displays the percentage of the job that completed and the count of addresses, by entity type, that were updated successfully or with errors.
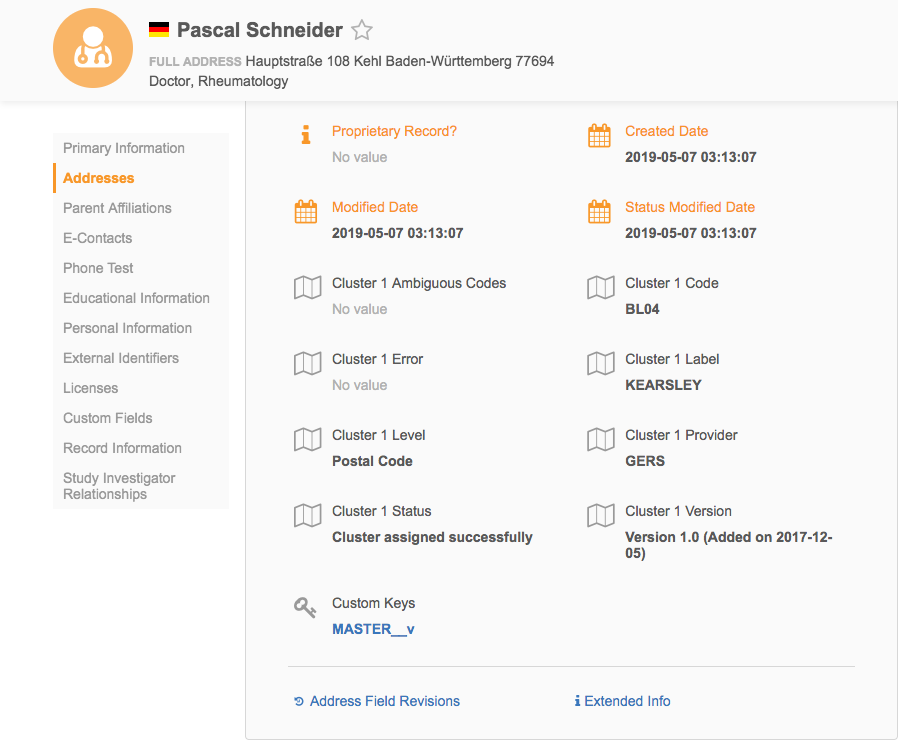
Profile updates
Cluster code information is available on the profile page for enabled countries. Expand an address to view the cluster fields. All cluster fields are gray fields and they are read-only; they cannot be edited on the profile.
Events that trigger cluster code calculation
When a country is enabled for cluster codes, records are updated with cluster information from the related provider during the following events:
- Downloading Veeva OpenData records using the Network MDM UI; for example, a data steward searches for and downloads a record using Sync with OpenData.
- Running Veeva OpenData subscriptions that download and update records in the Network MDM instance. Any existing records where the Cluster Status field is O (overridden) are not updated from the subscription job.
- Approving data change requests (DCRs) for addresses. When a new address is verified by a data steward and the DCR is approved, the cluster information is calculated by Network MDM and added to the record.
-
Loading data from local or third-party data providers.
Source subscription requirements
-
The advanced property, "entity.model.cleanser.ADDRESS", must be contain the value
"address.cluster"so cluster codes are calculated for addresses.If the advanced property exists in the source subscription, add the
"address.cluster"value.Separate any values with a comma (,); for example,
"entity.model.cleanser.ADDRESS" : "address.loqate, address.cluster"
-
All required address fields must be included in the source file.
Existing records where the Cluster Status field is O (overridden) are not updated from the subscription job. For more information, see the section called Overriding cluster codes.
-
- Clicking Refresh Addresses at the top of the Cluster Management page for the country. This runs the maintenance job.
Overriding cluster codes
If there are addresses where no code or an ambiguous code was calculated by Network MDM, administrators can override the cluster codes by loading a .csv file in a source subscription.
Overriding the cluster codes this way ensures that you can have the correct data in your Network MDM instance without waiting to discover why the calculation did not work.
When cluster codes are changed, the status needs to be updated to O (overridden) so the code is not recalculated when the address refresh job runs again.
Prerequisites
Before you create a source subscription, complete the following tasks:
- Create a .csv file and include the address attributes that are required for the cluster calculation.
The following fields must be included in the .csv file:
cluster_1_code__ccluster_1_status__c- This must be set to O (overridden).
Example
To update the cluster fields on two addresses, add the Network ID of the HCP or HCO records and the addresses.

If the second level of cluster codes is used,
cluster_2, the same set of fields for should be added to the file. - Create a source system for the third-party cluster provider (System Interfaces > System).
When the prerequisite steps are complete, create the source subscription.
To create a source subscription to override codes:
- In the Admin console, click System Interfaces > Source Subscriptions.
- Choose Use Classic Mode.
The New Source Subscription page displays.
-
In the Job Run Outcome section, choose Save Changes to the Database so the addresses are updated during the job.
To review the updates the job will make before the changes are committed to the database, choose Run Job in Test Mode and Enable Simulation Mode.
For details about viewing simulated data, see Simulating data updates.
- Type a Name and Description for the subscription.
-
Select the System that you created for loading the cluster definition file.
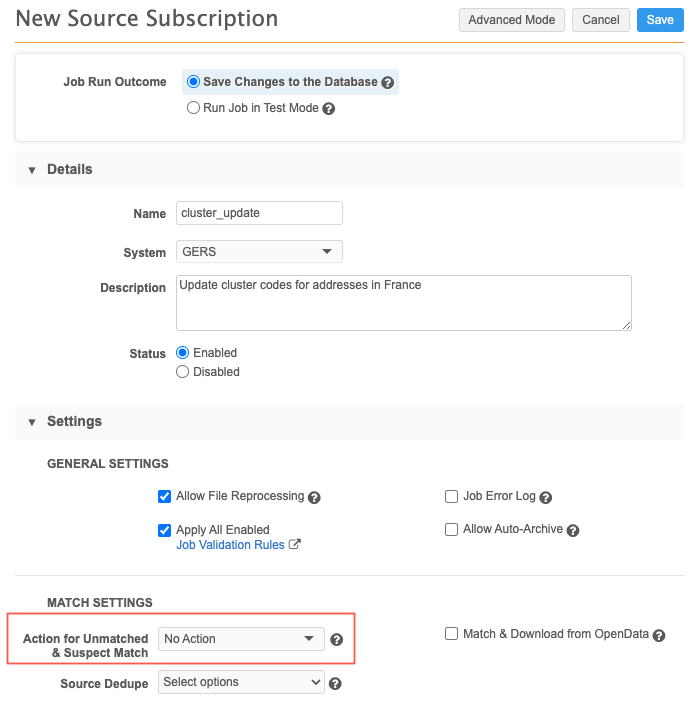
-
In the Match Settings section, expand the Action for Unmatched & Suspect Match option list and select No Action. This ensures that records are not created if Network MDM cannot find a match for the records that are in the .csv file.
Note: Accept all other default options in the Settings section.
-
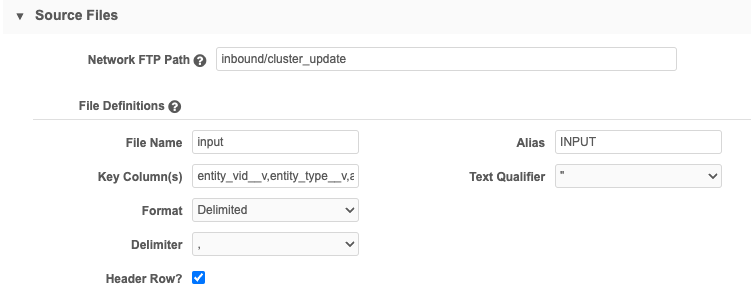
In the Source Files section, specify the file and path for the .csv file. Click Add File to define the File Definitions.
- File Name: Provide the name of a source file. The name should contain only numbers, letters, and underscores (_) and should not include the file extension; for example, .csv.
-
Alias: The simplified name of the file that is used to reference it in the model map code. The alias should be a simple term using only letters, numbers, and underscores (_).
-
Key Columns: Type keys from the external system, delimited by commas. This should include columns used for keys, anchors, and joins.
- Text Qualifier: Select a qualifier to use for the beginning and end of text.
- Format: Select Delimited or Fixed Length to indicate the file format.
- Delimiter: Identify how the data in the file is separated.
- Header Row?: Select the Header Row checkbox to indicate that a comma separated list of headers exists for the header row.
Example
For the example .csv file in the Prerequisites section above, the following file definitions would be used:
- File Name: input
-
Alias: INPUT
-
Key Columns: entity_vid__v,entity_type__v,address_vid__v
- Text Qualifier: quotation marks (")
- Format: Delimited
- Delimiter: comma (,)
- Header Row?: Selected
-
In the Modelling & Normalization section, identify how the data is provided in the incoming files, along with instructions on how to use them.
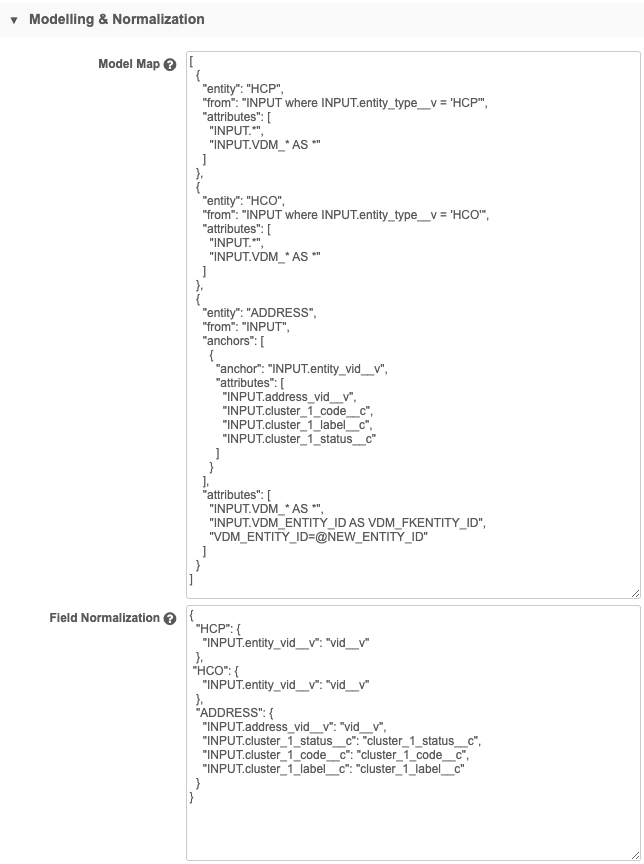
For example, the example .csv file uses the following model map and field normalizations:
Model Map
[
  {
    "entity": "HCP",
    "from": "INPUT where INPUT.entity_type__v = 'HCP'",
    "attributes": [
      "INPUT.*",
      "INPUT.VDM_* AS *"
    ]
  },
  {
    "entity": "HCO",
    "from": "INPUT where INPUT.entity_type__v = 'HCO'",
    "attributes": [
      "INPUT.*",
      "INPUT.VDM_* AS *"
    ]
  },
  {
    "entity": "ADDRESS",
    "from": "INPUT",
    "anchors": [
      {
        "anchor": "INPUT.entity_vid__v",
        "attributes": [
          "INPUT.address_vid__v",
          "INPUT.cluster_1_code__c",
          "INPUT.cluster_1_label__c",
          "INPUT.cluster_1_status__c"
        ]
      }
    ],
    "attributes": [
      "INPUT.VDM_* AS *",
      "INPUT.VDM_ENTITY_ID AS VDM_FKENTITY_ID",
      "VDM_ENTITY_ID=@NEW_ENTITY_ID"
    ]
  }
]
Field Normalization
{ "HCP": { "INPUT.entity_vid__v": "vid__v" }, "HCO": { "INPUT.entity_vid__v": "vid__v" }, "ADDRESS": { "INPUT.address_vid__v": "vid__v", "INPUT.cluster_1_status__c": "cluster_1_status__c", "INPUT.cluster_1_code__c": "cluster_1_code__c", "INPUT.cluster_1_label__c": "cluster_1_label__c" } } -
No changes are required in the following sections:
-
Network Expression Rules
-
Match configuration
Network MDM will match on the Network IDs defined in the .csv file; fuzzy match will not be used.
-
Transformation Queries
-
Job Schedule & Triggers
-
- Save and click Start Job run the source subscription.
Result
After the source subscription runs, the addresses will be updated with the codes contained in the source file. The status of the overridden codes will be O so they will not be recalculated the next time the addresses refresh job is run.
Reverting overridden cluster codes
If incorrect cluster code calculations have been fixed and you want Network MDM to calculate overridden codes again, you can revert the codes using a source subscription. Change the Cluster Status field for the address from O (overridden) to R (reverse) and Network MDM will calculate the cluster code when the subscription runs.
Prerequisite
- Create a .csv file and include the address attributes that are required for the cluster calculation.
The following fields must be included in the .csv file:
- The fields that the provider uses for cluster calculation - postal codes (
postal_code__v) or geocodes (latitude__vandlongitude__v). cluster_1_status__c- This must be set to R (reverse).primary_country__v- Include the primary country in HCP and HCO files only.country__v- Include the country code in Address files only.
Example
To reverse the codes that you updated in the Overriding cluster codes section, change the
cluster_1_status__cfield from O (overriden) to R (reverse). Because this is an address file for the United Kingdom and IQVIAi s the provider, thecountry__vfield andpostal_code__vvalues are required.
If the second level of cluster codes is used,
cluster_2, the same set of fields for should be added to the file. - The fields that the provider uses for cluster calculation - postal codes (
To update overridden cluster codes, follow the steps in the Overriding cluster codes section. The subscription settings are the same for reversing codes.
When the source subscription runs, the cluster codes for the applicable addresses will be refreshed and any codes that have a status of R will be recalculated by Network MDM. On the profile page, the Cluster Status field for the address will display Success to indicate that it was calculated correctly.
Logs
Cluster codes changes are tracked in the audit history and revision history.
Address verification
Cluster code calculation is triggered by address verification. When Data Stewards change an address on the profile page and click the Verify button, Network MDM calculates the cluster code for the updated address.
In the Address Verification dialog, Data Stewards can click Show cluster fields to preview the cluster information.
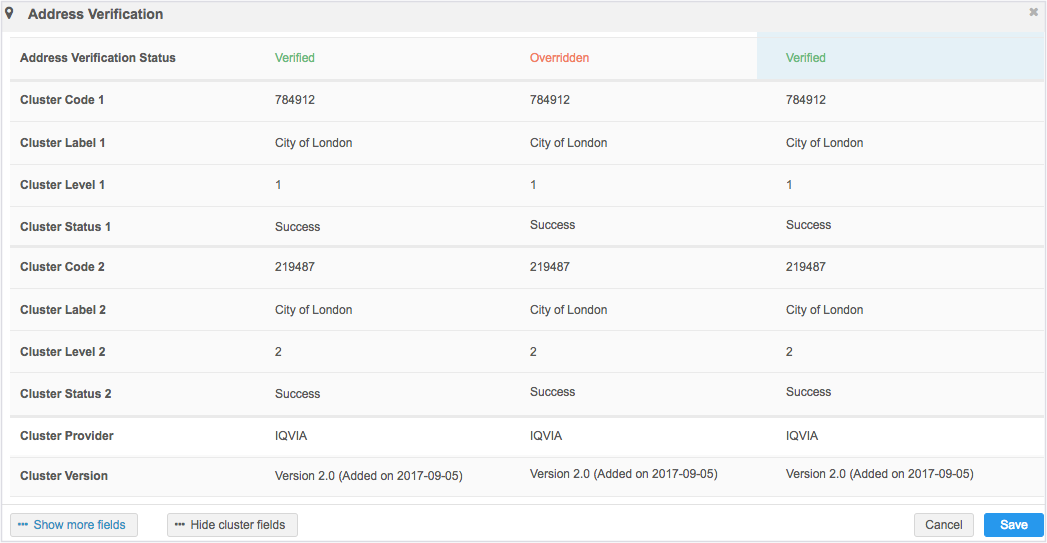
Until the DCR is approved, the profile page displays the old address and old cluster code. After the DCR is approved and the cluster calculation is triggered again, the values on the profile page are updated.
Configuration management
Administrators can export cluster management configurations from a source environment and import it to a target Network MDM environment.
Requirements
The Cluster Management feature must be enabled in both instances for the same provider/country combination for the configuration to be imported successfully.
For example, both the source and target environment must have GERS - France enabled. If the target Network MDM environment does not have Cluster Management feature enabled, or the provider/country combination is different than the source environment, the configuration is skipped during import.