Address lines construction
Addresses can be reconstructed to ensure that they are standardized to support requirements for downstream systems.
Network MDM uses a third-party cleansing tool to verify addresses. During the verification process, address details are moved to specific fields. When records are exported to downstream systems, some address fields are stripped from the record. To ensure that critical details are not removed, the address details can be moved to fields that will be retained.
US address example
After US addresses are cleansed in Network MDM, building or organization are placed in Address Line 1. When the record is exported to downstream systems, Address Line 2 is often stripped from the record, so the street number, name and suite number (if available) are lost. Samples cannot be delivered without this information.
| Field | Network MDM (after address cleansing) | Downstream system |
|---|---|---|
| Address Line 1 | Kaiser Permanente Medical Center | Kaiser Permanente Medical Center |
| Address Line 2 | 6600 Bruceville Rd | |
| Address Line 3 | ||
| City | Sacramento | Sacramento |
| State | CA | CA |
| Postal Code | 95823 | 95823 |
| Country | US | US |
Using the address lines construction option, these critical details will be moved to fields that will be retained on the exported address.
Address reconstruction process
-
Address is added or updated.
This can be done through a data change request, by updating the record profile, or through data loading.
-
Address is cleansed and verified.
To learn about how addresses are cleansed and parsed, see About address validation and parsing.
-
Address reconstruction rules run to reformat the address.
Addresses must meet the requirements before the rules run. Requirements and rules are specific to each country.
Supported countries
-
Canada
-
Malaysia
-
Vietnam
-
United States
Supported addresses
-
Locally managed addresses
-
Addresses that have been cleansed by Network MDM's third-party address cleansing services.
The supported values for the Address Verification Status field depend on the country.
Addresses that are not supported
-
Locally managed addresses that are externally mastered (the
is_externally_mastered__vfield is true) or third-party mastered addresses.Address cleansing is not applied to these addresses, so they are not supported for address lines construction.
-
US and Canadian addresses that use the shipping address feature.
Only one address recalculation feature can be enabled in a single Network MDM instance for each country.
Enable the feature
- US addresses - Administrators can enable this feature for locally managed US addresses. Go to Settings > General Settings and click the Address lines construction option.
Tip: The US OpenData team uses this feature to update US addresses. Customers with both locally managed US records and OpenData US records should consider enabling this feature so all US addresses are standardized consistently.
-
Malaysia and Vietnam - The feature is on by default. As addresses are added/changed and then cleansed, the rules are applied.
-
Canada - Contact Veeva Support.
When the feature is enabled in your Network MDM instance, existing locally managed addresses must be updated.
US/Canada addresses
Most downstream systems map Address Line 1 only and expect it to contain the street name and number. However, address cleansing places the building or organization name in the first address line and moves street number, name, and suite number to Address Line 2.
If this information is removed in downstream systems, samples cannot be delivered. Additional costs and IT overhead might be incurred to resolve the problem. Using this feature to normalize the address lines will support downstream systems and improve data consistency.
Tip: Existing customers who enable and use this feature might want to backfill locally managed addresses. See Backfilling US and CA addresses in your Network MDM instance.
Address requirements
Reconstruction rules are applied if the following requirements are met:
- Address verification status is V (Verified) or A (Ambiguous) or P (Partially Verified).
- Street number, street name, and/or building are populated
Reconstruction rules
After address cleansing is complete, the address is reformatted to follow these rules.
| Address field | Details |
|---|---|
| Address line 1 | street number (premise__v) street name (thoroughfare__v) suite number (sub_building__v) |
| Address line 2 | building (building__v). If available. |
| Address line 3 |
organization ( If building is not available, move to Address Line 2. |
Address reconstruction examples
Review the following examples to see how Network MDM reconstructs the address lines when this feature is enabled.
Example 1
Address Line 1 has a building, and Address Line 2 has a street name and number.
| Field | Address Lines (after cleansing) | Reconstructed Address Lines |
|---|---|---|
| Address Line 1 | Stratford Court Apts | 58 N Lansdowne Ave |
| Address Line 2 | 58 N Lansdowne Ave | Stratford Court Apts |
Example 2
Address Line 1 has a building, and Address Line 2 has a street name, number, and suite number.
| Field | Address Lines (after cleansing) | Reconstructed Address Lines |
|---|---|---|
| Address Line 1 | Gray Street Medical Bldg | 210 E Gray St Ste 1105 |
| Address Line 2 | 210 E Gray St Ste 1105 | Gray Street Medical Bldg |
Example 3
Address Line 1 has an organization, Address Line 2 has a building, and Address Line 3 street name, number, and suite number.
| Field | Address Lines (after cleansing) | Reconstructed Address Lines |
|---|---|---|
| Address Line 1 | Gulfcoast Veterinary Clinic | 15560 McGregor Blvd Ste 3 |
| Address Line 2 | 15560 McGregor Blvd Ste 3 Bruno Plaza | Bruno Plaza |
| Address Line 3 | Gulfcoast Veterinary Clinic |
Vietnam addresses
The address reconstruction rule ensures that the details for Vietnam's three administrative tiers: (provincial (administrative_area__v), district/county (sub_administrative_area__v), and commune (locality__v) are sent to downstream systems.
Address requirements
Reconstruction rules are applied after addresses are cleansed and the Address verification status is one of the following:
-
V (Verified)
-
A (Ambiguous)
-
P (Partially Verified).
Reconstruction rules
| Address field | Details |
|---|---|
| Address line 1 | suite number (sub_building__v) + street number (premise__v) + street name (thoroughfare__v)
|
| Address line 2 | city (locality__v)
|
| Address line 3 | always empty |
Example address reconstruction
| Field | Address Lines (after cleansing) | Reconstructed Address Lines |
|---|---|---|
| Address Line 1 | 12, Đường Thủ Khoa Huân | 12, Đường Thủ Khoa Huân |
| Address Line 2 | Phuong 1, Thành Phố Mỹ Tho | Phuong 1 |
| Address Line 3 | Tiền Giang 84120 | |
| City | Thành Phố Mỹ Tho | Thành Phố Mỹ Tho |
| State | Tiền Giang | Tiền Giang |
| Zip/Postal Code | 84120 | 84120 |
| Country | Vietnam | Vietnam |
Malaysia addresses
Supported addresses
Reconstruction rules are applied to any address with an Address verification status.
-
V (Verified)
-
A (Ambiguous)
-
P (Partially Verified)
-
U (Unverified)
-
NS (Not Supported)
-
DS (Data Steward Approved)
Address owner
All addresses are reconstructed if they go through address cleansing, regardless of ownership (locally managed, Veeva OpenData, and third-party managed).
Reconstruction rules
| Address field | Details |
|---|---|
| Address line 1 | Includes: Suite number (sub_building__v), building (building__v), street number (premise__v), street name (thoroughfare__v)
Each entry is separated by a comma (,). Cannot exceed 80 characters; otherwise, the values in the |
| Address line 2 | Includes: Dependent locality (dependent_locality__v)
Can include the The number of characters cannot exceed 100; otherwise, the value will be truncated. |
| Address line 3 | always empty |
Example address reconstruction
| Field | Address Lines (after cleansing) | Reconstructed Address Lines |
|---|---|---|
| Address Line 1 | No 3 Block A Glomac Jalan Gc/1 | Glomac Block A, 3, Jalan Gc 1 |
| Address Line 2 | Cyber 4 | |
| City | Cyberjaya | Cyberjaya |
| Province | Selangor | Selangor |
| Zip | 63000 | 63000 |
| Country | Malaysia | Malaysia |
Match rules
Default match rules
The default match rules for the US and Canada consider all of the address lines fields.
- address lines are the same - HCP
- address lines are the same - HCO
- address lines are similar - HCO
Update your match rules
Update the rules to consider all the address line fields for the following situations:
-
You have custom match rules.
-
You have overridden the default match rules for any subscriptions.
-
You are working with addresses in Malaysia or Vietnam.
To update:
- Navigate to any feature in the UI that uses match rules.
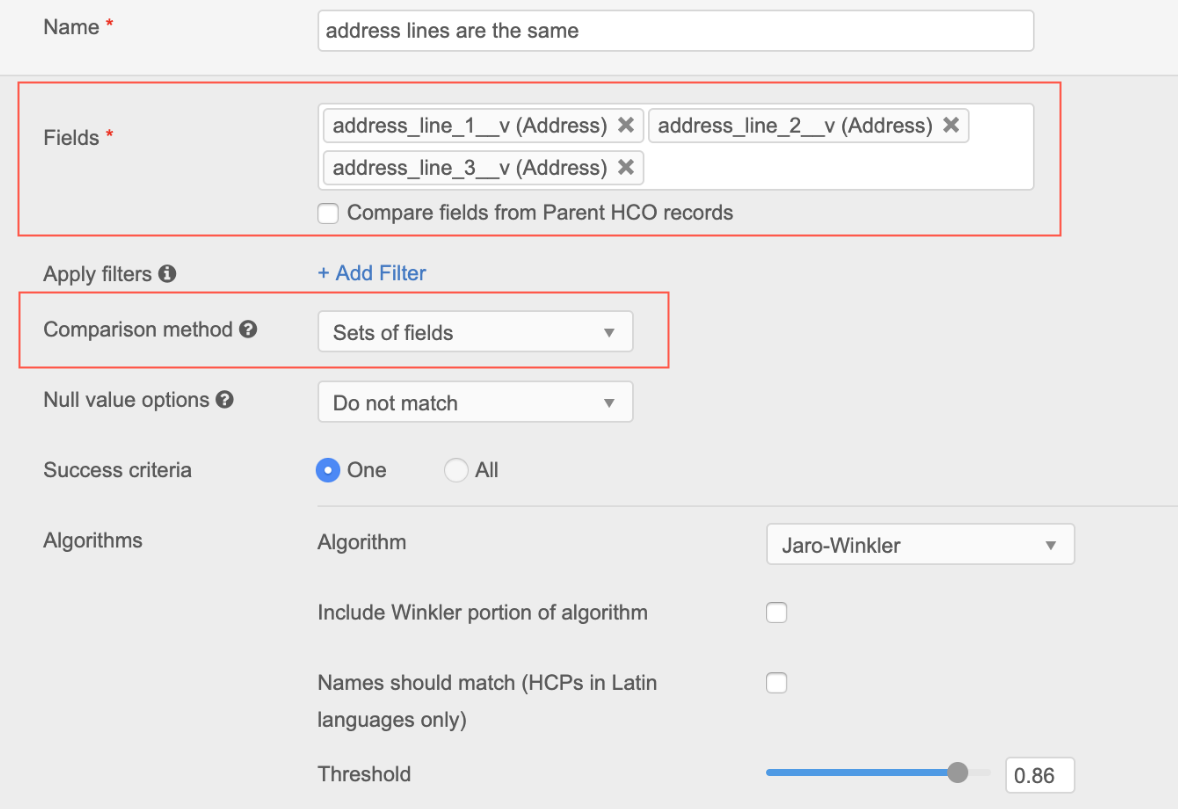
- On the Match Rules tab for the applicable country, find the match rule that you want to change; for example, address line 1 is the same.
- In the Name field, type a more appropriate name; for example, address lines are the same.
- In the Fields box, add
address_line_2__vandaddress_line_3__v. - Expand the Comparison method list and change Direct field to select Sets of fields.
- Keep any of the remaining configuration options in the match rule.
- Ensure that the Enabled checkbox is selected.
- Save your changes.
Example updated match rule
Update US Veeva OpenData addresses
If you subscribe to Veeva OpenData for the US, addresses are reconstructed and pushed to your Network MDM instance when your Veeva OpenData subscription runs. Candidate records are excluded from this process.