Network Portal and widgets
My Request widget
A new Network widget is available so business users can view the data change requests that they've submitted. Administrators can configure the My Request widget in their Network instance and add it to a Network Portal application so all users, except Integration Users, can check the status of their requests without logging into Network.
The My Request widget configuration is available by default in Network instances. Administrators can create a widget and add it to a Network Portal application.
Viewing requests
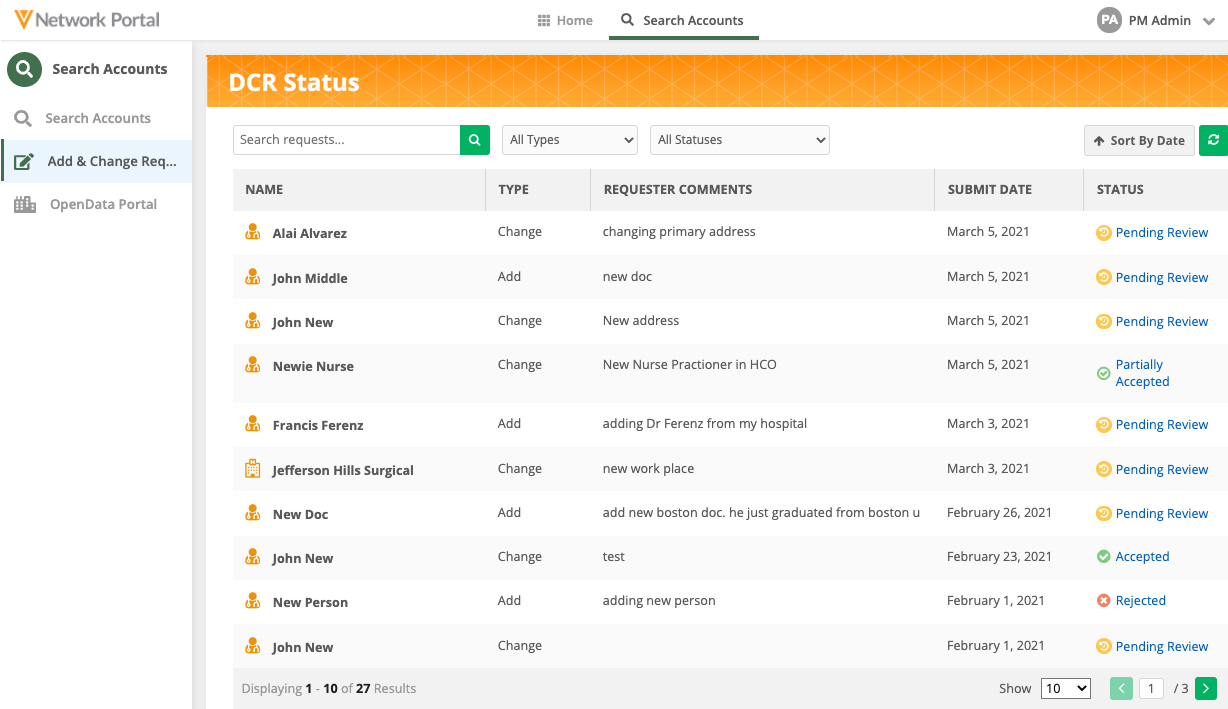
The main page of the My Request widget displays all of your submitted requests.
Each request displays the following information:
-
Type - Add or Change request
-
Requester Comments - Notes that you added to the request.
-
Submit Date - The date you sent the request
-
Status - The task status (Accepted, Partially Accepted, Pending Review).
The list can be filtered by the Type and Status columns or you can click Sort by Date to sort the list by the Submit Date column. Use the search field to search for a specific request.
Note: Requests submitted through the Affiliation widget do not display.
Request details
Click a request to view details about the status, requester comments, and resolution notes.
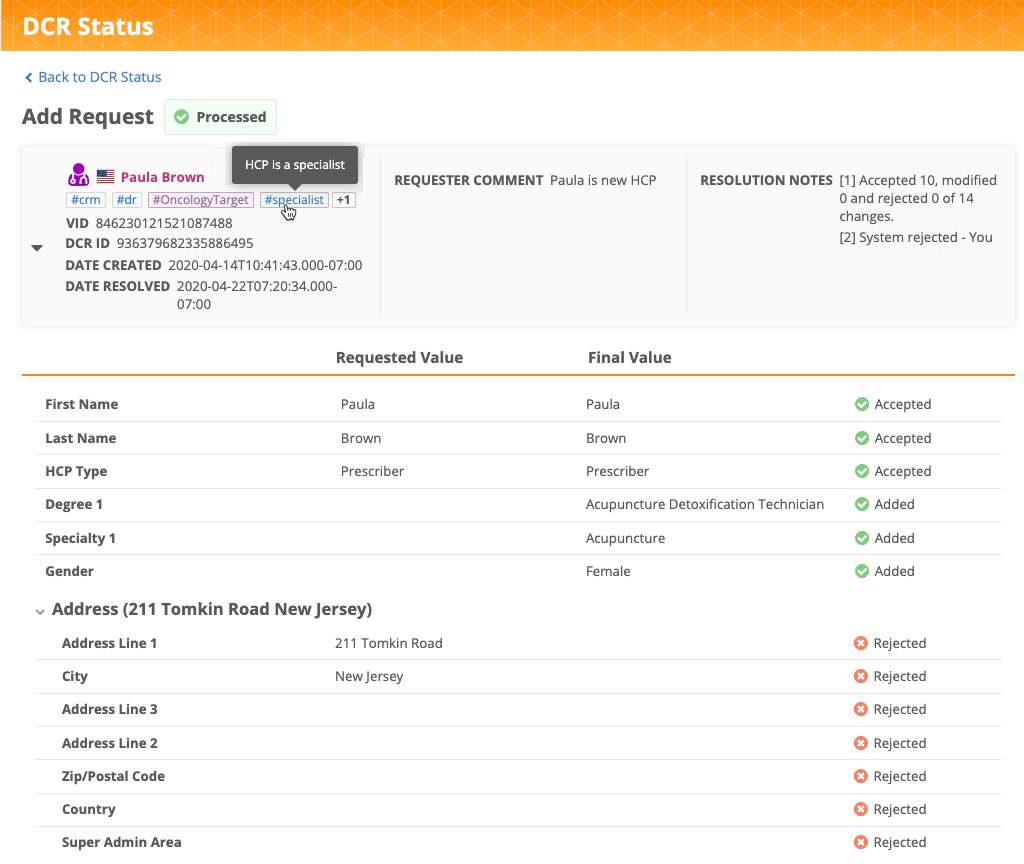
On processed requests, you can review the results of the DCR line items. You can see your original requested value and any values that were changed by Data Stewards.

Matched records
If you submit an add request and it matches to an existing record, a message displays at the top of the request to advise that your add request has become a change request.

View a record profile
If a processed request has become a record, you can click the name on the record to open the profile.
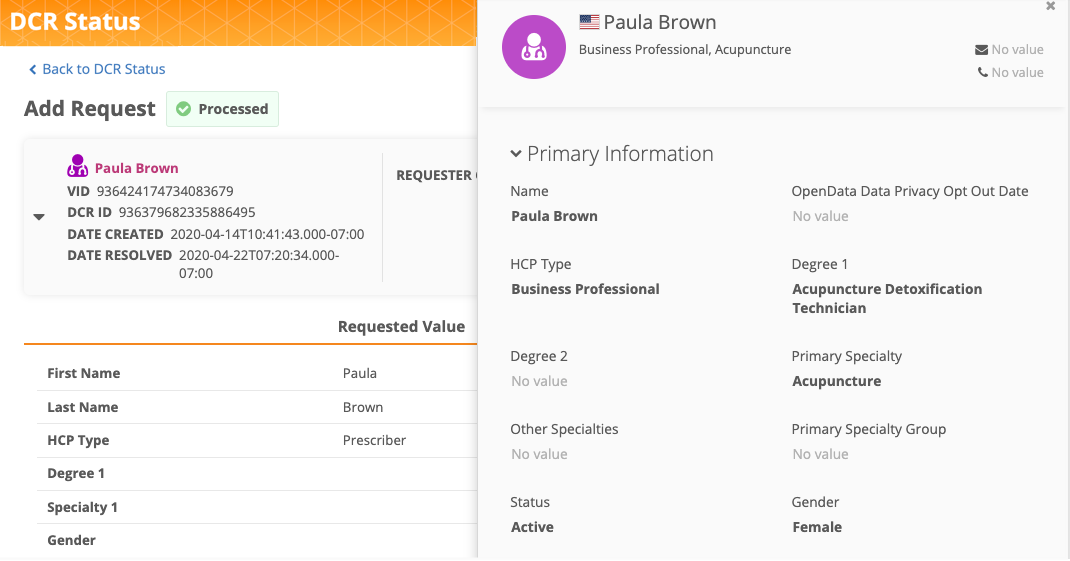
Tip: To display only the relevant information for business users, administrators can configure the widget to use a reduced profile layout by defining a custom layout in the widget configuration.
Configure the My Request widget
To add a My Request widget:
- In the Admin console, click Widgets & Portal > Network Widgets.
- Click Add Network Widget.
-
In the New Network Widget dialog, select My Request Widget from the list.
- Click Create Widget.
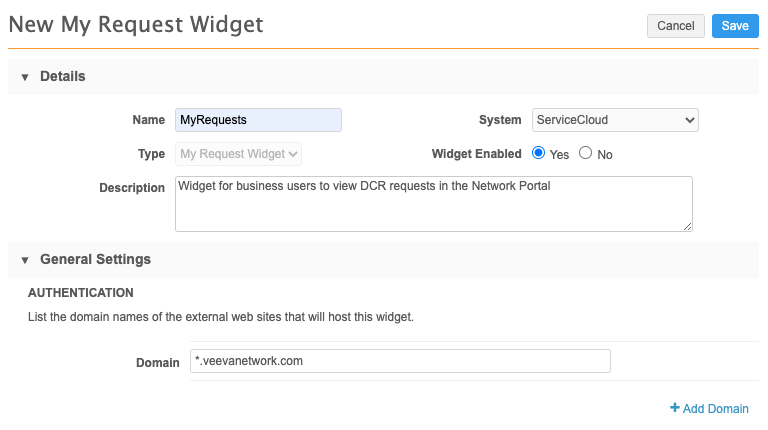
The New My Widget page displays. -
In the Details section, define the following information
- Name and Description.
-
System - Select a source system.
- Type - My Request Widget is selected by default.
- Widget Enabled - Yes is selected by default.
-
In the General Settings section, define the domain and behavior for your widget.
-
Authentication - Domain name for the internal website that will host the widget. To use the widget in the Network Portal, add *.veevanetwork.com.
-
Languages - Any languages that should display in the widget. English is defined by default.
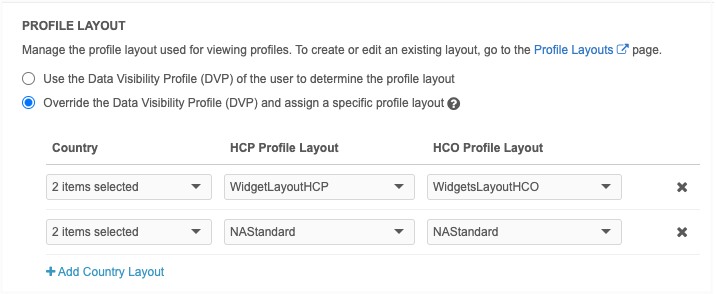
- Profile Layout - Determine which layout to use for viewing profiles.
Typically, the layouts assigned to the user's data visibility profile contain all of the fields in the Network data model. You can override this default behavior and assign specific profile layouts for each country to the widget. For example, you can use custom profile layouts to limit the number of fields so widget users only see the essential fields.
Choose one of the following options:
Use the DVP of the user - Typically, the layouts assigned to the DVP contain all of the fields in the Network data model.
Override the DVP and assign a specific profile layout - Use a custom profile layout.
If you choose this option, define the Country and profile layouts for HCPs and HCOs.
Important: If you override the layout to display a limited set of fields in record profiles, it also impacts that fields that display in their requests. If the field isn't included in the layout, it will not display in the request.
-
Use the Branding section to customize the look of the widget.
-
Widget header- Choose whether your widget should display a header. For the Network Portal, a header is not required.
By default, a header is not included so the widget displays seamlessly into your internal portal. If you include a header, you can add a custom logo and title.
-
Images - If you choose to include a header, upload a logo to add to the widget.
Image files in .JPG and .PNG formats are supported. The image name cannot contain spaces. The image file will be automatically resized to fit in the appropriate space. The maximum height and width is 24px by 24px.
The uploaded image displays in the Preview section.
- Fonts - Choose the font family to be used in the widget. By default, Open Sans is selected.
- Colors - Customize the colors for your widget.
- Link Color - Used for all links. Default, #3A78BB
- Icon Color - Used inside the HCP and HCO icons. Default, #FFFFFF
- HCP Icon Color - The default icon color for HCPs when a metric is not selected. Default, #444444
- HCO Icon Color - The default icon color for HCOs when a metric is not selected. Default, #005FB1
-
-
-
In the Labels section, define the Widget Title -The languages that you defined for the widget are listed. If you chose to have a widget header, type the Widget Title label for each language.
By default, the title is Network My Request. It can be a maximum of 80 characters.
- Save your changes.
The My Request widget can be added to a new or existing application in your Network Portal so users with access to the Network Portal can view their DCR requests.
For detailed instructions, see Network Portal administration in the Veeva Network Online Help.
Affiliation widget branding
The Affiliation widget now provides the ability to customize the Influence Map branding so you can distinguish object types and highlight relationship details. This enables you to visualize specific business information; for example, to differentiate HCO types and business professionals from other HCP types, or to better understand the patient journey in the health system.
These enhancements enable you to do the following:
-
Override existing icon mappings and color branding.
-
Customize relationship details such as labels and colors
-
Use new Influence Map tools to filter on relationships
These enhancements are not enabled by default. To add custom branding for objects and relationships, contact Veeva Support.
Custom branding examples
Review the following example to see how you can customize the objects and relationships to your specific business purposes. The examples provide the type of mapping details that will be required by Veeva for creating the custom branding.
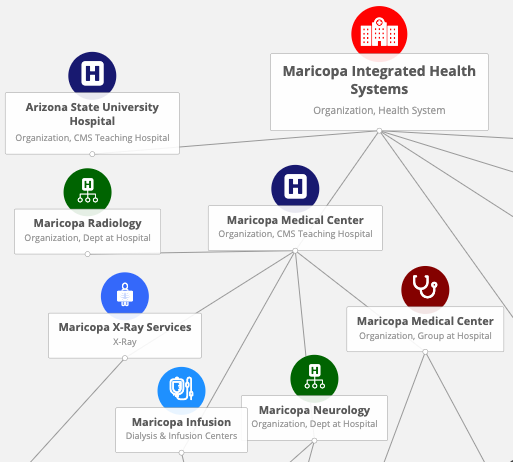
Customize icons and colors for HCOs
Custom HCO branding can be created for the Affiliation widget where the icon and color can be configured.
You might want to customize the HCOs that display in the Influence Map for the following reasons:
-
The standard HCO types are too broad for your business purposes. In this branding example, you can use labels, colors, and icons to identify specific HCO types on the Influence Map.
-
To extend the current HCO type icon mappings to HCO types that do not have an icon defined or to define custom HCO types.
-
To define specific color mappings for HCOs based on the HCO type; for example: department icons are green and Dialysis and Infusion center icons are blue.
Example mapping details
To extend the HCO type mappings, we can use the hco_type__v field as the branding field with the following mappings:
-
Object: HCO
-
Branding field: hco_type__v
-
Mapping
Reference Value Color/Icon Icon Organization, Health System Red - Health System 
Organization, Dialysis & Infusion Center Blue - Infusion Bag 
X-Ray (Custom Reference Value) Blue - X-ray 
Organization, Group at Hospital Maroon - Stethoscope 
Organization, Dept at Hospital Green 
Organization, CMS Teaching Hospital Purple 
Using this mapping, HCOs with the reference values defined in the hco_type__v field use the mapped color and icon defined. If a reference value isn't mapped for custom branding, the default HCO icon mappings are used.
Customize HCP icons
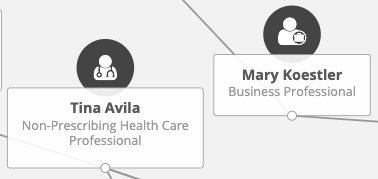
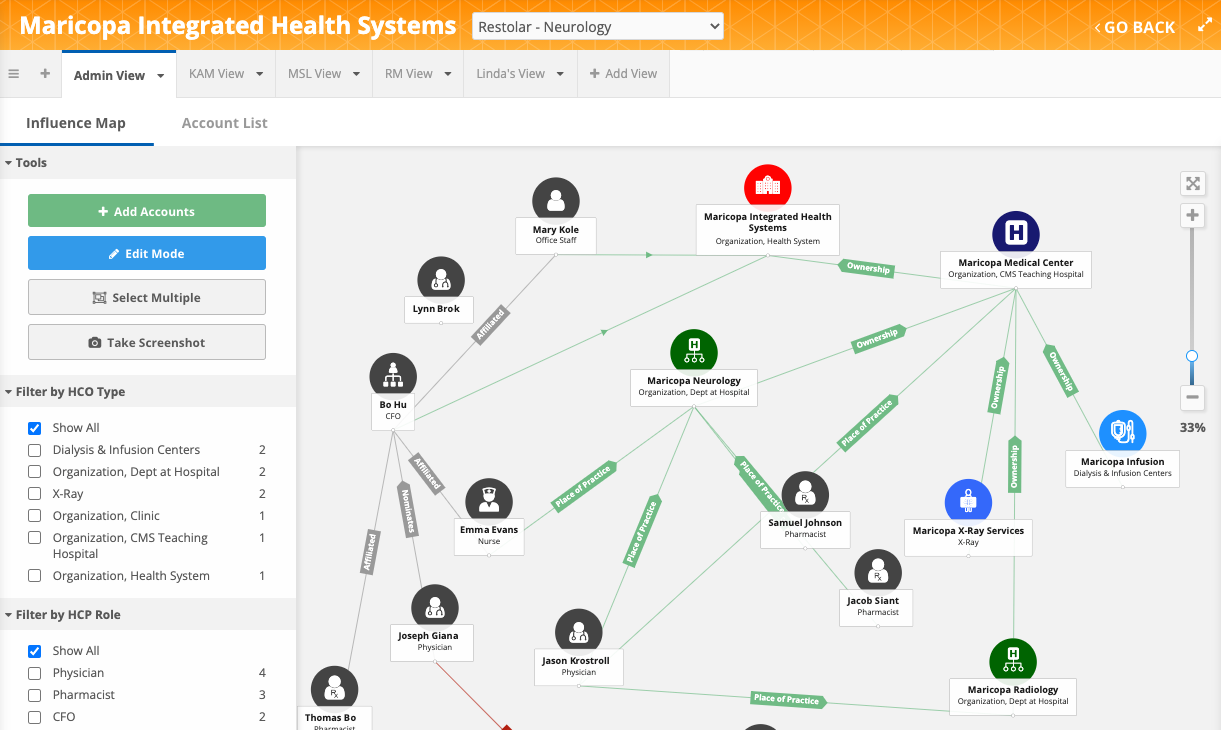
You might want to distinguish business professionals from other HCPs (for example, prescribers). To do this, you can create a mapping between the reference value for Business Professional to a new icon.
Example mapping details
The mapping details use the hcp_type__v field and reference values for the custom branding.
-
Object: HCP
-
Branding field: hcp_type__v
-
Mapping
Reference Value Icon O (Business Professional) 
In this example, HCPs that have the Business Professional HCP type will be assigned the Business Professional icon. All other HCP types will default to the standard HCP icon. The Business Professional icon and standard HCP icon will use the default colors defined in the widget configuration.
Parent HCO relationship branding
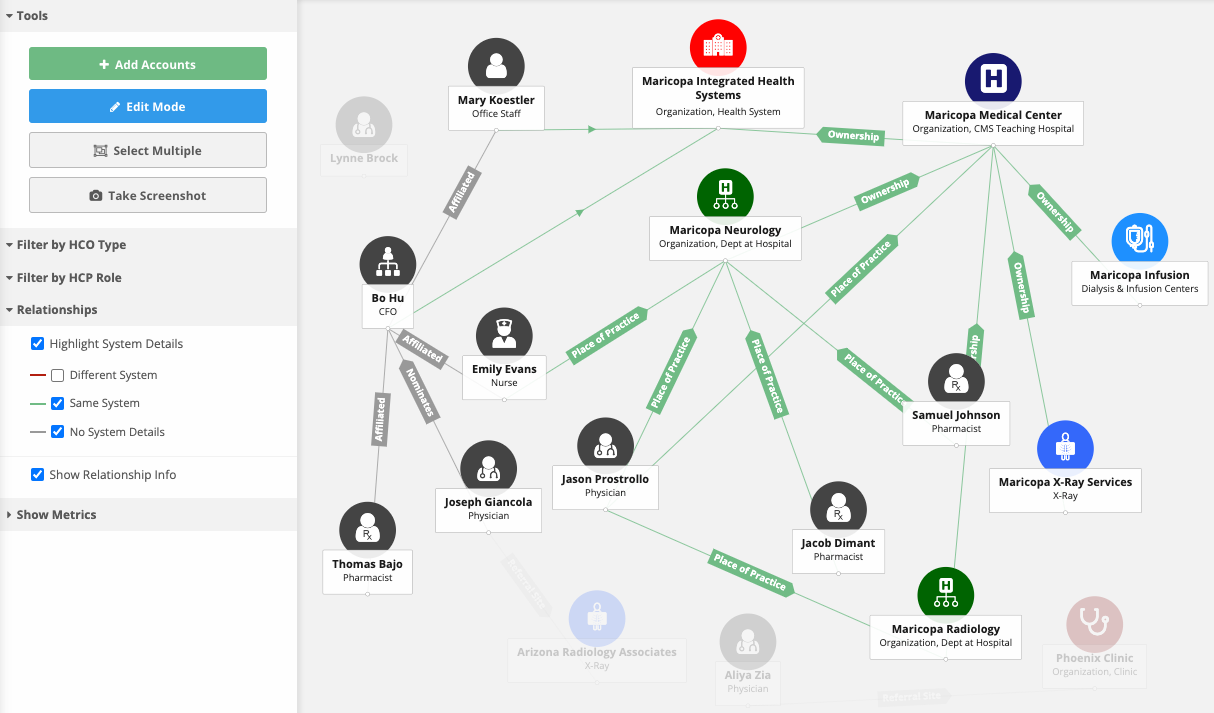
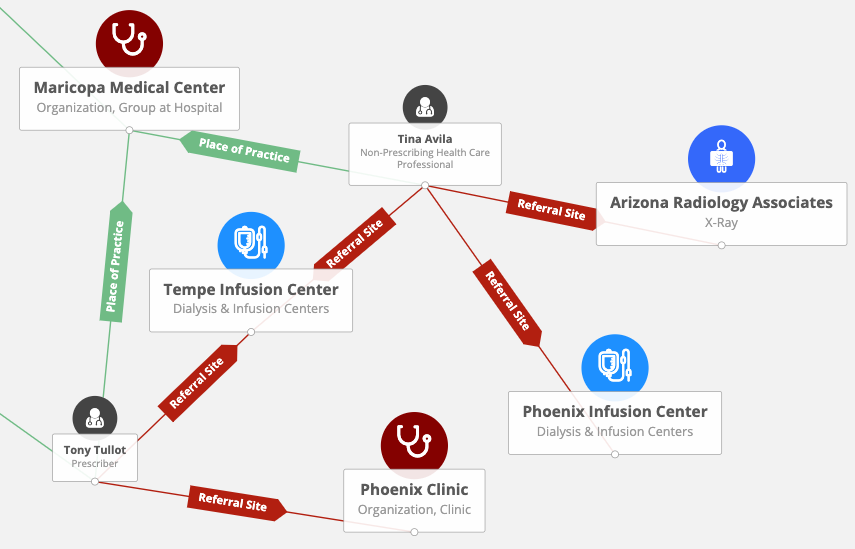
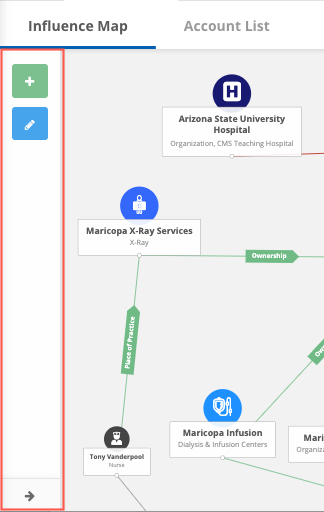
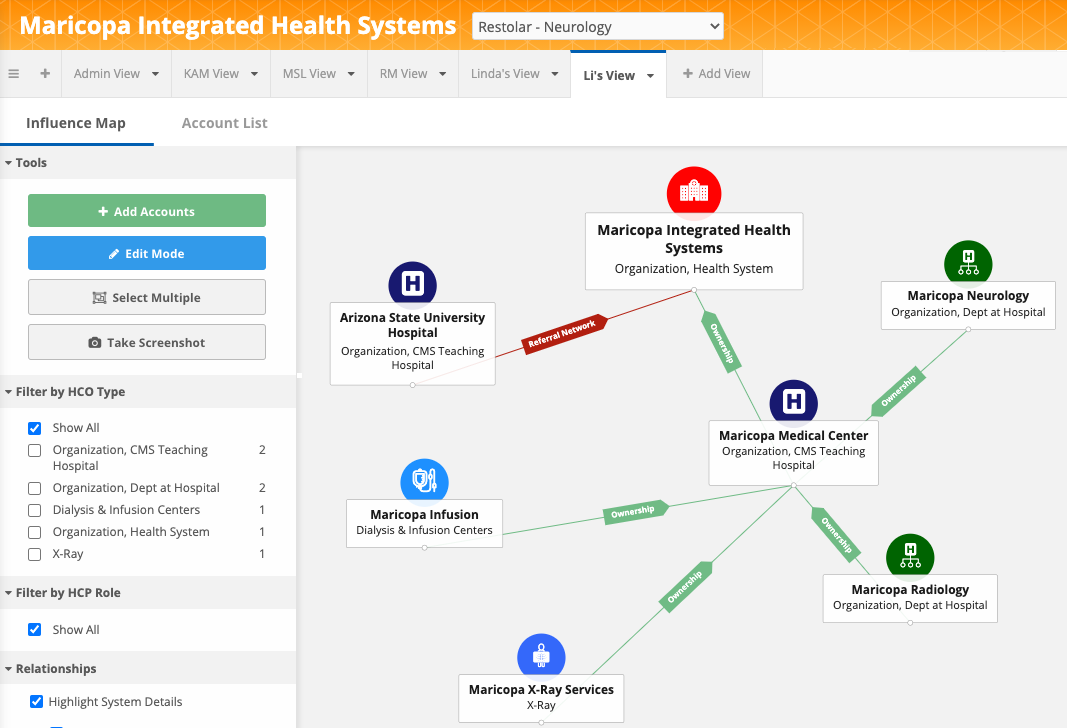
You can define color and label branding for HCP-HCO and HCO-HCO relationships. Using colors and labels on the relationships can help you to understand the relationships between accounts from the Influence Map itself. For example, from our Influence Map below, we can understand the patient flow within Maricopa Health System, where patients are being referred to outside the health system.
Example 1 - HCP-HCO relationships
For this example, we'll define the following set up for relationships between HCP-HCOs:
-
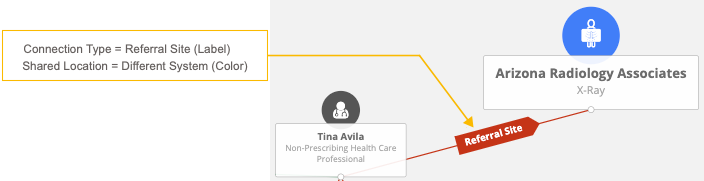
Line Color - Represents whether the relationship between the HCO and HCP is within the same system or not. This help users understand quickly from the Influence Map whether patients are being referred to outside the system.
-
Line Label - Represents the connection between an HCP and an HCO. Either the HCP practices at the location or the HCP refers their patients to the location.
For this custom branding, the following mapping details are required:
-
Object: Parent HCO
-
Type: HCP-HCO
-
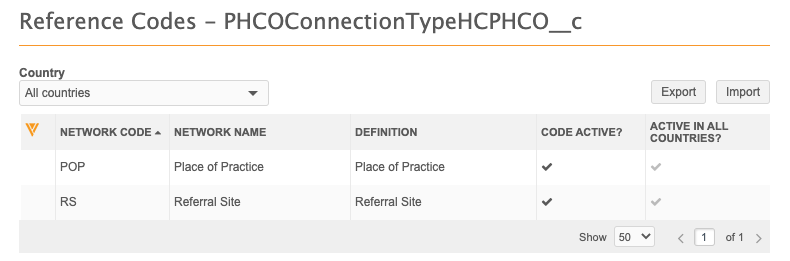
Label: hcp_hco_connection_type__c (custom field)
-
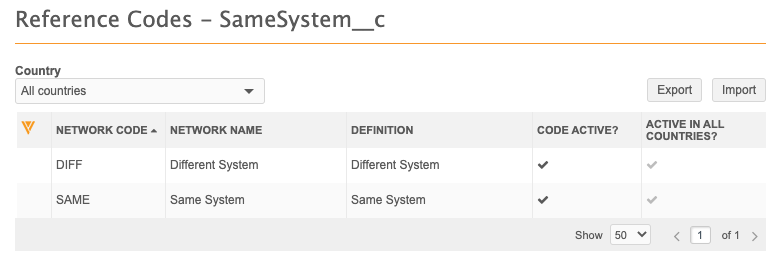
Branding Field: system_difference__c (custom field)
-
Mapping
Reference Value Icon Same System Green Different System Red
In this example, if a parent HCO is Referral Site relationship using the hcp_hco_connection_type__c field, it can be identified as being in the Same System or Different System on the Influence Map using the system_difference__c field.
Editing relationships
If the branding field and label field are displayed in the parenthco fields to edit, after a change is made, the relationship will be updated right away.

These labels (fields) are defined in the Affiliation widget configuration.
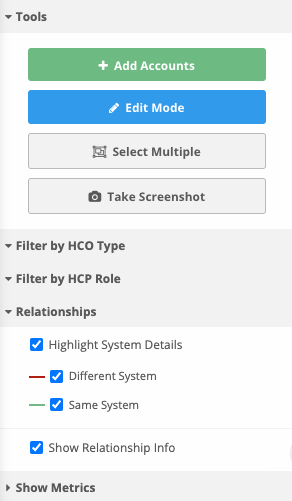
The Tools pane contains a new Relationship section that you can use to filter and highlight relationships if you have customized the branding.
-
Show Relationship Labels - Choose to display labels and arrows on the connecting lines that represent parent HCO relationships.
-
Highlight Shared Location - Highlight the connecting lines with color for HCP-HCO and HCO-HCO relationships that are in the same system but different locations to understand the patient journey.
The same type of custom branding can be defined for HCO-HCO relationships.
Support for custom branding
Custom branding is applied to the Affiliation widget and the Search widget. For example, if you search for and add an account to the Influence Map, the search results and record profiles contain the branding that you have customized.
Show or hide the toolbar
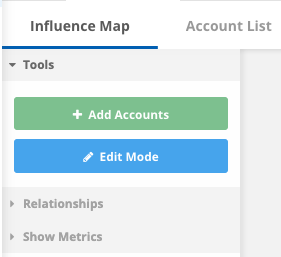
In addition to the branding enhancements, the Tools pane has been updated.
Users can hide the Tools pane to create more space for the Influence map. By default, the Tools pane displays. When the pane is hidden, only the Add Accounts and Edit Mode options display. To display the pane again, expand it from the bottom corner.
You can now collapse the sections in the toolbar.
Search widget - profile enhancements
Empty sections are collapsed
Record profile sections that contain no field values are automatically collapsed so users can more easily scan for relevant data.
You can manually collapse or expand any sections on the record profiles.
Network Portal
The Network Portal provides a way for business users to access Network data through predefined or custom applications. Network is generally focused on Data Stewardship and Data Management processes and activities. Some users (compliance, marketing, or other front office/back office users) might find the Network UI too technical for their purposes. Using the Network Portal, these users can access Network data through an easy and intuitive user experience.
The Network Portal includes a predefined search application, Search Accounts, so users can find and edit HCP and HCO accounts in Veeva OpenData and your Network instance.
Network Portal benefits:
-
Easy and intuitive user experience for business users to access MDM data
-
No coding effort required (contains a drag and drop user interface to update the configuration)
-
Create multiple applications that use the Network widgets
-
Controlled access to applications using user groups and user permissions
-
Quickly implement - users can immediately start using the Network Portal to search HCO and HCP accounts
-
Supports single sign-on (SSO) users
The Network Portal is available in all Network instances, but it is disabled by default. System Administrators and System and Data Admin users can enable the Network Portal. See the "Enable the Network Portal" section below.
Network Portal videos
Videos are available to provide an overview for using the Network Portal and for creating an application. To watch the videos, go to the Network Videos page in the Veeva Network Online Help.
Using the Network Portal
Access to the Network Portal
The Network Portal is available to the following users:
-
Portal Users - A new Network user type that has access to the Network Portal but no access to the Network UI.
These users can sign-in using their Portal Username and password.
For more information about this new user type, see "Creating a Portal User" in the topic below. -
Network Users - Standard Users, Data Stewards, Data Managers, System Administrators, and System and Data Admin users.
Integration Users do not have access to the Portal; they have access only to the Network API.These users can sign in using their regular Network username and password.
Logging into the Network Portal
You can log into the Network Portal using the following methods:
-
Login page (unique URL)
-
Network UI
-
Single sign-on (SSO)
Login page
Business users can log into the Network Portal using their Network username, a Portal Username (for non-SSO customers), or through single sign-on (SSO).
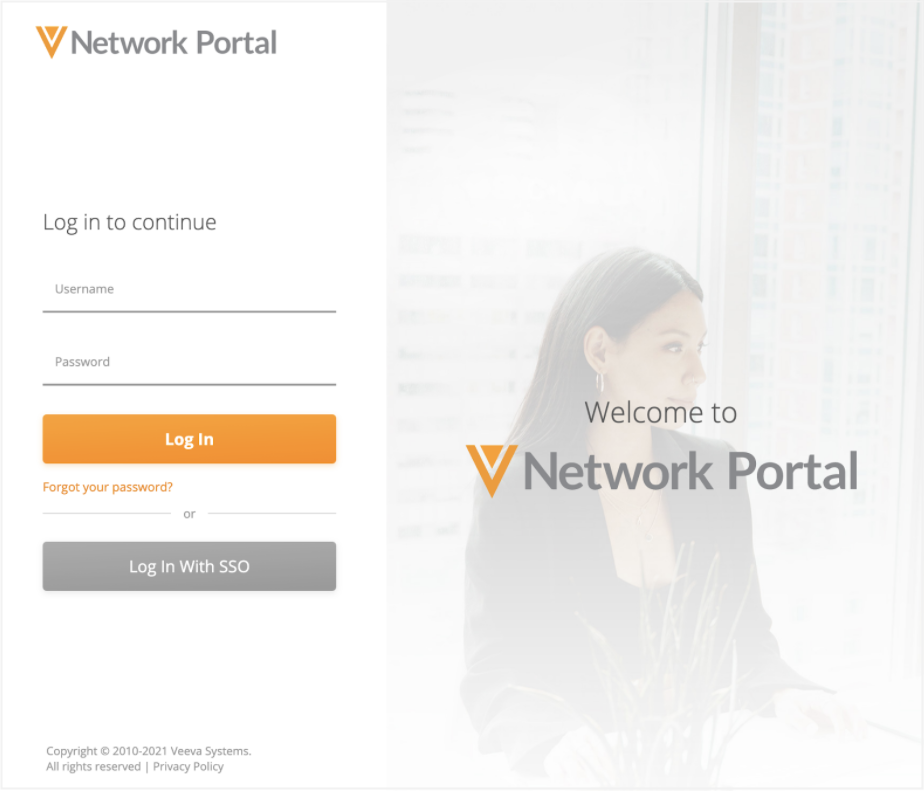
Portal Users and Network users can reset their password on the Network Portal login page. Click Forgot your password.
Network UI
When the Network Portal is enabled, Network users can access it from their Network instance if they have been granted access to the Network Portal.
On the Network menu bar, click Network Business Portal.

Some user types can also access the Network Portal from their Home or Overview page.
-
Standard users and Data Stewards - Click the Network Business Portal link on the Home page.
-
System Administrators and System and Data Admin users - Click the Launch the Network Portal button under the Widgets and Portal heading on the Admin Overview page.
The Network Portal will open in a new browser tab.
Single sign-on (SSO)
Users can access the Network Portal using SSO through the following methods:
-
SSO dashboard (for example, a Network Portal tile on an Okta® Dashboard) that is optionally configured by your SSO admin
-
Bookmarked Portal SSO URL
-
Network Portal login page using the SSO button
Viewing the Network Portal
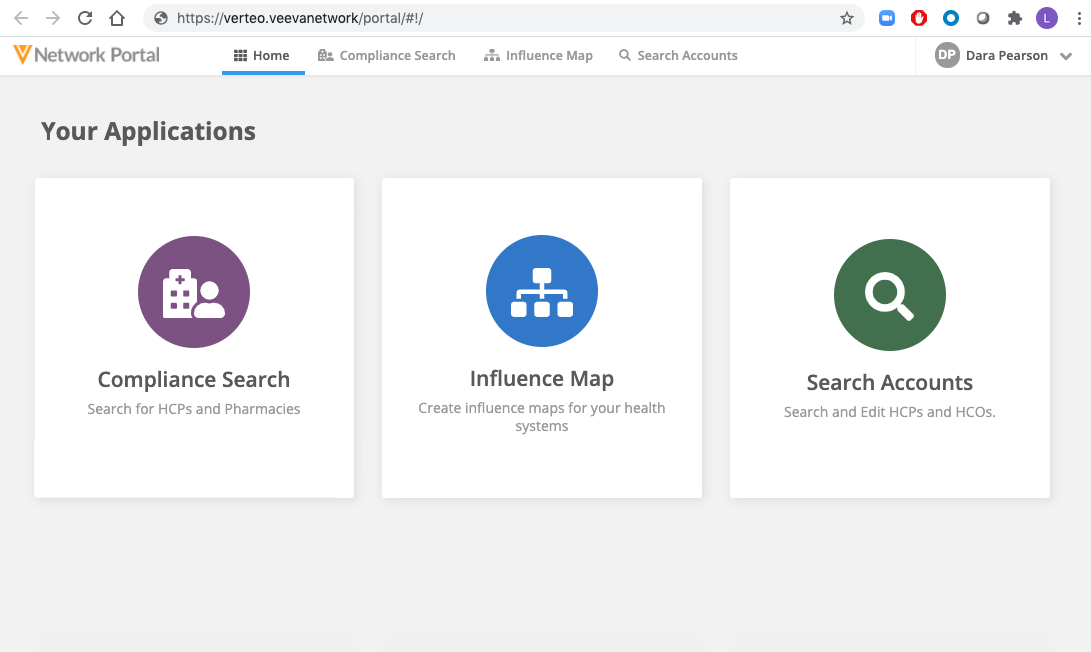
When the Network Portal opens, the default view is the Home page. This page contains all of the enabled applications that you have access to in the Network Portal.
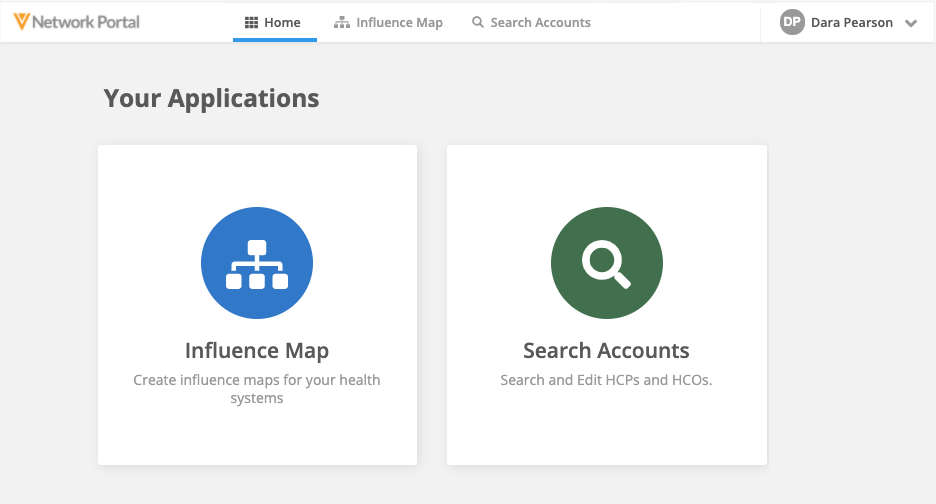
If there is only one app available in the Network Portal, the app will be open by default. For example, when you log in, the Search Accounts application will be open.
Navigation
Use the navigation bar at the top to navigate to another application or to go to the Network Portal Home page to view all applications. The logo in the top left corner will also navigate to the Network Portal Home page.
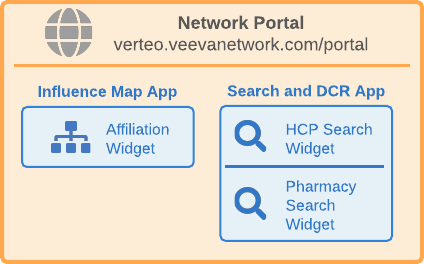
Multiple widgets
An application can contain multiple Network widgets. Use the tabs in the left panel to switch between widgets. Each tab (widget) has its own unique URL so you can bookmark the page.
User settings
You can view your Network Portal user settings. The settings are read-only but can be helpful to Veeva Support for troubleshooting issues.
-
In the top-right corner, expand the arrow beside your user name.
-
Click Settings.
-
On the General Settings tab, view your user name, language, locale, and timezone.
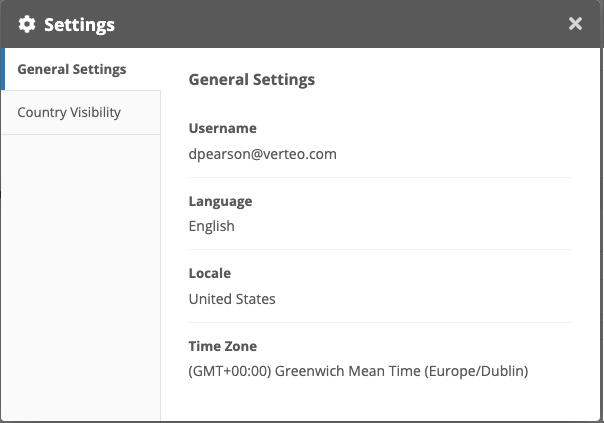
SSO users can view their language and time zone.
-
Click Country Visibility to view the countries that you have access to view records for. This is helpful to troubleshoot issues where you cannot access records from specific countries.
Log out of the Network Portal
-
In the top-right corner, expand the arrow beside your user name.
-
Click Logout.
Note: When Network users log out of the Network Portal, they are also logged out of the Network UI if they were signed in.
Search Accounts application
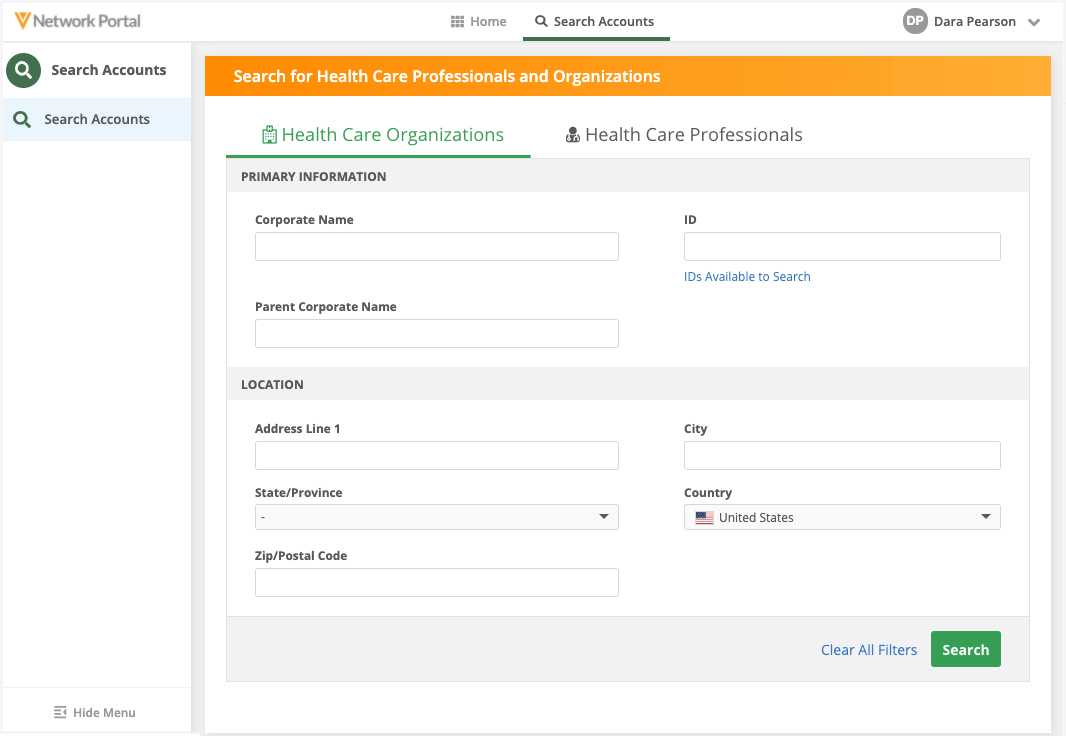
The Search Accounts application is available by default when the Network Portal is enabled. This application uses the Network Search widget. You can search for HCO and HCP accounts, edit records (if you have edit access through your data visibility profile), and create new records.
Note: There is no option to download records from Veeva OpenData. If you click Edit to make a change to a record, the record will be downloaded from OpenData.
Search for accounts
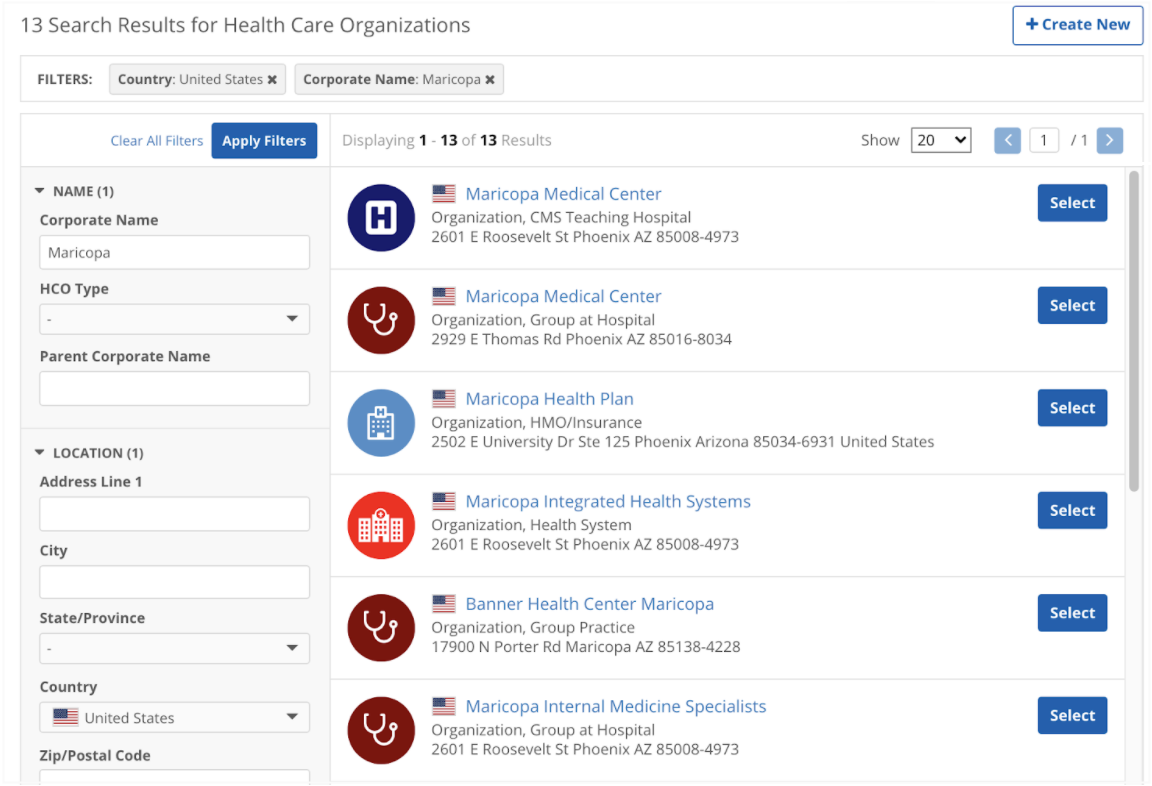
Use the widget to search for HCP and HCO accounts. Click the Health Care Organizations and Health Care Professionals tabs at the top of the application to toggle between the two search forms.
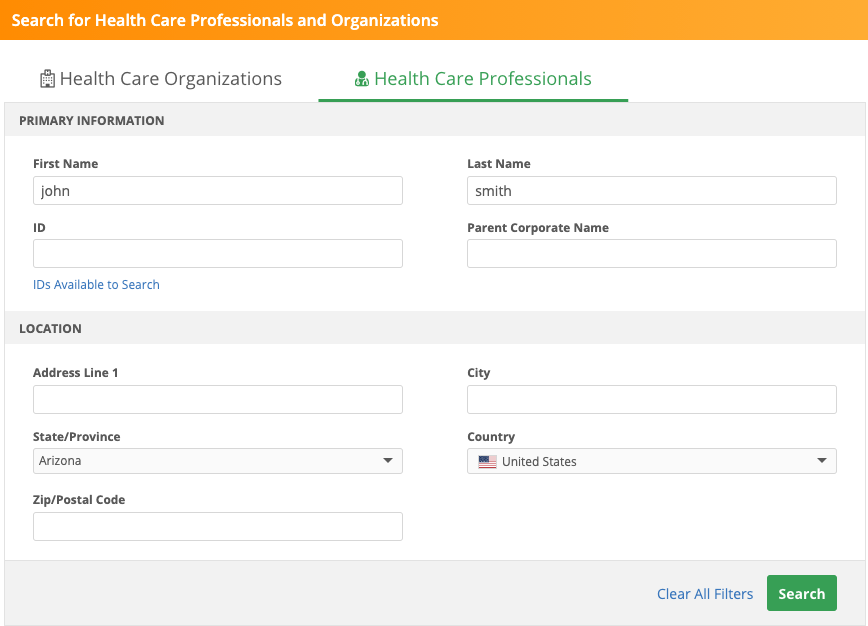
The search results display the accounts that matched the field values that you specified. You can continue to change or filter the results using the fields in the left panel.

For more information about searching for records, see Using the search widget in the Veeva Network Online Help.
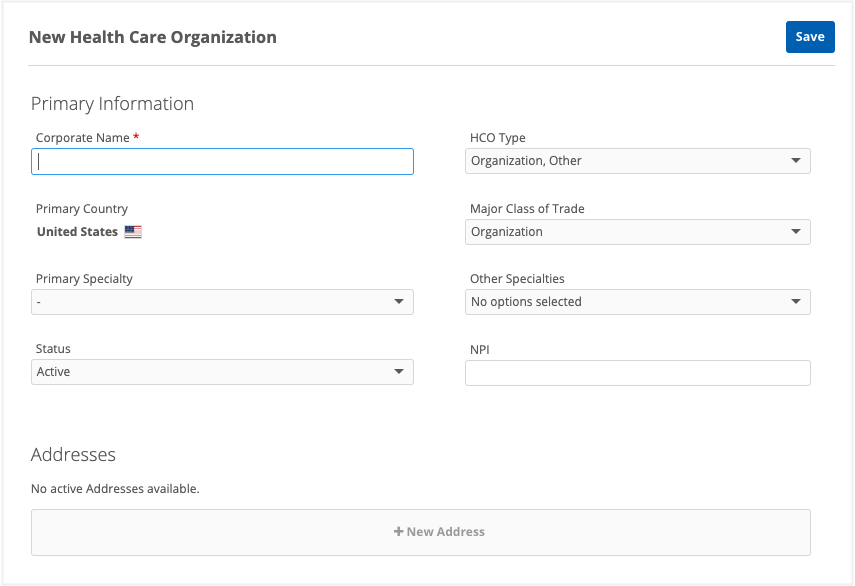
Create a new account
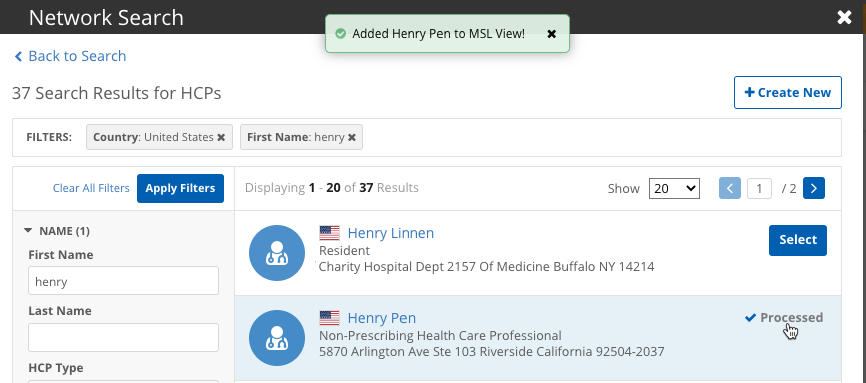
If you cannot find an existing account that matches your search criteria, you can create a new one. On the search results page, click Create New.
When you submit the request, a confirmation message displays and includes the Network entity ID of the new account. Click Copy Task ID if you want to store your request somewhere locally for reference. Click the x icon to remove the message.

For more information about adding accounts, see Creating add requests in the Veeva Network Online Help.
Network Portal administration
System Administrators and System and Data Admin users can customize the Network Portal and its applications and widgets.
The Network widgets and Network Portal configurations are located on a new tab called Widgets & Portal in the Admin console.

This new tab does not display for Data Manager users; the access to configure Network widgets has been removed for this user type.
View a quick video on enabling the Network Portal.
See how to add an application to the Network Portal.
About the Network Portal
The Network Portal contains applications that are connected to Network widgets. Only applications that you have access to will be displayed in the Network Portal. Access to the Network Portal and each application is controlled by user and user group permissions. The Search Accounts application is available by default for all users except Integration Users.
Launching the Network Portal
The Network Portal can be quickly configured and available for your users in four steps:
-
Define settings and permissions - Configure the Network Portal so users can access it.
By default, a system managed user group is assigned to give access to all users except Integration Users. -
Configure applications - Create new applications for the Network Portal. Define the name, permissions, and widgets associated with the application.
This includes customizing the associated widgets and profile layouts. -
Preview and enable - Explore the Network Portal and its full functionality and then enable it for your users.
Note: The Network Portal is not enabled by default.
-
Provide access to users - Distribute the Network Portal URL to users and optionally create bookmark applications in your SSO.
Information about each activity is available below.
Define settings and permissions
System Administrators and System and Data Admin users can customize the Network Portal settings and user permissions.
To customize the settings:
-
On the Admin console, click Widgets & Portal > Network Portal.
-
On the Network Portal page, click Settings and Permissions.
-
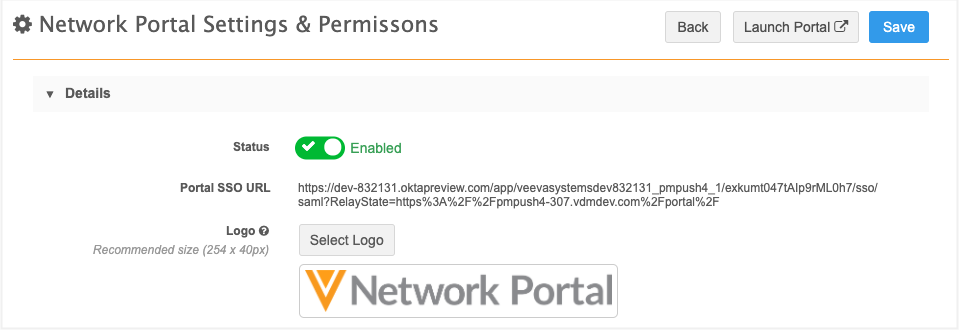
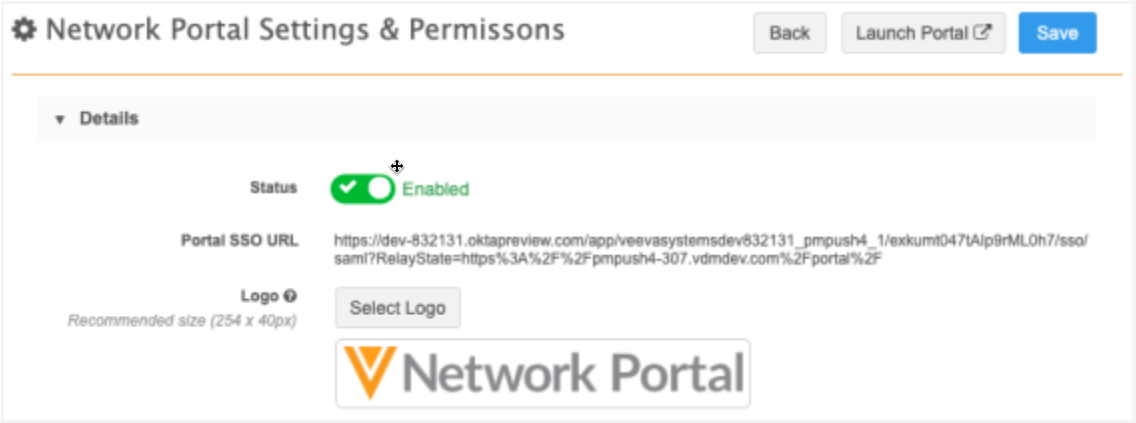
In the Details section, you can update the following settings:
-
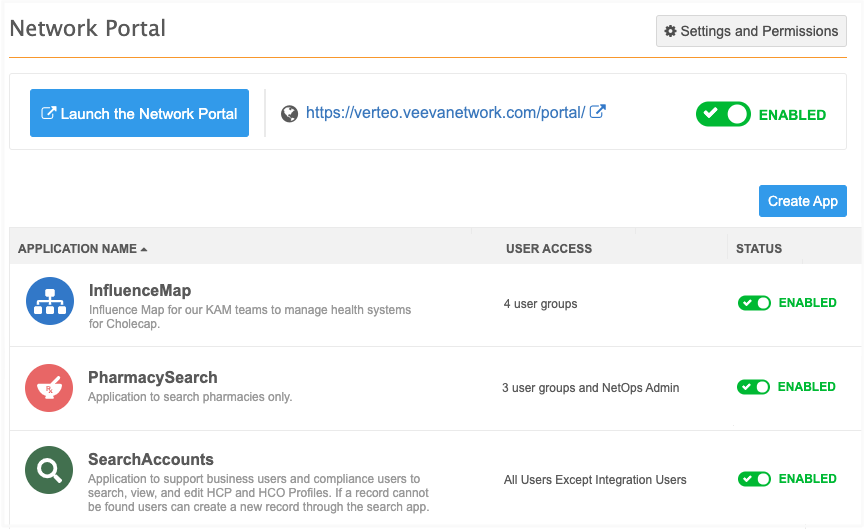
Status - By default, the Network Portal is disabled. Toggle the button to enable it; all applications can be enabled.
If you disable the Network Portal, the applications will also be disabled.Important: The associated widgets will not be disabled because they might be used in your other downstream integrated systems.
-
Portal SSO URL - If single sign-on is configured for your Network instance, the read-only URL displays.
This can be used to provide a link in an internal website to the Network Portal where users can be signed in automatically through SSO. It can also be used to set up a bookmark application for your SSO provider. -
Logo - The Network Portal logo displays by default. Click Select Logo to add your custom branding.
The logo displays on the login page and in the Network Portal.
-
-
Use the Permissions section to grant access to the Network Portal. By default, All Users Except Integration Users is selected. This is a system managed user group that includes all active users in your Network instance except Integration Users. Integration Users cannot access the Network UI or Network Portal UI.
To provide more granular access to the Network Portal, click Specific Users / User Groups.
The User Groups and Users sections become active so you can configure user access.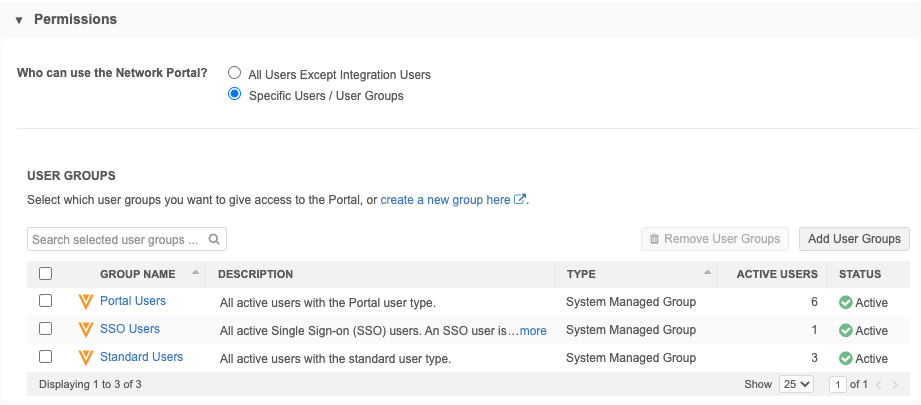
-
In the User Groups section, choose the user groups that should have access to the Network Portal. You can choose system managed groups or existing custom groups in your Network instance.
Note: The All Users and Integration Users user groups will not be available in the list.
To define a new group for this application, click Create a new group here to open the User Groups page in a new browser window.
When a group is added, a group Description, Type, count of Active Users in the group, and Status displays in the list. -
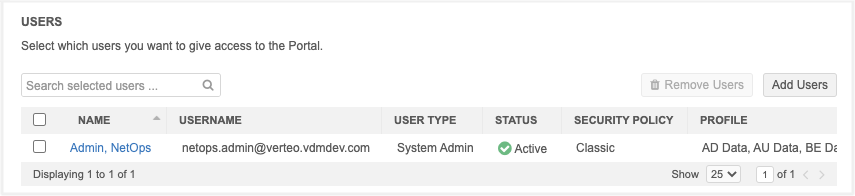
In the Users section, choose the users that should have access to the Network Portal.
When a user is added, their User Type, Status, Security Profile, Profile (data visibility profile), and Inbox Task Groups display in the table.
You can remove users and user groups if necessary.
If a user or user group is disabled, they will no longer have access to the Network Portal. If the Network Portal is disabled and becomes enabled again, users with previous access will regain functionality; the same settings will be retained.
-
In the Login Page Settings section, choose to add the SSO button on the Network Portal login page. You can also define your own label for the SSO button. By default, the English label is Login With SSO. This is available if SSO is enabled in your Network instance.
-
Save your changes.
Click Launch Portal to open the Network Portal.
Managing applications
All of the applications configured in your Network instance are listed on the Network Portal configuration page. The list is sorted by name.
Each application contains the following information:
-
Icon - The icon that will display in the Network Portal.
-
Name - The application name.
-
Description - The description of the application.
-
User Access - The user groups and individual users that have access to the application. If there is only one active group or user, the name displays. If there are multiple active groups or users, a count displays.
-
Status - Indicates if the application is enabled or disabled.
You can open each application to edit these details.
Creating an application
You can create applications to your Network Portal.
-
On the Network Portal page, click Create App.
-
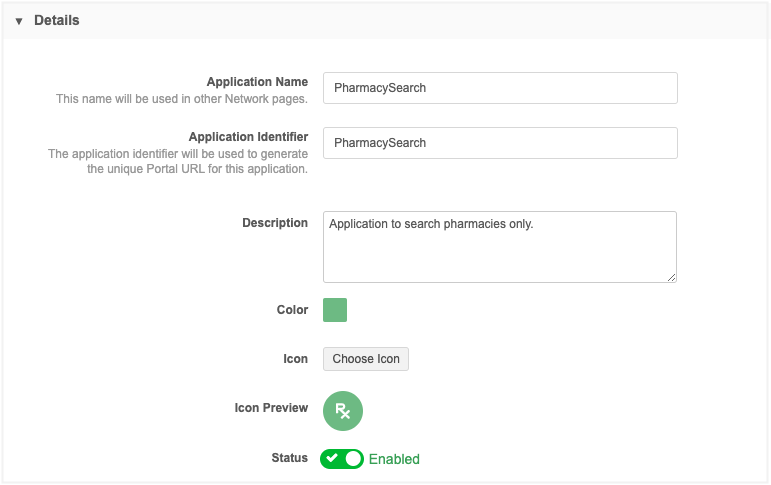
In the Details section, provide the following information:
-
Application Name - The name for your app for the Network Portal configuration page. This is not the name that displays in the Network Portal.
-
Application Identifier - The identifier is used in the unique Network Portal URL for the app. When you click the field, it is populated with the Application Name by default.
Example
When the application is launched from the Network Portal, it has a unique URL.https://verteo.veevanetwork.com/portal/#!/app/{applicationidentifier}/{widgetidentifer}Important: Changing the Application Identifier after it has been set might break any bookmarked or saved links.
-
Description - A description of the application for the Network Portal configuration page. This description does not display in the Network Portal.
-
Color - The color for the app. The default color is a color that has not been previously used for an app. Colors can be reused.
-
Icon - The icon that represents your application. Choose an icon from the library. Icons can be reused.
-
Status - Enable or disable the app. The app is enabled by default.
-
-
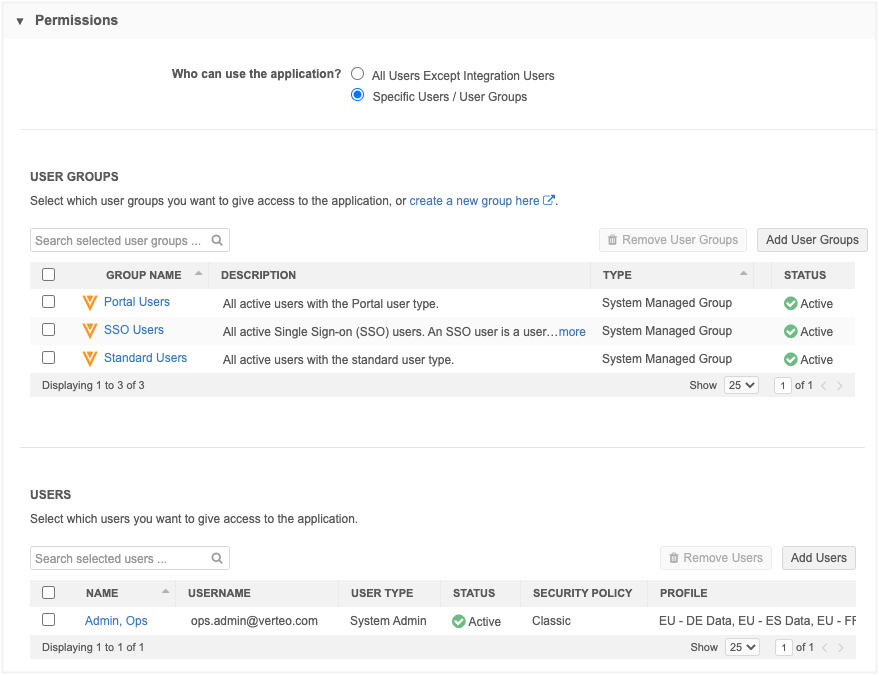
The Permissions section defines the users that can access the app in the Network Portal. By default, the All Users Except Integration Users user group is selected.
To provide more granular access to the application, choose Specific Users / User Groups.
-
In the User Groups section, choose the user groups that should have access to the application. You can choose system managed groups, existing custom groups in your Network instance, or you can create a new user group for this application.
When a group is selected, a group Description, Type, count of Active Users in the group, and Status displays in the list. -
In the Users section, choose the users that should have access to the application.
When a user is selected, their User Type, Status, Security Profile, Profile (data visibility profile), and Inbox Task Groups display in the table.
You can remove users and user groups if necessary.
If a user or user group is disabled, they will no longer have access to the application or the Network Portal. If the Network Portal is disabled and becomes enabled again, users with previous access will regain functionality; the same settings will be retained.
-
The Application Labels section defines the application Name and Description that the user will see in the Network Portal.
By default, the English language is selected. You can change the language or add more languages.
-
In the Widget Configuration section, define the widgets that will be used in the application.
Provide the following information:
-
Widget Type - Select the type of widget. Search widgets and Affiliation widgets are supported.
Note: The Affiliation widget is available if it is enabled in your Network instance.
-
Widget - Choose the specific widget to use from your Network instance. The list is filtered by the type that you selected.
-
Widget Identifier - The identifier that is included in the unique Network Portal URL.
Example
When the application is launched from the Network Portal, it has a unique URL. If you have multiple widgets in the app, the URL will be unique for each widget.
https://verteo.veevanetwork.com/portal/#!/app/{applicationidentifier}/{widgetidentifer}Important: Changing the Widget Identifier after it has been set might break any bookmarked or saved links.
-
Icon - Choose the icon that will display in the application.
-
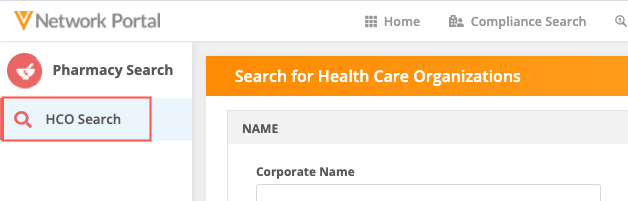
Section Labels - The widget label that displays in the application beside the icon.
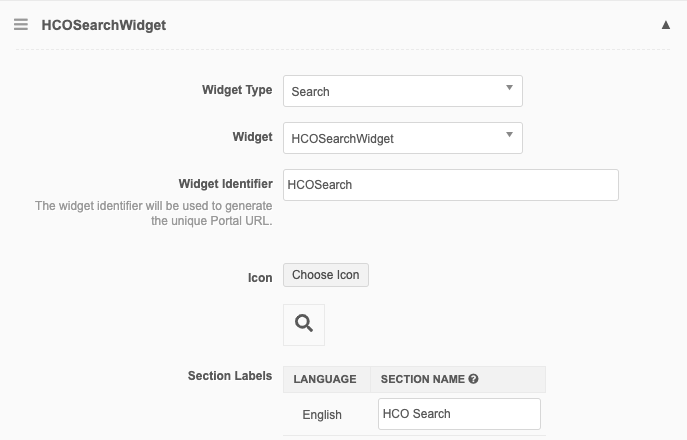
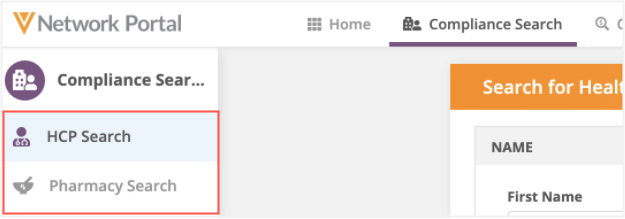
Example - Search widget
The Section Label, HCO Search, displays beside the defined icon in the Network Portal.
-
-
In the Advanced Settings section, the settings depend on the type of widget.
Search widget
The following optional settings display:
-
Background Search Filter - Add a filter to automatically narrow the search results to meet specific criteria. The filters require API syntax, so an example filter to limit search results for active records displays as a suggestion in the field.
The following syntax rules apply for this filter:
-
Use an ampersand (&) to separate the fields used for filtering.
-
To separate multiple reference codes, you must use a comma (,).
-
Fields must be prefixed with their object (for example, hco.hco_status__v=A)
-
Only reference fields and checkbox fields are supported for filters.
-
Only fields on main objects (HCPs and HCOs) can be used for filtering.
Example
Define a filter to limit the HCO search results to active pharmacies only.
hco.hco_status__v=A&hco.hco_type__v=11:3,11:4,11:1,11:2,11:11,11:12,11:9,11:10,11:7,11:8,11:5,11:6,13:3,11:99,11:97,11:98,6:3,14:10
The filter includes all of the reference values for pharmacies for the
hco_type__vfield.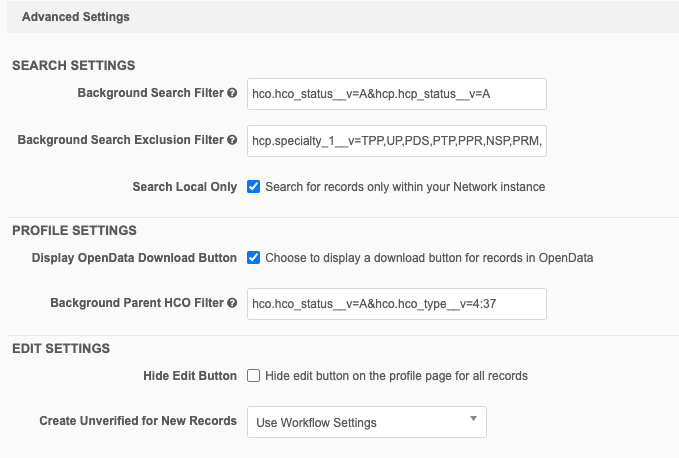
-
-
Background Parent HCO Filter - Define a filter to limit the parent HCOs that are returned in the search results. A filter to limit search results for active records displays as an example of the required syntax. The syntax rules that apply to the Background Search Filter also apply to this filter.
Example
If you want to only see those parent HCOs that are active Health Systems, you can change the Background Parent HCO filter to the following:
hco.hco_status__v=A&hco.hco_type__v=4:37
- Create Unverified for New Records - Define the behavior for new records that are created in the application.
Yes - Create unverified records. This enables users to submit a new record and immediately make changes to the record. This might override the existing workflow settings. New records will have an Under Review record state.
No - New record requests must be reviewed by data stewards before changes can be made. This might override the existing workflow settings.
Use Workflow Settings - Use the existing Create Unverified setting (Settings > Workflow Settings) to determine the behavior for add requests in the application.
This value is defined by default.
Affiliation widget
The following optional setting displays:
-
Ready Only Mode - Select to display the Affiliation widget in read-only mode; users will not be able to add or edit affiliations.
-
-
Add Widget - Add another widget to the application. If you have multiple widgets, use the handle
 to change the order that the widgets display in the application.
 For example, if you include two Search widgets (one for HCPs and one for pharmacies), you can define their display order in the application.
Widgets can be removed after they have been added to the application. Click Remove Widget. An application must have one widget defined.
-
Save your changes.
The application now displays in the list on the Network Portal page. It is enabled by default.
Managing the Search Accounts application
The Search Accounts application is predefined and ready to use as soon as the Network Portal is enabled in your Network instance. This application includes a series of configurations that have been implemented to support the application.
The following new configurations are included in your Network instance:
-
System - network_portal__v
-
Search widget - NetworkPortalSearch
-
Profile layouts - NetworkWidgetsLayoutHCP and NetworkWidgetsLayoutHCO
The configurations are predefined so the application can be used immediately. The search widget and profile layouts can be customized.
Customize the NetworkPortalSearch widget
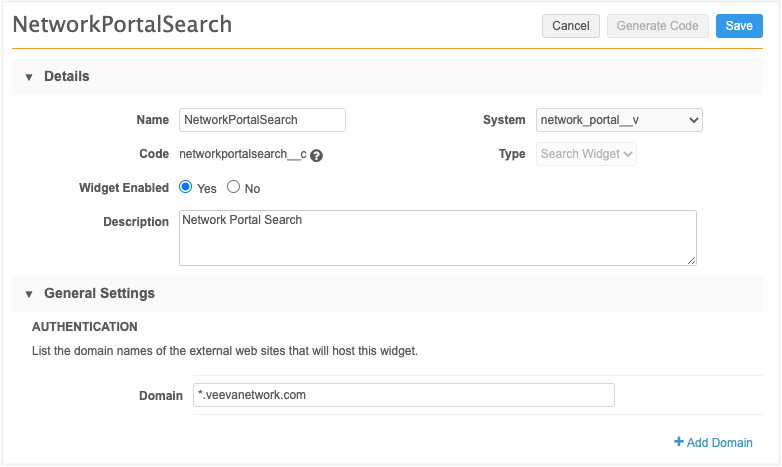
A search widget, NetworkPortalSearch, is predefined and associated to the Search Accounts application. It is enabled by default.
To view or edit the widget, in the Admin console, click Widgets & Portal > Network Widgets.
Widget settings
The following settings have been applied:
-
System: network_portal__v (a new system that is created in your Network instance for the widget)
-
Domain: *.veevanetwork.com
-
Languages: All supported languages
-
Add Requests: Yes, allows users to send add requests
-
Generate Custom Keys: No, keys are not generated
-
Search Style: Advanced Search Only
-
Enabled Entities: Health Care Organizations, Health Care Professionals
-
Profile Layout - Overrides data visibility profiles and uses the predefined NetworkWidgetsLayoutHCO and NetworkWidgetsLayoutHCP layouts.
-
Branding - A header that includes the widget title, Search for Health Care Professionals and Organizations. Colors and fonts are predefined.
Customize the NetworkWidgets profile layouts
Two custom profile layouts are provided and apply to all countries. These are simplified layouts that are associated to the NetworkPortalSearch widget. The profiles contain a minimal number of fields so users have fewer fields to complete when they create a record. You can add fields that are essential to your business purposes.
-
NetworkWidgetsLayoutHCO
-
NetworkWidgetsLayoutHCO
To view or edit the layouts, in the Admin console, click Data Model > Profile Layouts.
Preview the Network Portal
Before the Network Portal is enabled, you can preview it and the Search Accounts application with full functionality (for example, you can search for accounts and create data change requests). This gives you an opportunity to try out the Search Accounts app without enabling or configuring anything. Preview Mode is only available when the Network Portal is disabled.
To access the Network Portal in Preview Mode:
-
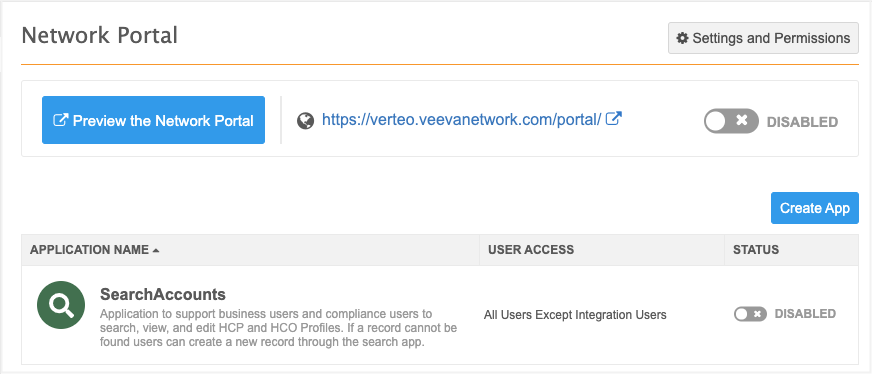
On the Network Overview page, click Preview the Network Portal under the Widgets and Portal heading.
-
On the Network Portal page (Portal & Widgets > Network Portal), click Preview the Network Portal.
A banner displays at the top of the Network Portal to remind you that you are in Preview Mode.
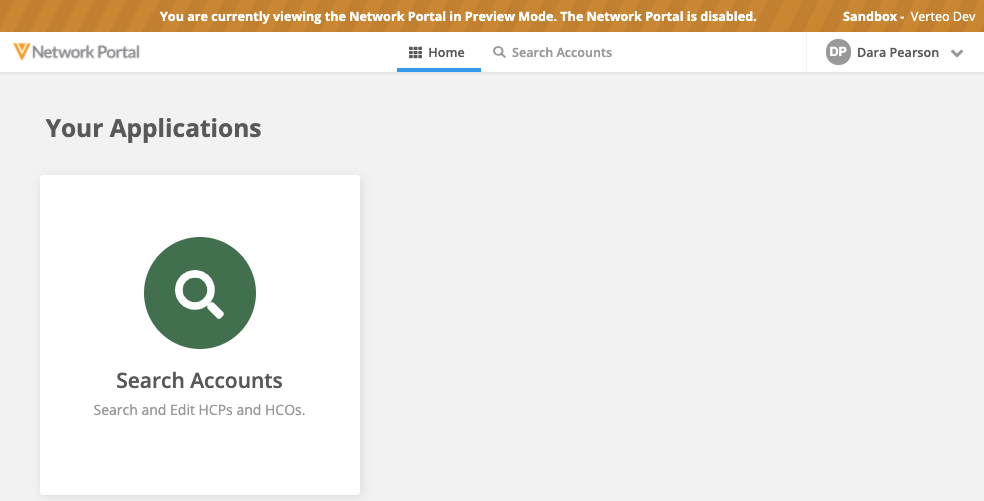
If other applications have been configured for the Network Portal, they display in Preview Mode only if you have permission to the application. The status (Enabled or Disabled) of the application is ignored for Preview Mode.
Enable the Network Portal
Each Network Sandbox and Production instance has its own Network Portal. A unique Network Portal URL is assigned for each Network instance.
<instance name>.veevanetwork.com/portal
For example, verteo.veevanetwork.com/portal.
When you enable the Network Portal for your Network instance, the Search Accounts application is available to all users except Integration Users by default.
To enable the Network Portal:
-
In the Admin console, click Widgets & Portal.
-
Click the Network Portal tab.
-
Beside the Network Portal URL, toggle the Disabled button so it displays the Enabled status.
-
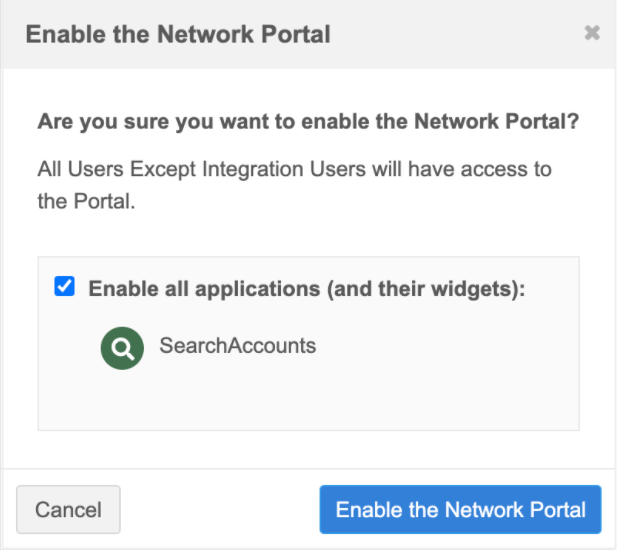
On the Enable the Network Portal dialog, confirm that you want to enable the Network Portal for the defined users and user groups.
The Search Accounts default application and any other applications that have been created are listed and will be enabled if the checkbox is selected. If the checkbox is not selected, the previous application statuses will not change.
-
Click Enable the Network Portal.
The Network Portal and the Search Accounts application are enabled. To open the Network Portal, click the URL or Launch the Network Portal.
Note: When you use the Network Portal for a Sandbox instance, the tag and instance name display in a banner to identify the environment you are using.

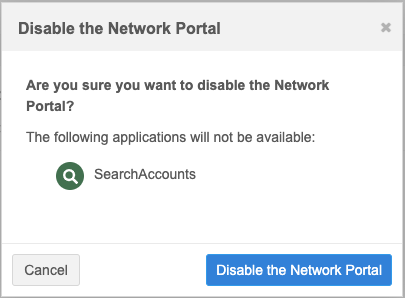
Disable the Network Portal
If you disable the Network Portal, all of the applications will be disabled also. The widgets that are connected to the applications are not disabled because they might be used in other downstream integrated systems.
Example
If you disable the Network Portal, the Search Accounts application will also be disabled. The application is connected to the NetworkPortalSearch widget; the search widget will not be disabled because you might also be using it in another system.
Provide access to users
Three types of users can access the Network Portal:
-
Network Portal users - Can sign into the Network Portal login page using their Portal Username.
This is a new user type that can access only the Network Portal and Network Widgets. This user is also useful if your organization doesn't use single sign-on. Portal Users will access the Network Portal directly from the login page.
For more information about this new user type, see the "Users" section in these Release Notes.
-
SSO users - Sign in using the SSO button (managed by the identity provider (IdP)) on the Network Portal login page or through your SSO dashboard.
Any user that signs into Network or the Network Portal using SSO is automatically added to the SSO Users user group. -
Network users (Standard Users, Data Stewards, Data Managers, System Administrators, and System and Data Admins) - Sign into using the Network Portal login page or through the Network UI.
Integration Users do not have access to the Network Portal; they have access only to the Network API. Integration Users can be added to user groups that have access to the Network Portal, but these users will be unable to sign in.
Support for single sign-on
Single sign-on users can log into the Network Portal using the SSO button on the login page. With some SSO providers, such as Okta® and Microsoft® Azure® AD®, IT admins can create a bookmark application for users to sign into the Network Portal directly.
For more information about using SSO, see the following topics in the Veeva Network Online Help:
-
Configuring single sign-on in Network (general guide)
SSO URL
If single sign-on is configured for the Network instance, an SSO URL displays on the Network Portal settings page. You can bookmark and provide links to this URL to allow users to sign into the Network Portal automatically via SSO.
The Identity Provider Login URL in your SAML settings must be configured (Settings > SSO Settings) for the SSO URL to display.
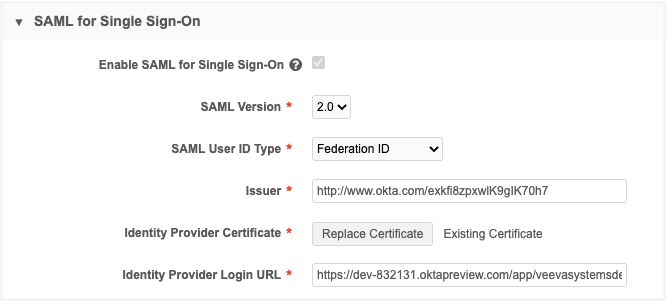
For more information about the SAML settings, see Configuring single sign-on in Network in the Veeva Network Online Help.
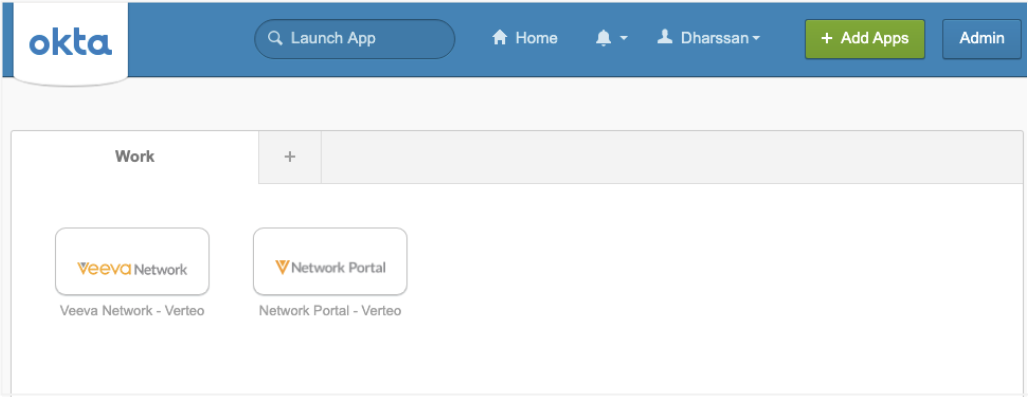
Creating an Okta bookmark
From Okta, Okta admins can create a tile for users to sign directly into the Network Portal via SSO.
Example
Users can click on the "Network Portal - Verteo" application to log into the Network Portal directly from Okta.
For the bookmark URL, use the SSO URL on the Network Portal settings and permissions page.
Example Okta bookmark configuration
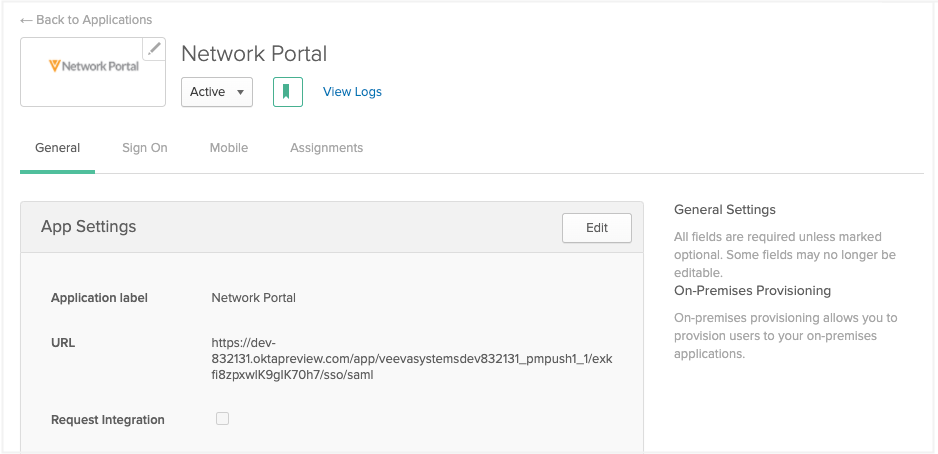
For more information, see How to Create a Bookmark App in the Okta Help Center.
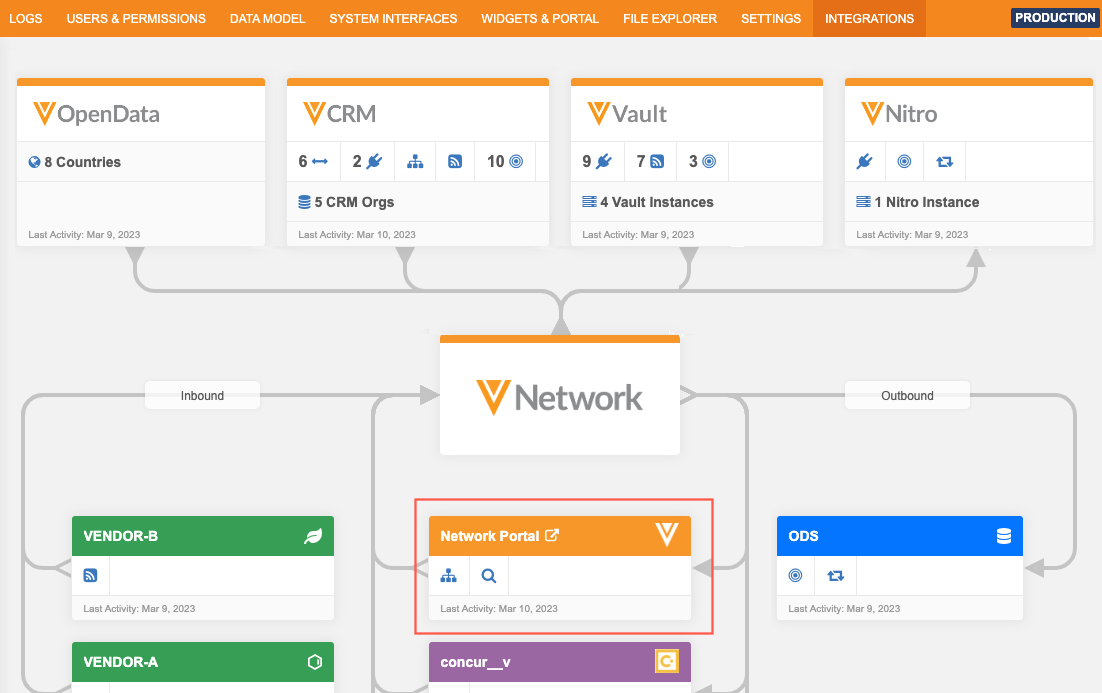
Integration dashboard
The Integration Dashboard is a single-view of all of your Network instance's integration activities. The Network Portal displays in the bi-directional list under the system name, network_portal__v.
Audit details
Administrators can use the audit logs to track logins and changes to the Network Portal and its applications.
Logins
The Login Audit History tracks all user log ins to the Network Portal.
Network Portal configuration changes
The System Audit Log displays any changes that are made to the Network Portal:
-
Status of applications and the Network Portal
-
Network Portal settings
-
Application settings
Configuration Management
Network widgets and applications cannot be exported to a target environment.
Affiliation widget availability
The Affiliation widget is now generally available. It was introduced in version 19R3.0 for early adopters. Use the widget to create influence maps for your health systems.

The widget is not available by default. Contact Veeva Support to enable the widget configuration for your Network instance.
For more information, see Network widgets in the Veeva Network Online Help.
Affiliation widget views
The Affiliation widget now supports creating multiple views to provide more control and flexibility for your Influence Maps. Creating different views of your health care system enables you to customize your view without limiting other users.
Views can be used for the following purposes:
-
Team Views - Create a view for each team that is focused on a different part of the health system so they can manage their views separately from each other. For example, for a given health system, you might have an MSL View, a KAM View, and a Reimbursement Manager view.
-
Segmented Views - Create views for each of the smaller hospitals or geographical area within a health system.
-
User views - Each user can create a view for their own purpose. For example, Mary can create a view called Mary’s View.
This enhancement is enabled by default if the Affiliation widget is enabled in your Network instance.
About views
Views are specific to each health system and product/therapeutic area combination. All views are available to all users that have access to the affiliation widget.
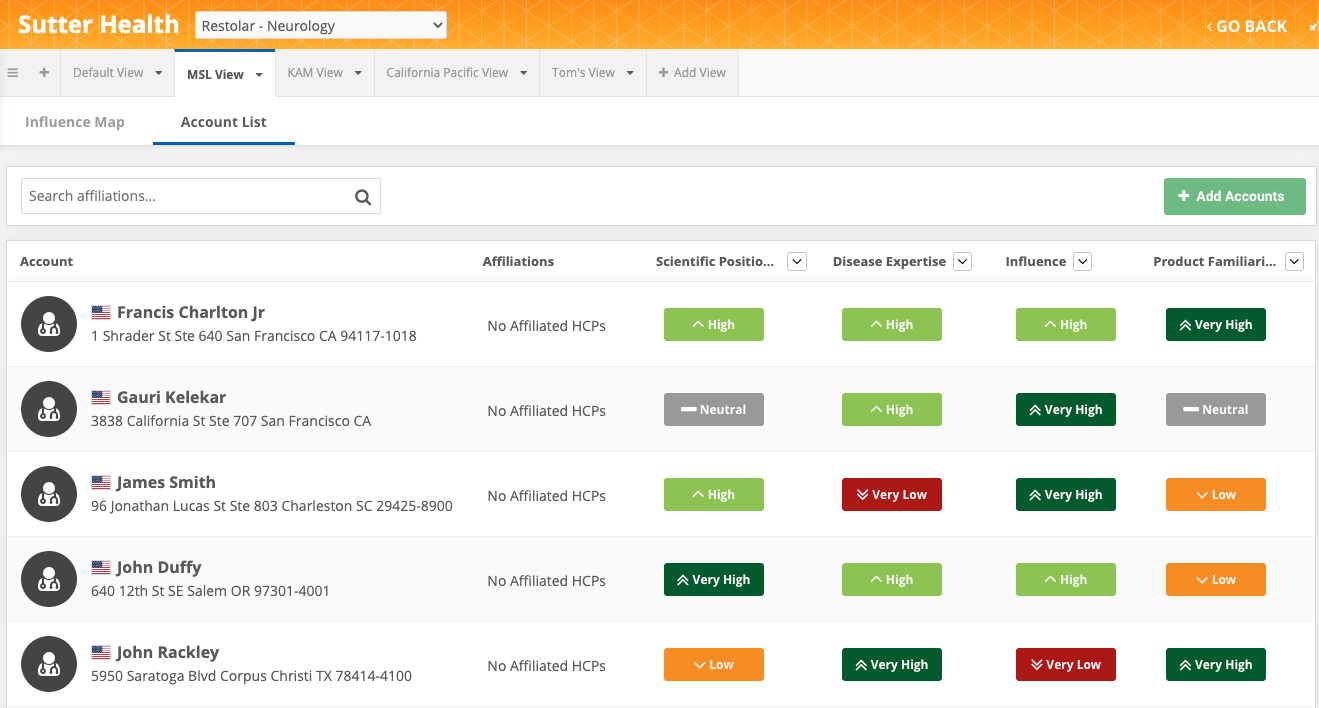
Example
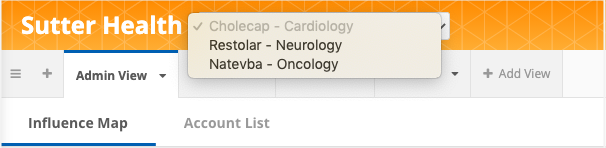
The health system, Sutter Health, has several views created for the Restolar - Neurology product/therapeutic area combination. All users can view and edit these views.
Different types of views
-
Default view - The existing influence map canvas is the default view and the only view that HCO and HCP data can be loaded into.
For existing customers, your influence map will become a default view to preserve your current map.
The name of the view cannot be changed in the widget. To change the view name, contact Veeva Support.
- Standard views - Veeva can create standard views for each of your health systems; for example, a KAM view and MSL view. These views cannot be changed by users. Submit a ticket to Veeva Support to help you to create these views. Each standard view is pre-populated with the health system.
- Custom views - Users can create views for the health system that are specific to their own needs.
Summary of behavior for different types of views
| Action | Default View | Standard Views | Custom Views |
|---|---|---|---|
| Create View | This view is created by default. | Contact Veeva Support. Standard views can be created for product / therapeutic areas. | All users can create custom views in the widget. |
| Rename view | Contact Veeva Support. The view cannot be renamed in the widget. | Contact Veeva Support. The names cannot be changed in the widget. | Users can change the name in the widget. |
| Add Records | Data Loading - Load Account Link objects and have the records display on the influence map.
Search widget - Creating add requests |
Search widget - Creating add requests. |
Search widget - Creating add requests. |
| Add Relationships |
Data Loading - The relationship filter in the widget configuration is applied for new relationships (existing behavior) Draw relationships on the Influence Map. |
Data Loading - The canvas filters decide which relationships are loaded. Draw relationships on the Influence Map. |
Data Loading - The canvas filters decide which relationships are loaded. Draw relationships on the Influence Map. |
| Delete view | All views can be deleted by users in the widget. | ||
Accessing views
Views are specific to each product / therapeutic area combination for a health system.
-
When you open a health system, the product / therapeutic area displays beside the name. Choose a product/therapeutic area from the list.
-
The list of active views are located in tabs under the health system name. The views display in the order that they were created, but the order can be rearranged.

The view that you had open last will display. If that view has been removed, the first tab in the product/therapeutic area opens.
- Click a tab to open a different view.
Editing views
When you make changes to a view, the change occurs only to the current view; the other views are not updated.
You can make the following changes:
-
Adding and removing HCPs and HCOs
If you add an account using the search widget, the account is added to the current view only.
Similarly, removing an account removes it from the current view only. It does not create a data change request to permanently remove the account.
-
Removing the health system
Users can remove the health system from the current view. Previously, the health system could not be removed.
If it is added back to the view using the search widget, a new position is generated for the health system on the Influence Map. Create a relationship to existing accounts.
-
Moving nodes
The position of each node is now saved to the Influence Map canvas. If a user moves a node, its position is saved for that view.
-
Adding and removing relationships
Relationships between HCP-HCO, HCO-HCO, and HCP-HCP can be added to or removed from your view. When a relationship is added, a data change request is created and the current view is updated.
-
Viewing the account list
The Account List applies to the current view; only the HCPs in the view display in the list.
Creating a view
You can have unlimited views. There is no security or permission rules for views; all users can see the views for each product/therapeutic area.
To add a view
-
Open a health system and choose the product/therapeutic area from the list.
-
Click + Add View.
A new tab is created with the default name View #<1>. The health system is added by default.

-
Click the arrow beside the view name to see the options:
The following actions are available:
- Delete View - The view will become inactive and will no longer display. Default, standard, and custom views can be deleted as long as there are two views available within the health system and product/therapeutic area. If there is only one active view, the Delete View option is dimmed.
Deleting the view does not impact the entities or relationships. - Move Left / Move Right - Reorder the views by moving the current view. Tabs can also be dragged to different positions.
The view position is not user-specific. All users have the -
Rename a view - Supported for custom views only.
Name have the following rules:
-
Can contain a maximum of 50 characters.
-
Can contain spaces, letters, numbers, and some symbols.
-
Must be unique for the health system and product/therapeutic area.
-
-
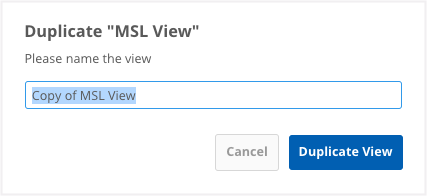
Duplicate - Clone a view as a custom view with a new name. The cloned view includes all of the accounts, relationships, and account positions.
In the dialog, type a name for the cloned view.
- Delete View - The view will become inactive and will no longer display. Default, standard, and custom views can be deleted as long as there are two views available within the health system and product/therapeutic area. If there is only one active view, the Delete View option is dimmed.
Loading data to your default view
A new data model field, account_link_load_to_default_view__v, has been added for the Account Link object so records can continue being loaded into your default view. The field is enabled by default if you have the Account Link object in your Network instance.
Include the field with a Yes/True value in your source subscription file. If the account link record matches the health system, product /therapeutic area, the HCPs and HCOs will display in your default view.
Affiliation widget - Relationship details
Users can now capture more information about HCP-HCO and HCO-HCO relationships when they are created or edited in the Influence Map. Previously, only HCP-HCP relationships could be edited. This provides more information for users and enables you to report on connection types using Network reporting.
This enhancement is available by default. Administrators can update the widget configuration to define custom fields that display when users create or edit relationships in the Influence Map.
Adding relationship fields
Administrators can add relationship criteria to the Affiliation widget configuration.
-
In the Admin console, click Widgets & Portal.
-
Create a new widget or edit an existing one.
-
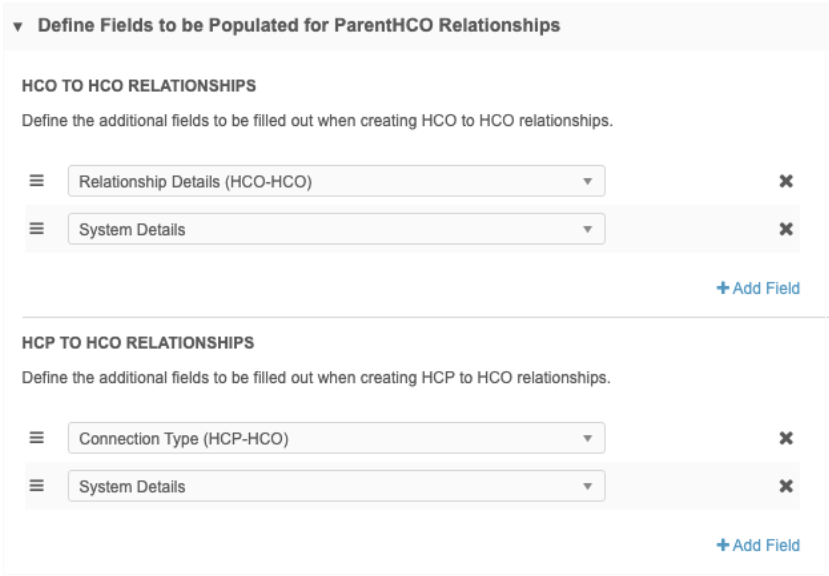
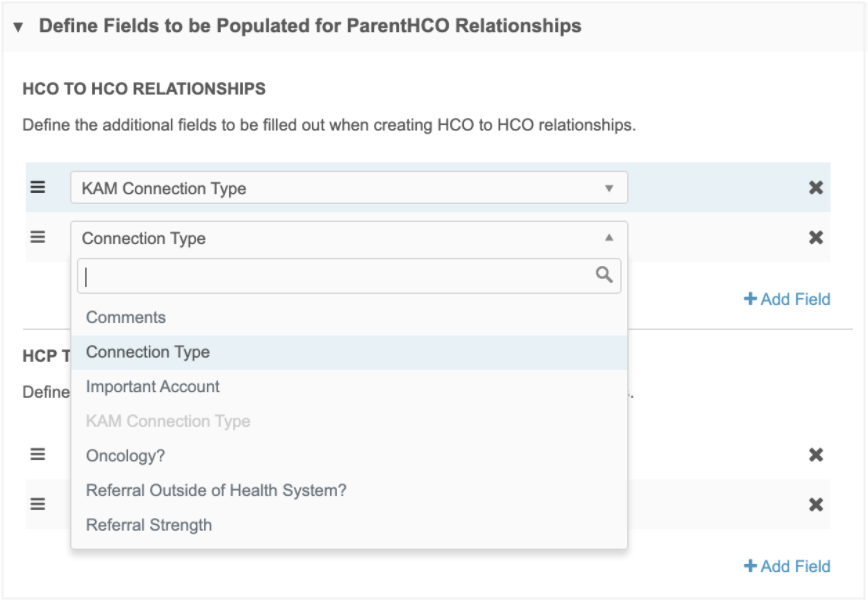
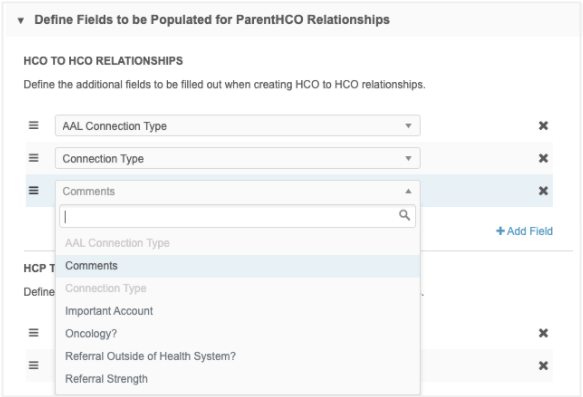
In the widget configuration, find the new section called Define Fields to be Populated for ParentHCO Relationships.
-
In each section (HCO to HCO and HCP to HCO) choose the custom fields that you want users to complete when they add or edit a relationship. There is no limit to the number of fields that you can add.
Supported field types
The fields must be custom fields so the changes can be auto-approved.
The following types are supported:
-
Reference - The reference values that display in the widget will be filtered based on the HCP's country.
-
Boolean Checkbox
-
Text
-
Integer / Number
Primary fields and system fields are not supported.
-
-
Save your changes.
Add or edit relationships
When users add or edit HCP-HCO or HCO-HCO relationships in the Affiliation widget, the fields display so users can add details.
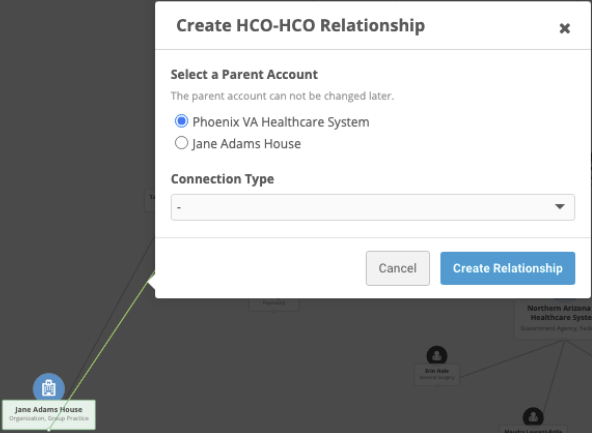
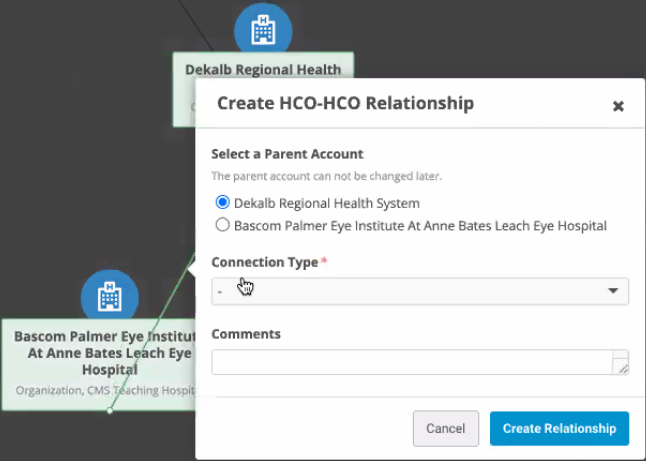
When HCO-HCO relationships are created, the Select a Parent Account setting is automatically added to the dialog.
When you click Create Relationship, a data change request (DCR) is submitted with the additional fields. The relationship is automatically approved as a local relationship; the DCR is not routed to Veeva OpenData.
Fields display if the following criteria is met:
-
The field is enabled
-
It is available for the HCP/HCO's country. When you create an HCO-HCO relationship, the fields must be available for both countries.
-
The field is not read-only.
-
The field is not a restricted field for the user.
If no fields display, define the parent account and create the relationship.
Edit a relationship
Relationships can also be added when you edit a relationship.
-
To edit a relationship, click the Edit icon on the line between the nodes.
-
On the pop-up that displays, click Edit Details.
The Edit Relationship dialog displays the fields so you can add more information about the relationship.
Delete relationships
You can delete a relationship from the Edit dialog or using the Remove button on the Edit Relationship dialog.
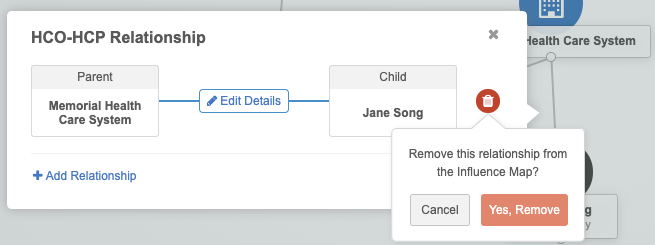
When you delete relationships, they are only removed from the Influence Map; they are not inactivated.
Affiliation widget - HCO metrics
You can now see metrics displayed for HCO objects in the Affiliation widget. Previously, metrics displayed only for HCPs. Using metrics enables you to visually understand custom defined metrics for HCOs.

This enhancement is not enabled by default. Developers can enable the HCO metrics by including a property in the widget code.
Viewing metrics
The metrics are applied to the following areas in the widget:
-
Metrics menu in the Influence Map
-
Profiles
-
Edit metrics
Note: Metrics do not display for the main health system.
Enable HCO metrics
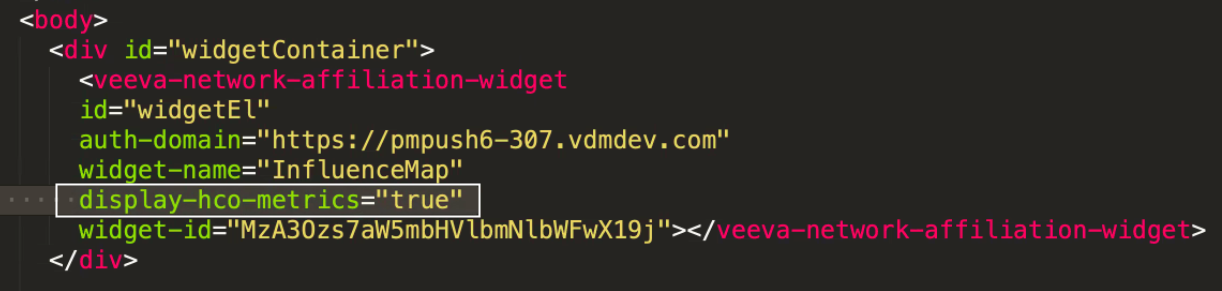
To see HCO metrics in your Affiliation widget, add the following to the widget code that was automatically generated by Network.
display-hco-metrics = "true"
This code was added to the <body> of your internal application.
Search widget
Administrators can configure search widgets to use a specific profile layout for add requests that can be different than record profiles and change requests. This gives you more flexibility over the forms that display for users. Using a limited profile layout can generate better add requests because you can include only the fields that are essential for creating a new record.
This enhancement is enabled by default in your Network instance.
Define a profile for add requests
System Administrators and System and Data Admin users can update the search widget configuration to specify a profile layout.
-
On the Network menu bar, click Widgets & Portal.
-
Open an existing widget or create a new search widget.
-
In the Entity Management section, find the Profile Layout section on the HCO and HCP tabs and ensure that the Override the Data Visibility Profile and assign a specific layout option is selected.
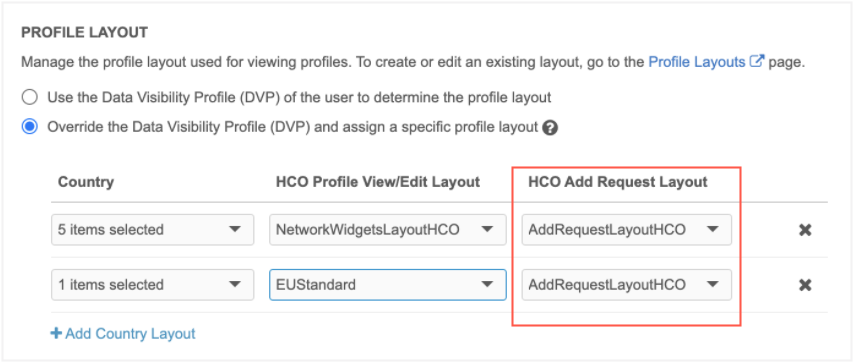
- Expand the Add Request Layout list and choose a layout. This is a required field, but can be set to the same layout as the Profile View/Edit Layout field.
All of the standard and custom profile layouts in your Network instance display. - Save your changes.
For information about creating custom profile layouts, see Configuring profile layouts in the Veeva Network Online Help.
When users create an add request in the search widget, they will see the layout that you defined. If a country isn't defined, the profile layout defined in the user's data visibility profile displays.