Configuring profile layouts
DM
Profile layouts define the data that users can view for HCPs, HCOs, and custom objects in the Network MDM UI.
Layouts define the following for record profiles:
-
The data model fields that display.
-
How the fields are organized.
Default layouts
The following predefined layouts are available for HCPs and HCOs.
| Type | Layout Name | Supported Data Model |
|---|---|---|
| Regional |
AUStandard
CNStandard EUStandard HKStandard JPStandard LatAmStandard NAStandard |
OpenData 1.0, CDA |
| Global | GlobalStandard | OpenData 1.0, OpenData 2.0, CDA |
| Network Widget | NetworkWidgetsLayoutHCO
NetworkWidgetsLayoutHCP |
OpenData 1.0, CDA |
These standard layouts are read-only, but they can be cloned to create new layouts.
Enable the feature
Administrators can enable the ability to create custom layouts for their Network MDM instance.
-
In the Admin console, click Settings > General Settings.
-
Select the Profile Layout Configuration option.
Access profile layouts
Administrators and Data Managers can access profile layouts.
- In the Admin console, click Data Model > Profile Layouts.
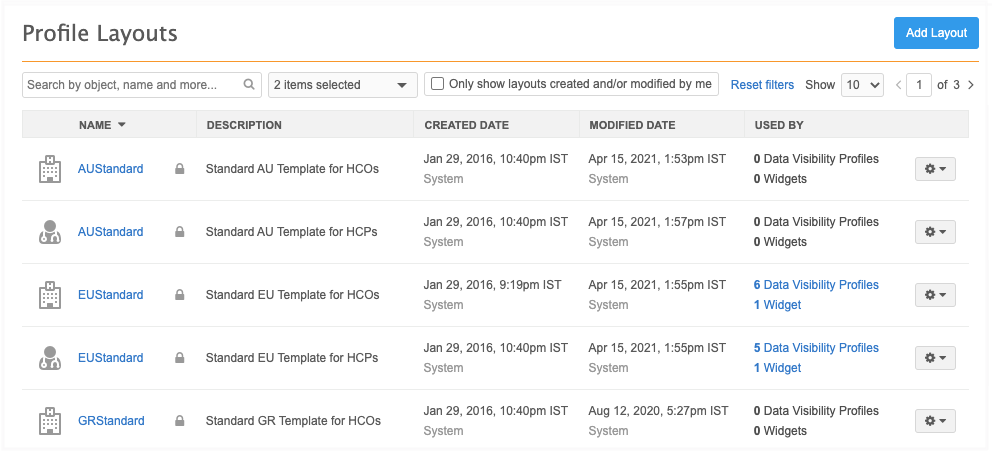
The profile layout list displays all of the standard (Veeva-owned) and custom profile layouts that exist in your Network MDM instance. By default, the page lists the layouts alphabetically by name and displays the layouts for all objects and users.
Layout details
The following details are available for each layout:
-
Name - Click the column header to sort the layouts by name in ascending or descending order.
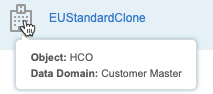
Hover over the name for details about the object type and the data domains it belongs to.
-
Description
-
Created Date - Click the column header to sort the layouts by date.
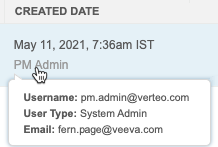
In the Created Data and Modified Data column, click the username to see the user type and email details for the user that changed the profile layout configuration.
-
Modified Date - Click the column header to sort the layouts by date.
-
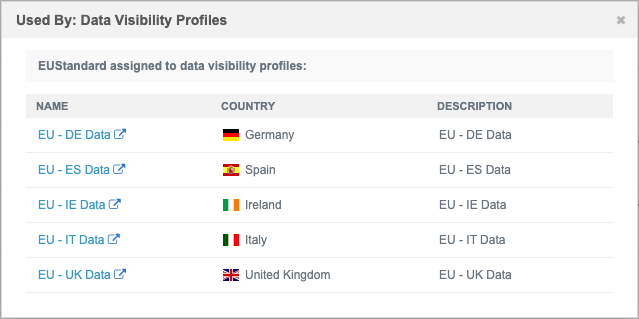
Used By - This column displays a count of the data visibility profiles and that use the profile layout.
Use this information to understand what features can be affected if you make changes to the layout.
Administrators can click the Data Visibility Profile or Widget link to see more details. Links do not display for Data Managers because data visibility profiles and are managed by Admin users only.
Data visibility profiles
Each data visibility profile is listed. Click the link to navigate to the data visibility profile configuration page.
Details about each widget is listed. Click the link to navigate to the widget configuration page.

Profile layout actions
Use the Options![]() icon to see the list of actions available for each layout.
icon to see the list of actions available for each layout.
-
Standard profile layouts - Default layouts that are provided in all Network MDM instances. They are read-only. A lock
 icon displays beside standard layouts. They have only a subset of the actions that custom layouts have.
 -
Custom profile layouts - Layouts that have been created in your Network MDM instance for your own use.

Available actions
| Action | Description | Standard Layout | Custom Layout |
|---|---|---|---|
| Edit Layout | Edit the layout to manage the sections and fields and how they display in the profile layout. |
|
|
| View Layout | View the layout in Read-Only mode. Within the layout view, users can preview the layout by searching for an existing entity. |
|
|
| Preview Layout | Search for an entity and view the existing profile layout. The layout can be previewed. |
|
|
| Rename Layout | Update the name of an existing profile layout. |
|
|
| Clone Layout | Create a new profile layout by making a copy of an existing layout. The cloned layout must retain the entity type and sub-objects from the original layout. The layout name and description can be changed, as well as any field and section updates on the actual layout. |
|
|
| Delete Layout |
Remove the profile layout from your Network MDM instance. If a layout is being used by a data visibility profile, you must replace it with a different layout.
Note: Only administrators can delete layouts. |
|
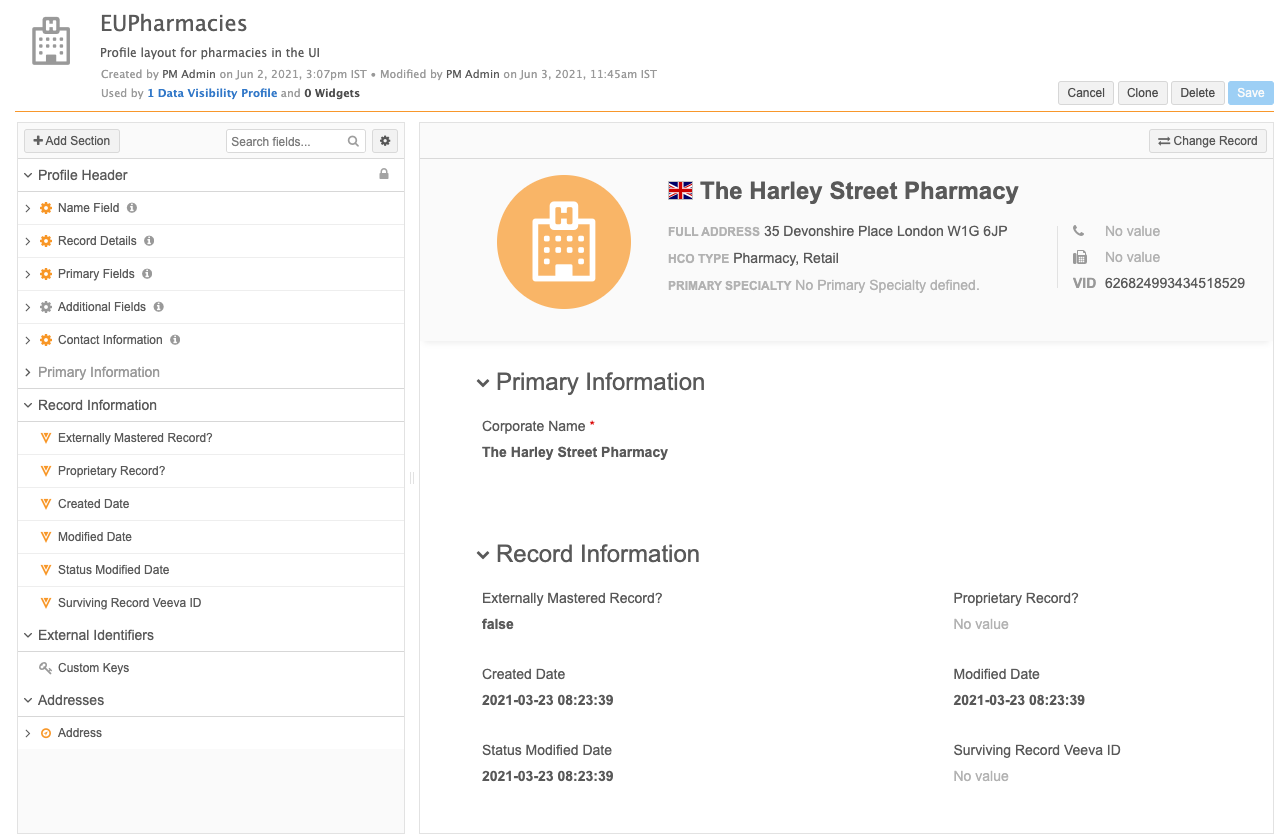
View a layout configuration
Select a profile layout to open the configuration to view the sections and fields included in the layout.
Summary header
The layout's summary header includes more details about the creation date and user and the modified date and user.
-
Hover over the username to display details about the user type and email address.
-
Hover over the object icon for details about the object type and the data domains it belongs to.
A count of the data visibility profiles and that use the layout also displays on the header. Administrators can click the Data Visibility Profiles or Widgets link to open a dialog for more details.
Add a profile layout
Administrators and Data Manager can create layouts for specific use cases.
Tip: For details about adding profiles layouts for custom objects, see Creating profile layouts for custom objects.
To add a layout:
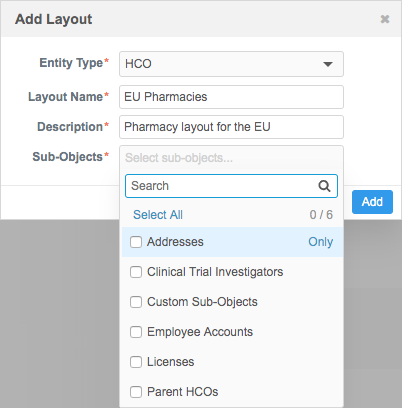
- On the Profile Layouts page, click Add Layout.
-
In the Add Layout dialog, define the following information:
-
Entity Type - Choose HCP, HCO, custom object, or Contract (if enabled).
Contract is for contract organizations. Profiles for contract organizations can be restricted by user permissions.
- Layout Name - Type the name for this profile layout.
- Description - Type a meaningful description for this profile layout.
-
Sub-Objects - Select all of the sub-objects or relationship objects that should be included on the profile layout. The list is filtered by the entity type that is selected.
When the profile is created, all of the fields for the selected objects will be added to the section. This way, instead of adding all of the required fields, it is easier for you to remove any fields that you do not need.
-
-
Click Add.
The new profile layout displays.
-
Right pane - Contains a preview section so you can view your changes to the layout before saving.
-
Left pane - Displays default sections for the selected sub-objects.
Sections are created for all of the selected sub-objects. Each sub-object section contains all of the fields assigned to the sub-object in the Network MDM data model; standard Veeva fields and custom fields.
Important: When new Veeva fields are enabled for your Network MDM instance, they are not automatically included in custom profile layouts. They must be manually added.
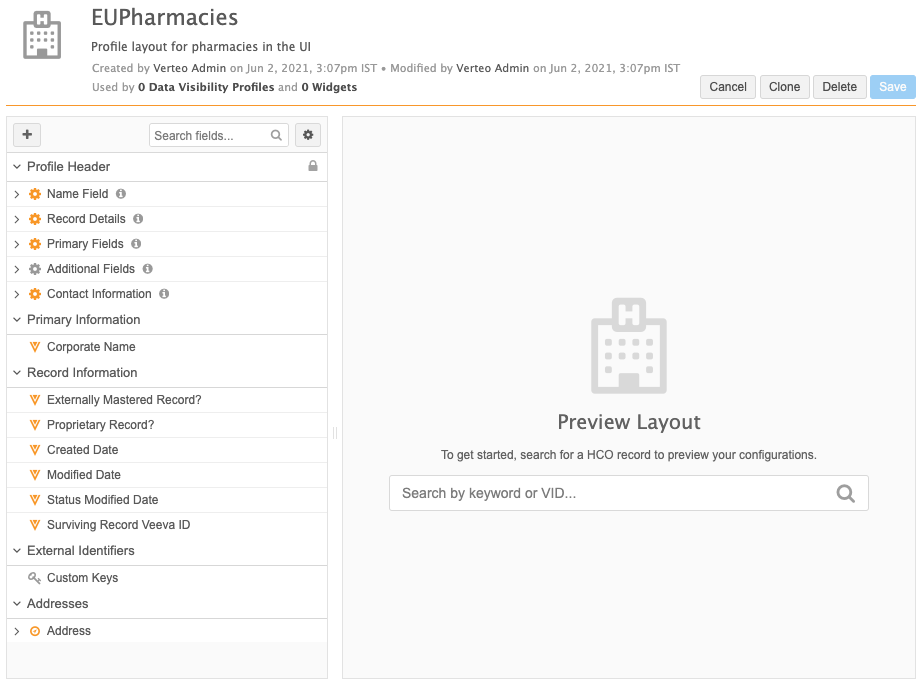
Now that the profile layout is created, you can edit the layout.
Edit profile layouts
Customize profile layouts by adding and editing sections and fields. Only custom profile layouts can be edited. Standard profile layouts are read-only.
At the top of the profile layout, click the Options ![]() menu to list the general display settings for the profile layout configuration.
menu to list the general display settings for the profile layout configuration.
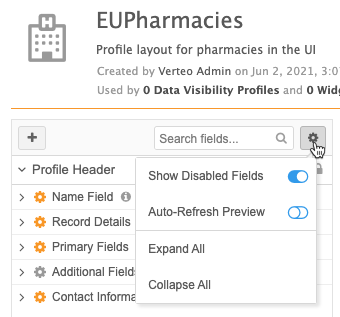
The following settings are available:
| Setting | Details |
|---|---|
| Show Disabled Fields |
View disabled fields in your profile layout. This option is not enabled by default. If this option is set, only enabled fields are returned when you search for fields in your layout. |
| Auto-Refresh Preview | Enable so the preview pane automatically refreshes the record you are viewing whenever you make changes to the profile layout. This option is not enabled by default. |
| Expand All Sections | Expand all of the sections that have been added to the profile layout. |
| Collapse All Sections | Collapse all of the sections that have been added to the profile layout. |
Default sections
The profile layout displays with the following default sections in the right pane:
-
Profile Header - Define the fields that display in the summary header at the top of the profile page. This section cannot be removed from the profile layout.
The Name Field sub-section cannot be removed. It contains the formatted name for the object.
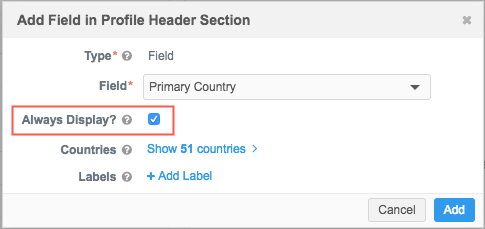
The Additional Fields sub-section contains the Entity Type and Network ID fields by default. Fields can be added to this sub-section; for example, if the country is important for the custom object record, you can add the Primary Country field to this section.
If you add a field to the Profile Header section, select Always Display if the field should remain on the collapsed header as you scroll through the record.
For example, it might be important for data stewards to always see the Network ID or NPI fields on HCP profiles, so you can ensure that those fields remain on the collapsed header.
The Profile Header section is also now available for Veeva entities and includes Name, Record Details, and Contact Information sub-sections that cannot be updated to add, edit, or remove the default fields.
- Primary Information - The section that contains the key information about the entity; for example, name, Network ID, contact information, primary country, and record state.
- Record Information - All of the standard Veeva fields that are added for the custom object are included in this section.
- External Identifiers - This section contains the custom key placeholder.
- Sub-Objects - A section for each sub-object and relationship that was added to the profile layout. These sections will include all of the fields that are available and enabled in the data model for these objects.
Add sections
Sections are automatically created for any of the sub-objects that you select when you create a profile layout. You can add new sections.
To create a section:
-
At the top of the left panel, click the Add Section
 icon.
icon. The Add Section dialog displays with the Object predefined. Any sections that already exist in the layout are dimmed in the list; for example, sub-objects, to ensure that they are not duplicated.
- In the dialog, type a Section ID; for example, Primary Information. Note that this is not the label for the section on the profile. This ID is for internal Network MDM purposes.
- Optional. Type a Description.
-
Beside Labels, define labels for the section for all applicable languages. At least one label is required. Click +Add Label, select the language, and type the label for that language.
If only one label is defined, the section displays with that name, even if your Network MDM instance isn't localized for that language. For example, if your user profile defines English as the language setting, but you only define a French label for the profile layout section, the section name displays in French.
-
Click Done.
The new section is added to the bottom of the list in the left panel.
Edit sections
Customize your profile layout by adding fields and moving or deleting sections.
Hover over a custom section to view the actions available. The sub-objects within sections can also be edited.

- Edit - Click the Edit
 icon to update the Section ID, Description, and Labels. On sub-objects, you can add labels only.
 -
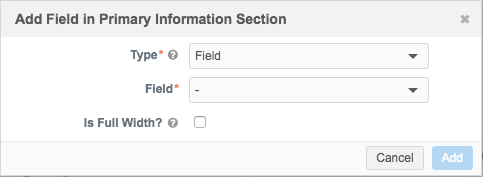
Add Field - Click the Add
 icon to add fields to the section. For example, for the Primary Information section for an HCP, you might add First Name, Last Name, Email 1, and so on.
In the Add Field dialog, define the following settings:
Setting Details Type The type of field that you want to display. The types are filtered on the entity or sub-object defined for the section. For most fields, choose Field. For more information about each type, see the "Field Types" section. Field Select the fields to add to this section on the profile layout. Full Width Define whether the field should be sized to the full width of the section or not. The default value is False.
Most fields will be False but some fields; for example, email fields or URL fields, might require the full width because they can have long field values.
Is Summary Field? For sub-object sections that have summary cards, you can indicate if this field should be listed in that summary because it's primary information for the object. 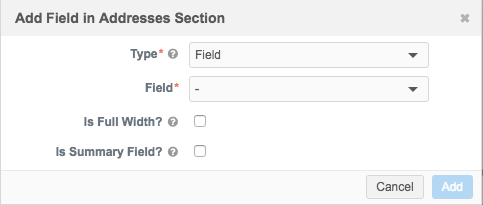
- Move section - Use the handle
 to move the section and all of its fields to another place in the profile layout. For example, click the handle and drag the Primary Information section to the top of the profile layout. All of the sections automatically collapse so you can easily move that section into the correct position on the profile layout.
 -
Delete - Remove the section and all of its fields from the profile layout. If you click the Delete
 icon, a confirmation dialog displays to ensure that you want to complete the action. Click Delete to remove the section.
Edit fields
Hover over a field to view the available actions.
-
Edit- Click the Edit
icon to update the following settings:Setting Details Type The field type cannot be changed. Field Click the value to open the Network MDM data model page for that field in another browser window. Full Width Define whether the field should be sized to the full width of the section or not. The default value is False.
Most fields will be False but some fields; for example, email fields or URL fields, might require the full width because they can have long field values.
Is Summary Field? Choose if this field should be listed on the summary card for the sub-object or relationship object. For example, for Parent Affiliations, you might want the Network ID to display on summary cards because it's important information to you. Countries Click the link to view the countries that use the field. 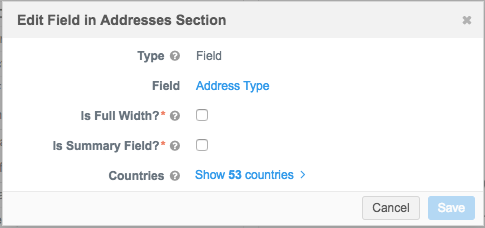
-
Move - Use the handle
to move the field to a different position within the section. Fields cannot be moved to other sections that belong to different sub-objects. For example, a Fax field cannot be moved from the Addresses sub-object section to the Parent Affiliation section. -
Delete - Remove the field from the section. When you click the Delete button, the field is immediately removed.
Tip: The field can be restored by clicking the link in the message at the top of the browser or by adding the field again to the custom section or sub-object.

-
Widget field settings - Click the Lock
 button to configure specific settings for . For example, you can define the field as required in add and change requests or limit the field values that are available for users to select. For more information, see Widget profile layouts.
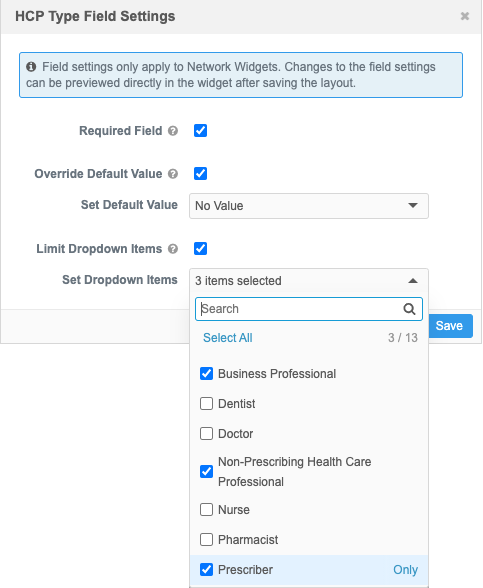
Add custom fields
Custom fields are automatically added to sub-object sections that you add to your profile layout. The sub-object custom fields cannot be moved or deleted from their sub-object placeholder. For example, in the Custom Fields (Parent HCO) placeholder, the Batch Confirmation Date and Merqurio Phone ID fields cannot be edited.
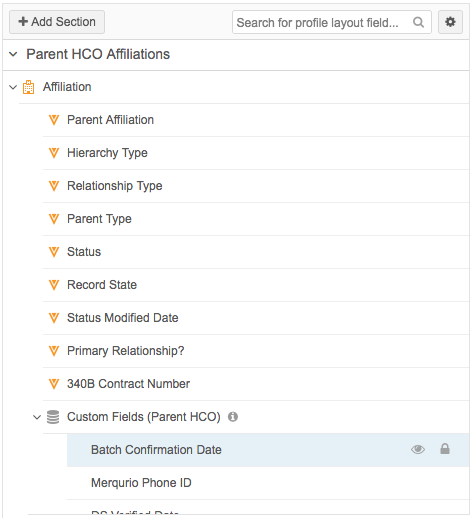
For the top level HCP and HCO entities, the Custom Fields type can be added as its own section (+Add Section), or to the end of an entity-level section; for example, a Primary Information section.
To add the Custom Fields type to an entity-level section, click the Add![]() icon on the section.
icon on the section.
The custom field placeholder and the custom fields will be added to the section.
Custom fields can be moved to another section. To move a custom field to another section, create the field in the other section. The custom field will be automatically removed from the Custom Fields type.
Field types
Field types define how the fields are displayed in the user interface. Review the list to understand each of the available types.
| Type | Description | Entities and Sub-Objects |
|---|---|---|
| Field | The typical type for most Network MDM data model fields. | HCO, HCP, Address, License, Parent HCO, Child Affiliations, Contract |
| Extra Field | Use for fields that do not display in the profile by default, but can be displayed in a pop-up window. For example, an address field that users can view if they click Extended Info at the bottom of an address. | HCO, HCP, Address, License, Parent HCO, Custom sub-objects |
| Reference Set |
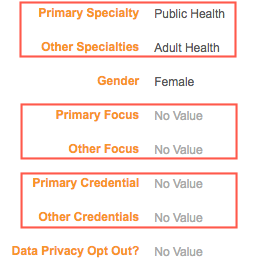
A grouping of fields that share the same reference type. For example, Specialty. On a profile, the fields render as Primary Specialty and Other Specialties. Also used for HCP Focus Area, HCO Focus Area, and Credentials.
Note: The ordering of fields cannot be changed. For example, if you include HCP Focus Area 1, HCP Focus Area 3, and HCP Focus Area 2 in that order (1,3,2), Network MDM automatically reorders the fields. |
HCO, HCP, Address, Parent HCO |
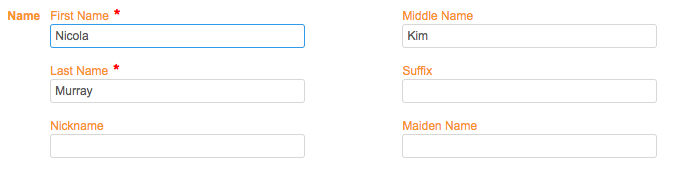
| Name Set |
This field groups names fields together in a single line (formatted name), but when it is expanded, there are multiple fields that can be edited.
|
HCO, HCP, Address, Parent HCO |
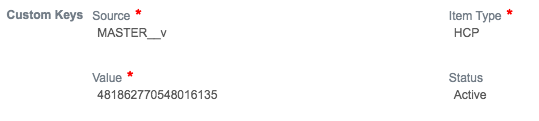
| Custom Keys |
A set of custom keys for the object. Select to create the grouping. Automatically adds the Source, Value, Item Type, and Status fields in the group.
|
HCO, HCP (for Address, License, and Parent HCO this field type is automatically added and cannot be changed) |
Preview a profile layout
Previews are available for all standard and custom profile layouts. On custom layouts, this enables you to review changes that you make before saving them. In the right pane of the layout, search for an entity. Search results are filtered so results are returned only for the same entity type as the profile layout; for example, HCOs.
Tip: To properly validate your changes, remember to preview entities for the same country or region as the profile layout. Some fields are not used in all countries, so if you are configuring a profile layout for a region (for example, EU) and you preview a record from another country (for example, US), you might not see all of the fields that you have added to your layout.
To change the record that you are using the preview the layout, click Change Record.
If you make a change to the layout, the preview pane recognizes the change. Click the link to reload the preview pane. If you have enabled the Auto-Refresh Preview setting in the Options menu, the preview automatically updates.
Clone profile layouts
Create a new layout by cloning an existing standard or custom layout that is similar to what you need.
For example, if you want a new profile layout for pharmacies, you can clone an existing HCO layout that contains many of the fields and sections that you want.
To clone a layout:
- On the Profile Layouts page, highlight a layout and expand the Action
 list. Choose Clone Layout.
 - In the Clone Layout dialog, the Entity Type cannot be changed. Type a Layout Name and Description.
-
Click Continue.
The cloned layout opens in edit mode so you can customize the sections and fields.
Delete profile layouts
Custom profile layouts can be removed from your Network MDM instance if they are no longer required.
Note: Only Administrators can delete profile layouts.
To delete a layout:
- On the Profile Layouts page, highlight a layout and expand the Action list. Choose Delete Layout.
-
In the Delete Layout dialog, confirm the removal by clicking Delete Layout.
Or
-
If the profile layout is being used by any data visibility profiles (DVPs) or , the list displays in the dialog. You must choose another profile layout to assign to the DVPs or .
Select an existing profile layout from the list.
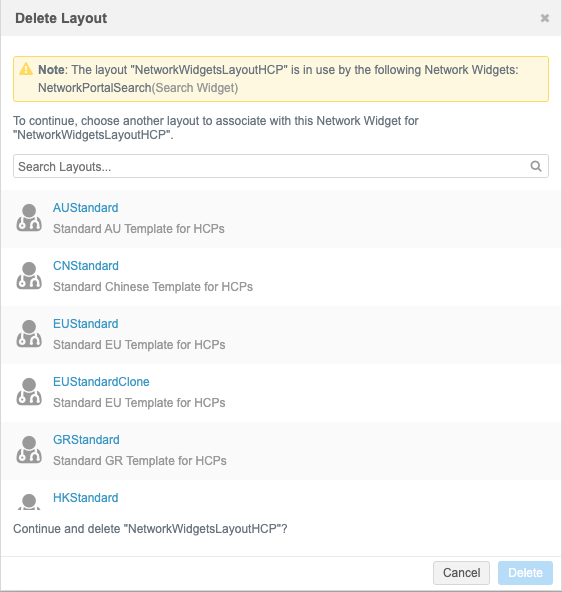
- When the replacement profile layout has been selected, confirm the removal by clicking Delete Layout.
The profile layout is removed from your Network MDM instance, and the affected data visibility profiles and are updated with the new layout.
Export profile layouts
Profile layouts can be exported to target systems so that you can manage changes between your Network MDMinstances.
Custom layouts can be exported between environments using Configuration Export and Configuration Import. Standard layouts are automatically included in any new environment and cannot be changed, so managing them across environments is not necessary.
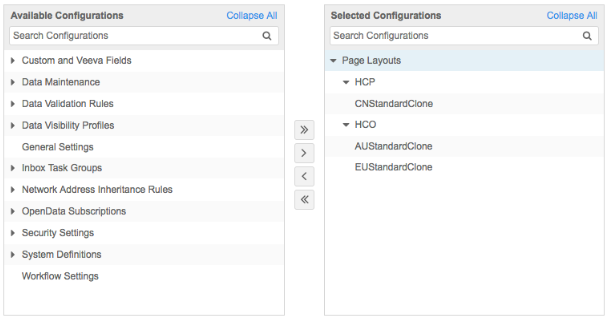
For more information, see Managing Network MDM configurations.