Profiles
View additional affiliations
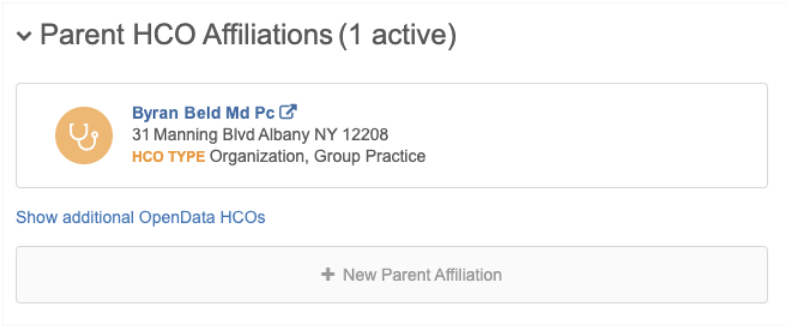
On an OpenData record profile, you can now view affiliations that have not yet been downloaded to your Network instance. You can download the HCOs using the Show additional OpenData HCOs link. Additional HCOs can display in the Parent HCO Affiliations section on HCP profiles and the Parent HCO Affiliations and Child Affiliations sections on HCO profiles.
This feature is supported only on OpenData record profiles that are downloaded in your Network instance.
This feature is not enabled by default. Administrators can enable this feature for their Network instance.
Enable the feature
The feature is not enabled by default in existing Network instances.
-
In the Admin console, click Settings > General Settings.
-
Click Edit.
-
In the Search section, select Show Additional OpenData HCOs.
Note: This feature cannot be enabled if the Search OpenData feature is not enabled.
For new Network instances, the feature is enabled by default; however, administrators must enable the Search OpenData feature before additional HCOs are available to view.
View additional HCOs
When you are viewing an OpenData record, a link displays at the bottom of the Parent HCO Affiliations (HCPs and HCOs) and Child Affiliations (HCOs) sections. Click the link to display the list of related HCOs that have not yet been downloaded to your Network instance.
Note: The link displays on full record profiles only, it does not display on profile previews that are available in some Network features (for example, Network Explorer and profile layouts).
A pop-up displays the missing related HCOs in alphabetical order. A count of the HCOs displays in the pop-up.
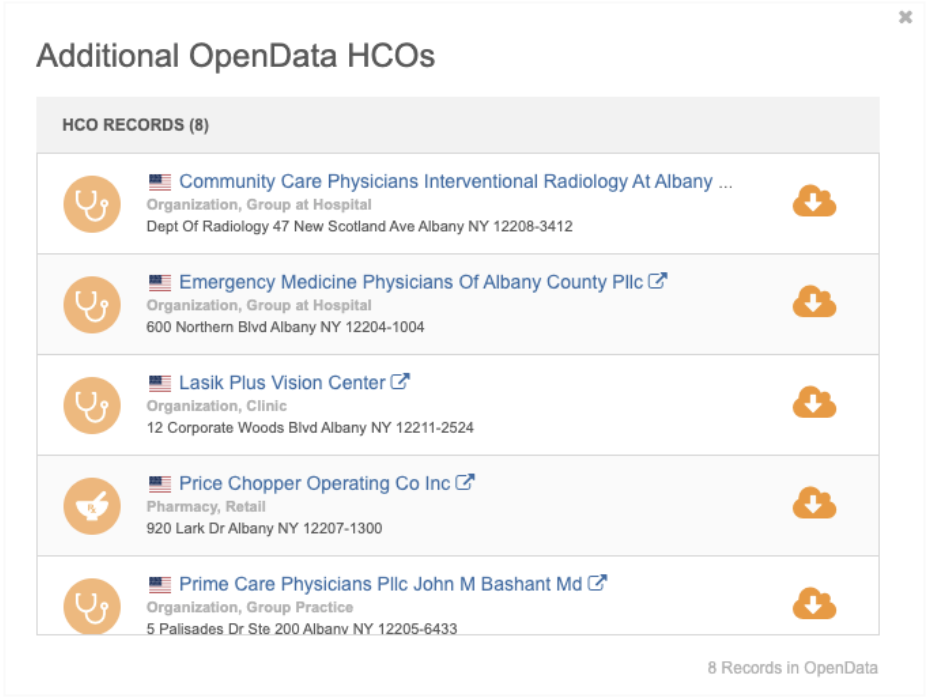
Considerations for HCOs that display:
-
HCOs must have an Active record state and be related to the entity with Active relationships.
-
Unsubscribed records will display if they are Valid and Active.
-
HCOs that are candidate records do not display.
-
HCOs can be for any country; they don't have to be for the same country as the related entity.
If there are no additional HCOs to download, the pop-up displays the following message: There are no additional OpenData HCO records to download for this record.
Download the HCO
You can download the record to your Network instance.
-
On the Additional OpenData HCOs pop-up, click the Download from OpenData
 icon.
icon. If you want to view the record before you download, click the HCO name to open the record in a new browser window. On the record profile, click the Download from OpenData
icon. -
In the pop-up, confirm that you want to download the record.
When the download is complete, the Download from OpenData icon is removed from the record.
-
Refresh the original record profile to update the list of affiliations.
User requirements
To view additional HCOs, you must have the following data visibility profile permissions:
-
Access to the HCO records through your country permissions
-
Can Search OpenData Instance permission
-
Can download/sync records from OpenData instance permission
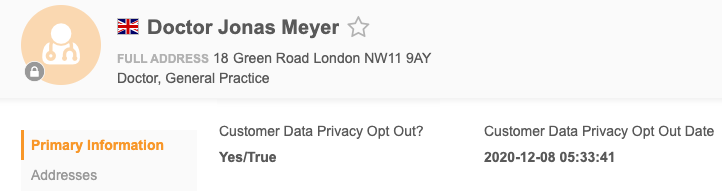
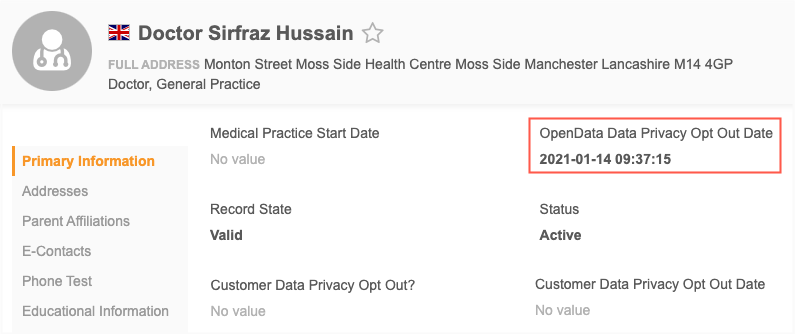
Data privacy opt out date
The date that the data privacy opt out flag is set to True is now captured in a new field so you can easily see the date in record profiles and use it in reporting queries. Previously, the date was only set in the revision history. Now, the date is explicitly captured and available in the new HCP field.
This enhancement is enabled by default in your Network instance.
Opt out date fields
Two new data model fields are added to the HCP object:
-
data_privacy_opt_out_date__v- Opt out date for OpenData -managed opt-outs. -
data_privacy_opt_out_date__c- Opt out date for customer-managed opt-outs
The fields are populated with the date whenever a record is opted-out through a change request (on the profile page or using the API) or through a source subscription.
Standard field for OpenData opt-outs
The data_privacy_opt_out_date__v has the following behavior:
-
Automatically enabled for every country that uses the
data_privacy_opt_out__vflag. -
Captures the date that the opted-out flag was set to True by Veeva OpenData.
-
Automatically added to standard profile layouts so it displays on record profiles. It can be added to custom profile layouts.
Note: The label for the data_privacy_opt_out__v field has been changed to OpenData Data Privacy Opt Out. Previously, the label was Data Privacy Opt Out.
Custom field for local opt-outs
The data_privacy_opt_out_date__c field has the following behavior:
-
Not enabled by default. It can be enabled for any countries that already use the data privacy opt-out flag,
data_privacy_opt_out__c. If you enable the opt-out flag for a country, you should enable thedata_privacy_opt_out_date__cfield as well. -
Captures the date that the opted-out flag is set to True in your Network instance.
-
Can be added to custom profile layouts so it displays on record profiles; it is not automatically added.
-
Can be updated using source subscriptions.
-
Date value will be blanked-out if the
data_privacy_opt_out__cflag is changed from Yes/True to No/False or No Value,
Backfilling the date for locally managed opt-outs
The date can be added for locally managed HCP records that you have previously flagged as opted-out in your Network instance. The opted-out date is contained in each record's revision history. Run a query to retrieve the date and use a source subscription to add the date to the opted-out records. The Data Updater cannot be used for this process because system fields cannot be updated using that feature.
Note: Please complete the backfill process in a timely manner; it will not be available indefinitely. The standard and custom data_privacy_opt_out_date fields can be updated through source subscriptions now, but they will become system managed fields (not editable) in a future release.
SQL query
Use this query to retrieve the opt-out date from the revision history. The date from the revision history will be used to backfill the data_privacy_opt_out_date__c field.
SELECT
        DISTINCT hcp_vid,
        record_state,
        opt_out_switch_to_Y_date
    FROM
        (
            SELECT
                    h.vid__v AS hcp_vid,
                    h.record_state__v AS record_state,
                    LEFT( hr.created_at, 10 ) || 'T' || RIGHT( hr.created_at, 8 ) || 'Z' AS opt_out_switch_to_Y_date,
                    rank (
                    ) over (
                        partition BY h.vid__v
                    ORDER BY
                        created_at DESC
                    ) AS rank
                FROM
                    hcp h LEFT JOIN hcp_revision hr
                        ON h.vid__v = hr.vid__v
                WHERE
                    h.data_privacy_opt_out__c = 'Y'
                    AND hr.data_privacy_opt_out__c = 'Y'
        ) t
    WHERE
        rank = 1 ;
Important: Use this query so the time is returned in GMT (example date format with timezone: 2016-01-12T23:13:17Z). If you create your own query, ensure that the timezone is returned in this format (includes 'Z') so the source subscription identifies the time as GMT.
To backfill the opted-out date in records:
-
Run a report to retrieve the opted-out date from the revision history.
-
On the Network menu bar, click Reports > SQL Query Editor.
-
Add the query to the query box and run the report.
-
Download the report results as a .csv file.
-
Save the file on your FTP server so it can be used in the source subscription.
The file should have two columns only and must contain the field names as the column header.

-
-
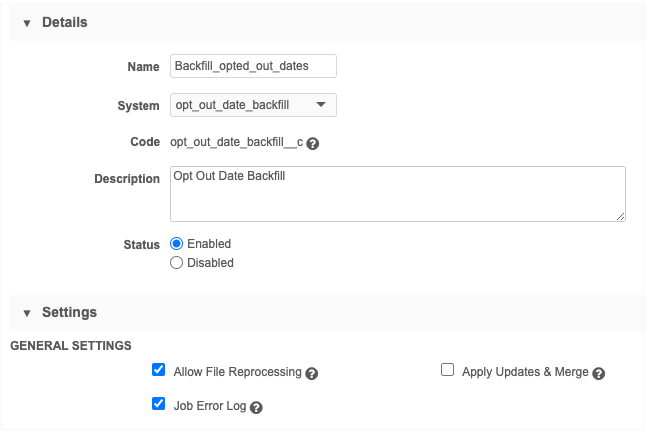
Create a system to use for the source subscription.
-
In the Admin console, click System Interfaces > System.
-
Click Add System.
-
Type a Name. For example, call the system opt_out_date_backfill.
-
Type a Description and accept the remaining default values.
-
Save the new system.
-
In the Confirm Edit System dialog, click OK.
Note: A new custom key will be added for this source system on the records that you backfill.
-
-
Create a source subscription to update the opted-out records with the date.
-
In the Admin console, click System Interfaces > Source Subscription.
-
Click Add Subscription and choose Use Classic Mode or Use Wizard Mode.
These instructions include examples for Classic Mode.
-
Type a Name and Description for the subscription.
-
In the System field, choose the system that you just created.
-
In the General Settings section, select the Job Error Log.
-
In the Match Settings section, set the Action for Unmatched & Suspect Match to No Action.
This ensures that new records are not created; this subscription is for updating existing records only.
-
Accept the default values for the remaining settings.
-
In the Source Files section, define the FTP path where you saved the report results (.csv file).
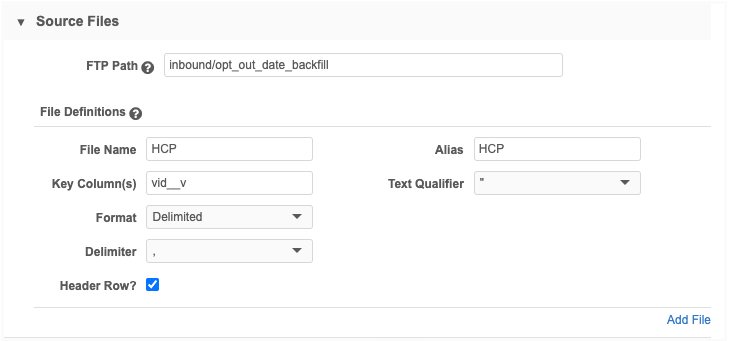
-
In the Modelling & Normalization section, add a model map. Field normalizations are not required.
[ { "entity": "HCP", "from": "HCP", "attributes": [ "HCP.* AS *" ], "customkeys": [ { "value": "HCP.vid__v" } ] } ] - Network Expression Rules and Match Configuration are not required for this backfill subscription.
- In the Job Schedule section, choose to schedule the subscription or manually run it.
-
Save the subscription.
Manually run the subscription or wait until it is scheduled to run. The specified records will be updated with the opted-out date.
-
Backfilling Veeva OpenData opt outs
Veeva OpenData will backfill the date for previously opted-out records. The updates will be included in your Veeva OpenData country subscription when it runs. The date will be available in reporting and it will be included in target subscriptions (for example, when opted out records are exported to Veeva CRM).
Locally managed records that were converted from OpenData opt outs
If you have records that were opted-out in OpenData and converted into locally managed records, the opted-out date is not included in the OpenData subscriptions because updates to the converted record are blocked.
To backfill the Veeva OpenData opted-out date for any converted records that you may have in your Network instance, contact Veeva Support . They can provide the opted-out date for the Network entity IDs that you identify. You can use your source subscription to add the dates to your converted record for reference.
Timezone considerations
The date and time that displays on the record profile might be different from the date and time that was loaded into the source subscription. This is expected.
The date and time that displays on record profiles uses the timezone of your local computer. The source subscription loads the opt out date using the GMT timezone - the provided SQL query intentionally specifies the timezone using 'Z' (GMT). So, all users (except users whose computer is in GMT timezone) will see an offset between the date/time that was loaded and the date/time that displays on the record profile.