Users
Integration User
Administrators can now provide Integration Users with additional permissions for the target subscription and metadata API. This enhancement supports Nitro's Veeva Network Intelligent Sync Connector. For more information about this integration, see the Nitro Online Help.
Metadata permissions
With the new permissions, Integration Users will have the following access:
-
Visibility to all fields in the Metadata API regardless of their data visibility profile.
Users can use the new ALL countries option in the metadata fields API with this permission. For more information, see the "API " section in these Release Notes.
The permission is not enabled by default.
Enable the permission
-
Open an Integration User's account (Users & Permissions > Users).
-
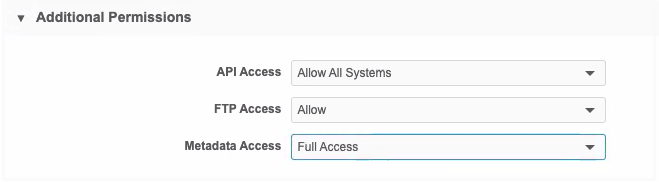
In the Additional Permissions section, select Full Access for the Metadata Access permission. By default, the permission is set to Limited by Data Visibility Profile.
- Save your changes.
When the permission is assigned, an Integration User will have access to view and export all objects and fields to support Nitro Intelligent Sync.
Managing users
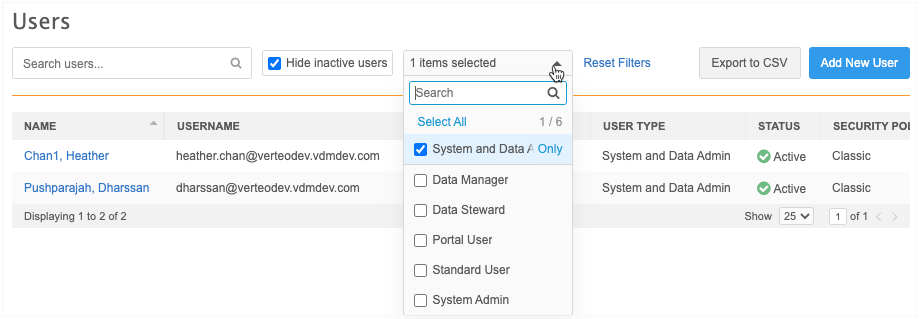
Administrators can now quickly find user profiles by filtering the Users page by status or user type. Now, only active users display by default.
Performance improvements have been made to load users to list faster.
These enhancements are enabled in your Network instance by default.
Portal User
A new user type called Portal User enables you to create users that have access only to the Network Portal and Network Widgets. This user is also useful if your organization doesn't use single sign-on. Portal Users will access the Network Portal directly from the login page.
This user is available in your Network instance by default.
Create a Portal User
To configure a Portal User:
-
On the Users page (Users & Permissions > Users), click Add New User.
-
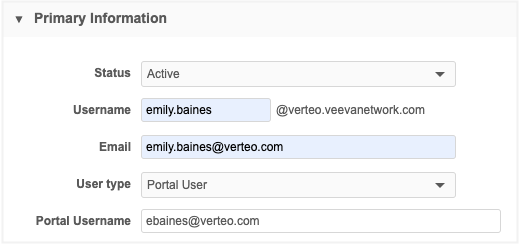
In the User type list, select Portal User. The settings in the Primary Information section will update.
-
Type the Username - This field is required, but it will not be used by the Portal User. For other user types, this is the username that the user logs into the Network UI with.
-
Type the user's Email address. The welcome email for the Network Portal will be sent to this address.
-
In the User type list, select Portal User.
-
Define a Portal Username - This is the username for accessing the Network Portal only. The username must be unique. It cannot be the same as any other Network Username or Portal Username. This enables you to log into the Portal using a Portal Username or your Network Username if you have both.
Tip: For the best experience, use the user's corporate email address as their Portal Username.
-
Complete the Contact Information section, as usual. The First Name and Last Name fields are mandatory.
-
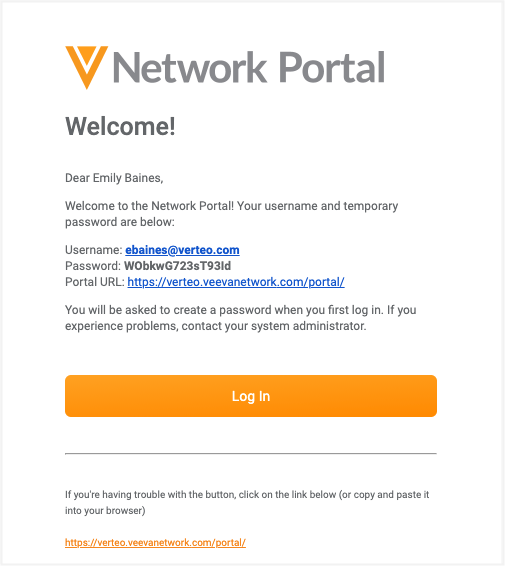
In the Password section, the Password the Generate temporary password and notify user setting is selected by default. This ensures that the user receives an email with their username and temporary password. The email includes a link to their Network Portal.
-
Assign the appropriate Data Visibility Profiles to the user so they will have access to records in the Network Portal.
-
In the User Groups section, you can add the user to any custom user groups. The user will be assigned to several system managed user groups by default: All Users, All Users except Integration Users, Portal Users, and SSO Users (if the user is an SSO user) .
-
Accept the default Settings or make any required changes.
-
Save your changes.
Note: When you create a Portal User, the Additional Permissions section does not display because those permissions apply to the Network UI.
Welcome email
Portal Users will receive a welcome email from Veeva Network that includes their (Portal) username and temporary password. Use the link in the email to navigate directly to the Network Portal .
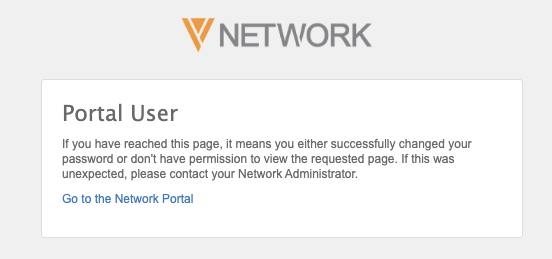
Access to the Network UI
Portal Users cannot access the Network UI. If a Portal User attempts to log into a Network instance, an error displays. Portal Users can click on the link to navigate to the Network Portal.
System managed user groups
To help you easily manage and maintain user groups, Network now provides a number of system managed groups.
Custom user groups must be manually maintained, so managing them for larger Network instances with many users can be time-consuming. The system managed user groups are read-only; Network dynamically adds and removes users based on their user type, status (active or not active), and security policy. You can use the system managed user groups to easily assign permission to the Network Portal and its applications.
These system managed user groups are enabled in your Network instance by default.
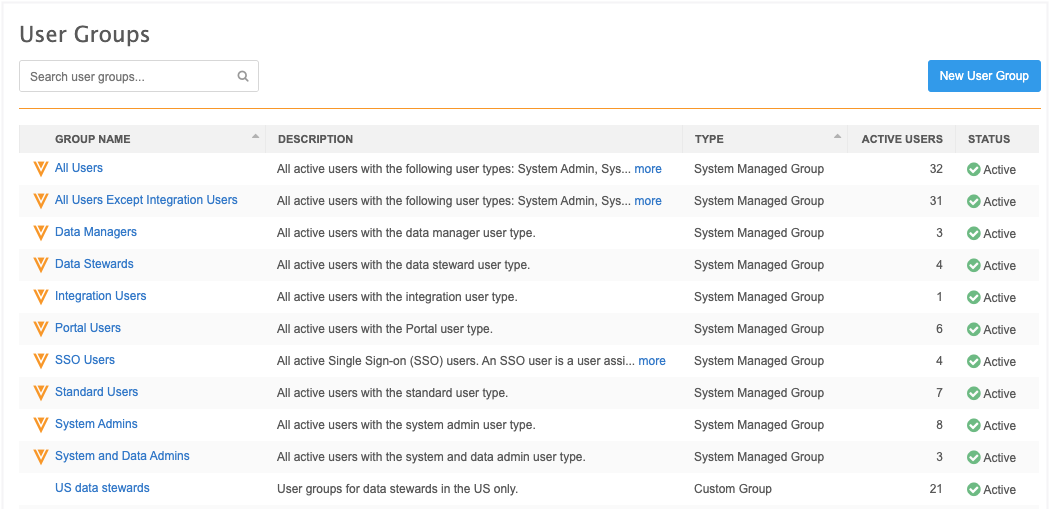
New user groups
Several new predefined user groups have been added to your Network instance. They are managed by Veeva and they are read-only.
| User Group Name | Description | User Types and Criteria |
|---|---|---|
| All Users | All active Network users. |
All of the following active user types: System Admins, Data Managers, Data Stewards, Standard Users, System and Data Admins, Portal Users, Integration Users. |
| All Users Except Integration Users | All active Network users except Integration Users. | All of the following active user types: System Admins, Data Managers, Data Stewards, Standard Users, System and Data Admins, Portal Users. |
| Data Managers | All active Data Manager users. | All active users with the Data Manager user type. |
| Data Stewards | All active Data Steward users. | All active users with the Data Steward user type. |
| Portal Users | All active Portal Users. | All active users with the Portal user type. |
| SSO Users | All active users with single sign-on (SSO). |
All users with SSO security policy. Any user that logs in using single sign-on is automatically added to this group. The security policy in the Security Settings must be Single Sign-on with SAML. |
| Standard Users | All active Standard users. | All active users with the Standard user type. |
| System Admins | All active System Admin users. |
All active users with the System Admin user type. |
| System and Data Admin | All active System and Data Admin users. | All active users with the System and Data Admin user type. |
These groups can be used for dynamic access control, field restrictions, and the Network Portal.
Add users to system managed groups
Network automatically adds users to system managed groups based on their user type, status (active only) and security policy. If your user type changes, you are removed from the previous group and added to the group for your new user type. If the status of a user is no longer active, the user is removed from all system managed user groups. These changes are dynamic.
View user group details
To view more information and see a list of users included in the user group, select the group on the Users Group page. All system managed groups are read-only.

User group improvements
Enhancements have been made to custom user groups so you can easily add and remove users in bulk. Usability enhancements have been made to user groups on the User Groups page, the Dynamic Access Control feature, and the Field Restrictions feature to help you find and select groups.
These enhancements are enabled in your Network instance by default.
Custom user groups
Updates have been made to custom user groups to make it easier to add and remove users in bulk.
Add users
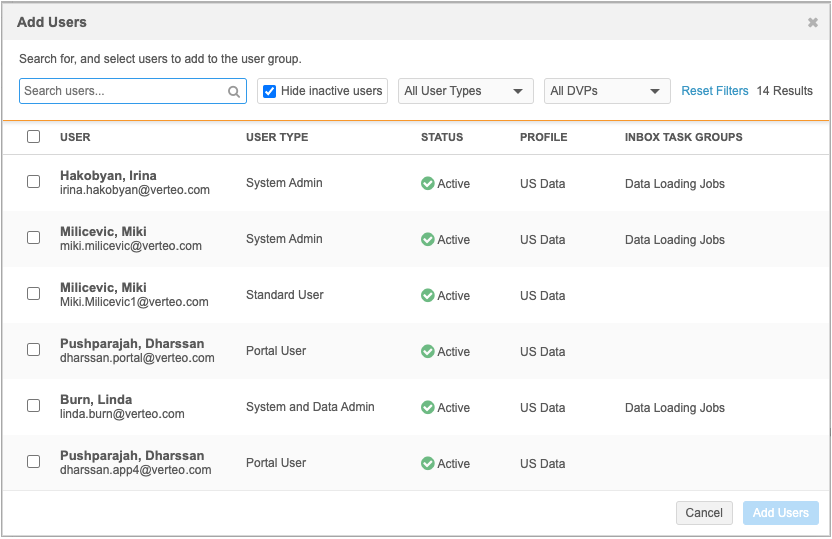
To add users, select the group from the User Groups page and click Add Users.
The Add Users pop-up is redesigned and includes filters so you can sort the list by user type, status, and data visibility profile. You can also use the search box to find specific users. The users that are not already included in the user group display in the list. Only active users display by default.
The count of users displays; for example, 14 results. The count updates if you filter or search for specific users.
-
Add users individually - Select the checkbox beside the user name.
-
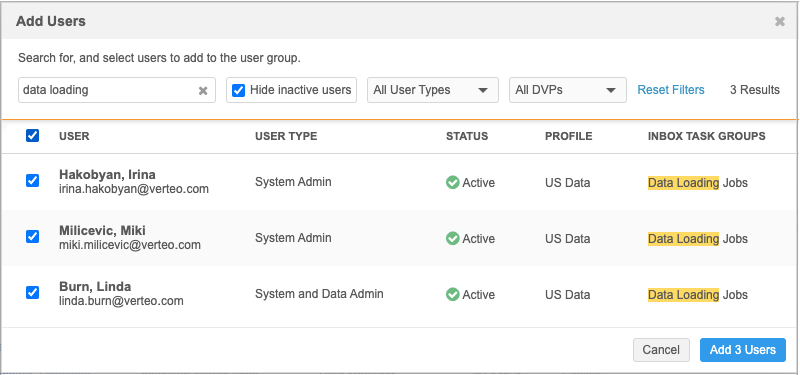
Add users in bulk - Select the checkbox beside User. This selects all of the users that currently display.
Tip: To add most, but not all users, click the checkbox beside User to select all of the users and then clear the checkbox beside any user names that should not be added.
The count of selected users displays in the Add Users button; for example, Add 3 Users. The users will be added to the group when you save your changes.
Example
You can search for users assigned to the Data Loading Jobs inbox task group. Click the checkbox beside User to select all of the users that match your search and add them to the group.
Remove users
Users are removed directly from the user group configuration page.
-
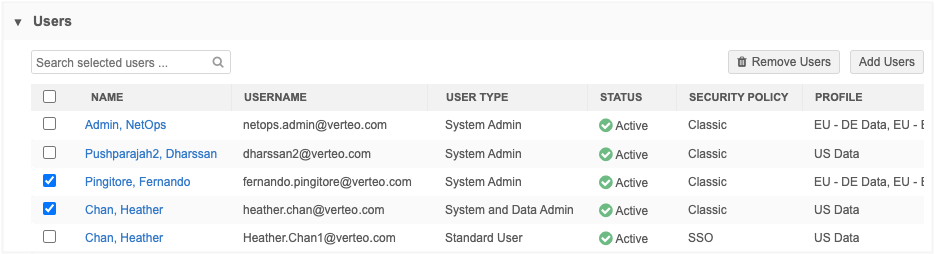
Remove individual users - Select the checkbox beside the user name and click Remove Users.
-
Remove multiple users - Select the checkbox beside Name. All users will be selected. Clear the checkbox beside any users that you want to remain in the group and click Remove Users. The users are immediately removed from the table. The users will be removed from the group when you save the User Groups page.
User details page
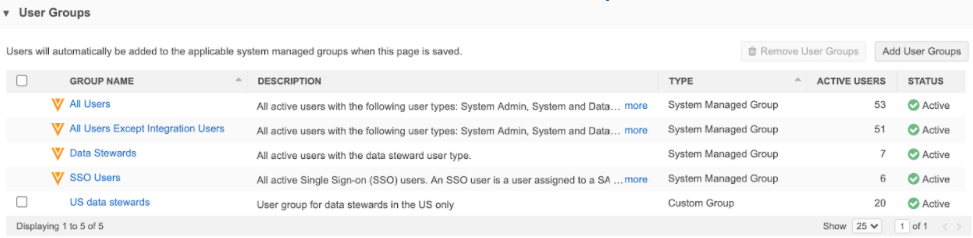
User groups are listed on each user's User page. The table displays the system managed groups that the user is automatically assigned to, based on their user type. It also displays any custom groups that the user has been manually added to. A count of the active users in each group also displays in the table.
Remove user from a custom group
To remove the user from a custom group, click the checkbox beside the custom user group name and click Remove User Groups. The group is immediately removed from the table. The user will be removed from the group when you save the user page.
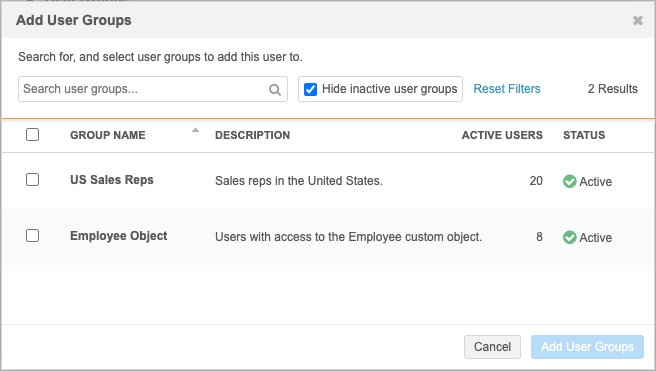
Add user to custom groups
You can add a user to a user group directly from the user detail page. Click Add User Groups. The pop-up displays any custom groups that the user is not already assigned to.
To add the user to multiple groups, click the checkbox beside Group Name to select all of the groups.
User Groups page
The User Groups page is updated to include the Type column and the Active Users column so you can see a count of active users in each system managed and custom user group. If there are no users for a specific user type, the user group still displays on the User Groups page.
The system managed groups also include the Veeva icon beside the group name so you can quickly identify the system managed groups.
Dynamic access control
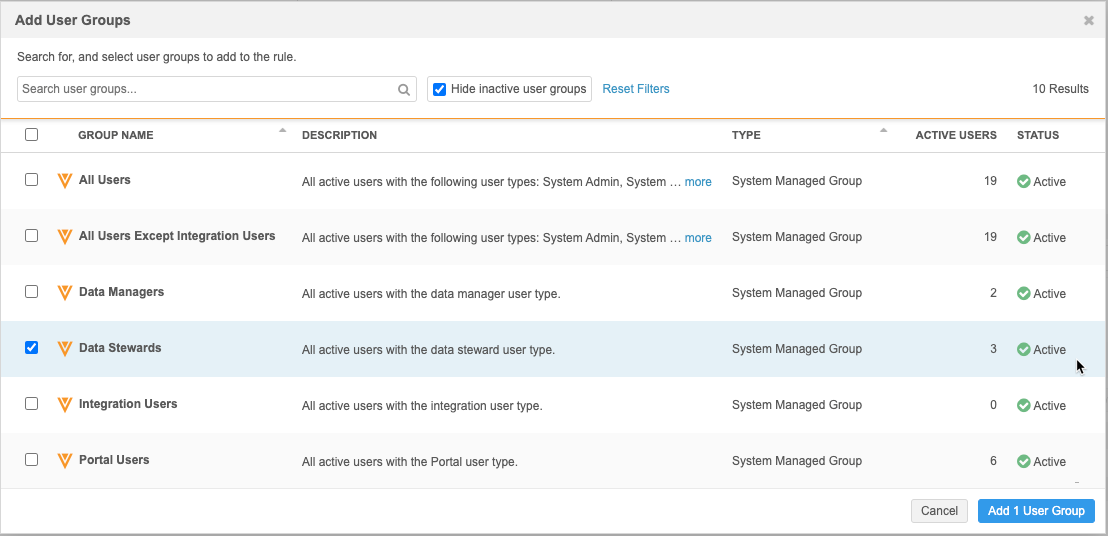
You can add custom and system managed user groups in bulk to your dynamic access control rules. Use the search field to find a specific group.
-
Add user groups individually - Select the checkbox beside the user group name.
-
Add user groups in bulk - Select the checkbox beside Group Name. This selects all of the user groups that currently display.
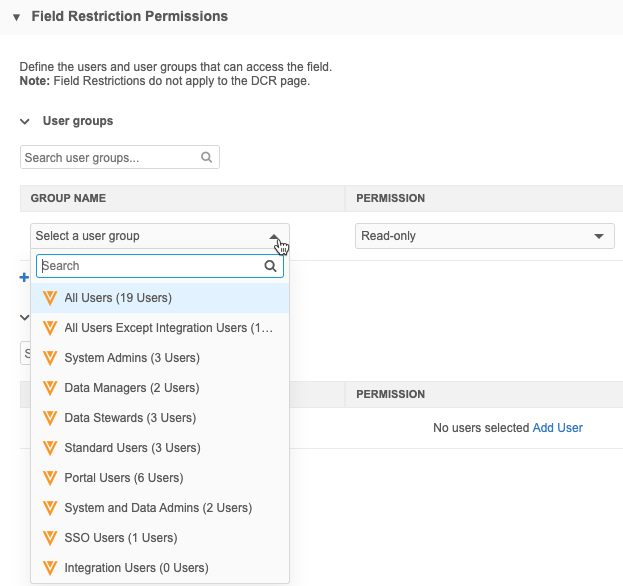
Field restrictions
The system managed user groups can be added to your field restriction permissions. When you expand the user group list, the system managed groups can be easily identified by the Veeva icon beside the group name.
Audit
All changes made to custom user groups are tracked in the System Audit Log.