Creating add requests from the Search widget
DM
DS
ST
When you cannot find the record you are looking, submit an add requests from the search widget to create the record.
A data change request (DCR) is submitted to data stewards to validate and create the record in Network; however, the record is also available immediately in your internal application or Network (if you are using the widget in the Network Portal) so you can action it.
Submit an add request
- On the search results page, click Create New.
- Select the Country and click Create Record.
-
A new page displays so you can add the record information.
-
If you searched using the Quick Search Bar - Add the record details.
-
If you searched using the Advanced Search form - The values from the form are pre-filled in the add request, if possible. This includes sub-object field values.
Include any additional information that you have for the record; for example, addresses and licenses.
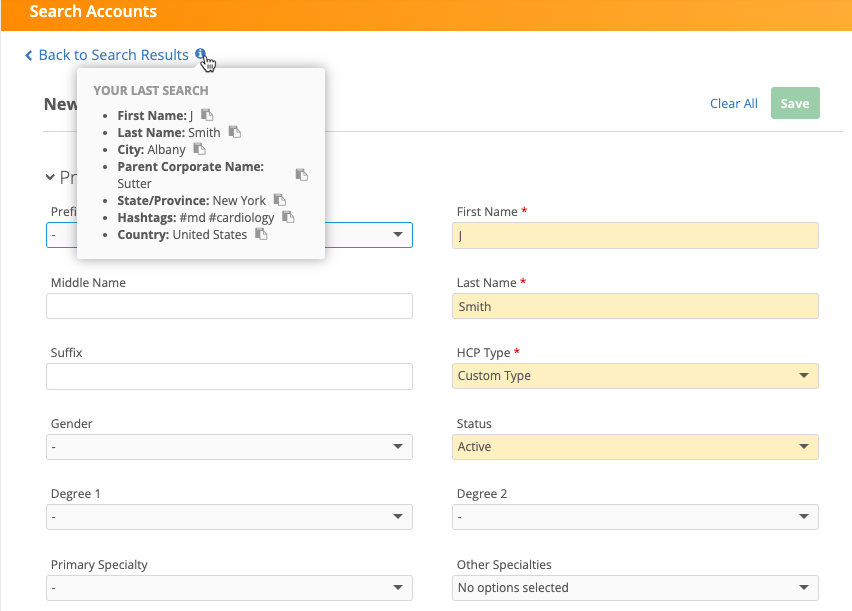
 Considerations for copied values
-
Profile layout - The field must be in the profile layout used for add requests.
-
Default values - Fields copied from the Advanced Search form will replace any default values specified on the add request profile layout.
For example, if the default value for the HCP Type field on add requests is Prescriber, but you searched for Business Professional, the HCP Type field on the add request will be Business Professional.
-
Reference values - Only values that apply to the country in the add request will be copied.
Example
If you search for John (First Name), Smith (Last Name), Prescriber (HCP Type), and France (Country) and then create an add request for a US record, only John and Smith will be prefilled in the add request. France will be dropped as the country and Prescriber is dropped because it is not an HCP Type in France.
-
To remove the values and reset the add request to a blank form, click Clear All.
-
To review your original search terms, click the Info icon on the Back to Search Results link. Not all values (for example, hashtags) are copied to the search form.
-
-
- Click Continue to review the information that you just added.
On the summary page, you can validate the information that you just provided. If you need to make any changes before submitting the record, click the Back to link.
- In the Notes field, optionally add some information to provide details for the data steward who will process this request.
- Click Add Account to submit the add request to a data steward to process.
The record is now available in your internal application so you can immediately action it.
For details about the created record, see Records created from add requests.
Recommended details for add requests
When records are added, they are routed to data stewards to process.
Include the following details to ensure that data stewards can validate the information and quickly accept the record.
-
Address - Provide at least one address (ideally with a suite number and phone number).
The following address types are available:
-
Professional and Preferred (B) - A business address to which the provider has indicated they want their mail delivered. B refers to “both.”
- Mail Only (M) - Where the HCP wants material to be mailed. This can also be a residential (home) address.
- Professional (P) - A business address.
- Address (U) - An address that cannot be confirmed as any of the above. U refers to “unknown.”
-
- Gender
- Specialty or Degree
- Phone number - (Particularly for HCPs) Include a phone number in your comments so data stewards can easily complete a call verification.
- License or NPI number
- Custom key - In the event that this record is merged with another in future, add a custom key A cross-reference between an identifier from an external system and a Network ID. to ensure it can be subsequently unmerged if necessary.
Simplify add requests
Administrators can configure field and object settings on custom profile layouts to simplify add and change requests submitted through .
For example, you can indicate required fields, or limit the values that are available for specific fields.
For details, see Widget profile layouts.
Recover cleared values
If you accidentally clear the values from the add request form, you can recover them.
-
On the add request, click the Back to Search Results link.
-
In the Unsaved Changes pop-up, click Discard Changes.
-
The Search Results page displays with your search terms. Click Create New.
-
Confirm the country and then the add request displays with the fields populated with the values again.