Creating custom fields
DM
Administrators can extend the Veeva Network MDM data model by adding custom fields to any of the Veeva standard objects (HCOs, HCPs) or custom objects in your Network MDM instance.
Custom fields have a suffix of __c and can be configured to use a standard list of values, using reference types.
Veeva OpenData considerations
Veeva OpenData does not provide data for custom fields; they are private to your Network Address Inheritance instance and are not shared with Veeva OpenData.
Supported objects
Custom fields can be created for Veeva standard objects and for custom objects.
Primary type custom fields
For specific details for creating Network Calculated or Unique Checkbox primary fields, see Primary type custom fields.
Add a field
When you create a custom field, you define the field name and type, the countries and entities that it applies to, and the change behavior.
To create a custom field:
-
In the Admin console, click Data Model and select a data domain.
- Select the object to add the custom field to.
-
In the Fields section, click Add Field.
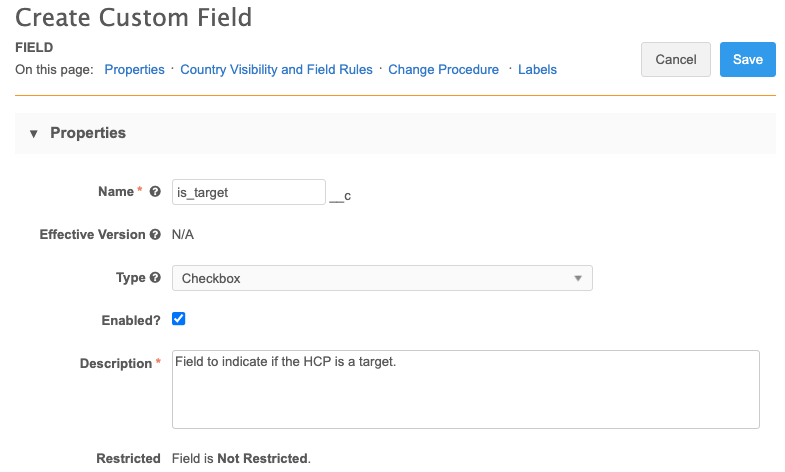
Define the following details for the new field:
-
Name - Type a unique, lowercase internal name. The underscore (_) character can be used. No other symbols are supported.
Fields that are created for custom objects have the object name is added as a prefix to ensure that duplicate fields are not created across objects.
Note: Field names cannot be changed after the field is created.
-
Type - Expand the list and select a field type (for example, integer, decimal, date, and so on).
Ensure that the type is correct. The field type cannot be changed after the custom field is saved.
 Custom field types
The following field types are available for custom fields.
Field type Description Text Supports any combination of letters, numbers, and symbols. Integer number Supports any whole (non-fraction) number. Leading zeros are removed. Decimal number Supports any whole number or fraction. Leading zeroes are removed. Date (no time) Supports any date formats (month, day, year) as well as a calendar (pop-up window). Date and time Supports any date formats (month, day, year) and time combination (hour, minute, second). Checkbox Supports true (checked) or false (unchecked) values. Reference Supports only values defined in the associated reference type list of values. You must select the reference type used for displaying the list of allowed values in the custom field. Alternate key Specifies the alternate key format. You must define the alternate key User directed automated jobs that improve data quality by targeting specific data quality issues like sub-object inactivation and data deduplication detection. rules. For more information, see Alternate keys.Primary Enables use of a primary designation on sub-objects. See Primary type custom fields for more details. -
Depending on the selected field type, the following settings display.
Most field types
-
Length - Type the maximum recommended length for the field. Displays for most field types.
Note: Field lengths are suggestions only. Field length is not enforced in Network MDM.
Reference field type
-
Reference Type - Assign the list of values that will be used for the fields.
-
Allow multiple values - Set the field to accept more than one value.
This setting cannot be removed after the field is saved.
For details, see Multivalued reference fields.
Alternate key type
-
Alternate key rules - Add a NEX rule to define the rules for creating the alternate key value.
Primary type
-
Configuration - Unique Checkbox displays by default.
-
-
The field is enabled by default. Clear the Enabled? checkbox if you are not ready to use the field in your Network MDM instance yet.
-
Description - Type a meaningful description.
- Restricted - Indicates if the field is available to all users or has restrictions. For more information, see Field restrictions.
- (Custom object custom fields only) Search Behavior - This section displays for text type fields only.
Define how the fields are treated during search. Choose one of the following options:
- Identifier - Use for fields that contain numerical or alphanumerical IDs. Records that match the field values (case insensitive and exact match) are ranked higher in search results.
- Name - Use for fields that contain a name. Name fields are prioritized so matches on these fields are ranked higher in search results. This option is only available on custom fields for custom objects (root level entities).
- Other - Use for fields that contain data that are not names or IDs. This option is selected by default.
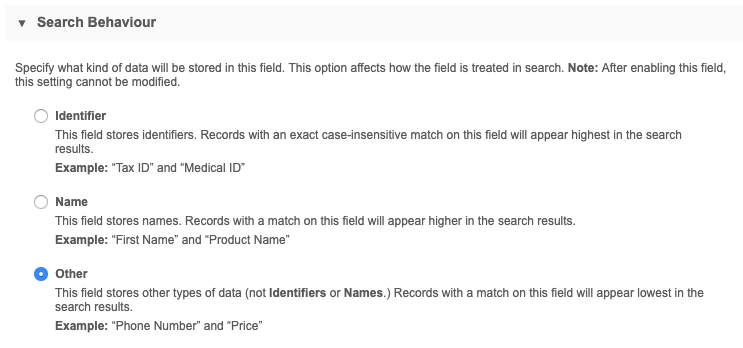
The Search Behavior cannot be changed after the custom field is created. Ensure that you consider the options and choose the appropriate option.
-
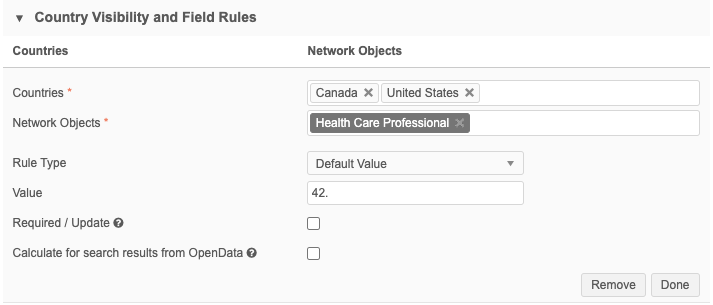
In the Country Visibility and Field Rules section, define the following information:
- Countries - The countries this field is used in.
- Network Object - Define the objects this field applies to.
-
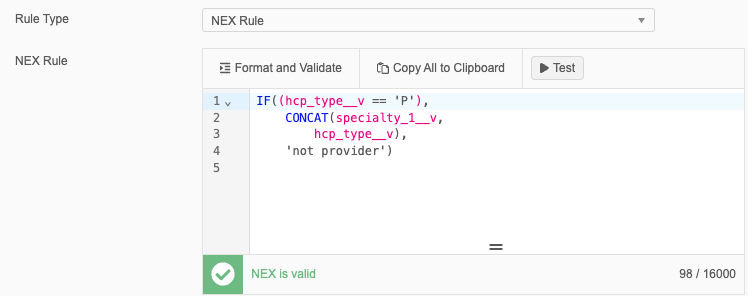
Rule Type - Indicate if you want to use a default value or NEX rule for this field.
-
Default Value - If the field does not contain a value, the Value that you define will be used.
If the Value is blank, no default values will be used for the field. If a Value is added later, empty values in the field will only be populated with this default value if the record is updated (in any manner) in the Network MDM UI.
Tip: Default values for new records can also be defined in the workflow settings. Using the workflow setting ensures that the value is populated when the task is created so it is considered during matching. When the default value is added through this data model field setting, it is applied only when the task is approved.
-
NEX Rules - Define a Network Expression Rules for the field. For example, the rule might calculate a value for the field, or it might cleanse and standardize field values.
NEX rules for lookup tables are supported for custom fields.
Write the NEX rule in the provided box. The expression validates as you write the rule.
-
Format and Validate - Click to organize the expression in a readable format.
-
Copy All to Clipboard - Use if you need to copy the expression and save to your clipboard.
-
Test - Use a valid Network ID (main object) to test the outcome of the expression.
-
Expand - For long rules, use the handle (
 ) to expand the box so you can see the entire rule.
 For more details about formatting and testing NEX rules, see NEX Tester.
Note: NEX rules on custom fields for sub-objects can read only the fields on that sub-object. NNEX rules on main objects can reference custom fields on the related sub-objects though. For example, a NEX rule for a custom field on an HCO record can reference address custom fields, but the opposite will not work.
Important: When the custom field is created, the NEX rule does not backfill existing records. The NEX rule runs only when a record is added or changed.
Formatting considerations for NEX rules
-
Rules expressions must not include square braces ([ ... ]). This is different than the requirement for NEX rules in source subscriptions.
-
Data model field names are case-sensitive.
-
Field names that begin with a number; for example,
340B_id_1__v, must be enclosed in backticks (`).Example
[
"IF(`340B_id_1__v` == '5', SET(hco_status__v,'I'))"
]
For examples and details, see NEX functions, NEX operators, and SELECT statements.
-
-
Required/Update - This setting depends on the selected Rule Type.
-
Default Value - Selecting this option makes the field required when a record is added or updated in the Network MDM UI.
-
NEX Rule - Selecting this option will update the custom field value if the record is being updated in the Network MDM UI.
Note: This setting applies only when records are manually added or updated in the Network MDM UI; it does not apply when data is loaded into Network MDM.
If the field is restricted, this option is dimmed.
-
Example NEX rule
IF(NOT(ISEMPTY(expiration_date__v)),DATEADD(day,30,DATE(expiration_date__v,'yyyy-MM-dd')))This expression adds 30 days to the license expiry date, if a license expiry date exists (is not empty).
If Required / Update is not enabled, the expression will only run if a value isn't supplied. If Required / Update is enabled, the field will always calculate the new value.
Note: Avoid defining rules to set default values for automatically computed fields; for example, for the primary address or primary affiliation
The primary affiliation of an HCP or HCO. fields. Values you set for these kinds of fields will be overwritten. -
-
Calculate for search results from OpenData - Display the default or calculated field values on search results from the OpenData instance to help end users select the relevant entity to download in Veeva CRM. The field and value also displays in the Search API.
Note: Field values will not display when you are previewing OpenData records to download in the Network MDM UI or in .
For more details, see View custom fields in OpenData search results.
-
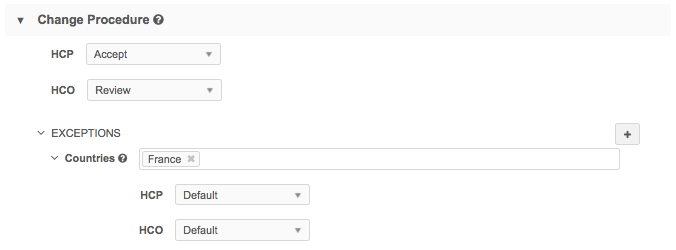
(Custom fields for Veeva standard objects only) In the Change Procedure section, for each object, define how changes to the field value are handled on valid and unverified records.
These change procedure settings apply only to customer-managed fields on local, Veeva OpenData, or third-party records. Veeva OpenData fields and third-party managed fields are always reviewed by data stewards for those data providers.
Note: On unverified (Under_Review) third party records, customer-managed fields can be automatically accepted or sent to local data stewards for review only if the Allow change requests for customer manged fields on unverified records setting is set to Yes on the third party system configuration. Otherwise, the change request will be automatically rejected. For more details, see Add a third party system.
Select one of these options:
-
Accept - Changes to this field are accepted automatically.
-
Review - Changes to this field are always forwarded for local data steward review.
This will overrides the auto-approve workflow setting, if it's set.
- Default - Change behavior is defined by the global workflow settings (for example, if the workflow setting is set to Auto-Approve for an object, then changes to this field are auto-approved; otherwise, changes are routed to local data stewards).
To create exceptions to the change procedure by country, click the + icon and type one or more countries affected by the exception. This field auto-completes as you type. Then select the change procedure for each object.
-
-
In the Labels section, select a language and type the baseline field label that users will see when viewing the field in a profile, and in data steward tasks. You can click the Add Label link to add labels for additional languages.
-
Save your changes.
-
A confirmation dialog displays. Confirm that the Field Type and Search Behavior (is applicable) are correct. These settings cannot be changed after the field has been saved.

-
Click Cancel to return to the field configuration and change the settings.
-
Click Yes, Continue and Save to accept the configuration and save the custom field.
The field is now available to use in the applicable record profiles.
-
Adding new data model countries to fields
When a new data model is added for a country, the county is not automatically added to custom fields unless you have at least one existing record for that country in your Network MDM instance.
Example
A data model is added for Armenia and Uzbekistan. These countries were previously part of the Other Countries (ZZ) data model. Several custom fields and reference values were available for the Other Countries (ZZ) data model.
Your Network MDM instance has at least one record for Armenia, but it has no records for Uzbekistan. Armenia will be added to the custom fields and reference values automatically; Uzbekistan will not be added.
Manually adding a country
It is always best to check if the country has been added to the field. If it has not been added, manually update the field to add the country.
This includes custom fields (for example, name__c, status__c) that are created when a custom object is enabled in your Network instance.
Learning about new country support
When Veeva OpenData adds a data model for a country, it is announced in the Veeva Network MDM Release Notes and the Veeva Network MDM Data Governance document that is published on Veeva Support for each release.