Lookup tables
DM
You can import lookup tables into your Network instance to perform operations and to calculate or validate data. These multi-value reference lookups are stored in Network so you can cross-reference your object data.
Lookup tables support Veeva standard objects and custom objects.
Supported features
Lookup tables can be used in Network expressions for source subscriptions and data model fields. You can report on lookup tables using the SQL query editor.
Lookup functions
Lookup tables are used in Network Expressions (NEX rules). The lookup functions can be used in field calculations and source subscriptions. For example, you might want to use a lookup table to populate a field value or to evaluate data to produce a warning or reject a record. You can use the NEX rule to fail a subscription if a defined number of records don't comply with the validation.
Note: The fields that are used in the function must be related to the object; for example, do not include an HCP field for an address lookup.
Use the following functions in NEX rules to reference a lookup table:
Use this function to look for a value from a range (one or multiple columns in a row) and then returns a value in the same row.
Syntax
LOOKUP('lookup_table_name', 'column_name', <lookup_column_1>: <expression1>, <lookup_column_2>: <expression2>)
where
-
column_name is the column in the lookup table that the data will be returned from.
Create a lookup table that maps HCP Type to record type.
Lookup table (type_mapping__t)
| hcp_type | record_type |
|---|---|
| P | HCP |
| N | HCP |
| R | HCP |
| O | HBP |
| STAFF__C | HBP |
NEX rule
Results
-
If the HCP Type is P (Prescriber), return HCP.
-
If the HCP type is O (Business Professional), return HBP.
Support for field collections
A collection of fields can now be referenced in LOOKUP and LOOKUPN functions for NEX rules.
Example
You can include some of the specialty set of fields (speciality_1__v to specialty_10__v) in the LOOKUPN() function.
JOIN(LOOKUPN('specialtymatrix__t', 'product_family_name__c', product_specialty__c: [specialty_1__v, specialty_2__v, specialty_3__v, specialty_4__v, specialty_5__v], product_specialty_indicator__c: 'E'), ';')
Use this function to lookup all values matching a key in the defined lookup table. For example, you can use the functions to store a product family in a custom field. This new function is very similar to the LOOKUP() function, but it returns all matching values on the table; the LOOKUP() function ends after it finds the first value.
By default, LOOKUPN() returns 100 results. You can specify a parameter to limit the number of lookups returned. The maximum limit is 500 values. If more than 500 is defined, the NEX rule automatically fails. In a source subscription, the job will complete, and the error displays in the Job Error Log.
Syntax
LOOKUPN('lookup_table_name', 'column_name', <limit_parameter>, <lookup_column_1>: <expression1>, <lookup_column_2>: <expression2>)
where
-
column_name is the column in the lookup table that the data will be returned from.
Lookup table (spec_matrix__t)
| specialty | product | restriction |
|---|---|---|
| CD | Cholecap | Allow |
| ON | Cholecap | Restrict |
| CD | Restolar | Restrict |
| ON | Restolar | Restrict |
NEX rule
Results
-
Finds restricted products for an HCP who's specialty is ON (Oncology)
Returns: ['Cholecap','Restolar']
-
Finds restricted products for an HCP who's specialty is CD (Cardiovascular Disease)
Returns: ['Restolar']
Note that a collection is returned. To generate a string that is delimited from the collection, use the JOIN function with LOOKUPN.
Empty values
If a field contains an empty value, the empty value is returned in the results. For example, if the lookup returns two values but the first value is null, the null value and separator displays with the text value.

Use this function to format an array of values using a delimiter.
Tip: To ensure that the array returned by the LOOKUPN function can be easily managed in a field or another calculation, always use JOIN with LOOKUPN.
Syntax
JOIN(<collection>,<separator>)
Note: Format the returned array so each value is separated by a pipe (|).
This returns the following result: "abc|Edgar|def|Elum"
In a source subscription, create an after update rule for the lookup table, address__t, that returns a maximum of 10 postal codes from the United States and Spain. Format the returned array so each value is separated by a pipe (|).
[
  "postal_code_list__c = JOIN( LOOKUPN('address__t', 'postal_code__v', 10, country__v: ['US', 'ES']), '|')"
]
Use this function to look for a value from a range (one or multiple columns in a row) and then returns TRUE if value found, FALSE otherwise.
Syntax
LOOKUPVALIDATE('lookup_table_name',<lookup_column_1>: <expression1>, <lookup_column_2>: <expression2>)
This example uses a lookup table called spec_matrix__t.
Lookup table
| specialty_code | specialty_name | cholecap | restolar |
|---|---|---|---|
| CD | Cardiovascular Disease | Allow | Restrict |
| ON | Oncology | Restrict | Allow |
NEX rule
Leverage one specialty field:
Leverage two specialty fields:
Results
-
If the HCP's specialty is CD, then the NEX rule will return FALSE.
-
If the HCP's specialty is ON, then the NEX rule will return TRUE.
This function checks for the existence of a lookup table and returns TRUE if exists, FALSE otherwise.
Syntax
TABLEEXIST('lookup_table_name')
Use this function display a warning in the job history for any record failing certain criteria.
Note that this is not specifically for lookups. It can be used for other NEX functions also, for example, REJECT().
Syntax
[
"IF(LOOKUPVALIDATE('addressdata__t', postal_code__v: UPPERCASE('a12b3c'), locality__v:'springfield', administrative_area__v: concat('NY', 'C')), LOGDETAILWARN('The address combination is incorrect'))"
]
Examples - source subscriptions
Example - LOOKUPVALIDATE()
In a source subscription, create a transformation rule that uses a lookup table to validate address data. If the addresses being loaded cannot be verified using the cross-referenced data in the lookup table, create an error.

[
 "IF(!LOOKUPVALIDATE('addressdata__t', postal_code__v: postal_code__v, locality__v: locality__v, administrative_area__v: administrative_area__v), LOGDETAILWARN('The address combination is incorrect'))"
]
Example - LOOKUP()
Create a transformation rule to query the value of a specific column in the lookup table by providing multiple parameters to find the desired combination in the table. For example, create a lookup for cluster codes.

[
"address_text__c = LOOKUP('addressdata__t', 'country__v', postal_code__v: postal_code__v, locality__v: locality__v, administrative_area__v: administrative_area__v)"
]
Example - TABLEEXIST()
Create a feed acceptance rule that verifies that the lookup table exists and if the table is empty. Fail the data load if the lookup table or data is missing.

[
"IF(!TABLEEXISTS('addressdata__t'), FAILJOB('Reference dataset missing or invalid'))"
]
Examples - data model fields
Use the lookup functions to calculate the value of a field.
Select the field in the object configuration (Data Model > Data Domains) and click the Visibility in Countries section to add a NEX rule.
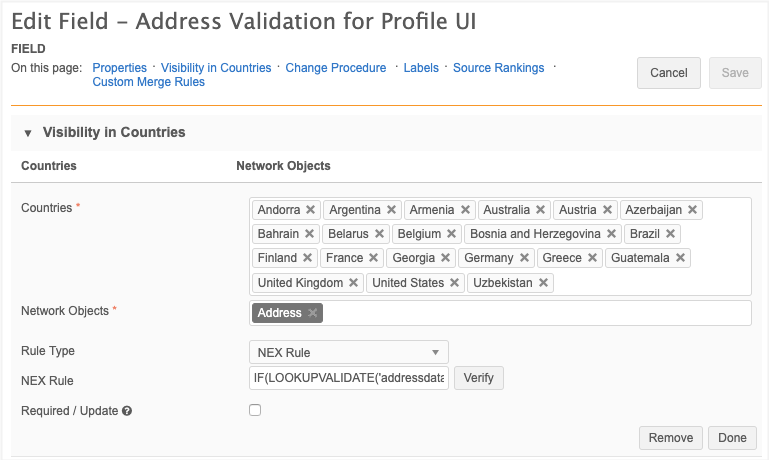
Note: Do not use square brackets ([ ]) in a NEX rule for a custom field. Errors will occur in data change requests if these characters are used in the rule.
Example 1 - LOOKUP()
Use the this NEX function to calculate a reference field value based on specific fields.
This example calculates the hcp_subtype__c reference field based on medical_degree_1__v and credentials_1__v. The ?? coalescing operator functions as ELSE, so if the lookup does not find anything, D becomes the value of the hcp_subtype__c field.
(LOOKUP('hcp_subtype_mapping__t', 'hcp_subtype', medical_degree:medical_degree_1__v,credentials:credentials_1__v) ?? 'D')
Example 2 - LOOKUPVALIDATE()
Use a NEX rule to calculate a boolean value (for example, VALID or INVALID and TRUE or FALSE) to a custom field if a combination between fields contained in the lookup table exists or not.
In this example, the function will return a Y or N value for a Boolean reference field if a value is found in the addressdata__t table
IF(LOOKUPVALIDATE('addressdata__t', postal_code__v: postal_code__v, locality__v: locality__v, administrative_area__v: administrative_area__v, country__v: country__v), 'Y', 'N')
Example - data cleansing
Data cleansing dictionaries (.csv files) can be added to Network as lookup tables. Use the CLEANSE_STRING function in a NEX rule with the data dictionary to cleanse and standardize field values.
Example
In this example, the company_name_dcd .csv file was added to Network as a lookup table. When the NEX rule runs (in a source subscription job or when a record is updated (if the rule is applied to a data model field), the rules in the data cleansing dictionary are applied.
[
    "company_original_name__c = company_name__c",
    "company_name__c = CLEANSE_STRING(company_name__c, 'company_name_dcd__t')"
]
For more information, see Data cleansing.
Create a lookup table file
Lookup tables are files that you can create and import into your Network instance. Lookup tables can also be created by using transformation queries in source and target subscriptions.
The files must have the following requirements:
- Format - Files must be in .csv format
-
Size - Files cannot exceed 1 GB.
If your file exceeds this limit, consider creating a custom table instead. Custom tables have no size limit.
- Rows - A maximum of 5 million rows can be included in each file. Note that this limit is not validated when you upload a file; the limit is enforced when a source subscription runs. If the row limit is exceeded, the subscription job will fail.
- Headers - Column headers can only contain lowercase letters, numbers or underscores. They must start with a letter. Headers cannot be blank or contain spaces.
- Delimiters - Commas are supported
Example file

Upload a lookup table
A maximum of 50 tables can be added to your Network instance.
To add a lookup table to your Network instance:
- In the Admin console, click Data Model > Lookup Tables.
-
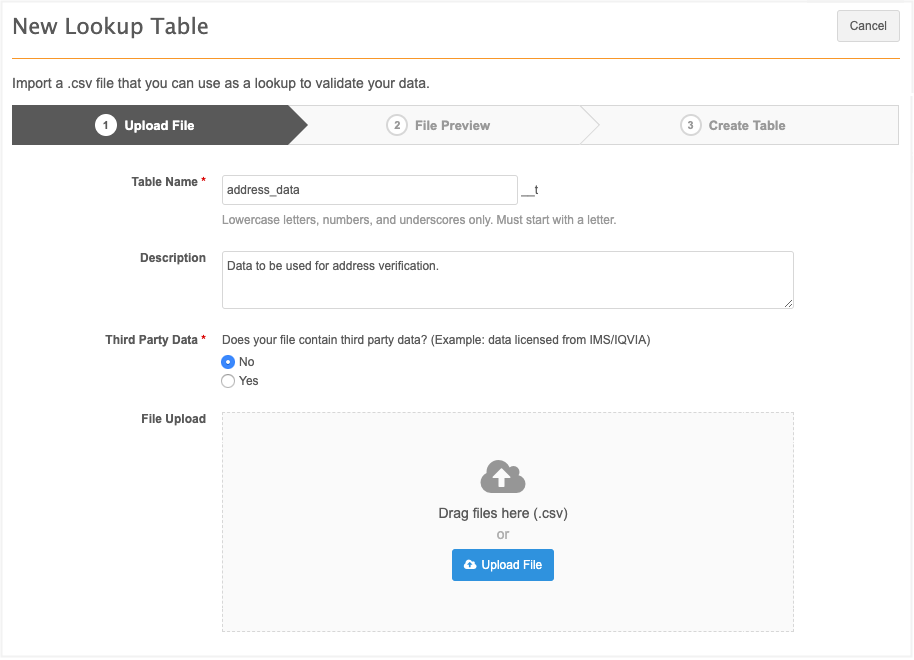
Click Create Lookup Table.
The New Lookup Table page displays.
-
On the Upload File tab, the following details are required:
-
Name - Type a name for this table.
Names must follow these requirements:
- be lowercase letters, numbers, and underscore characters (_) only
- start with a letter
- be a minimum of two characters and cannot contain more than 255 characters.
- must be unique. Duplicate table names are not supported. If a table is deleted, that name can be reused.
- Description - Provide a meaningful description. Descriptions can contain a maximum of 255 characters
- Third Party Data - Indicate if the file that you are uploading contains third-party data. If you choose Yes, confirm that you either have a TPA in place, or that your agreement with the third-party data provider does not require a TPA for Veeva to receive the data.
The responses to these questions are logged in the System Audit Log. For details, see Confirming third-party agreements.
-
File Upload - Drag your .csv file into the box or click Upload File to choose a file.
When the file is being uploaded, the data is scanned and validated. If there are any issues, fix them and upload your file again.
-
-
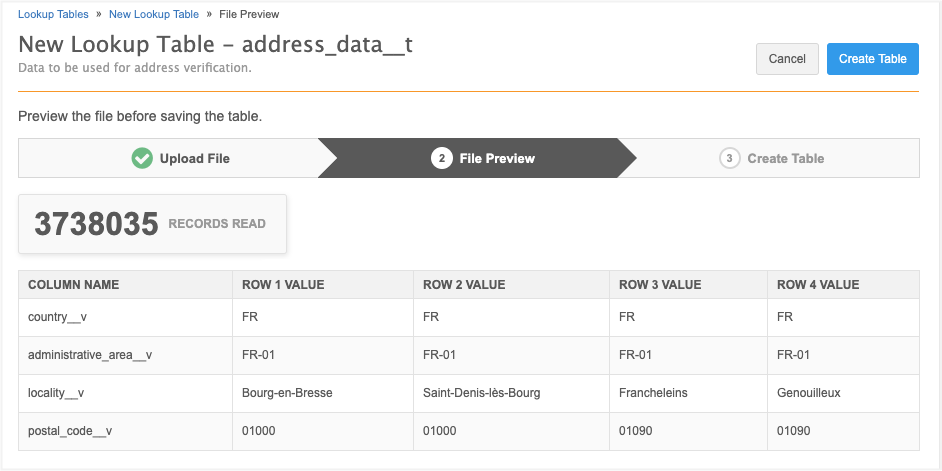
The File Preview tab displays a count of the records read from the file (not including the column headers). Four rows of data display by default so you can review the column and row values.
-
Click Create Table.
The lookup table is created and is highlighted on the Lookup Tables page.
If there was an issue, the table will be created but a message will display to advise you that the upload failed. Re-upload the table.
You can now create NEX rules that reference this table. Note that the table name must include the __t suffix when it is used in your NEX rules.
Lookup table options
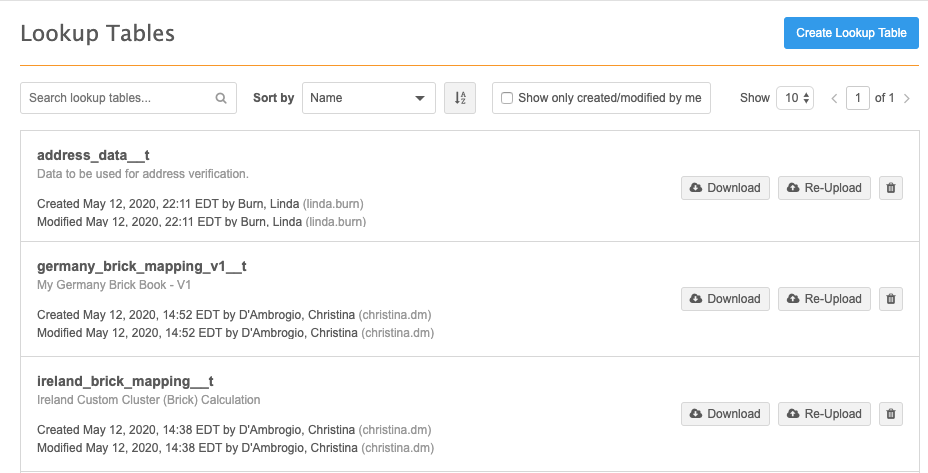
On the Lookup Tables page, you can search for a specific table name or sort the list to find your lookup table.

Download lookup tables
After a table has been created, you can download the table from the list on the Lookup Tables page. Click the Download button to save the lookup table to your local computer.
Re-load tables
You can override an existing lookup table by re-loading the file. On the Lookup Tables page, click Re-Upload in the table row.
The wizard will open again so you can choose a file. The name and description cannot be changed, but you must confirm the Third Party Data question again. Preview the file and click Update Table. Messages will display on the Lookup Tables page to confirm that the table was updated.
Delete lookup tables
If they are no longer used, or created in error, lookup tables can be removed. On the Lookup Tables page, click the Delete icon in the table row.
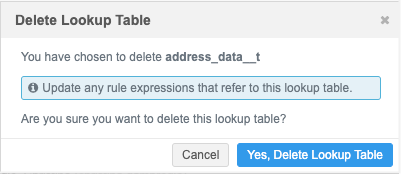
Note: Network rule expressions that reference the table are not deleted during this process; they must be updated.
Lookup table logs
Administrators can view logs for lookup tables in the System Audit History. Any time a user creates, re-uploads, downloads, or deletes a lookup table, the event is logged.
For compliance, whenever a user confirms that third party data is being loaded into Network, it is also tracked in the System Audit History.
Configuration management
Lookup tables cannot be exported to a target environment using the Configuration Export feature. The tables must be created in each Network instance.
Reports
Advanced reporting users can run queries against lookup tables using the SQL Query Editor. For more information, see Reporting on lookup tables.