Adding records
DM
DS
ST
You can manually add records to your local data. The new record is added or merged![]() The process of combining successfully matched records, or those manually identified as the same. with existing data pending further review. If a new HCP or HCO record meets the criteria for Veeva OpenData or a third-party master source, the add request
The process of combining successfully matched records, or those manually identified as the same. with existing data pending further review. If a new HCP or HCO record meets the criteria for Veeva OpenData or a third-party master source, the add request![]() A request to add a new HCP or HCO profile to a customer instance. Add requests are matched against existing data before routing to customer data stewards for review. is sent to that system. You can also add custom object records to your local data.
A request to add a new HCP or HCO profile to a customer instance. Add requests are matched against existing data before routing to customer data stewards for review. is sent to that system. You can also add custom object records to your local data.
Tip: Before you add a record, search for it to see if it already exists or if it can be downloaded from OpenData.
Create a record:
-
Add a record using one of the following ways:
Network MDM feature Details Supported Users Home Click Submit a new Change Request. Standard Users, Data Stewards If the link does not display, you have read-only access to the Network MDM instance.
My Requests Click Add Record. All users that can access the Network MDM UI. Search Results Click Add Record. All users that can access the Network MDM UI. Inbox Click Add Record. Data Stewards, Data Managers, System Administrators -
The Add Record dialog box displays. Select a Record Type and Primary Country for the record and click Next.
The primary country cannot be changed after the record is submitted.

Custom objects
Custom objects can be created. If the object is dimmed in the Record Type list, contact your Administrators.
Administrators must complete the following tasks so users can create custom objects:
-
Define a profile layout for the custom object.
-
Give users edit permission for the custom object; set the Data Read-only access permission in the data visibility profile for that country to False.
If dynamic access control is enabled on a custom object and a Data Steward is not included in the rule, the custom object is available in the list and a record can be created but it will be immediately locked after approval.
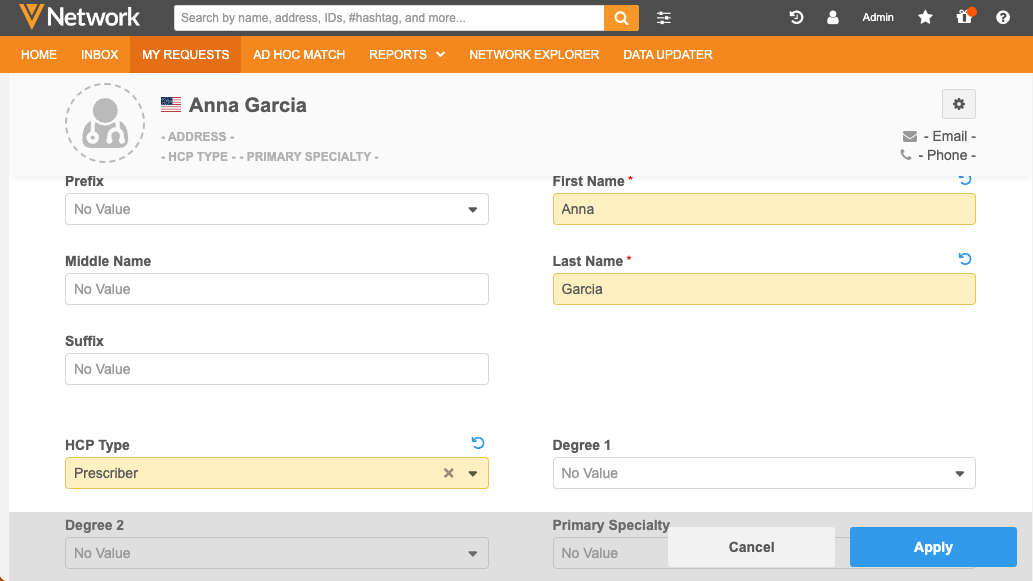
Add record information
The Add New Profile page displays. The summary header section includes a blank header with a generic title and the primary country.
Recommended details for add requests
When records are added, they are routed to data stewards to process.
Include the following details to ensure that data stewards can validate the information and quickly accept the record.
-
Address - Provide at least one address (ideally with a suite number and phone number).
The following address types are available:
-
Professional and Preferred (B) - A business address to which the provider has indicated they want their mail delivered. B refers to “both.”
- Mail Only (M) - Where the HCP wants material to be mailed. This can also be a residential (home) address.
- Professional (P) - A business address.
- Address (U) - An address that cannot be confirmed as any of the above. U refers to “unknown.”
-
- Gender
- Specialty or Degree
- Phone number - (Particularly for HCPs) Include a phone number in your comments so data stewards can easily complete a call verification.
- License or NPI number
- Custom key - In the event that this record is merged with another in future, add a custom key
 A cross-reference between an identifier from an external system and a Network ID. to ensure it can be subsequently unmerged if necessary.
Simplify add requests
Administrators can configure field and object settings on custom profile layouts to simplify add and change requests submitted through .
For example, you can indicate required fields, or limit the values that are available for specific fields.
For details, see Widget profile layouts.
Expand or collapse profile sections
By default, profiles are fully expanded so you can view all sections within a profile. You can collapse sections to view sections on the screen more easily.
To collapse or expand one section:
- Click the triangle to the left of the section.
To collapse or expand all sections:
- Click the Options
 menu. Choose Expand all page sections or Collapse all page sections.
Apply changes
When you have finished adding the details, click Apply on the ribbon at the bottom of the page.
On the Apply Add Request dialog, complete the details.
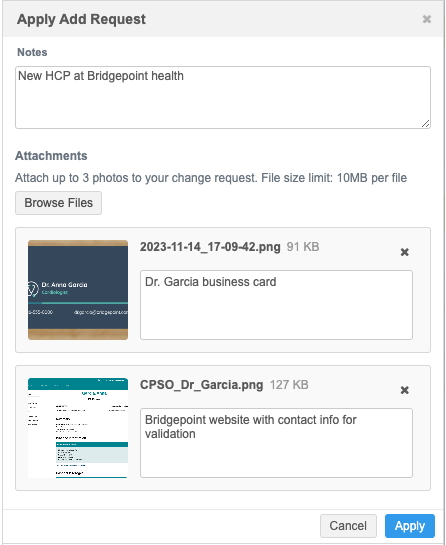
Notes
Include information to help Data Stewards easily process the add request.
Attachments
If attachments are supported, you can add image files to provide supporting information or evidence that Data Stewards can use to quickly validate the requests.
For details, see Attachments on DCRs.
Attachments not supported
Attachment support can be configured for each object in your Network MDM instance.
If attachments are not supported for the request, the Browse button does not display. You can leave a comment for Data Stewards.
Records for OpenData
If a banner displays the following message: OpenData does not support attachments for this country. Files added will not be sent to OpenData then OpenData does not support attachments for this country.
OpenData Data Stewards will not see or know if you have added attachments to a DCR for that country.
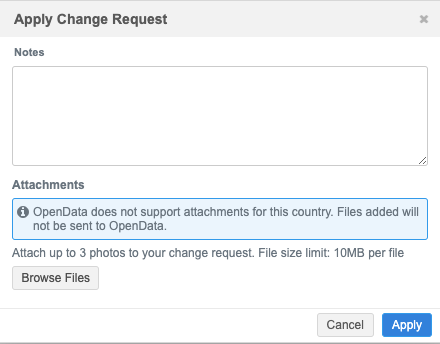
You can still add attachments to the request. They will not be included on the DCR for OpenData, but they are available to local Data Stewards to review for local fields.
Disclaimer
For compliance, confirm that the information you are submitting was not sourced from another master data provider. This ensures that data that you license from another provider is not shared with another master provider.
The following message displays when you submit a data change request that will be routed to a master data provider (OpenData, IQVIA OneKey, or another third-party data provider).
Disclaimer
I confirm that the information I am submitting is based on my personal observations, research or interactions with an HCP/HCO, and is not based on any information my company licensed from another data provider.
The Apply button is dimmed until the Disclaimer is selected.
Submit a record
After you apply your changes to the new record, the request is routed to the appropriate Data Stewards for review. You can access the add request on your My Requests page.
If a Data Steward or System and Data Admin user submits a local record, it is automatically accepted. Requests that are routed to Veeva OpenData but are then rejected can also be automatically accepted as a local record if the workflow settings are configured to review rejections.
View the new record
When the add request is processed and accepted, the record is available to view.
To view the record:
-
My Requests page - Click the link in the Entity column. When the add request is accepted, the entity name becomes a link.
-
Search - Use the Network MDM search bar or Advanced Search to find the record.
Record profiles
The profile page contains any accepted data that you provided.
The Record Information section is populated with the latest data and the External Identifiers section includes any keys generated by Network MDM during the add request process.
Default field values
When a record is added, some fields are pre-filled with default values if no value is provided. This happens when you add a record, save a record, or during data load.
When you add records, you do not have to specify values for default fields unless you want to change the default value. During a data load,![]() A record that has not yet been validated by a data steward. if a source does not have a value for a field with a default value, the default value is used.
A record that has not yet been validated by a data steward. if a source does not have a value for a field with a default value, the default value is used.
Key points for default values:
- They can be set by country.
- They apply to custom fields.
- When used in the UI, Data Stewards do not need to process these fields unless they want to change the default value.
- They can be set for any type of field.
- Upon implementation, they will be set for all identified fields, however existing values will not be overwritten.
- They cannot be blank.
Define default field values
The default behavior for these fields is determined by
They can be defined in custom field configurations or in the workflow settings.
Change a default value
Default values can be changed after they are set. For example. if you download a record from OpenData, a default value is applied. If the value is changed afterward, it does not revert back to the default value.
Survivorship
Survivorship![]() The process by which the final record is determined as duplicate records are merged, resulting in winning and losing values. for fields with default values does not change; field values are overridden using the usual field survivorship process. Data Stewards do not need to edit the default values for fields unless they want to change the value.
The process by which the final record is determined as duplicate records are merged, resulting in winning and losing values. for fields with default values does not change; field values are overridden using the usual field survivorship process. Data Stewards do not need to edit the default values for fields unless they want to change the value.
Create an unverified record (reserve a Network ID)
When an add request is submitted, a Task ID is immediately returned to the user. The Network ID for the record is created only when the request is approved.
However, if an add request is created using the API, Network MDM can provide a Network ID for a new record as soon as it is created. This enables you to use the Network ID as an identifier in your downstream system.
Enable Create Unverified
Prerequisite
-
An Administrator must enable the Create Unverified option in the Workflow Settings (Settings).
To enable this feature:
-
A Network Integration user must update the Change Request API to set the value for the reserve_vid parameter to true.
For details, see the Change request API documentation.
Search behavior
If you search for an entity using the reserved Network ID before the record is created, an error message displays:
Reserved VID cannot be found. Please try again later.
Match behavior
No matching occurs within your Network MDM instance on records before the task is created.
If the entity type of the record is managed by Veeva OpenData, the add request is routed directly to OpenData. If the entity type is managed locally, the add request is immediately routed to local Data Stewards. This behavior enables you to get the Network ID immediately for an unverified record.
Matching occurs when the task is created. If the record matches with an existing local record, the add request becomes a change request and the records are merged when Data Stewards process the task. If no match is found, the request remains an add request.
If the reserve Network ID feature is not enabled, add requests go through the ACT matching process before the task and the unverified record is created, but the VID is not available until the task is created.
Logs
The reserved Network ID is logged in the Task Audit History in the Message column.