Data validation rules
Custom keys
Data validation rules can now be created for custom keys on HCP and HCO objects. This is helpful if you manually maintain custom keys and need to validate the Source and Value fields; for example, to check for specific sources and the length of values.
Data validation rules should run only on custom keys that have just been manually created on a record profile. When custom keys are saved, they are read-only and cannot be edited. If validation rules fire for existing custom keys, data stewards cannot resolve the issue on the profile page; it must be resolved through data loading. For this reason, these data validation rules must be thoroughly tested before they are used in production.
This enhancement is enabled in your Network instance by default.
Supported objects
Custom keys supported for HCPs and HCOs only. Custom keys are not supported for sub-objects because custom keys cannot be edited for sub-objects on the profile page.
Clean up existing keys
Before you create data validation rules for custom keys, clean up existing custom keys. Use reports to query existing custom keys and ensure that the Source and Value fields are correct. Existing custom keys are read-only and can conflict with the new rules. If a rule fails on an existing custom key, it must be addressed through data load.
Create a validation rule for a custom key
- In the Admin console, click System Interfaces > Data Validation Rules.
-
In the HCP or HCO section, click the Add
 icon to add a new rule.
 Custom key data validation rules can't be applied to both HCPs and HCOs so rules must be created for both objects.
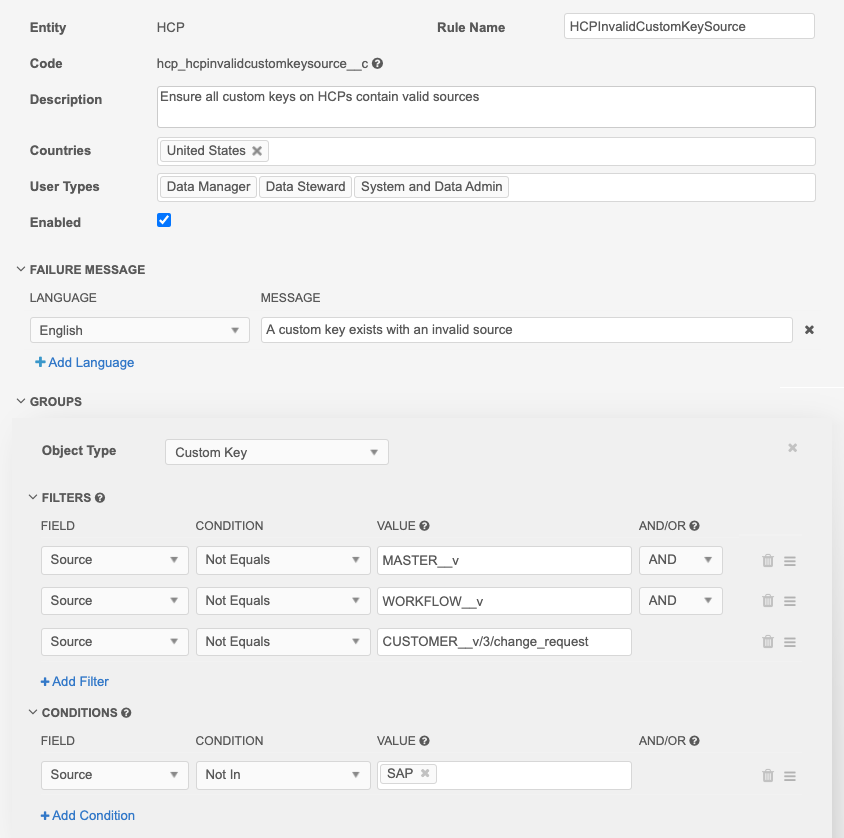
- Type a Description for the rule. For example, Ensure all custom keys on HCPs contain valid sources.
- Select the Countries that this rule applies to.
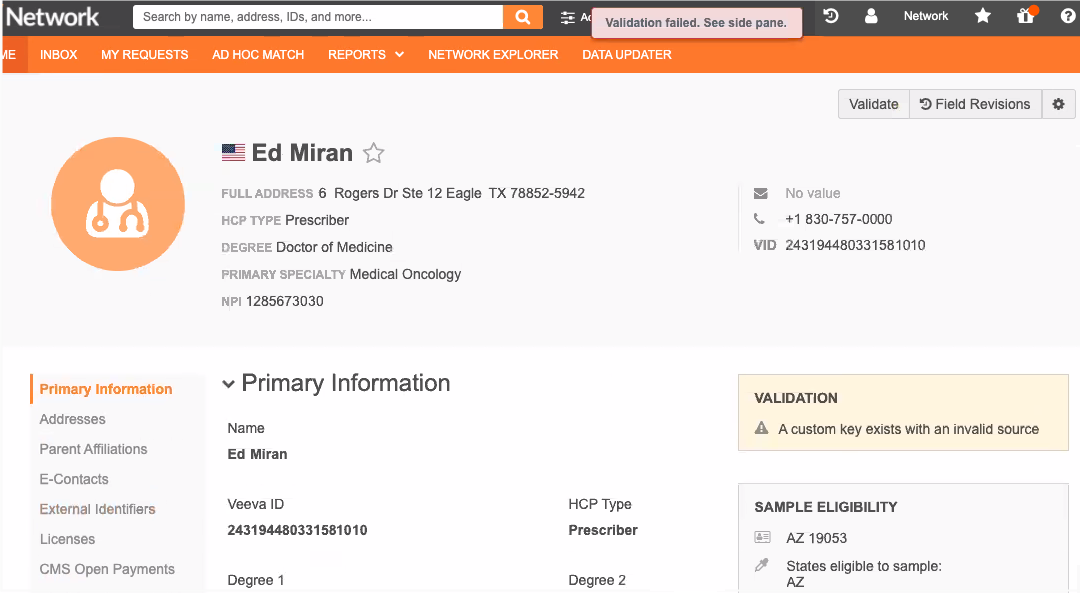
- In the Failure Message section, click Add Language. Choose the Language and type the Message. For example, A custom key exists with an invalid source. This is the error that data stewards will see on the profile page.
- Expand the Groups section and choose Custom Key as the Object Type.
-
Click Add Filter to limit the rule to run on specific records. For example, these data validation rules should run only on custom keys that are manually created, so exclude custom keys that are automatically added or are created from master sources.
- In the Field list, choose Source.
-
In the Condition list, choose Not Equals.
-
In the Value list, type the source name; for example, MASTER__v for Veeva OpenData custom keys.
Every record has a default custom key with MASTER__V as the source, so this source should always be added as a filter. When records are created using the Network UI, custom keys with the sources WORKFLOW__v and CUSTOMER__v/3/change_request are automatically added. These sources should also be excluded from the rules.
- Click Add Filter to specify additional sources to exclude. Choose the AND operator for the filters.
-
Click Add Condition to define the condition that will cause the rule to fail. For example, we want the data validation rule to fail if the source is not SAP.
-
In the Field list, choose Source.
Only the fields that are visible in the Network UI are available in the list: Item Type, Source, Status, and Value. This ensures that a data steward can edit the field value to resolve the validation error.
-
In the Condition list, choose Not In.
Note: If you use the Not Find or Not Equals conditions, custom keys that are automatically added to records (WORKFLOW__v and CUSTOMER__v/3/change_request) can cause issues. Ensure that you add filters for these sources so data validation rules do not run for them.
- In the Value list, type the source name; for example, SAP.
-
- Save the data validation rule.
Example 1 - Validate the source
Create a data validation rule to check that a custom key source name matches the predefined list of sources. In this example, the only source is SAP.
The rule ensures that any custom keys from Veeva OpenData (MASTER__v) or from records that were added using the Network UI (WORKFLOW__v and CUSTOMER__v/3/change_request) are excluded from the rule.
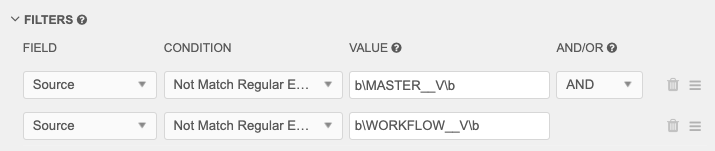
Case sensitive sources
For case sensitive sources, use regular expression conditions. The Find, Not Find, Equals, and Not Equals comparisons are not case sensitive. Also, wrap the source name text with \b; for example, \bMASTER__V\b. Spaces can be included without quotations.
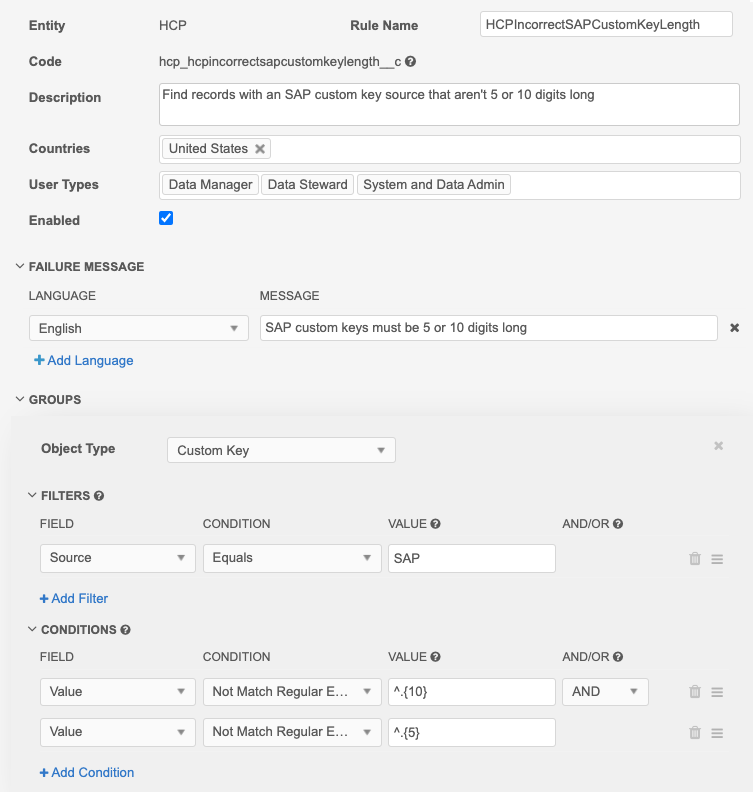
Example 2 - Validate the value length of the custom key
In this example, if the Value field of the custom key is not 5 digits or 10 digits long, the rule will fail. The rule only validates custom keys from the SAP source.
Note: The AND operator must be used for the condition. If OR is used, the rule will always fail.
Testing validation rules
Data validation rules should be thoroughly tested before they are used in production. Create the data validation rules in your Sandbox instance. You might need to adjust the rule or adjust the data manually using source subscriptions. If data stewards encounter a rule that fails for an existing custom key, it cannot be edited on the profile page. The steward will need an administrator to either edit or disable the rule, or to run a source subscription and adjust the custom key values.
Tip: To validate the rules before finalizing them, run reports that mimic the rule criteria.
After the rules have been tested, export the rules to your Production instance using the Export Configurations feature. For more information, see Exporting configurations. Custom fields or reference codes are not exported by default when you export the custom key. These dependencies must be independently added to the export.
New sources
When new sources are added, update your data validation rules.