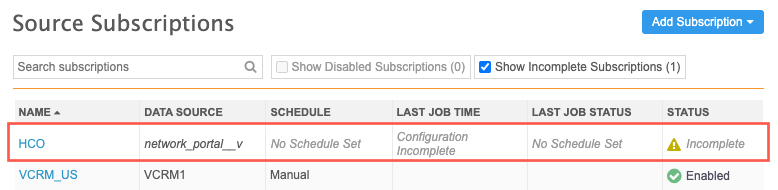
Source subscriptions
Source subscription wizard
Network now provides a wizard to simplify the process of creating a source subscription. Using a sample file of data, the wizard guides you through the steps to define the advanced properties, field normalization, and model map. At the end of the wizard, the classic subscription configuration page opens so you can continue the setup by defining match rules, Network expression rules, and so on.
This feature is enabled by default in your Network instance.
Prerequisite
Before you begin the wizard, create one or more sample files of the data you will load using the subscription. These files are typically much smaller than you would use for the data load; the maximum file size is 30MB. Only the first 50 rows of each file are read.
Add a subscription
To create a subscription using the wizard:
- In the Admin console, click System Interfaces > Source Subscriptions.
-
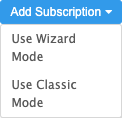
On the Source Subscriptions page, click Add Subscription.
-
Choose Use Wizard Mode from the list.
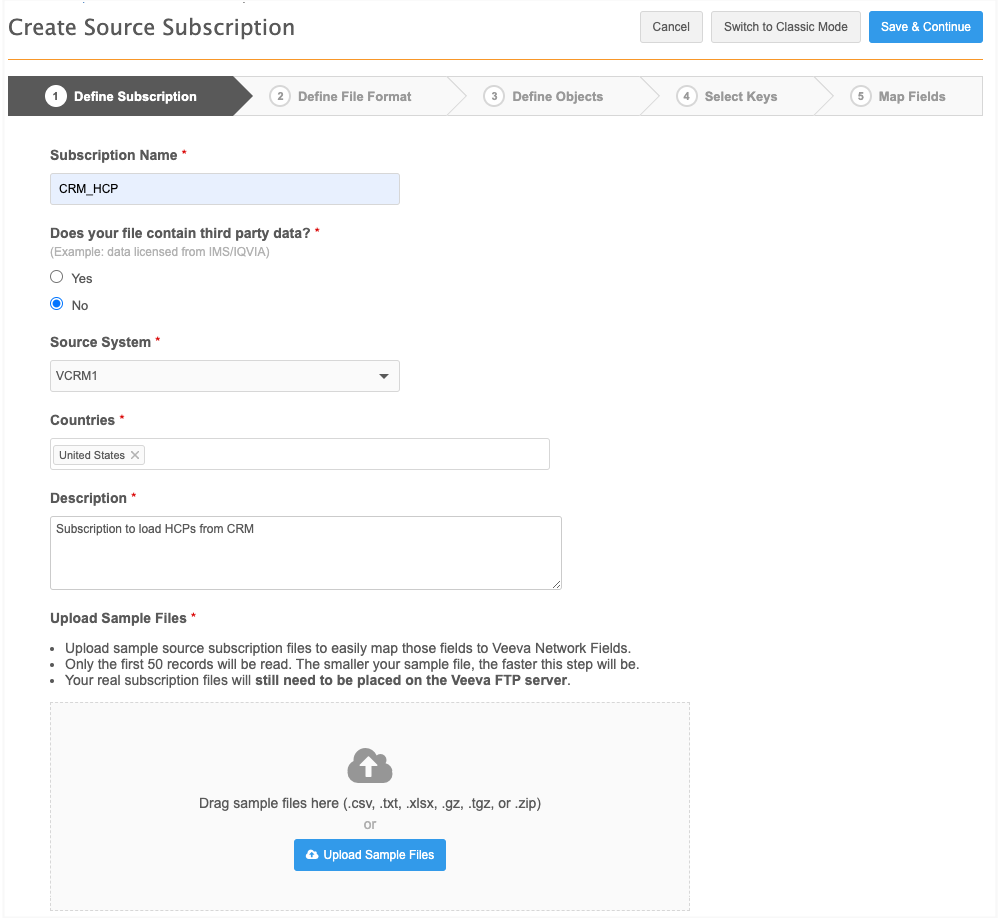
Define subscription
The new source subscription wizard displays.
You can click Switch to Classic Mode to go to the classic subscription configuration page. If you choose to stay in the wizard, the option to Switch to Classic Mode is not available after you save your changes on this tab. When you complete the wizard, the classic subscription page opens so you can continue the setup.
On the Define Subscription tab, provide the following information:
- Subscription Name - Type a unique name.
- Third party data - Indicate if the file that you are uploading contains third party data. If you choose Yes, confirm that you have a TPA in place so Veeva can receive the data.
- Source System - Choose the source that is providing the data. Sources are defined in System Interfaces > Systems.
- Countries - Choose the countries that the subscription data applies to. The countries that you select determine the field values that are available throughout the wizard.
- Description - Provide some information about the subscription.
-
Upload Sample Files - Drag your sample files to the box or click Upload Sample File to choose it from your local computer.
The file is scanned and validated when it is being uploaded. If any issues are found, warnings or a failed message displays.
The upload will fail if any of the following issues are found:
- Invalid file format - The file format is not supported. Files must be in .csv, .txt, .xlsx, .gz, .tgz, or .zip format.
- Cannot process file - The file is not formatted correctly.
- Something went wrong - An unknown issue occurred.
- File size limit exceeded - The file size maximum is 30MB.
-
When the upload is successful, the files display. Click Save & Continue.
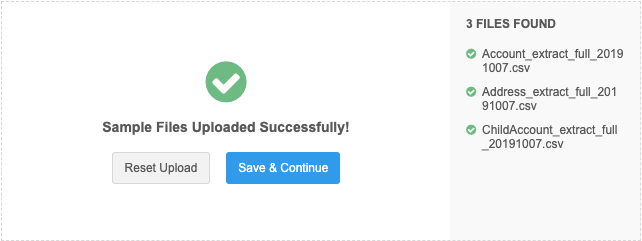
If you mistakenly loaded a file, click Reset Upload to choose your files again.
Draft mode
The subscription is now created in draft mode. If you navigate away from the wizard or your user session times out, the draft will be saved. You can return to it from the Source Subscriptions page.
Tab options
Each wizard tab contains the following buttons:
- Save & Continue - Saves your changes and opens the next tab.
- Back - Return to the previous tab. Any changes that you made on the current tab could be lost. For example, if you are on Step 3 and click Back, the information on Step 3 could be lost, but the information on Step 2 tab is preserved.
- Cancel - The draft will be removed from your Network instance.
Define file format
Each tab displays the files that you have uploaded in the left pane.
Define the format for each file.
-
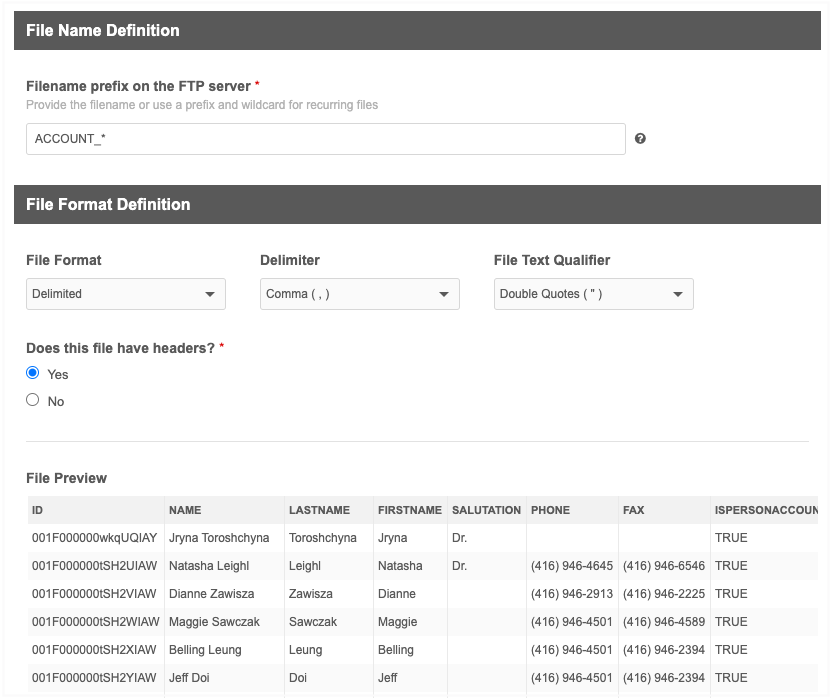
File name prefix on the FTP server - The prefix of the file that you will regularly use for this subscription. For example, the file name might change to indicate a date but the beginning of the file name will always be the same.
The field is automatically populated with the prefix of the file that you loaded. Edit the prefix if this is not correct for future files. The file name must be unique; the subscription cannot contain multiple files with the same name.
-
File Format - Indicate how the fields in the file are separated. Choose Fixed Length or Delimited. Delimited is selected by default.
-
If you choose Fixed Length, type the allowed character lengths for each column into the Fixed Length Widths field.
For an example of configuring a fixed length file, see Example - Fixed length file in the Veeva Network Online Help.
- If you choose Delimited, Network tries to identify how the file is formatted. Ensure that the following settings are correct:
- Delimiter - Identify how the data in the file is separated.
- File Text Qualifier - The characters that identify separate fields.
Note: If you uploaded an .xlsx file, these fields do not display. Network automatically identifies the format.
-
-
Headers - Confirm if your file includes headers. If you choose No, type the headers that should be used in the field below. Use the following format Column_A_Name, Column_B_Name, Column_C_Name, and so on.
A preview of the file displays in the format that you identified.
- Click the next file in the left pane to define its format.
- When each file format has been defined, click Save & Continue.
Define objects
On this tab, identify the objects and how they are organized in your files. These settings are used so Network knows how to extract and model the data in each file to load it.
Supported object types for each file
In the wizard, each file can contain a maximum of three objects. Additional objects can be added in the classic subscription configuration.
The following combination of objects is supported for each file:
- 1 main object and 1 or 2 sub-objects
- 2 main objects and 1 sub-object
- 1 main object and 1 or 2 relationship objects
- 2 main objects and 1 relationship object
- 1, 2, or 3 main objects
- 1, 2, or 3 sub-objects
- 1, 2, or 3 relationship objects
An object cannot be in more than one file.
Defining objects and their file structure
To identify the objects in each file, provide the following information:
-
Objects - Select each object that is included in your file. Three objects can be selected.
-
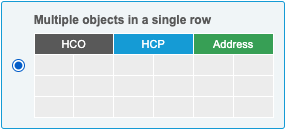
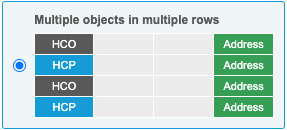
File structure - If there is more than one object in the file, identify how the objects are organized.
-
Multiple objects in a single row - Each row contains the included objects. This structure is available for any supported combination of objects in the file.
-
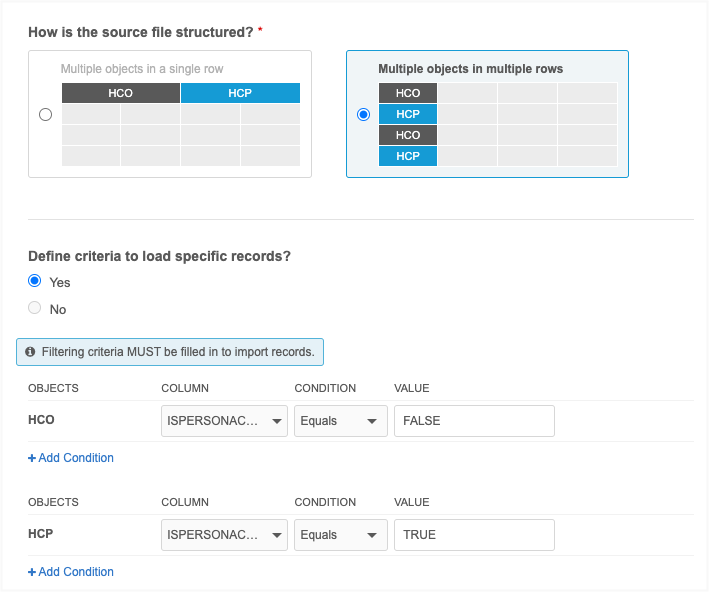
Multiple objects in multiple rows - Objects are organized by row. This structure is available to choose if the file contains more than one main object or more than one sub-object (no main object) in the file.
-
-
Filtering criteria - Use filters to skip records from being loaded or to differentiate records if there are multiple objects in the file. If the file is organized with multiple objects in multiple rows, at least one filter criteria must be used so Network knows the criteria to use to differentiate the records on each row.
Example - Skip records from being loaded
Use the filters to tell Network to load the objects if they are HCPs AND they are not from Chicago.
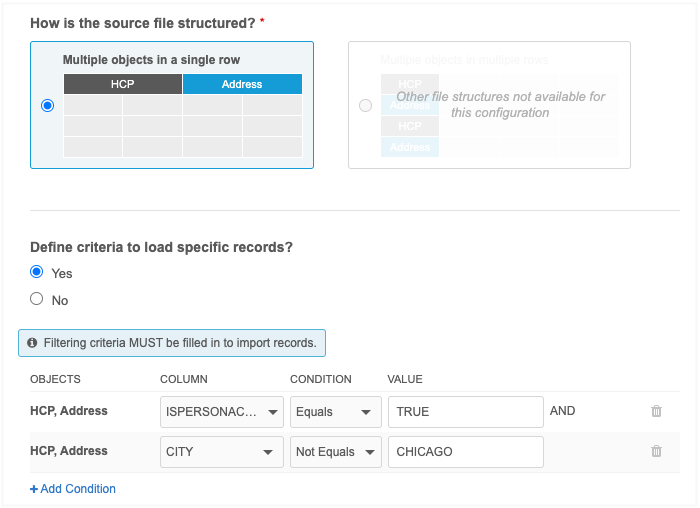
The objects are grouped because they are on a single row. Only rows can be filtered; not each object within the row. Sub-objects are never filtered on their own.
If multiple filters are defined, they are treated as an AND condition.
Example - Differentiate objects
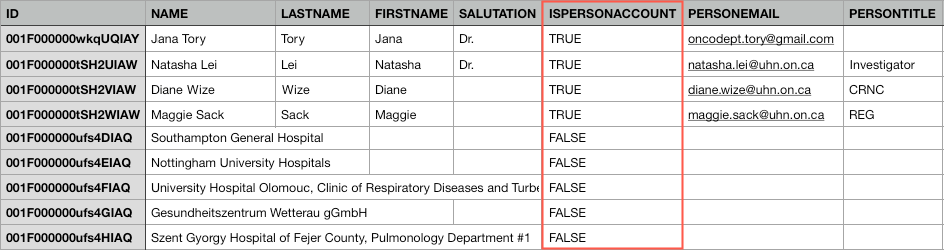
If a file has more than one main object in multiple rows, ensure that the file contains a field that can be used to differentiate the objects. For example, if the file contains HCOs and HCPs, a field called ISPERSONACCOUNT can identify which row contains an HCO or HCP based on its TRUE or FALSE value.
Sample file
Use the filtering criteria to tell Network that the field, ISPERSONACCOUNT, is used to differentiate HCOs from HCPs.
- Define these settings for each of the files in the subscription.
- Click Save & Continue.
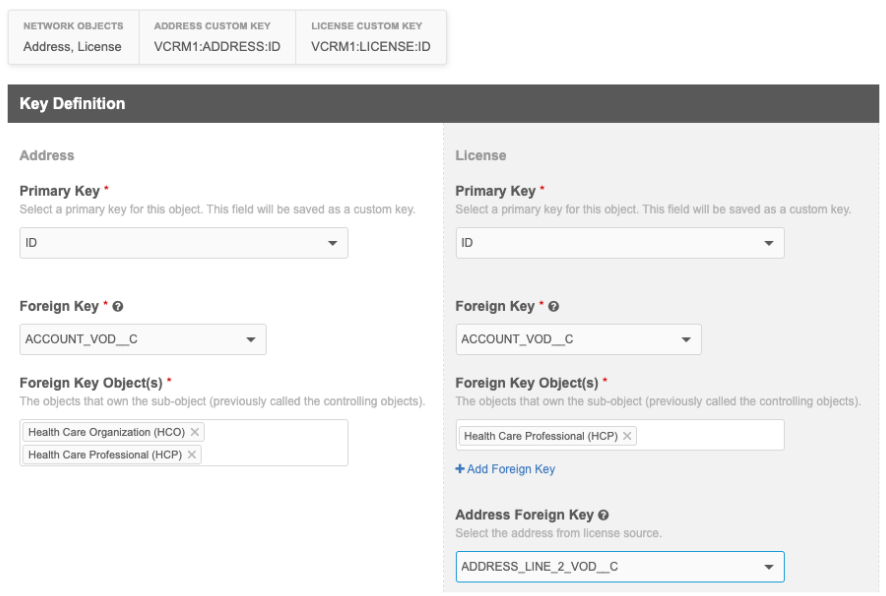
Select Keys
On this tab, configure the primary keys and foreign keys for each of the objects.
Files that contain main objects
Primary keys for main objects are used to join them to sub-objects and relationship objects.
- Define the Primary Key for each object. The field that you choose will be used to create the custom key for each record in Network.
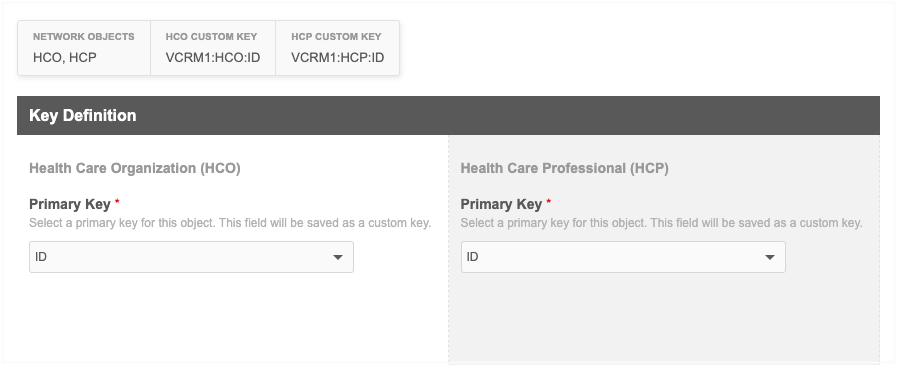
After you choose the field, the format for the custom key for that object displays.
Network generates custom keys using the following format: Source:Item:Value.
- Source - The source system that you chose on the Define Subscription tab. For example, VCRM.
- Item - The object; for example, HCP.
- Value - The value of the field that you chose as the primary key; for example, ID.
When the data is loaded into Network, an HCP record will have a custom key; for example, VCRM:HCP:47783849.
Files that contain sub-objects
Define the following settings for each sub-object:
-
Primary Key - Choose the field that will be used to create the custom key.
- Foreign Key - Choose the field from the associated main object that will be used to reference (JOIN) the main object.
-
Foreign Key Objects - Select the objects that are associated to the sub-object.
If the sub-object is associated to another main object using a different foreign key, click Add Foreign Key to define the field for the other objects. Only one foreign key can be created for each main object.
- Address Foreign Key (Licenses) - Optional. Select the field on the address to use as the foreign key. This is used when configuring licenses that should be linked to specific address records for compliance. For example, State licenses in the United States must be linked to the address where the HCP practices.
Files that contain main objects and sub-objects
If a main object and a sub-object are configured in the same file, a foreign key is not required; it will be automatically calculated by Network.
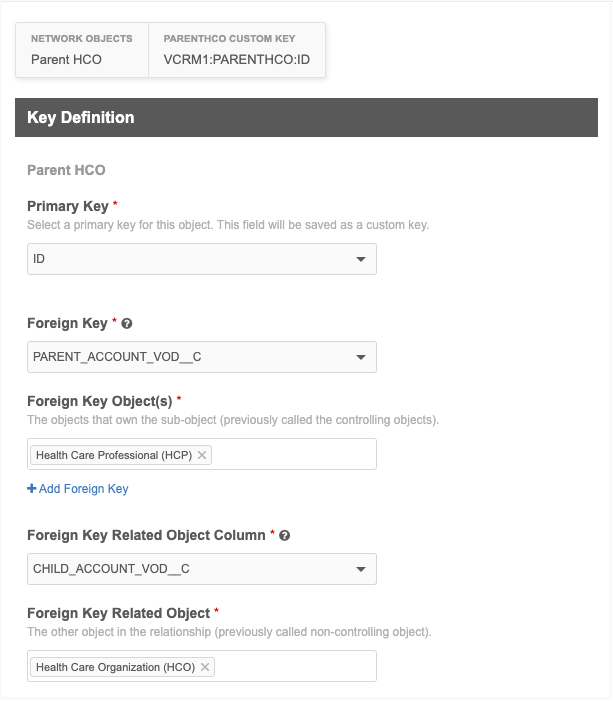
Files that contain relationship objects
Relationship objects associate two main objects, so foreign keys are required for the owner object and related object in the relationship.
-
Primary Key - Choose the field that will be used to create the custom key for the relationship object.
- Foreign Key - Choose the field that will be used to reference (JOIN) the owner object in the relationship.
-
Foreign Key Objects - Identify the owner object in the relationship.
- Foreign Key Related Object Column - Choose the field that will be used to reference (JOIN) the related object in the relationship.
- Foreign Key Related Object - Identify the related object in the relationship.
Files that contain main objects and relationship objects
If a main object and a relationship object are configured in the same file, the foreign key for the main object is not required; it will be automatically calculated by Network. The foreign key for the related object is still required.
When you have finished identifying the keys for all of the files, click Save & Continue.
Map fields
Map the fields for the objects that you defined in each file to Network fields. If the files do not contain headers, the headers you identified on the Define File Format tab are used. This information is used to create the Field Normalization section in the subscription configuration.
View sample data
Three columns of data from your sample file display to help you map the fields. Hover your cursor over the Sample File Data section to expand it so you can view the full data.
Fields that do not need to be mapped
In some cases, fields in your file are automatically mapped or do not need to be mapped.
- If the field names in your file match Network fields exactly, the Network fields are automatically populated.
- Network identifies the fields that you have selected as primary and foreign keys on the Select Keys tab. Icons for Primary and Foreign Key fields display beside the Sample File Field name (see the Legend). These fields do not need to be mapped.
- Fields that do not map to Network fields can remain unmapped; for example, if you used a field to distinguish HCPs and HCOs for the wizard (ISPERSONACCOUNT), it does not need to be mapped.
Find fields
To quickly find a specific field, type the field name in the search box. You can also use the Fields list to filter the Sample File Field column to display only Mapped or Unmapped fields.
Mapping the fields
To map the fields:
-
Beside each Sample File Field, choose the appropriate Veeva Network Field name from the list.
The available fields are filtered for the objects that you defined for the file and the country you defined for the subscription.

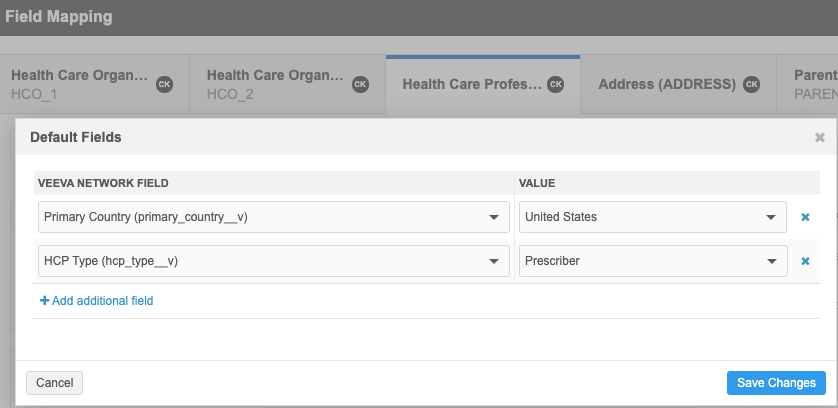
Default field values
In case there is no data for a field in the file, you can set default values for any fields for the objects in the file. For example, to ensure that each record has a primary country defined, add the primary country field (primary_country__v) and a value.
When the mapping is complete, click Save & Continue.
Important: When the changes are applied, the subscription is created; it is no longer considered a draft. The classic subscription page opens so you can continue configuring the settings and options.
Configure classic subscription settings
When the classic subscription page opens, it is disabled by default. The settings that you configured are passed into the source subscription to populate the file definitions, advanced properties, model map, and field normalization sections.
Continue configuring the subscription by defining match rules, Network expression rules, FTP folder, schedules, and any other settings that should be enabled.
When you are finished, the subscription is ready to run.
For more information about the classic subscription configuration, see Add a source subscription in the Veeva Network Online Help.
Configuration management
Draft subscriptions using the wizard cannot be exported to a target environment.
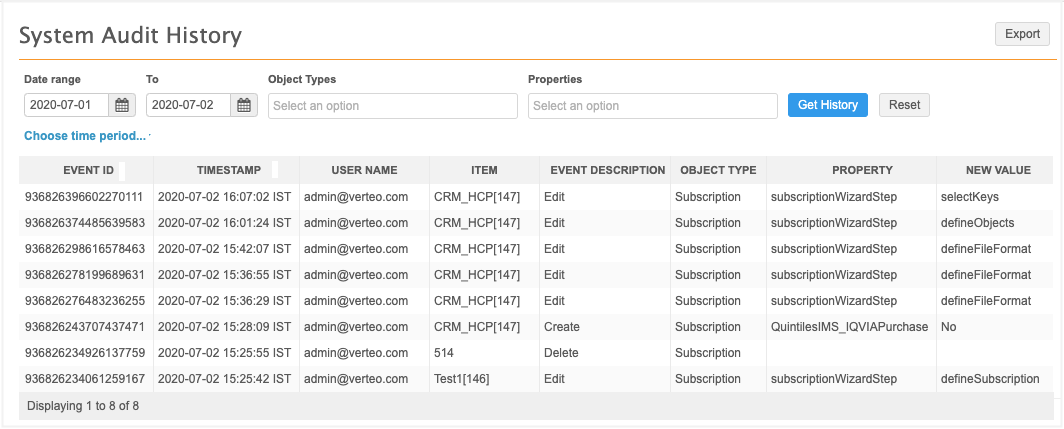
Logs
Administrators can track updates to subscriptions using the System Audit Log. For traceability and troubleshooting purposes, the logs track each action (create, edit, and delete) that users make in the source subscription wizard.