Data model
Primary address updates
Two of the Unique Checkbox primary address settings are updated to help ensure that records will have a primary address.
These enhancements are enabled by default in your Network instance.
Updated options
The following options have been updated to prevent records from not having a defined primary.
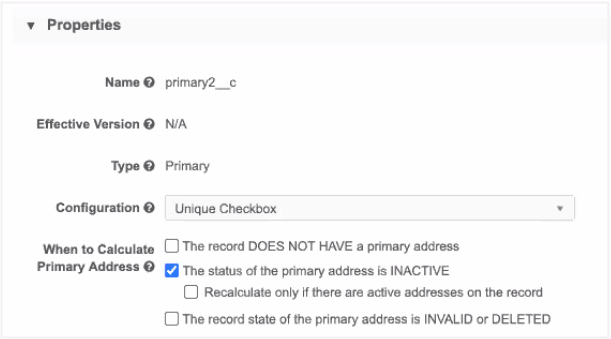
The record DOES NOT HAVE a primary address
Selecting this setting calculates a primary address if the record does not have one. Previously, if an incoming record had a primary address field value that was defined as No/False, a primary would not be calculated because input data overrode the calculation setting. Now, if the primary value is any value other than Yes/True, a primary will be calculated.
Important: If you want to retain the previous behavior for your Network instance, contact Veeva Support.
The status of the primary address is INACTIVE
This setting recalculates a primary if the current primary address is inactivated. If there are no active addresses on the record, a primary is not calculated so the record will not have a primary address. Now, if users select this setting, they can choose a new option: Recalculate only if there are active addresses on the record.
This new option ensures that Network only recalculates the primary if there are active addresses on the record. If there are no active addresses, Network keeps the primary on the address that was last active.
More information
For more details and primary address scenarios, see Unique Checkbox with primary address calculation options in the Veeva Network Online Help.
Lookup tables
Administrators and data managers can now import lookup tables into their Network instance to perform operations and to calculate or validate data. These multi-value reference lookups are stored in Network so you can cross-reference your object data. Lookup tables can be used in Network expressions for source subscriptions and data model fields.
Lookup functions
Lookup tables are used in Network Expressions (NEX rules). The lookup functions can be used in field calculations and source subscriptions. For example, you might want to use a lookup table to populate a field value or to evaluate data to produce a warning or reject a record. You can use the NEX rule to fail a subscription if a defined number of records don't comply with the validation.
Note: The fields that are used in the function must be related to the object; for example, do not include an HCP field for an address lookup.
Use the following functions in NEX rules to reference a lookup table:
LOOKUP()
Use this function to look for a value from a range (one or multiple columns in a row) and then returns a value in the same row.
Syntax
LOOKUP('lookup_table_name', 'column_name', <lookup_column_1>: <expression1>, <lookup_column_2>: <expression2>)
LOOKUPVALIDATE()
Use this function to look for a value from a range (one or multiple columns in a row) and then returns TRUE if value found, FALSE otherwise.
Syntax
LOOKUPVALIDATE('lookup_table_name',<lookup_column_1>: <expression1>, <lookup_column_2>: <expression2>)
TABLEEXIST()
This function checks for the existence of a lookup table and returns TRUE if exists, FALSE otherwise.
Syntax
TABLEEXIST('lookup_table_name')
LOGDETAILWARN()
A warning that displays in the job history for any record failing certain criteria.
Note that this is not specifically for lookups. It can be used for other NEX functions also, for example, REJECT().
Syntax
[
"IF(LOOKUPVALIDATE('addressdata__t.csv', postal_code__v: UPPERCASE('a12b3c'), locality__v:'springfield', administrative_area__v: concat('NY', 'C')), LOGDETAILWARN('The address combination is incorrect)"
]
Lookup examples - source subscriptions
Example 1 - LOOKUPVALIDATE()
In a source subscription, create a transformation rule that uses a lookup table to validate address data. If the addresses being loaded cannot be verified using the cross-referenced data in the lookup table, create an error.
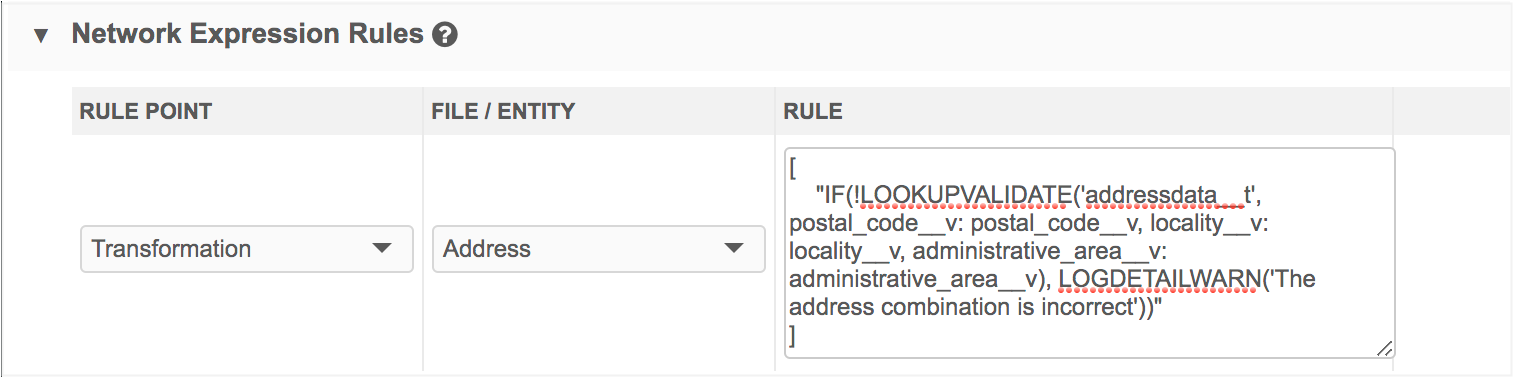
[
 "IF(!LOOKUPVALIDATE('addressdata__t', postal_code__v: postal_code__v, locality__v: locality__v, administrative_area__v: administrative_area__v), LOGDETAILWARN('The address combination is incorrect'))"
]
Example 2 - LOOKUP()
Create a transformation rule to query the value of a specific column in the lookup table by providing multiple parameters to find the desired combination in the table. For example, create a lookup for cluster codes.
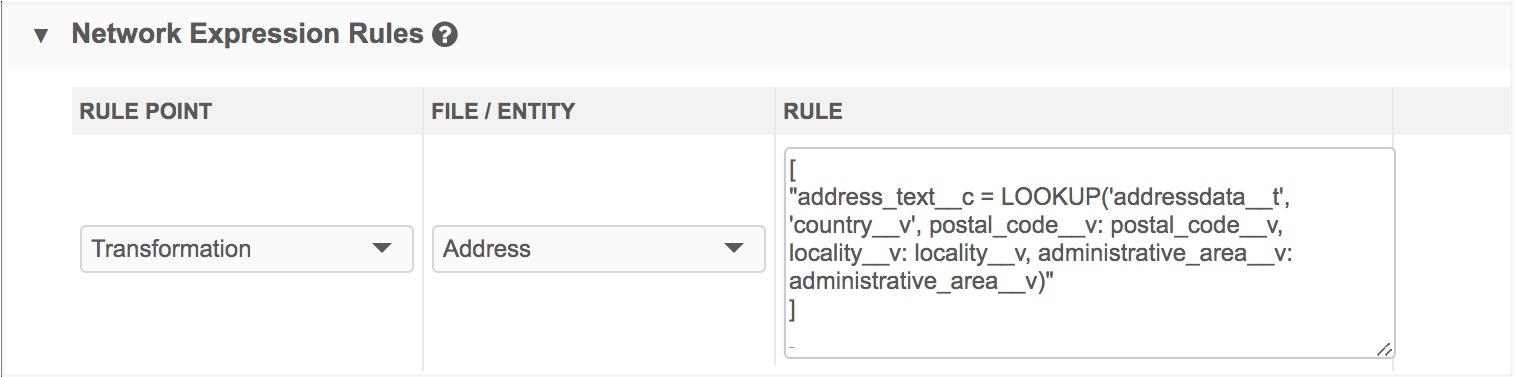
[
"address_text__c = LOOKUP('addressdata__t', 'country__v', postal_code__v: postal_code__v, locality__v: locality__v, administrative_area__v: administrative_area__v)"
]
Example 3 - TABLEEXIST()
Create a feed acceptance rule that verifies that the lookup table exists and if the table is empty. Fail the data load if the lookup table or data is missing.
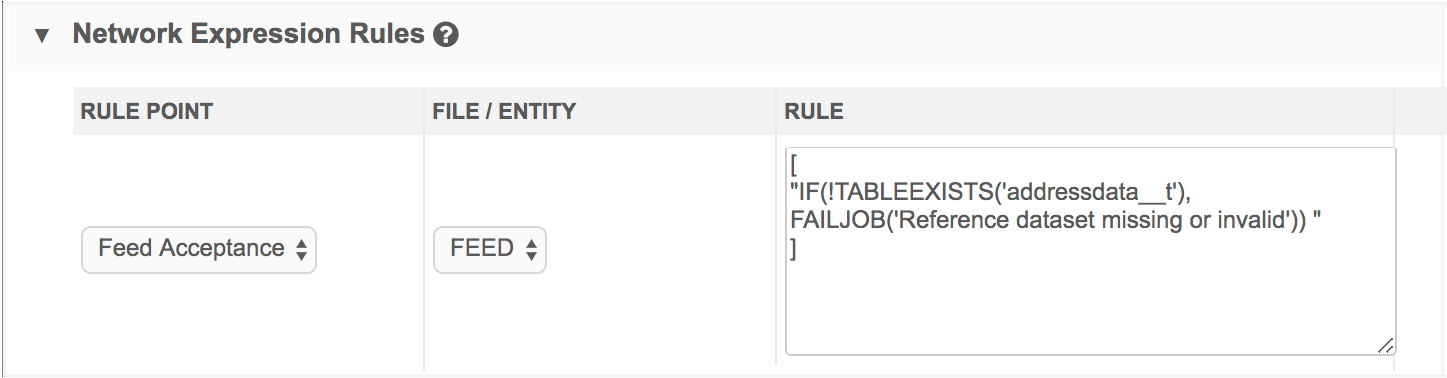
[
"IF(!TABLEEXISTS('addressdata__t'), FAILJOB('Reference dataset missing or invalid'))"
]
Lookup examples - data model fields
Use the lookup functions to calculate the value of a field.
Select the field in the object configuration (Data Model > Data Domains) and click the Visibility in Countries section to add a NEX rule.
Note: Do not use square brackets ([ ]) in a NEX rule for a custom field. Errors will occur in data change requests if these characters are used in the rule.
Example 1 - LOOKUP()
Use this NEX function to calculate a reference field value based on specific fields.
This example calculates the hcp_subtype__c reference field based on medical_degree_1__v and credentials_1__v. The ?? coalescing operator functions as ELSE, so if the lookup does not find anything, D becomes the value of the hcp_subtype__c field.
(LOOKUP('hcp_subtype_mapping__t', 'hcp_subtype', medical_degree:medical_degree_1__v,credentials:credentials_1__v) ?? 'D')
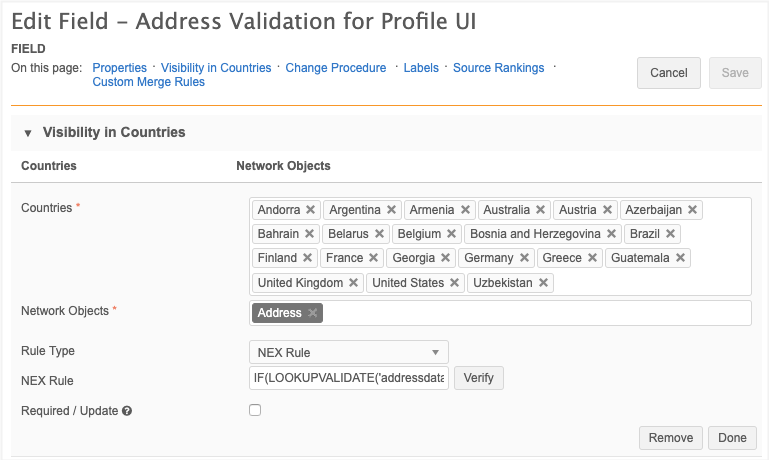
Example 2 - LOOKUPVALIDATE()
Use a NEX rule to calculate a Boolean value (for example, VALID or INVALID and TRUE or FALSE) to a custom field if a combination between fields contained in the lookup table exists or not.
In this example, the function will return a Y or N value for a Boolean reference field if a value is found in the addressdata__t table
IF(LOOKUPVALIDATE('addressdata__t', postal_code__v: postal_code__v, locality__v: locality__v, administrative_area__v: administrative_area__v, country__v: country__v), 'Y', 'N')
Create a lookup table file
Lookup tables are files that you can create and import into your Network instance. The files must have the following requirements:
- Format - Files must be in .csv format
- Size - Files cannot exceed 1 GB.
- Rows - A maximum of 5 million rows can be included in each file. Note that this limit is not validated when you upload a file; the limit is enforced when a source subscription runs. If the row limit is exceeded, the subscription job will fail.
- Headers - Column headers can only contain lowercase letters, numbers or underscores. They must start with a letter. Headers cannot be blank or contain spaces.
- Delimiters - Commas are supported
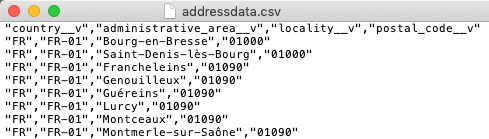
Example file
Upload a lookup table
A maximum of 50 tables can be added to your Network instance.
To add a lookup table to your Network instance:
- In the Admin console, click Data Model > Lookup Tables.
-
Click Create Lookup Table.
The New Lookup Table page displays.

-
On the Upload File tab, the following details are required:
-
Name - Type a name for this table.
Names must follow these requirements:
- be lowercase letters, numbers, and underscore characters (_) only
- start with a letter
- be a minimum of two characters and cannot contain more than 255 characters.
- must be unique. Duplicate table names are not supported. If a table is deleted, that name can be reused.
- Description - Provide a meaningful description. Descriptions can contain a maximum of 255 characters
- Third Party Data - Indicate if the file that you are uploading contains third party data. If you choose Yes, confirm that you have a TPA in place so Veeva can receive the data.
-
File Upload - Drag your .csv file into the box or click Upload File to choose a file.
When the file is being uploaded, the data is scanned and validated. If there are any issues, fix them and upload your file again.
-
-
The File Preview tab displays a count of the records read from the file (not including the column headers). Four rows of data display by default so you can review the column and row values.
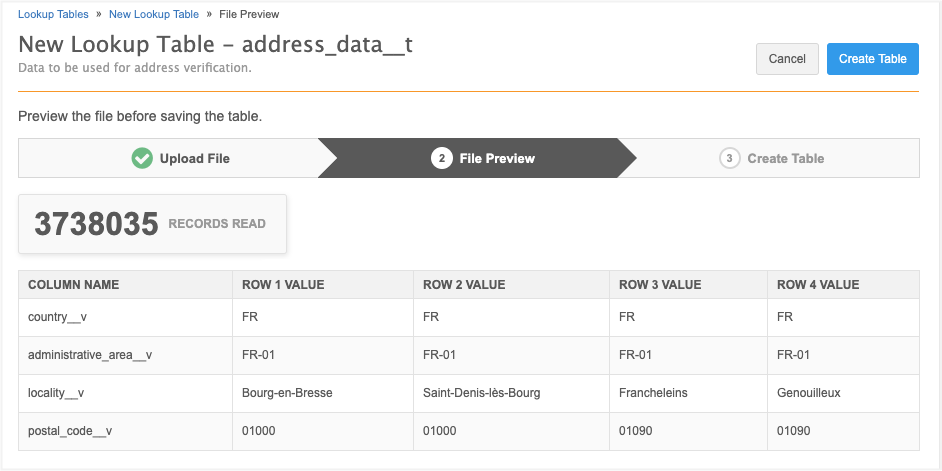
-
Click Create Table.
The lookup table is created and is highlighted on the Lookup Tables page.
If there was an issue, the table will be created but a message will display to advise you that the upload failed. Re-upload the table.
You can now create NEX rules that reference this table. Note that the table name must include the __t suffix when it is used in your NEX rules.
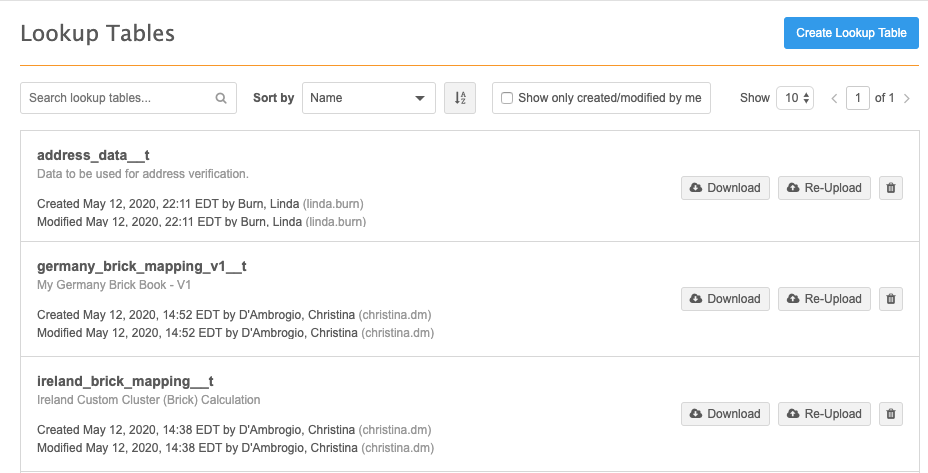
Lookup table options
On the Lookup Tables page, you can search for a specific table name or sort the list to find your lookup table.
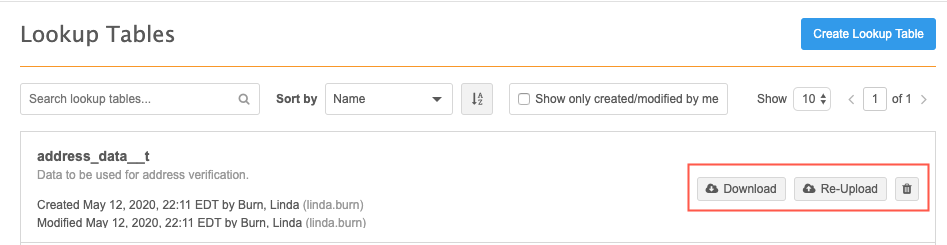
Download lookup tables
After a table has been created, you can download the table from the list on the Lookup Tables page. Click the Download button to save the lookup table to your local computer.
Re-load tables
You can override an existing lookup table by re-loading the file. On the Lookup Tables page, click Re-Upload in the table row.
The wizard will open again so you can choose a file. The name and description cannot be changed, but you must confirm the third party data question again. Preview the file and click Update Table. Messages will display on the Lookup Tables page to confirm that the table was updated.
Delete lookup tables
If they are no longer used, or created in error, lookup tables can be removed. On the Lookup Tables page, click the Delete icon in the table row.
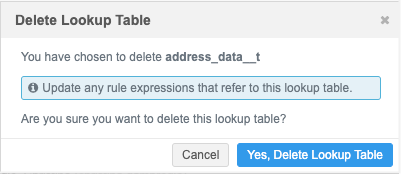
Note: Network rule expressions that reference the table are not deleted during this process; they must be updated.
Lookup table logs
Administrators can view logs for lookup tables in the System Audit History. Any time a user creates, re-uploads, downloads, or deletes a lookup table, the event is logged.
For compliance, whenever a user confirms that third party data is being loaded into Network, it is also tracked in the System Audit History.
Configuration management
Lookup tables cannot be exported to a target environment using the Configuration Export feature. The tables must be created in each Network instance.
Cluster management
Customers can enrich addresses in additional countries by adding cluster codes. In this release, Network has included support for the following third party cluster provider / country combination:
- Greece - IQVIA™
A TPA must be signed with the third party cluster provider to use the cluster management feature.
For more information about this feature, see the topic called Managing clusters
Reference data
Spanish (Mexico) has been added as a new reference data language.
This new language will inherit the translations from Spanish with a few exceptions. To review the specific translations, see "Spanish-Mexico" in the Translation section of the Veeva Network 20R1.1 Data Governance document.
To view reference codes in this language:
- On the Network menu bar, click My Profile.
- In the Settings section, expand the Language list and select Spanish (Mexico).
- Apply your changes.