Vault CRM Bridge setup
Before you create a Vault CRM bridge, there are a few tasks that need to be completed in Network MDM and in Vault CRM.
Network tasks
Define the following configurations:
-
Vault CRM system - Create a system for Vault CRM.
-
Vault credentials - Create credentials to connect Network MDM to Vault CRM (Settings > External Credentials).
-
Target subscription - Define the target subscription that will be used to export data to Vault CRM.
Tip: A target subscription can be created using the Data Launch Accelerator.
Use the Data Launch Accelerator
For initial implementations or to connect to another Vault CRM org, use the Data Launch Accelerator.
This feature creates the following essential configurations for the Vault CRM integration:
-
OpenData country subscriptions - Enables and configures the countries that you select.
-
OpenData country groups - Creates a group for applicable OpenData regions so you can easily manage country schedules.
-
Network Bridges - Creates the Vault CRM Multi-Country Bridge with a country-specific bridge configuration for the selected OpenData countries.
-
Target subscription - Creates the subscription used by the Network Bridge.
-
Data Visibility Profiles - Creates a DVP for each selected country.
Vault CRM tasks
-
Network - Vault CRM configuration - The integration steps between Network and Vault CRM must be completed.
See the Vault CRM Help: Configuring Network Integration topics.
This includes managing Vault CRM Help: Network mappings for objects, fields, and references.
Configure the target subscription
If you did not use the Data Launch Accelerator to create the target subscription configuration, the steps are provided below.
There are a few recommended settings for subscriptions that are used to export data to Vault CRM.
To create the target subscription:
-
In the Admin console, click System Interfaces > Target Subscriptions.
-
Click Add Subscription.
Configure the settings in each section.
-
Details - Define the following settings:
-
Name - Type a relevant name for the subscription.
-
Type - Choose Data.
-
System - Expand the list and choose the Vault CRM system that you will export the data to.
If you haven't defined a system yet, go to System Interfaces > Systems and create the system.
- Description - Type a meaningful description for this subscription.
-
-
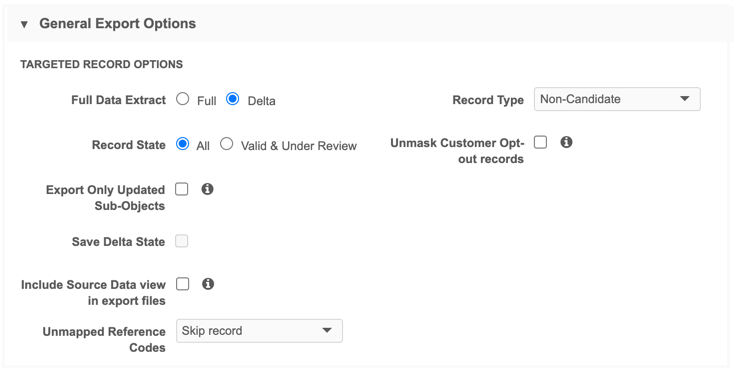
General Export - These setting values are recommended for target subscriptions for Vault CRM bridges.
Targeted Record Options
-
Full Data Extract - This setting is ignored for the Vault CRM bridge jobs. Account records are always exported as a Delta extract.
Each job is limited to a specific number of records:
-
Default record limit - 400,000 records
-
United States record limit - 200,0000 records
Records that have the oldest update time are exported first. The next time the bridge job runs, the next batch of records are exported, and so on.
-
-
Record Type - Choose Non-Candidate to export all records except for candidate records.
-
Record State - Choose All so records with all record states are exported.
-
Apply Record Limit - This setting is ignored for Vault CRM Bridge jobs. A default limit of 400,000 (200,000 for the United States) is automatically applied to jobs.
-
Export Only Updated Sub-Objects - Do not select this setting. All sub-objects should be exported in this subscription.
-
-
Hierarchy - Determine the related entities to export.
-
Level of Hierarchy to Export - By default, one level of parent will be exported to ensure that relationships are intact.
-
Apply "Export Options" to the target records related entities - Choose this option if you want to filter the related entities that are exported based on any filters that you apply in the Export Options section below.
-
-
Reference Data - Do not select Include Reference Data Files. It is not required for Vault CRM Bridge subscriptions.
-
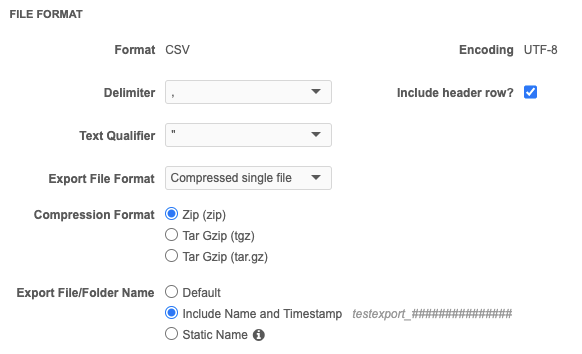
File Format - Do not change the default values in this section. Vault CRM expects target subscriptions to be comma delimited and to have a header row.
-
Format - The format of the export file. This is set to CSV by default.
-
Encoding - The encoding for the export. This is set to UTF-8 by default.
-
The following options help exported files to comply with Vault CRM's file acceptance format.
-
Delimiter- The character used to separate values in the exported .csv file. Choose comma (,).
-
Text Qualifier - The character to identify the beginning and end of text. Choose double quotes (").
-
Header row - Ensure that Include header row is selected. CRM expects the .csv files to contain a header row.
By default, Do not export headers is selected for empty files. You can choose Export headers.
-
Export File Format - Defines how the file is exported. Choose Compressed single file (default). This means that one compressed file will be exported and it will contain .csv file for each object.
-
Compression Format - Choose the Zip (zip) compression format. The target subscription will export one .zip file which will contain a .csv file for each object.
-
Export File/ Folder Name - Choose one of the following options:
- Default - The file exported with the following naming convention: exp_########.
- Include Name and Timestamp - The file is exported with the following naming convention: <subscription name>_YYMMDDTHHMMSSSSS; for example, CRM_Target_170113T191503397.
- Static Name - Do not choose this option. This exports the file with the same name, so the file and folder will be overridden each time the job runs.
-
-
Export Locations - Choose to save the exported file in the following locations:
-
Default - The default path is outbound/<system_name>.
-
Custom - Define a custom path.
Administrators can give users specific access to FTP folders, so identifying a custom path for this subscription enables you to protect the data.
For information about accessing the files in your Network file system, see File Explorer.
-
Export to Cloud Storage - Export the data directly to your private cloud storage. Exporting to Amazon S3 buckets are supported.
The Amazon S3 bucket must be created with write access so you can export the files. For more information, see Exporting data to cloud storage.
-
-
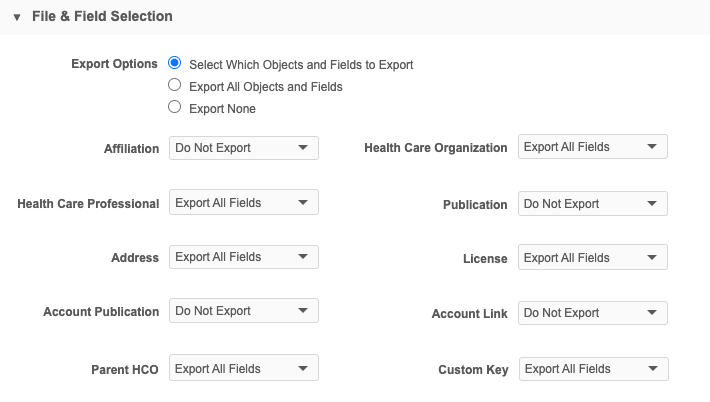
File & Field Selection - Accept the Select Which Objects and Fields to Export default value.
All the enabled objects in your Network instance display.
-
Veeva standard objects (HCO, HCP, Address, License, Parent HCO) - Accept the Export All Fields default value.
-
Custom Key - Accept the Export All Fields default value. Custom keys filtered by the defined Vault CRM source system should be included in the target subscription.
-
All other objects (custom objects and Network widget objects) - Choose the level of export.
Custom objects and Network widget objects (Affiliation and Account Link) are not supported for the Network Bridge integration with Vault CRM but they do not impact the Bridge subscription job. They can be included in the target subscription if you plan to use the same file that is generated for the Network Bridge for another purpose; for example, to load custom object data through a Veeva Connector.
-
-
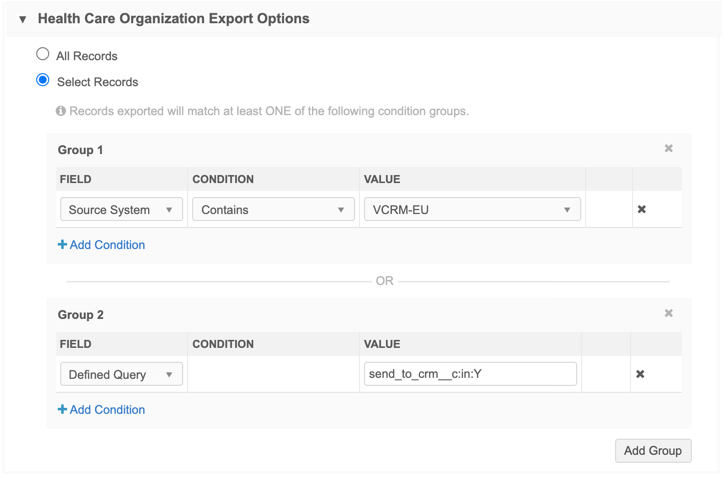
Export Options - Filter the objects to export.
Note: A primary country filter does not need to be configured. Vault CRM bridges are multi-country bridges by default. When the target subscription job runs, a primary country filter is automatically applied based on the country of the bridge job executing the target subscription.
A target subscription for a Vault CRM Bridge will have the following filter groups defined for HCOs and HCPs:
-
Group 1
-
Field - Source System
-
Condition - Contains
-
Value - The Vault CRM system
-
-
Group 2
-
Field - Defined Query
-
Value: send_to_crm__c:in:Y
This query means that the record will be exported if the send to CRM flag is set to Y.
-
-
-
Transformation Rules - Displays any rules that you have applied to this subscription.
For example, create rules to remove specific address types from Vault CRM.
For more information, see Transformation rules.
-
Transformation Queries - Displays any queries that you have applied to this subscription.
For more information, see Transforming outbound data.
Note: Do not use transformation queries to filter relationships or addresses for Vault CRM using the Bridge. The Vault CRM Bridge does not just use exported files, it also involves other processes (data change requests, Network Account Search, direct downloads through the API, and so on) that do not use transformation queries.
-
In the Job Trigger Configuration section, accept the Manual option to run the subscription. The schedule for the subscription will be set in the Vault CRM Bridge configuration.
-
Save your changes.
The target subscription is available and can be applied to the Vault CRM Bridge configuration.
Network - Vault CRM license mappings
The Network License object is automatically mapped to the Vault CRM address__v object for the Vault CRM Network bridge. Each license type has its own mapping.
Vault CRM license information
For details, see the Licenses topic in the Vault CRM Online Help.
ASSMCA license
Note: These fields are available but the licenses are no longer actively supported by Veeva OpenData.
| Network (License object) | Vault CRM (address__v object) | ||
|---|---|---|---|
| Field Name | Label | API Name | Label |
| license_number__v | License | assmca__v | ASSMCA |
| vid__v | Network ID | network_assmca_entity_id__v | Network ASSMCA Entity ID |
CDS license
|
Network (License object) |
Vault CRM (address__v object) | ||
|---|---|---|---|
| Field Name | Label | API Name | Label |
| expiration_date__v | Expiration Date | cds_expiration_date__v | CDS Expiration Date |
| license_number__v | License | cds__v | CDS # |
| license_status__v | License Status | cds_status__v | CDS Status |
| vid__v | Network ID | network_cds_entity_id__v | Network CDS Entity ID |
Massachusetts Controlled Substances Registration (MCSR) license
For additional information, see Massachusetts Controlled Substances Registration (MCSR) license.
|
Network (License object) |
Vault CRM (address__v object) | ||
|---|---|---|---|
| Field Name | Label | API Name | Label |
| expiration_date__v | Expiration Date | cds_expiration_date__v | CDS Expiration Date |
| license_number__v | License | cds__v | CDS # |
| license_status__v | License Status | cds_status__v | CDS Status |
| drug_schedule__v | Drug Schedule Details | cds_schedule__v | CDS Schedule |
| vid__v | Network ID | network_cds_entity_id__v | Network CDS Entity ID |
DEA license
|
Network (License object) |
Vault CRM (address__v object) | ||
|---|---|---|---|
| Field Name | Label | API Name | Label |
| expiration_date__v | Expiration Date | dea_expiration_date__v | DEA Expiration Date |
| license_number__v | License | dea__v | DEA # |
| vid__v | Network ID | network_dea_entity_id__v | Network DEA Entity ID |
| license_status__v | License Status | dea_status__v | DEA Status |
| drug_schedule__v | Drug Schedule Details | dea_schedule__v | DEA Schedule |
| record_state__v | Record State | dea_address__v | DEA Address? |
State (SLN) license
|
Network (License object) |
Vault CRM (address__v object) | ||
|---|---|---|---|
| Field Name | Label | API Name | Label |
| expiration_date__v | Expiration Date | license_expiration_date__v | License Expiration Date |
| license_status__v | License Status | license_status__v | License Status |
| license_number__v | License Number | license__v | License # |
| vid__v | Network ID | network_license_entity_id__v | Network License Entity ID |
| license_eligibility__v | Prescriptive Authority | network_sample_eligibility__v | Network Prescriptive Authority |
| rxa_eligible__v | Sample Eligibility | network_rxa_eligible__v | Network RXA Eligible |
| license_status_condition__v | License Status Condition | network_license_status_condition__v | Network License Status Condition |
| grace_period__v | Grace Expiry | network_license_grace_expiry__v | Network License Grace Expiry |
| collab_agree_required__v | Collaborative Agreement Required | network_collab_agree_required__v | Network Collaborative Agreement Required |
| comprehensive_prescriptive_authority__v | Comprehensive Prescriptive Authority | network_comp_prescriptive_authority__v | Network Comprehensive Prescriptive Authority |
| comprehensive_sample_eligibility__v | Comprehensive Sample Eligibility | network_comp_sample_eligibility__v | Network Comprehensive Sample Eligibility |
| ctrl_substance_prescriptive__v | Controlled Substances Prescriptive Authority | network_ctrl_sub_prescriptive__v | Network Controlled Substances Prescriptive Authority |
| ctrl_substance_sample__v | Controlled Substances Sample Eligibility | network_ctrl_sub_sample_eligibility__v | Network Controlled Substances Sample Eligibility |
State Distributor (Ohio TDDD) license
|
Network (License object) |
Vault CRM (address__v object) | ||
|---|---|---|---|
| Field Name | Label | API Name | Label |
| license_number__v | License Number | state_distributor__v | State Distributor |
| expiration_date__v | Expiration Date | state_distributor_expiration_date__v | State Distributor Expiration Date |
| license_status__v | License Status | state_distributor_status__v | State Distributor Status |
| drug_schedule__v | Drug Schedule Details | state_distributor_category__v | State Distributor Category |
| vid__v | Network ID | network_distributor_entity_id__v | Network Distributor Entity ID |
A new field in Vault CRM, Data Source, helps users identify the source for Account, Address, and Child Account records.
When the Vault CRM Bridge runs, the Data Source field will be populated with the value from the mapped field from Network MDM. Support for NAS (Network Account Search) and DCR account import will be in a future Vault CRM release.
Data Source field mapping
The Data Source field in Vault CRM helps users identify the source for Account, Address, and Child Account records.
When the Vault CRM Bridge runs, the Data Source field is populated with the value from the mapped field from Network MDM. Support for NAS (Network Account Search) and DCR account import will be in a future Vault CRM release.
The Third Party System Owner field has only one value: IQVIA. If the field value is null, the Record Owner Type field value is populated for Data Source instead.
|
Network MDM Field
record_owner_type__v |
Network MDM Field
third_party_system_owner__v |
Vault CRM Field
data_source__v |
|---|---|---|
| VOD | veeva__v | |
| LOCAL | self_managed__v | |
| TPP | other_third_party__v | |
| TPP | IQVIA | iqvia__v |
Map the fields
The fields are automatically mapped for the Vault CRM Bridge.
The fields will not be mapped in the following situations:
-
The field is not enabled for all object types in Vault.
-
Both the
third_party_system_owner__vorrecord_owner_type__vfields are not included in the exported file from the target subscription.
For more details about the field, see Record Data Sources for Account, Child Account, and Address in the Veeva Vault CRM Online Help.
Next step
When the prerequisite tasks are complete, the Vault CRM Bridge can be created.