Network instances
Customers are allotted four Sandbox instances and one Production instance with their Network license.
New Network instances
When new Sandbox or Production instances are created, the following configuration is applied:
- Data model fields - All existing Veeva OpenData fields are configured to be enabled
- Reference data - Instance configuration is identical to the configuration in all OpenData instances.
- Network user - A "System and Data Admin" user is created. This user type has access to all of the features in the Network UI.
- Data Visibility Profile - A DVP for US data is created.
- User groups - All system-managed user groups are created.
- Permission Sets - A default Notes permission set is created.
- Inbox task groups - The following inbox task groups are created: Data Stewards (US), Data Loading Jobs.
- Network hashtags - Default hashtags are enabled.
- Network Portal - A Network Portal is created with a unique URL for the instance.
-
Features - All features are configured to be enabled.
Note: There are a few features that must be enabled by Veeva Support. When a feature is not enabled by default, it is noted in the Network Help so you can request the feature by contacting Veeva Support.
Production instances
Production instances display a tag to help you quickly identify the environment you are using. These tags display for awareness, but also help prevent Admin and Data Manager users from accidentally changing data in the wrong environment, which can be time-consuming and costly to fix.
The Production tag is visible on all of the Admin areas in a Production instance. It does not display on the Network menu bar.

Sandbox instances
Sandbox environments are pre-production environments used for development and testing. Sandboxes do not have connections to Network Production instances.
By default, new customers receive one Production instance and one Sandbox instance.
Network releases
Sandbox PODs are updated two weeks before Production PODs.
Use the Sandbox release to begin validation assessment and to try out new features and enhancements.
For more info, see POD details.
Veeva OpenData considerations
The first Sandbox instance that is provisioned for new customers is connected to a copy of Veeva OpenData; not the OpenData production instance. This Sandbox instance can receive updates from that master data using Veeva OpenData subscriptions.
Any subsequent Sandbox instances are not connected to Veeva OpenData by default; but you can request a connection.
Data change requests
Data change request (DCRs) processing depends on the Sandbox configuration.
| Sandbox is connected to an OpenData instance (your first Sandbox instance) |
Sandbox is not connected to an OpenData instance (additional Sandbox instances) |
|---|---|
|
Data change requests on OpenData owned fields and records are auto-approved. They are not processed unless arrangements are made with OpenData. All other requests will be processed locally according to the workflow settings on the page. |
Data change requests on OpenData owned fields and records can be automatically approved in the following situations:
All other requests will be processed locally according to the workflow settings on the page. DCRs that are not auto-approved remain as Pending Review in your Sandbox environment. |
The Workflow Settings page indicates how the Sandbox instance will process data change requests.
Example - Sandbox not connected to an OpenData instance

Requesting a Sandbox environment
Customers are allotted four Sandbox instances with their Network license. To request another of your allotted Sandbox instances, contact Veeva Support.
Required details
- Sandbox name - Domain name of the new Sandbox environment; for example, customerdev2.veevanetwork.com.
- Network Admin - Name and email address of the person who will receive the welcome email.
-
Requested configuration - Do you want a blank Sandbox instance (default) or a clone of another environment (includes the data and configurations).
You can request to link the new Sandbox instance to Veeva OpenData; by default, it will not be connected.
Note: Additional Sandbox instances can be purchased. Contact your Veeva Account Executive.
Using cloned data in your Sandbox instance
Cloning an existing environment so your Sandbox contains data, configurations, and custom settings enables you to test configurations and new features outside of your Production environment. Also, it helps to keep your Network Sandbox and Veeva CRM integration aligned.
For more information about the CRM alignment, see the Synchronizing your CRM Sandbox section below.
Task considerations
When a Network instance (Sandbox or Production) is cloned, all tasks are included. This includes tasks in any state.
Pending tasks should be closed before the source instance is cloned because cloned tasks cannot be processed in the target instance. If a pending task is cloned to a target instance, there is no indication on the task to identify if it came from cloning or it was newly created in the instance.
Refreshing a Sandbox environment
To request a new Sandbox or refresh an existing Sandbox using a clone of a Network Production instance, contact Veeva Support.
Required details
- Source environment - The instance that will be cloned. Provide the instance ID and instance name. This is typically a Network Production instance.
- Target environment - The instance that is receiving the clone. This might be the domain name of your new Sandbox instance.
-
Date- Requested date to begin the clone refresh.
Every effort will be made to accommodate the requested start date, but delays can occur around planned software releases.
Data that will be cloned
The following data is included in a standard clone request:
- All data from the source instance (objects, sub-objects, relationship objects)
-
Tasks in all states (pending review, accepted, rejected, and so on)
Note: Cloned tasks cannot be processed in the cloned instance. Pending tasks should be closed in the source instance before the instance is cloned.
- Audit history
- Configuration (source subscriptions, target subscriptions, data maintenance jobs, and so on).
Data that will not be cloned from the source instance
Some configurations and data cannot be cloned and must be created in your new Sandbox environment.
- Custom tables
- Data visibility profiles
- Field restrictions
- FTP folder contents
- General settings - Some settings will not be included; for example, the Validation Rules settings are not included in the clone.
- Job events for jobs that ran in the source environment
- Lookup tables
- Profile Notes
- Revision History
- User accounts
Existing Sandbox configurations
When a Sandbox is refreshed using a clone, some configurations on that target instance are kept or removed.
-
Retained - Configuration in the target Sandbox instance remains and is then built upon as new activities take place in that instance.
-
Removed - Configuration is removed from the refreshed Sandbox because of the dependencies from the cloned source Sandbox configuration.
| Feature | Retained On Refreshed Sandbox | Removed From Refreshed Sandbox |
|---|---|---|
| Data visibility profiles |
|
|
| Field Restrictions |
|
|
| FTP folder contents |
This includes the working set file for OpenData country subscriptions. |
|
| General settings |
|
|
| Lookup Tables |
You can reload your lookup tables after the clone refresh. |
|
| Profile Notes |
|
|
| Revision History1, 2 |
|
|
| Task Revision History |
|
|
| User accounts |
|
1 After the refresh, revision headers display on the profile page but they do not contain details; an error advises that details are not available.
2 This will impact the results displayed on the Job Impact Dashboard. The dashboard tiles are copied from the source instance, but the results on the target will not match those from the source. The tiles will display results from the revision history retained on the target Sandbox.
Cloning process
Typically, it takes 3-5 days to clone an environment.
When the cloning process occurs, the target Sandbox is locked and users cannot log into the instance. Veeva Support will advise you when the clone is complete and the Sandbox can be used again.
If a new Sandbox instance is being created and is being updated with cloned data from another instance, you will receive the System and Data Admin welcome email with credentials, but you will be unable to log in; the instance will be locked until the clone is complete. Support will let you know when your new Sandbox environment is ready.
Sandbox tags
A Sandbox tag displays throughout the Sandbox instance; on the Network menu bar and in the Admin console. It displays the instance name so you can identify the instance you are in if you have multiple instances.

Synchronizing your CRM Sandbox
It is important to keep your CRM Sandbox and Network Sandbox instances aligned so you can validate the integration.
Network IDs for Veeva managed records remain the same, but the Network IDs for locally managed records change from environment to environment when records are created. The key to keeping the integration intact between CRM and Network is to ensure the Network IDs align. The Production clone process ensures the Network IDs from your Production instance and Sandbox instance are the same and integration between your CRM Sandbox and Network Sandbox is seamless.
To synchronize your Network and CRM Sandbox instances, complete the following tasks.
- Refresh your CRM Sandbox instance.
-
Contact Veeva Support to request a Network Sandbox refresh using a clone of your Production instance.
The Network Sandbox refresh will take 3-5 business days. When the clone is complete, you will receive an email to reset your password.
Veeva CRM Network Bridge configuration
Complete these steps:
- Log into the Network Sandbox instance.
- In the Admin console, click System Interfaces > Systems and note the system name for your Veeva CRM instance (for example, VCRM or the org ID, VCRM-00DA0000000xxxxxx)
- Click Users and create an integration user for the Network Bridge. The format of the Username should be: <integration_username>@<Network Sandbox name>.veevanetwork.com.
- In the Welcome email, reset the password for the Network Bridge user.
-
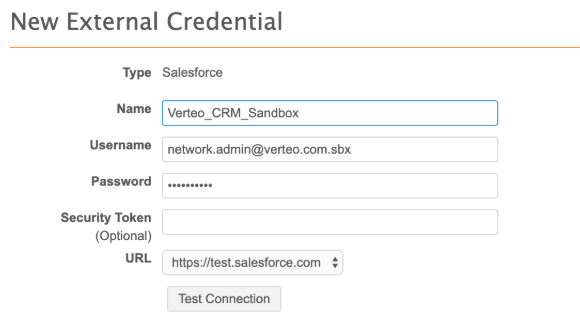
Click Settings > External Credentials and create a new Salesforce™ credential.

- Name - A meaningful name for the credential.
- Username and Password - The credentials for the Network Sandbox integration user.
- URL - Choose https://test.salesforce.com from the list.
- Click Test Connection to validate the credentials.
- Click System Interfaces > Network Bridge.
- Update the integration user and Salesforce credentials in the Network Bridge. Save your changes.
CRM Sandbox configuration
- Log into the Veeva CRM Sandbox that is associated with this Network Sandbox. Use https://test.salesforce.com.
- Click the Network Administration tab.
-
Edit the Network Credentials:
- Type the Network Sandbox URL. For example, https://sandbox.veevanetwork.com.
- Add the username and password for the integration user to access the Network Sandbox; for example, <integration_username>@<Network Sandbox name>.veevanetwork.com. For Network Bridge users, this is the Network Bridge username and password that you created in the Network Sandbox
- Click Submit and then Validate.
-
Edit the Salesforce Credentials:
- Add the Salesforce username and password; for example, <network.admin>@.verteo.com.sbx.
- Beside Sandbox? choose Yes.
- Click Submit and then Validate.
-
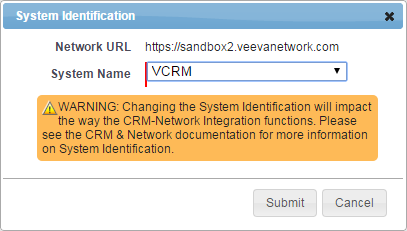
Edit the System Identification. Select the System Name for the CRM Production system that is used in Network; for example, VCRM.

- Click Submit and then Validate.
- Clear Veeva Cache.
Troubleshooting the synchronization
After you synchronize the refreshed Network and CRM Sandbox instance, errors might occur when you are testing the multichannel server.
Perform the following steps to resolve the errors:
- In the Veeva CRM Sandbox, click Setup > App Setup > Develop > Custom Settings.
- Next to MultiChannel Settings, click Manage.
- Click Edit and then Save (without making any changes).
- Return to the Custom Settings page. Beside Network Settings, click Manage.
- Click Edit and then Save (without making any changes).
- Clear Veeva Cache.
Test the connection using Network Account Search and by running the Network Bridge.
Vault CRM Network Bridge configuration
Vault CRM Sandboxes do not retain the same Vault ID of Accounts from production. For example in production CRM, Dr. John Smith may have Vault ID V4T000000000001. After refreshing the CRM sandbox, the Vault ID will not be the same. Network refreshes will copy the production Vault CRM custom keys over.
To avoid key conflicts, a new system should be created for each sandbox Vault.
Complete these steps:
-
Log into the Network Sandbox instance.
-
In the Admin console, click System Interfaces > Systems and create a new system for your Veeva Vault CRM Sandbox (for example, VCRM_Sandbox or the org ID, VCRM-00DA0000000xxxxxx).
-
Click Users and create an integration user for the Network Bridge.
The format of the Username should be: <integration_username>@<Network Sandbox name>.veevanetwork.com.
-
In the Welcome email, reset the password for the Network Bridge user.
-
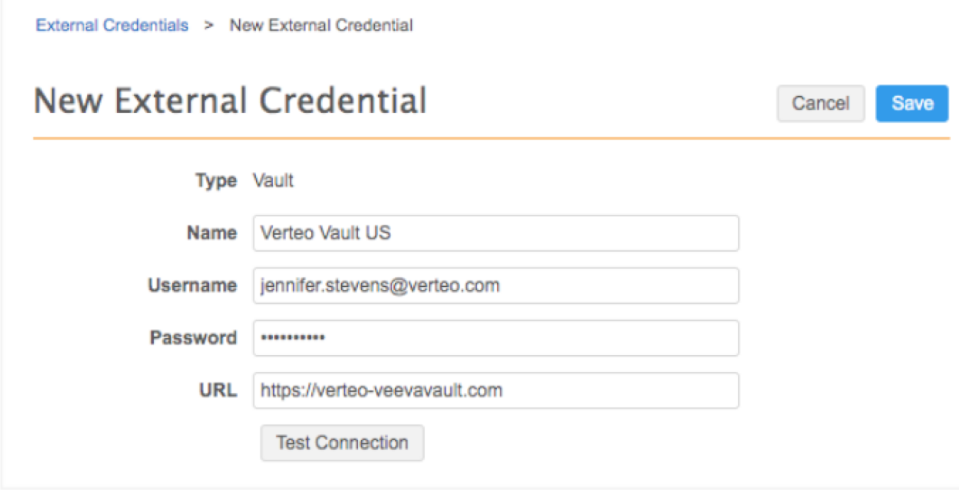
Click Settings > External Credentials and create a new Vault credential.
Example Vault credential

-
Click System Interfaces > Network Bridge.
Update the System and the Vault credentials in the Network Bridge.
-
Save your changes.
Vault CRM Sandbox configuration
-
Log into the Vault CRM Sandbox that is associated with this Network Sandbox.
-
Click Configuration > Vault CRM Configuration > Network Administration.
-
Edit the Network Credentials:
-
Type the Network Sandbox URL.
-
Add the username and password for the integration user to access the Network Sandbox.
This is the Network Bridge username and password that you created in the Network Sandbox.
-
Click Submit and then Validate.
-
-
Edit the Vault Credentials:
-
Add the Vault username and password.
-
Beside Sandbox? choose Yes.
-
Click Submit and then Validate.
-
-
Edit the System Identification.
Select the System Name for the Vault CRM Sandbox system that is used in Network; for example, VCRM_Sandbox.
-
Click Submit and then Validate.