Getting started with custom objects
DM
To use custom objects, they must be created, configured, and enabled in your Network Sandbox instance. After custom objects are enabled, you can load data, create profile layouts for the objects, and assign access to users so they can view and edit custom object data in the Network UI.
Provision custom objects
The process for adding and configuring custom objects in your Network instance includes the following high-level steps:
- Plan your custom data model - All objects must belong to a data domain. Consider the objects that are part of your custom data model and decide if you should add the object to an existing domain or if you should create a new domain for a specific theme or purpose.
- Create custom objects - Create custom objects, sub-objects and relationship objects in your Sandbox instance. Custom fields can be added to objects to store specific data.
-
Enable the object - Administrators and data managers can enable the objects in their Network instance.
Note: Until the object is enabled, it is not available in the Network user interface.
- Create default match rules for custom objects (optional) - Before loading data, define match rules for your custom objects. Match rules can be created using the advanced XML.
- Load data - Run a source subscription to load custom object data into your Network instance. Loading data before configuring the profile layout enables you to preview the layout with data as you configure it.
- Create a custom profile layout - Define a layout for each main object so they can be viewed in the Network UI. Organize profile sections to include the data that users can see on custom main object records.
- Provide access to custom objects through data visibility profiles - Access to objects in Network are defined by data visibility profiles (DVPs). After a custom object is enabled, all DVPs are set for no access to the custom object by default. Records cannot be viewed until the profile layout is added to a DVP and access is assigned. Add the profile layout to existing DVP for the appropriate country, or create a new DVP.
- Assign new data visibility profiles to user profiles - If you created a new data visibility profile for the custom object, assign it to the appropriate users so they can access custom object records throughout the Network instance.
- Define custom object workflow settings - Determine whether data change requests are automatically approved or routed to data stewards.
When these steps are complete, the custom object is ready for use in the supported Network features.
Supported data model for custom objects
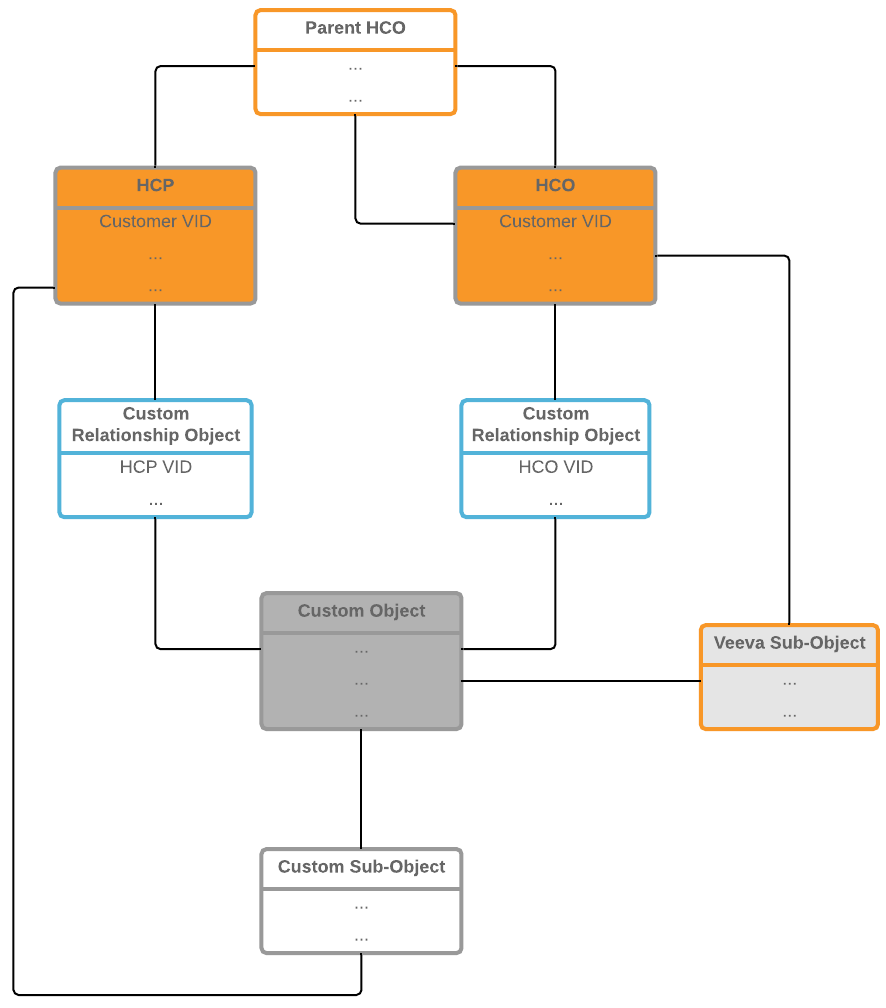
When you add a custom object (main object) in your Network instance, you can associate it to any of the following objects:
- data domain - (required - all objects must belong to a domain)
- other custom objects (using custom relationship objects)
- custom sub-objects
- Veeva objects (using custom relationship objects)
-
Veeva sub-objects (licenses, addresses).
For example, if it's applicable, including the address sub-object in your custom data model enables you to use the map feature in Network.
Parent HCO relationships are only supported for Veeva entities; they cannot be associated to any type of custom object in your custom data model.
Example of a data model that includes custom objects