Creating profile layouts for custom objects
DM
Administrators and data managers can create custom profile layouts to define how the data displays for custom object's profile page.
Tip: Load custom object data before configuring a profile layout so you can preview the layout with field values as you create it.
To create a profile layout for a custom object:
-
In the Admin console, click Data Model > Profile Layouts.
The Profile Layout page displays the list of existing layouts in your Network instance.
- Click Add Layout.
- On the Add Layout dialog, expand the Entity Type list and select the custom object. For example, a custom object called STUDY.
- Provide a Name for the layout. For example, if the layout is specific to a region, you might prefix the object with a region; NASTUDY; a profile layout for STUDY custom objects for North America.
-
Type a meaningful Description for the layout.
-
Expand the Sub-Objects list and select the objects assigned to the custom object. Only sub-objects and custom relationship objects that are assigned to the custom object display in the list.

For recursive or arc relationships, both the owner and related object in the relationship object can be added. To support these complex relationships, the perspective labels defined in the relationship object display in the Sub-Objects list.
-
Click Add to create the layout.
The profile layout displays with the default sections and fields displayed in the right pane.
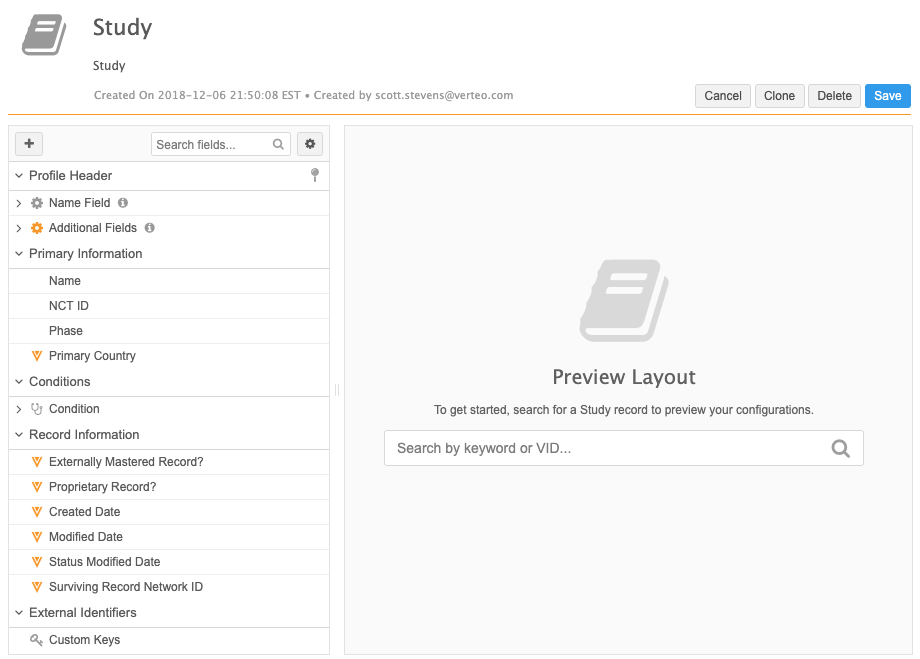
The profile layout displays with the following default sections in the right pane:
-
Profile Header - Define the fields that display in the summary header at the top of the profile page. This section cannot be removed from the profile layout.
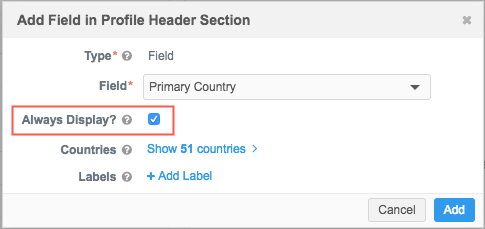
The Name Field sub-section cannot be removed. It contains the formatted name for the object. The Additional Fields sub-section contains the Entity Type and VID fields by default. Fields can be added to the Additional Fields sub-section; for example, if the country is important for the custom object record, you can add the Primary Country field to this section.
If you add a field to the Profile Header section, choose whether the field should always display on the header profile, even as you scroll through the record.
The Profile Header section is also available for Veeva entities and includes Name, Record Details, and Contact Information sub-sections that cannot be updated to add, edit, or remove the default fields.
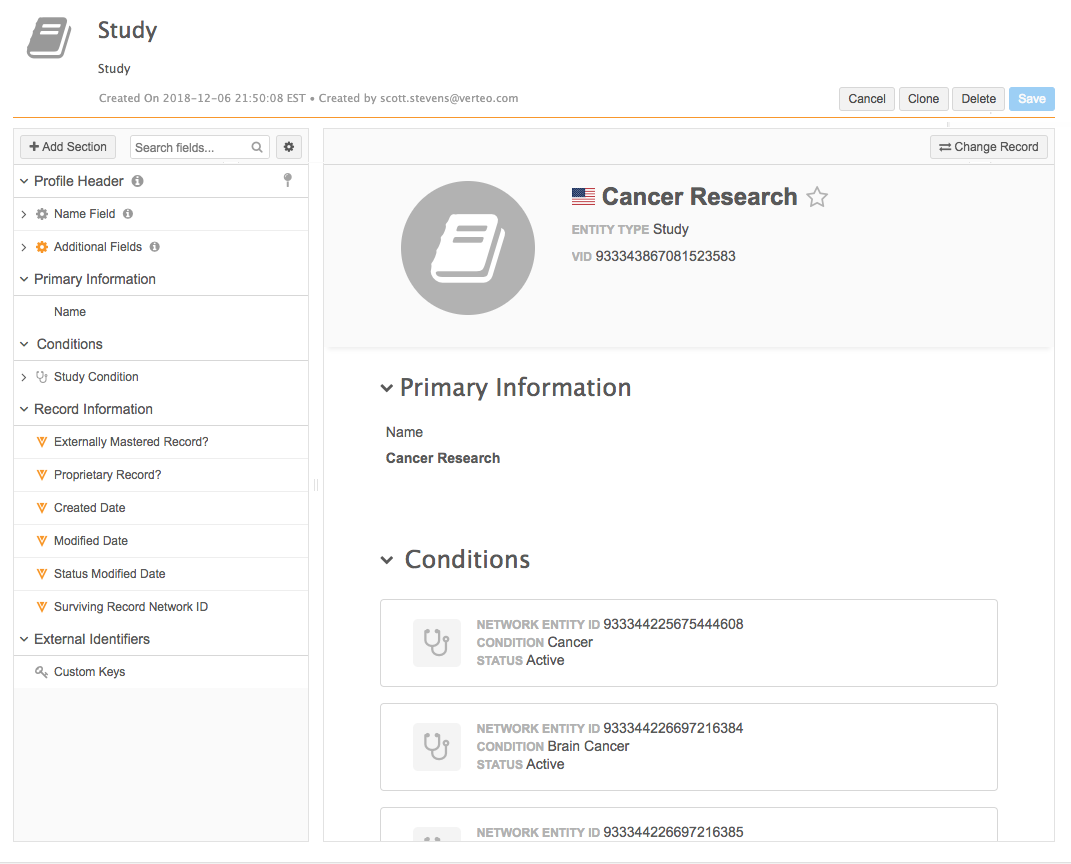
- Primary Information - The section that contains the key information about the entity; for example, name, Veva ID, contact information, primary country, and record state.
- Record Information - All of the standard Veeva fields that are added for the custom object.
- External Identifiers - The custom key placeholder.
- Sub-objects - A section for each sub-object that was added to the profile layout. These sections will include all of the fields that are available and enabled in the data model for these objects.
- Custom Relationship Object - A section for the relationship object that was added to the profile layout. The following fields are added to the relationship object section by default:
- Owner object name - The name is the label defined in the custom relationship object configuration. This is also defined as a summary field by default; it displays on the custom relationship object's summary card on the record profile.
- Status - The status of the custom relationship.
- Entity Type - The entity type of the owner object. This is also defined as a summary field by default.
- Custom fields - Any custom fields that were created on the custom relationship object.
- Custom keys - Identifiers assigned to the custom object.
This feature supports configuring layouts for custom objects in the same way that layouts are configured for Veeva objects. Administrators and data managers can add and remove sections, add fields, clone layouts, and so on. For information, see Configuring profile layouts.
Previewing the layout
On the Preview Layout pane, search for a record for that entity type to see how the profile page looks with record date. After you make changes to the layout, reload the preview pane to review those changes.
Next steps
The profile layout must be added to a data visibility profile so Network users can access the records.
Creating layouts for complex relationships
Custom relationship objects typically have one owner object and one related object. In some cases, a relationship can have more than one owner object or related object (arc relationships), or the same object can be both (recursive relationships).
To support these complex custom relationships, the profile layout editor supports having two sections for the same relationship so record profiles can display each related object.
Example
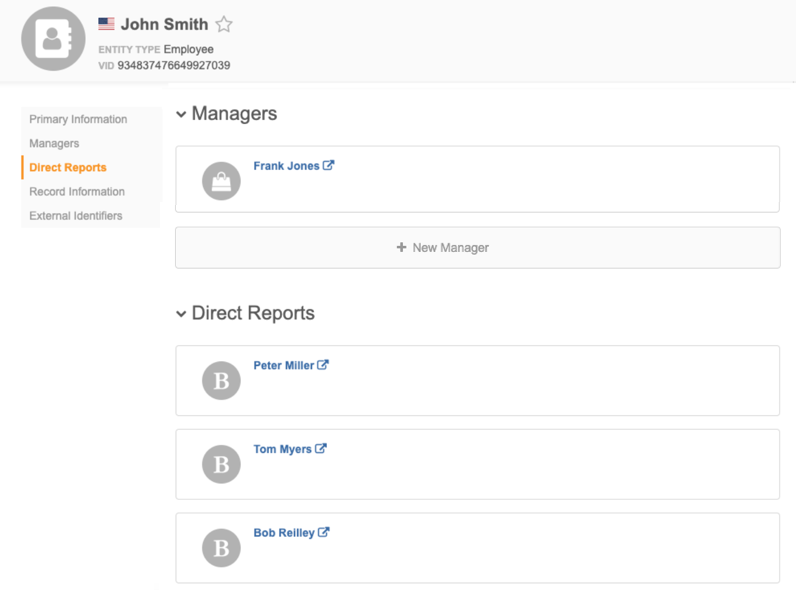
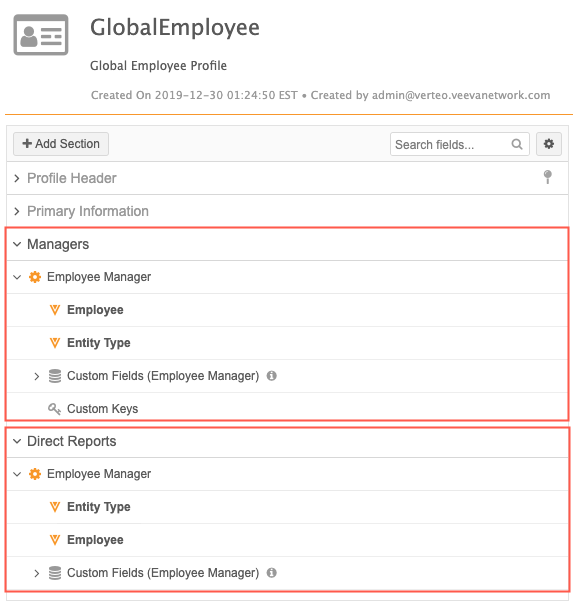
An employee can have a manager and they can have direct reports; in this custom relationship, the EMPLOYEE custom object is both the owner object and related object (recursive relationship).
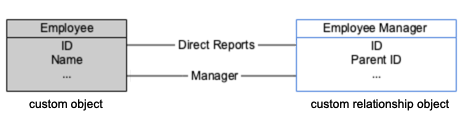
You can create two sections on the profile layout for the same custom relationship object so the profile page displays both sides of the relationship.
Using the perspective labels
To be able to select the same custom relationship object more than once, the profile layout editor uses the perspective labels that you defined for the owner and related objects in the custom relationship object configuration.
Example
In the EMPLOYEE example, the following labels are defined:
-
When the EMPLOYEE is the related object, the owner EMPLOYEE object is called Direct Reports.
- When the EMPLOYEE is the owner object, the related EMPLOYEE object is called Managers.
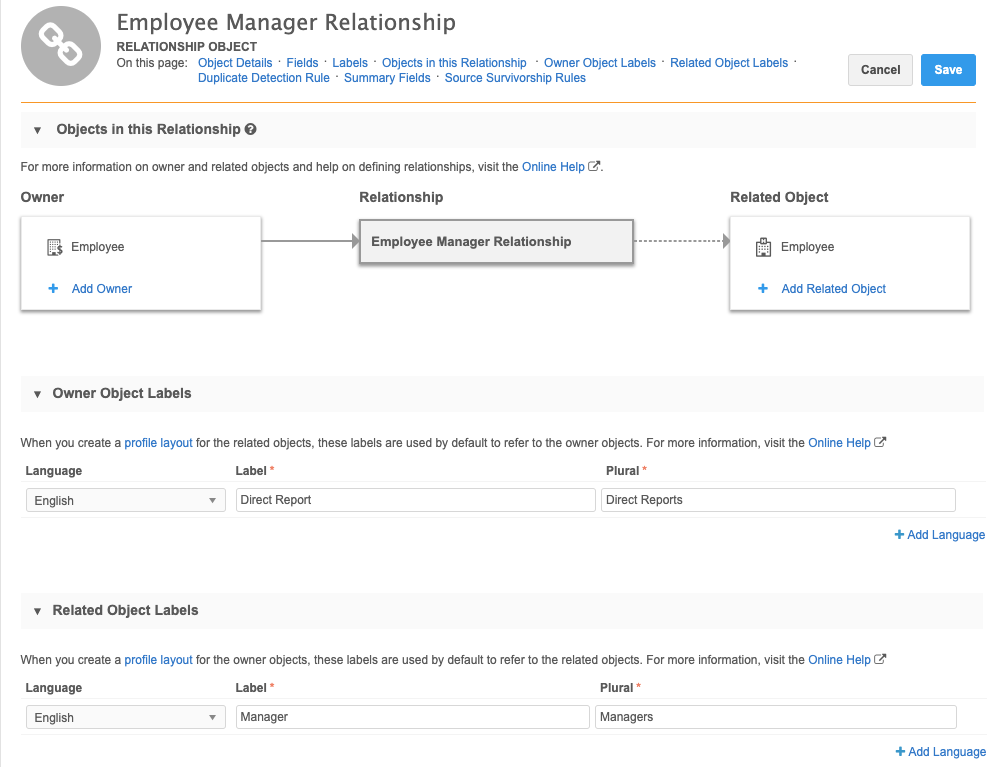
The Direct Reports and Managers labels are used in the profile layout editor to distinguish these relationships.
Add the relationships to the profile layout
You can add the relationship object when you create the profile or by adding sections if the profile has been created.
Creating the profile
Add the relationship object in the Add Layout dialog.
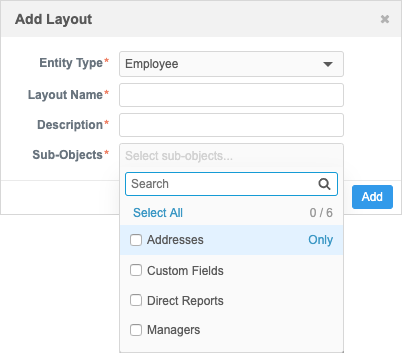
Tip: The owner and related object can be added at the same time.
Creating sections
- Click the + icon to add a section.
-
In the Add Section dialog, expand the Object list and select the owner object.
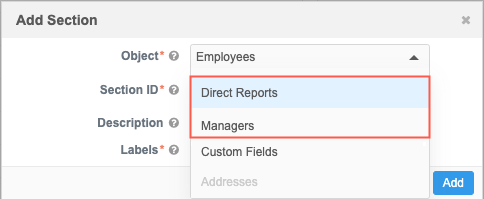
Sections are created for the different perspectives using the same relationship object (for example, Employee Manager).
In the sections, add the fields that apply to the relationship.
Profile page
After the profile layout is configured, the profile page displays the two sections for the custom relationship object.
-