Inbox
DCR enhancements
Enhancements have been made to add requests and change requests so Data Stewards and Data Managers can more easily navigate the page. These changes include navigation links to page sections, the ability to collapse and expand all sections, and updated labels to differentiate sub-objects.
These enhancements are enabled by default in your Network instance.
Sections
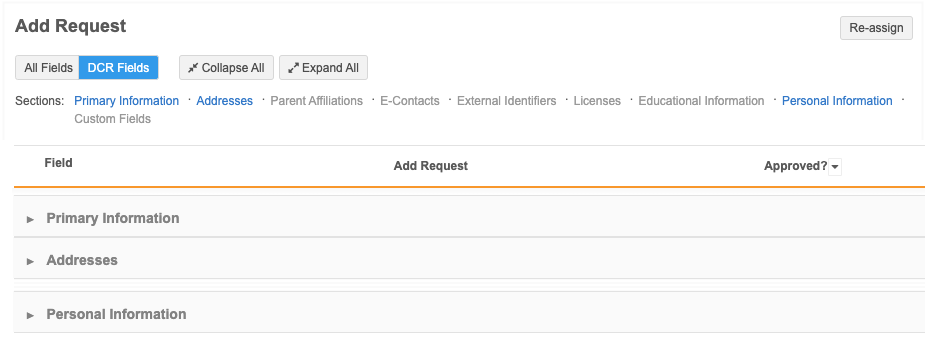
Data change request (DCR) pages now include quick links to sections at the top of the page. This area remains fixed at the top of the page when you scroll through the page.
All Fields
When Data Stewards are in the All Fields view, all of the section names are highlighted in blue. Click the section name to automatically scroll to that area on the page.

DCR Fields
In the DCR Fields view, only the section names included in the DCR are highlighted in blue. The other sections are listed but they are not highlighted (display as gray) so Data Stewards can easily identify the sections that apply to the request.
If you click a section name that is not included in the DCR, the page switches to the All Fields view and opens to the section that you selected.
If Data Stewards add field values to a section that was not included in the original DCR, that section is added to the DCR Fields view and the link is highlighted in blue.
Collapse or Expand sections
Use the Collapse All and Expand All buttons to hide or display all details in each section. By default, all sections are expanded when DCRs open. If you choose Collapse All, Network retains your preference if you reload or revisit the DCR.
For sub-objects and relationship objects, only the section is expanded; not each object within the section.
Identify sub-objects
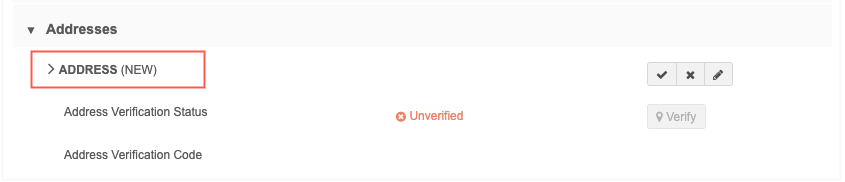
Data stewards can now easily identify each object in sub-object sections. Previously, each object was labeled as a count; for example, in the Addresses section, Address 1, Address 2, and so on displayed. Now each object is identified by relevant details.
The following label displays for each sub-object type:
-
Addresses - Formatted address
-
Affiliations - Corporate name of the HCO
-
Licenses - License number
Example
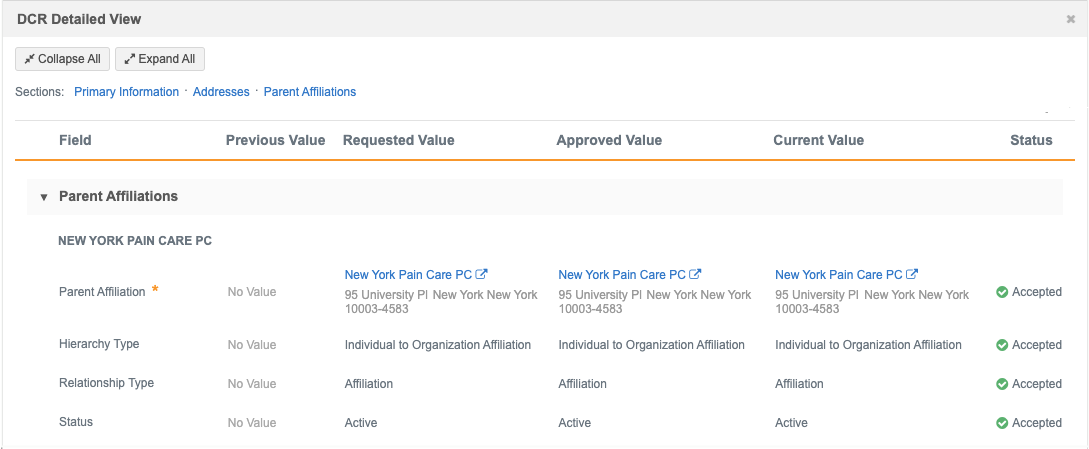
In the Parent Affiliations section, each affiliation is identified by its corporate name.

New sub-objects will continue to display the sub-object type and the (NEW) label until it is approved and processed by Data Stewards.
Example
Add sub-objects
When Data Stewards click the Add ![]() icon to add a sub-object to a DCR, the page scrolls to the (New) section so they can immediately begin adding the details. Previously, Data Stewards had to scroll to find the (New) sub-object section.
icon to add a sub-object to a DCR, the page scrolls to the (New) section so they can immediately begin adding the details. Previously, Data Stewards had to scroll to find the (New) sub-object section.
Suspect match enhancements
Suspect match tasks have also been updated to enhance the page navigation and usability.
Sections
Suspect match tasks now include quick links to sections at the top of the page. This area remains fixed at the top of the page when you scroll through the page.
All Fields
When Data Stewards are in the All Fields view, all of the section names are highlighted in blue. Click the section name to automatically scroll to that area on the page.

Summary
When Data Stewards are in the Summary view, only the section names included in the suspect match are highlighted in blue. The other sections are listed but they are not highlighted (display as gray) so Data Stewards can easily find the sections and apply the changes.

If you click a section name that is not included in the suspect match, the page switches to the All Fields view and opens to the section that you selected.
Collapse or Expand sections
Use the Collapse All and Expand All buttons to hide or display all details in each section. By default, all sections are expanded when suspect match tasks open. If you choose Collapse All, Network retains your preference if you reload or revisit the DCR.
For sub-objects and relationship objects, only the section is expanded; not each object in the section.
Task details
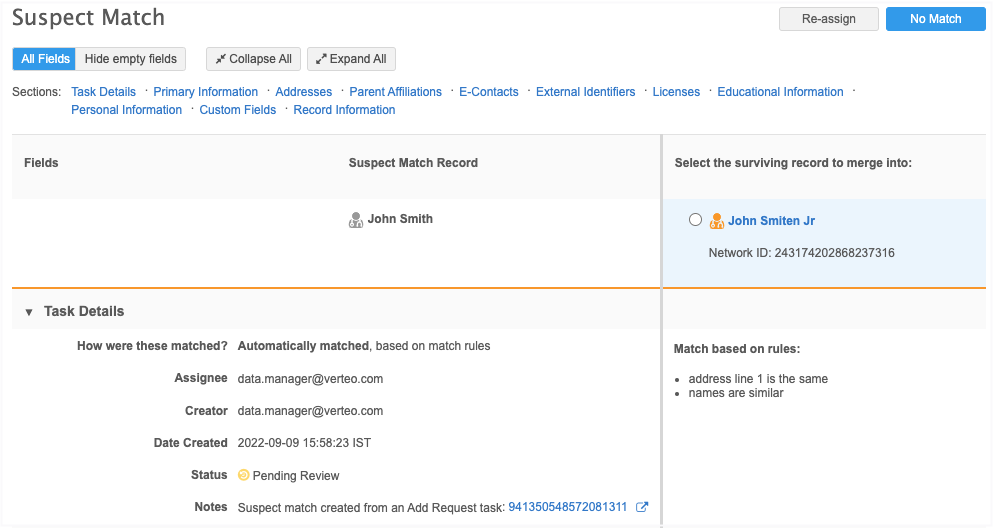
The task details are relocated near the top of the Suspect Match page. Data Stewards can quickly review the details without scrolling to the bottom of the page.
This section also includes the How were these matched? details.
DCR Detailed View
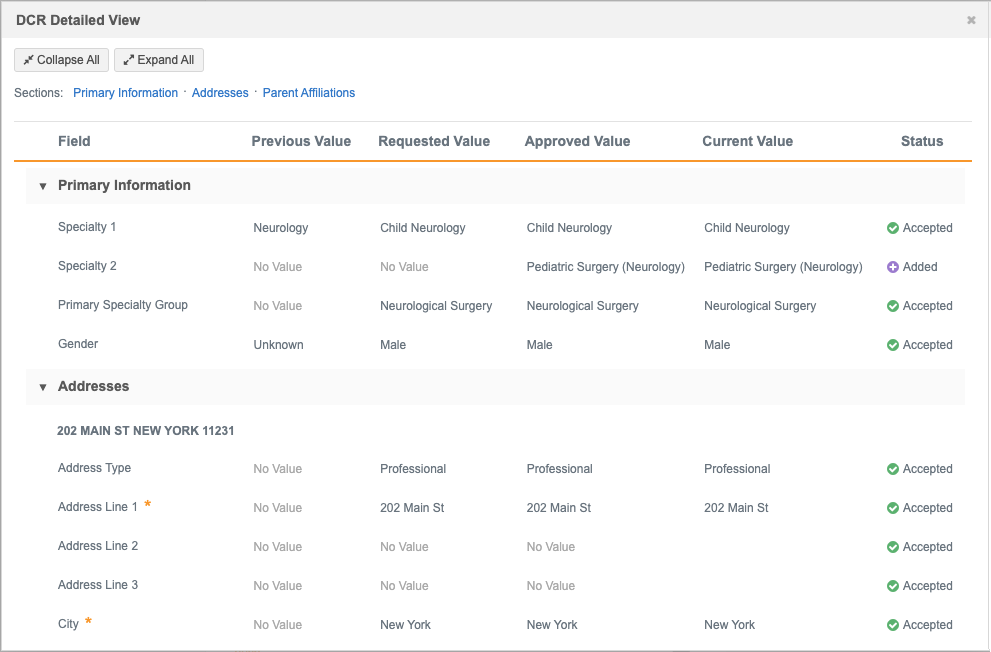
Data Managers and Data Stewards can now review the detailed changes of processed data change requests (DCRs). The DCR Detailed View displays all of the values that were part of the DCR and the current value so you have a better understanding of the outcome for data quality purposes.
This view is available only for processed add and change requests.
This enhancement is available by default in your Network instance.
Viewing processed DCR details
Data Stewards and Data Managers can open this view on processed tasks. The button does not display on pending tasks.
-
In the Inbox, open a processed DCR and click the DCR Detailed View button.

-
The DCR Detailed View dialog displays all of the values from the request and the current value on the record.
-
Previous Value (change requests only) - The value on the record that the user requested to change.
- Requested Value - The value that was included on the DCR.
- Approved Value - The value that was set on the DCR by a Data Steward.
- Current Value - The value on the record right now.
-
Status - The action for each field value on the DCR.
Possible values:
-
Accepted
 - The requested value is approved.
 -
Added
 - The Data Steward augmented the field value in the DCR. The field was not included in the original DCR.
 -
Rejected
 - The requested value was not approved.
 -
Modified
 - Data Stewards modified the requested field value before approving the DCR. The final approved value is different from the original requested value.
-
-
Address details
Network address inheritance
For addresses that have been copied from a parent address, an icon displays beside each field to indicate the final status after the task has been processed.
Possible values:
-
Synced
 - Address is synced or copied from a parent address.
 -
Unsynced
 - Address is unsynced from the copied parent address
 -
Disqualified
 - Copied parent address is disqualified.
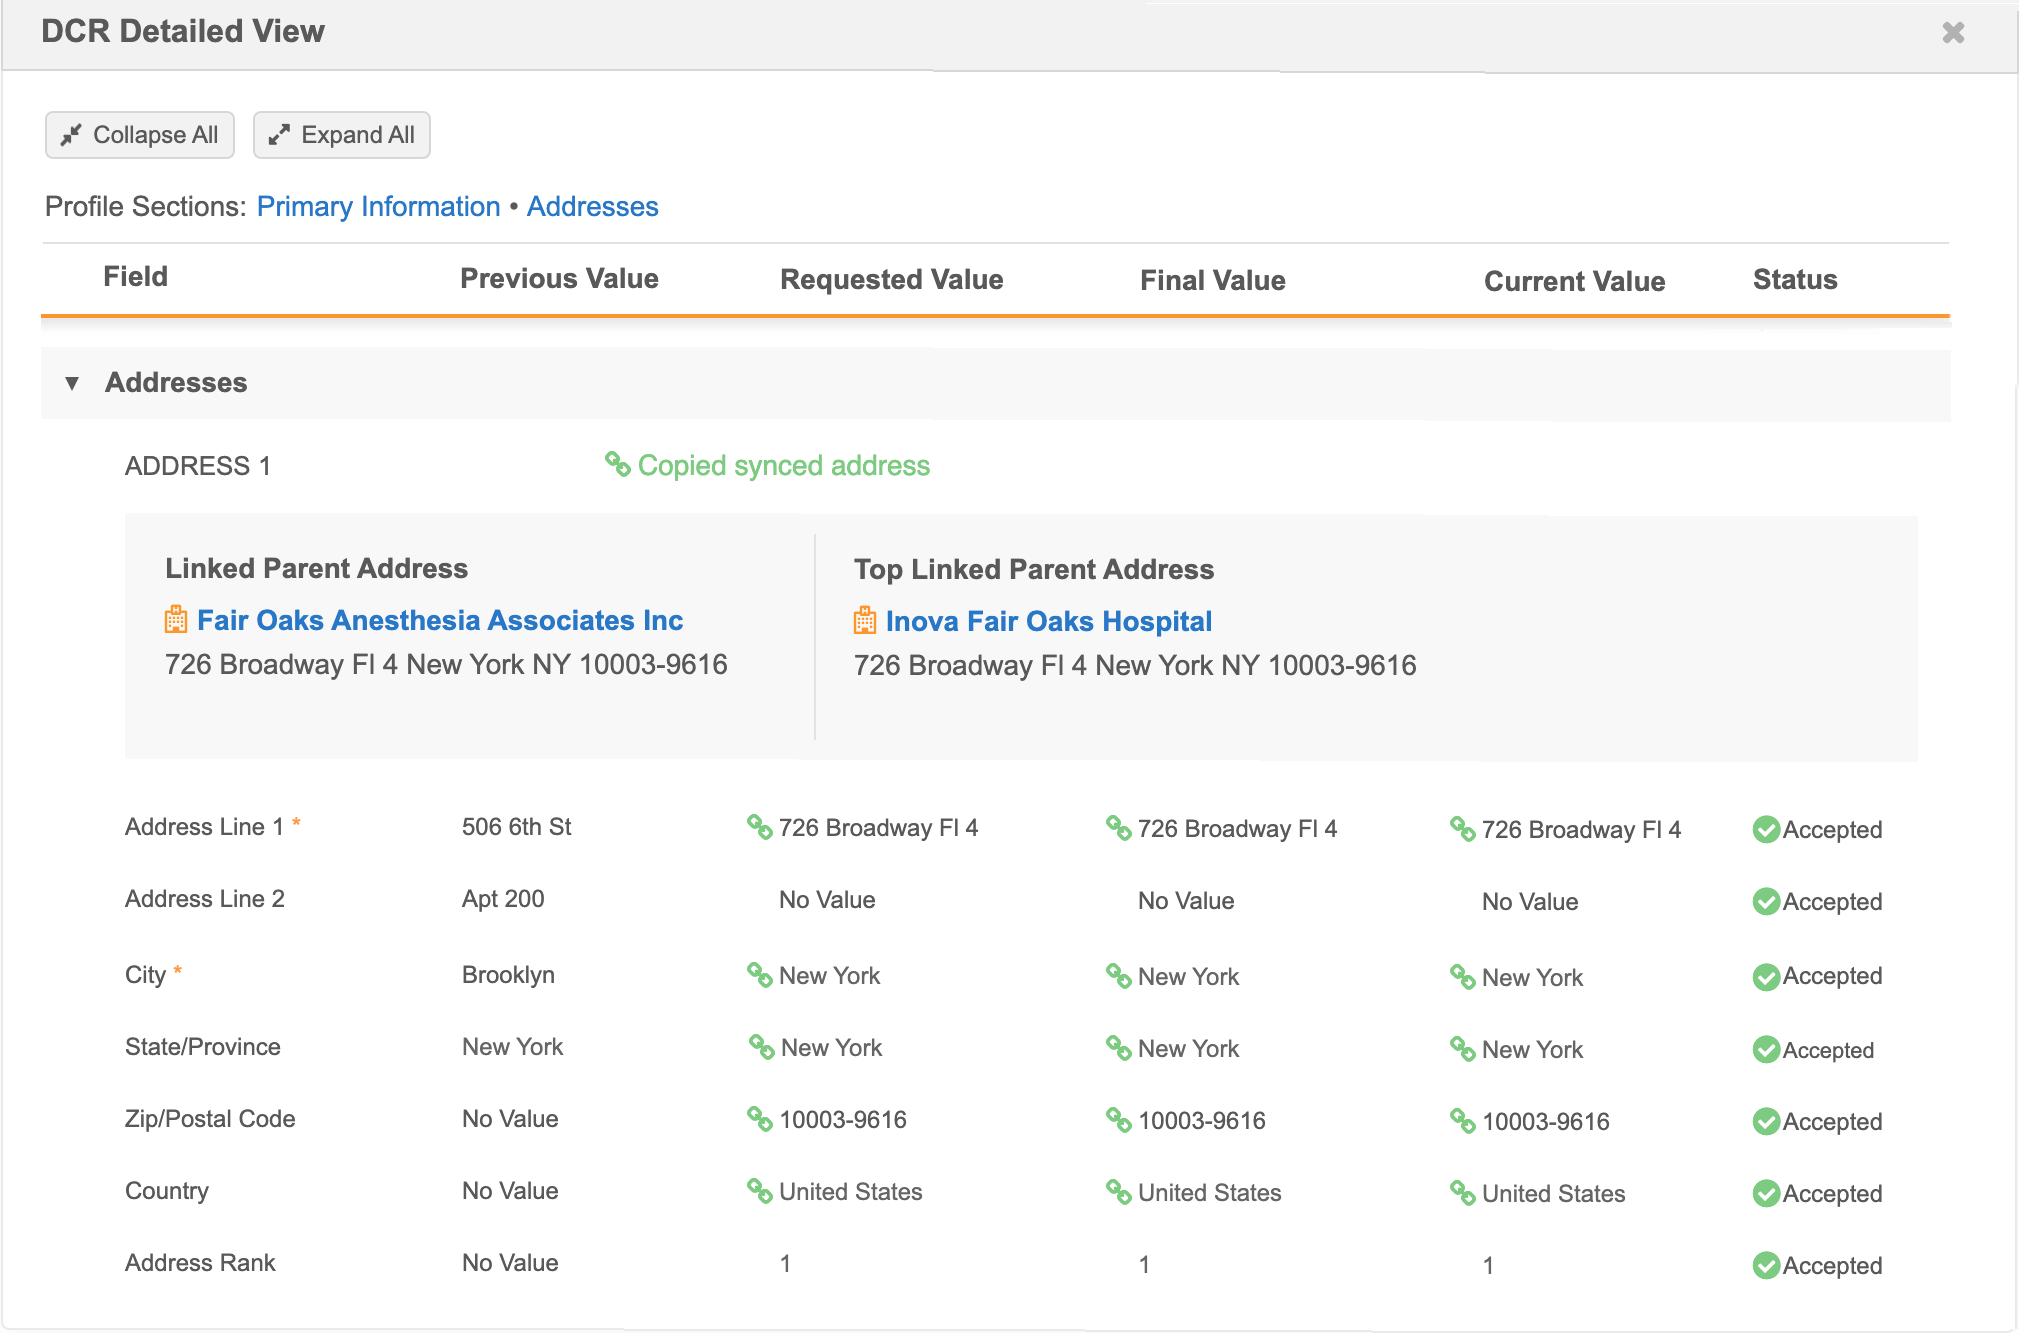
Address verification
Address verification changes also display on the view.

Parent affiliations
A link to the parent HCO displays in the detailed view. Click the link to open the parent HCO record in a new browser window.
Approve tasks in bulk
The DCR Cleanup button in the inbox was introduced in version 22R1.0 so Data Stewards can cancel and reject tasks in bulk. In this release, the ability to approve tasks in bulk is added.
This enhancement is added to the DCR Cleanup option by default in your Network instance.
The DCR Cleanup option is available only to users that have access to it through permission sets. Administrators must create permission sets and provide access to users.
For more information, see the Permission Sets topic in the Veeva Network Online Help.
Bulk approve options
Tasks can be approved in bulk using one of these options in the DCR Cleanup list:
-
Approve Selected Tasks - Select the tasks to be approved in bulk. A limit of 500 tasks can be approved in each operation.
When tasks are approved, a resolution note must be applied.
-
Upload a File - Instead of selecting each task in the Inbox, you can bulk approve tasks by uploading a file that contains a single column: task ID. A limit of 500 tasks can be uploaded in each file.
This option gives you more flexibility for approving tasks because it does not depend on access to the tasks. Your file can include tasks for any country and main object, even if you don't have access to the tasks through your inbox task groups.
Supported tasks
You can bulk approve the following tasks:
-
add requests
-
change requests
If you select tasks in the inbox, the tasks must be unassigned or assigned to the user running the operation. If you upload a file, assigned tasks can be included.
Tasks that are not supported
The following tasks will be ignored if they are included in the operation:
-
Assigned tasks - Tasks that are assigned to other users.
This applies to the Approve Selected Tasks operation only. It does not display if you have uploaded a file. -
Pending master tasks - Tasks that are pending review by Veeva OpenData.
-
Suspect match tasks - These tasks must be approved individually.
- Unsupported task types - Job warnings and failed jobs.
- Duplicate Task IDs - Tasks are listed more than once in the file.
- Tasks with Invalid ID - Tasks that do not have a valid task ID.
Approve selected tasks
To approve tasks in bulk:
-
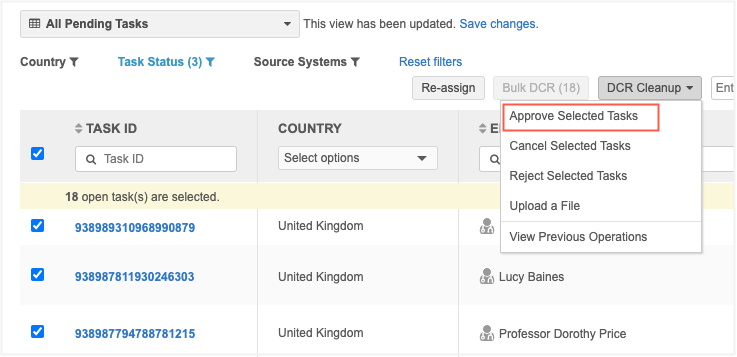
In the Inbox, select the tasks to approve and click DCR Cleanup > Approve Selected Tasks.
If you select the checkbox in the column header to select all tasks, a message displays a count of the selected tasks and an option to select the first 500 open tasks in the Inbox. Click the link to select those tasks. A maximum of 500 tasks can be selected for each operation.
Example
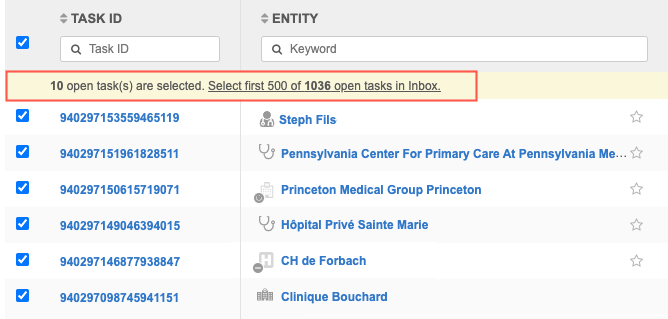
The count at the bottom of the list is updated to display the number of selected records.
Tip: Include tasks that are being approved for the same reason; one resolution note will be applied to all the tasks in the operation.
-
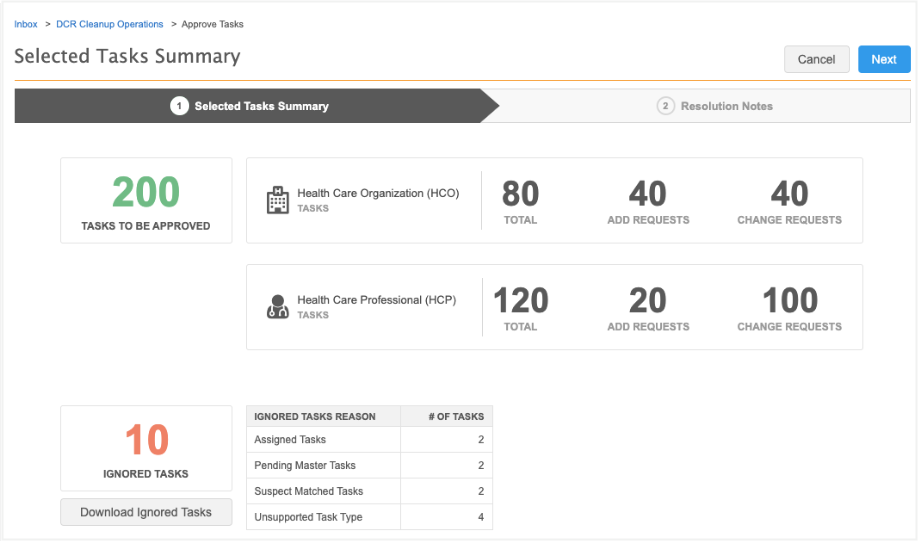
The summary page opens. It provides a count of add requests and change requests for each selected object and a total count of records that will be approved in the operation.
Ignored tasks
A count displays in this box if any of the tasks will be ignored because they cannot be approved for the following reasons:
-
Assigned tasks - The task is assigned to a data steward.
-
Pending Master Tasks - The task is pending review by Veeva OpenData.
-
Suspect Match Tasks - The task is a suspect match. These tasks must be approved individually.
-
Unsupported Tasks Type - Tasks that are Job Warnings or Failed Jobs.
-
Duplicate Task IDs - Tasks that are listed more than once in the file.
-
Tasks with Invalid ID - Tasks that do not contain a valid task ID.
Click Next.
-
-
On the Resolution Notes step, define the resolution note that will be applied to all of the selected tasks. Only resolution notes that apply to all countries display.
-
Code - The reason for approving the tasks.
-
Language - The language the resolution note will display in.
The localized message will display in the Resolution Notes field.
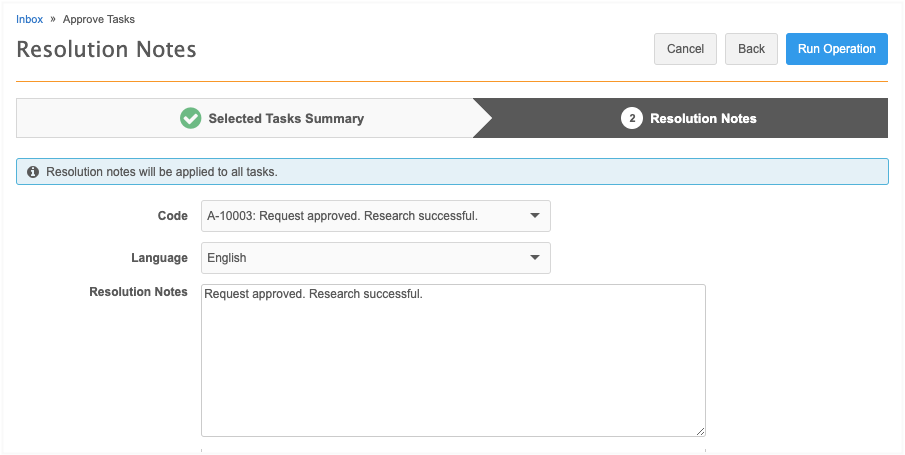
To continue, click Run Operation
-
-
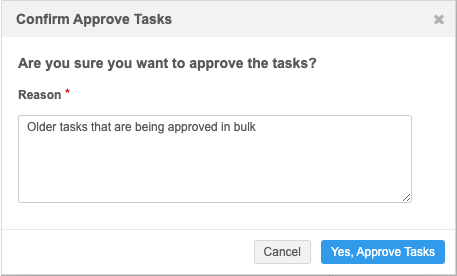
In the Confirm Approve Tasks dialog, provide a reason and then click Yes, Approve Tasks.
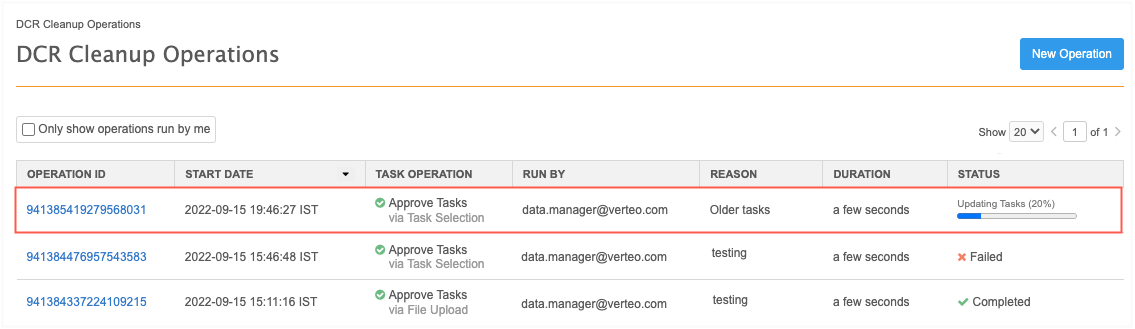
The DCR Cleanup Operations page opens and you can see from the message that the operation to approve the tasks has started.
-
When the operation completes, click the Operation ID to review the details.
The Operation Details page displays a summary of the tasks that were submitted and approved.
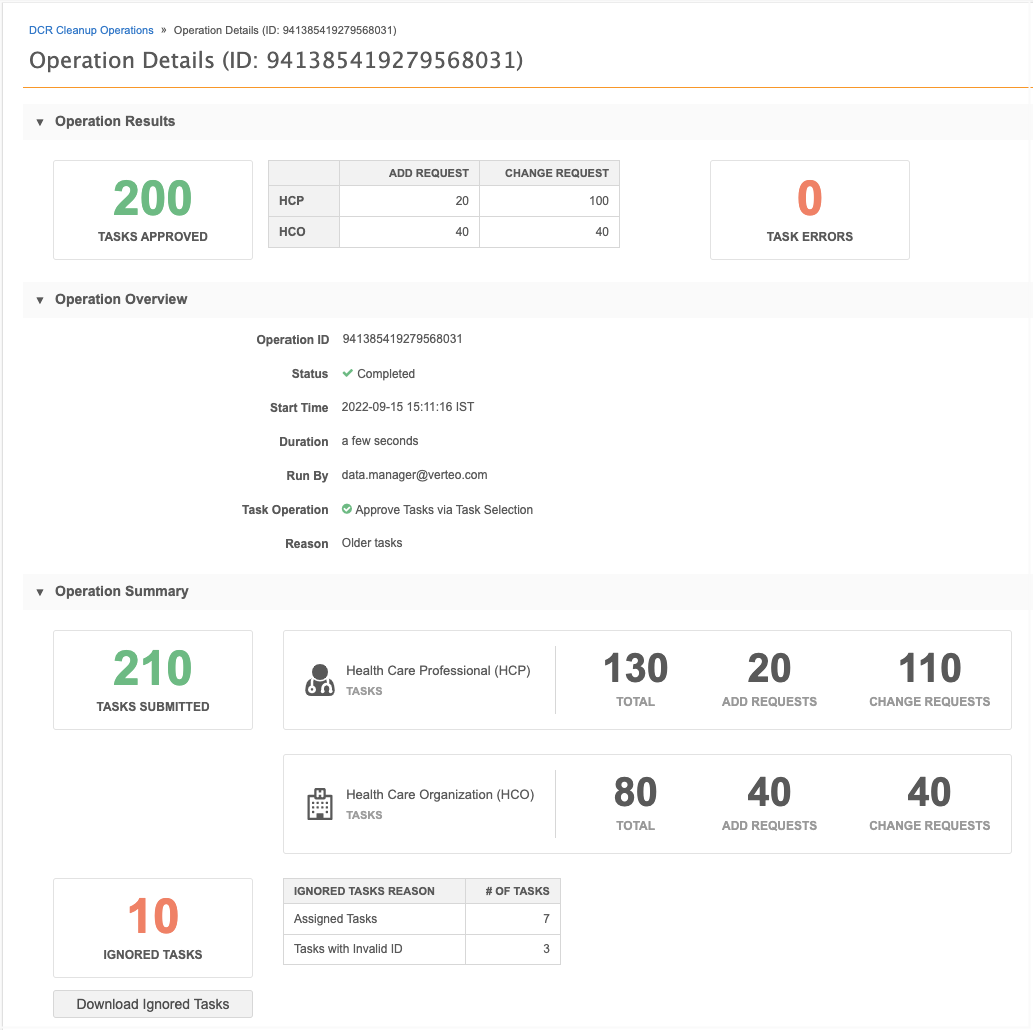
Ignored tasks
If the operation contains ignored tasks, a count and summary of the reasons display. Click Download Ignored Tasks to export a .csv file. The downloaded file identifies the task ID with the error (reason) so you can investigate further.
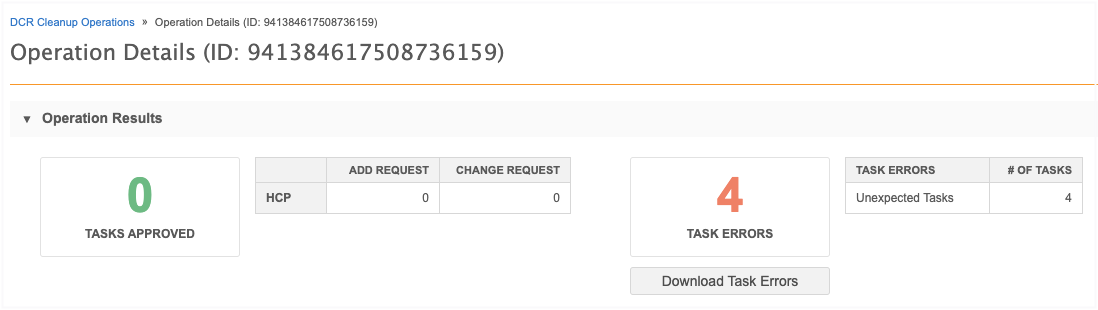
Task errors
If the approve operation contains errors, a count and summary of the errors display. Click Download Task Errors to export a .csv file that contains the task ID for each error.
Upload a file
Uploading a file gives you more flexibility for approving tasks in bulk. The file can contain tasks that are assigned and tasks for countries that you don't have access to through your inbox task groups.
File requirements
-
Format - Comma separated value (.csv) and Microsoft® Excel® (.xlsx) files are supported.
-
Contents - Must be a single column (task_id) containing the task IDs of the records that you want to approve.
-
Task limit - A maximum of 500 tasks can be uploaded in each operation.
-
File Size - Files can be up to 30MB.
-
Reason for approval - Include tasks that are being approved for the same reason; one resolution note will be applied to all the tasks approved in the operation.
Example file
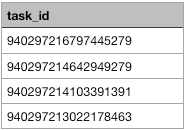
Tip: To retrieve the task IDs, export the Inbox and remove all the columns except the task_id column. Ensure that only the task IDs for the records that you want to approve are listed in the file. You can export the Inbox if you have permission through your assigned Inbox Task Group.
To upload a file:
-
In the Inbox, click DCR Cleanup > Upload a File.
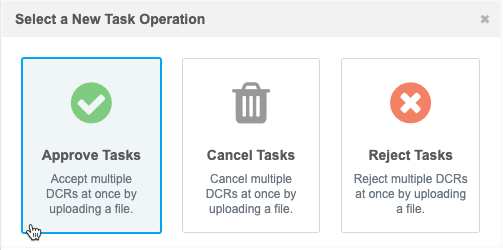
-
In the Select a New Task Operation dialog, choose Approve Tasks.
The task options that are available depend on your assigned permission sets.
-
On Step 1, Approve Tasks, click Upload File to browse for a file or drag the file to the box.
The file will be validated to ensure that it is the expected format and size and that it contains only the task_id column.
-
On Step 2, File Summary, review the details of the file that was uploaded and the records that will be approved. A total count of the tasks for each object and counts for each task type display.
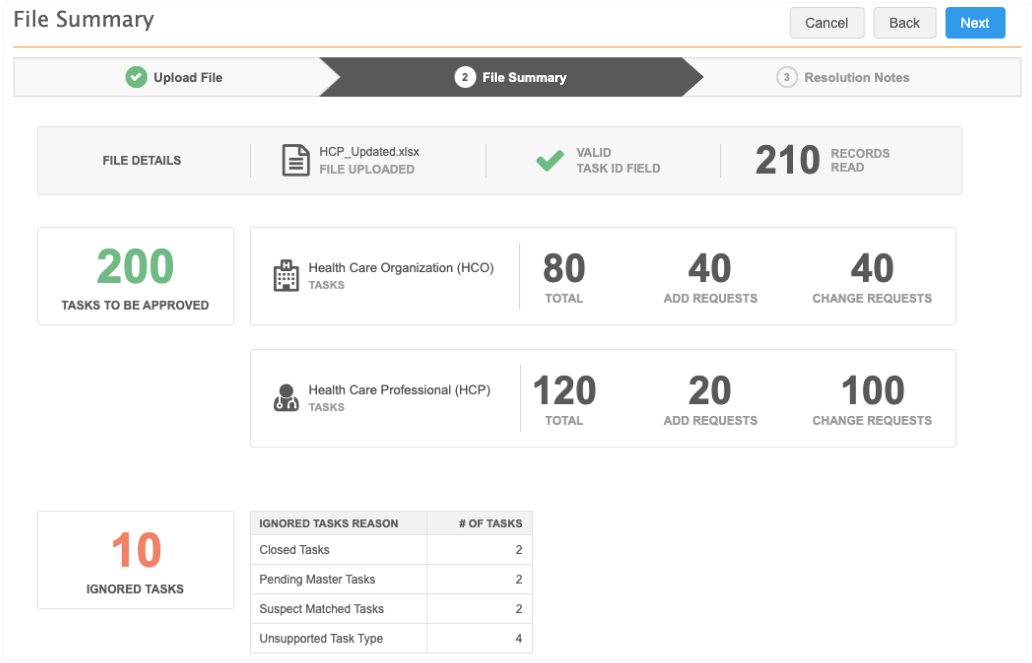
Ignored tasks
A count displays in this box if any of the tasks will not be approved for the following reasons:
-
Closed Tasks - The task has already been closed.
-
Duplicate Task IDs - The task is ignored because it is a duplicate.
-
Invalid Task IDs - The task is not a DCR ID.
-
Pending Master Tasks - The task is pending review by OpenData.
-
Suspect Match Tasks - The task is a suspect match.
-
Unsupported Tasks Type - Tasks that are Job Warnings or Failed Jobs.
-
-
Click Next.
-
On Step 3, Resolution Notes, define the resolution note that will be applied to all of the approved tasks.
-
Code - The reason for approving the tasks.
-
Language - The language the resolution note will display in.
The localized message will display in the Resolution Notes field.

-
-
Click Run Operation.
-
In the Confirm Approve Tasks dialog, type a reason and click Yes, Approve Tasks.
The DCR Cleanup Operations page opens so you can view the progress of the job. When the job completes, click the Operation ID to view the details of the job.
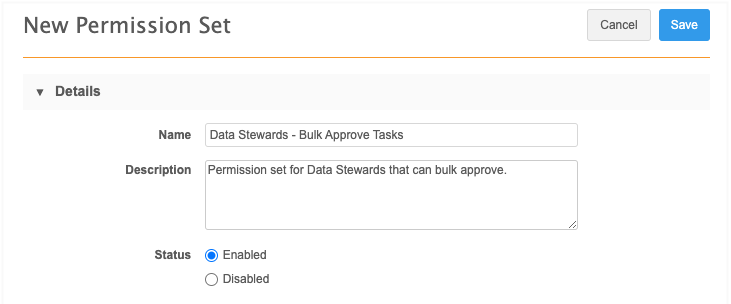
Permission sets
To support the ability to approve tasks in bulk, a new option is available for DCR Cleanup permissions (Users & Permissions > Permission Sets).
Administrators can assign the Approve tasks option to individual users or to user groups through the permission set.
For more information, see Permission Sets in the Veeva Network Online Help.
Reject suspect match tasks
Suspect match tasks are now supported for bulk reject operations. Previously, suspect match tasks that were included in bulk reject operations were ignored. Including suspect matches helps users clean up their inbox.
This enhancement is enabled by default in your Network instance.
Add request considerations
When suspect matches created from add requests are rejected in a bulk operation, the suspect match switches back to an add request. The add request could be automatically approved or could be sent to the Inbox for stewardship, depending on your workflow settings.