Step 1: Set up the Affiliation widget objects
Two new data model objects, Affiliation and Account Link, are added to support the Affiliation widget. Configure fields, reference codes, and workflow settings for the objects. Also, create a custom field to identify the HCOs that are health systems.
New data model objects
Two new objects have been added to the Customer Master data domain (Data Model > Data Domains):
-
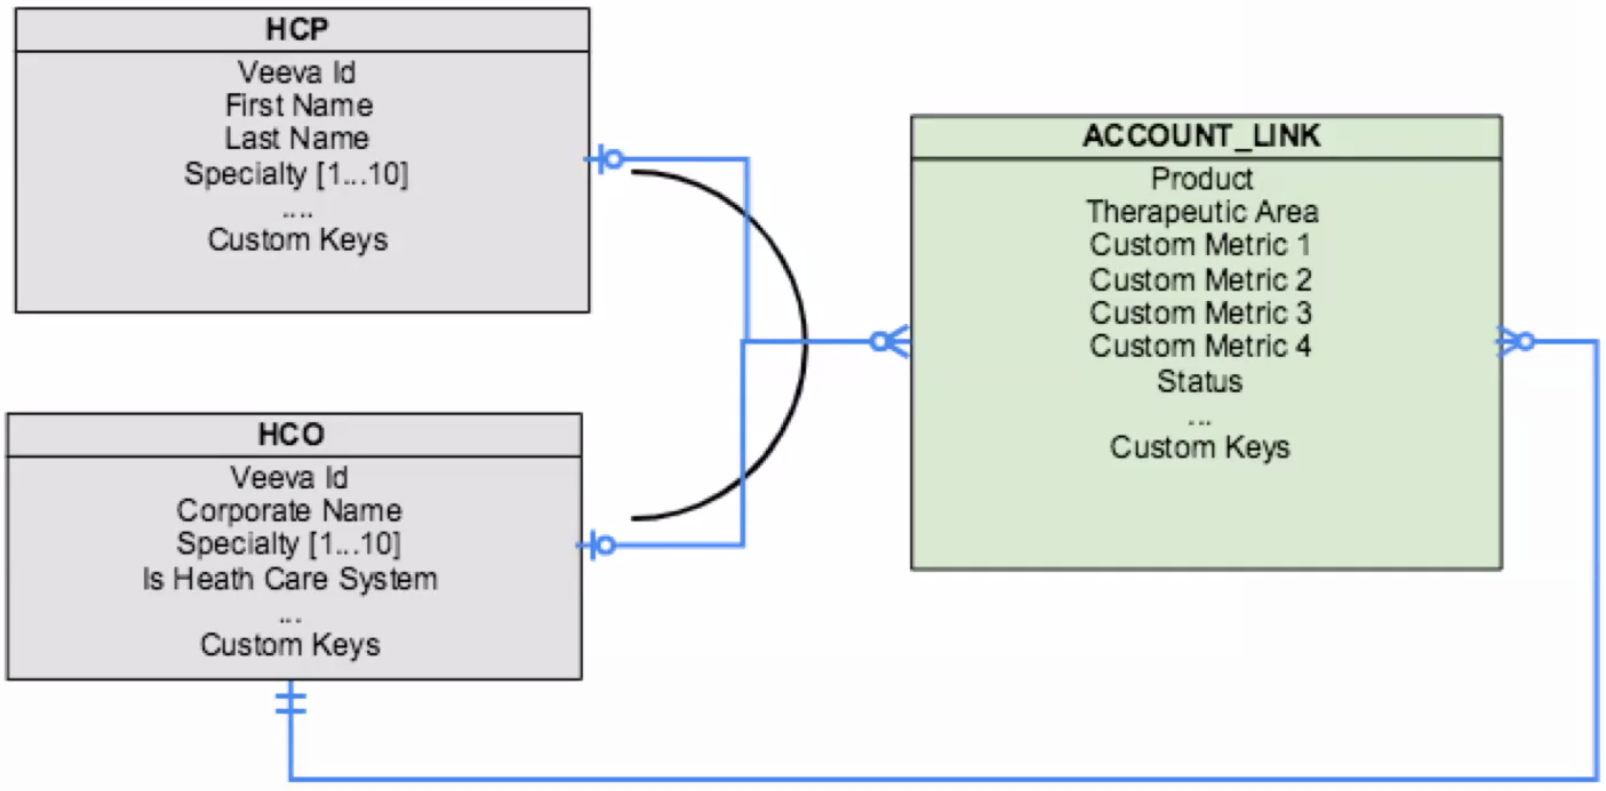
Account Link object - A custom relationship object that connects HCPs and HCOs to a health care system for a specific product and therapeutic area.
The Account Link object is supported for the Affiliation widget only.
-
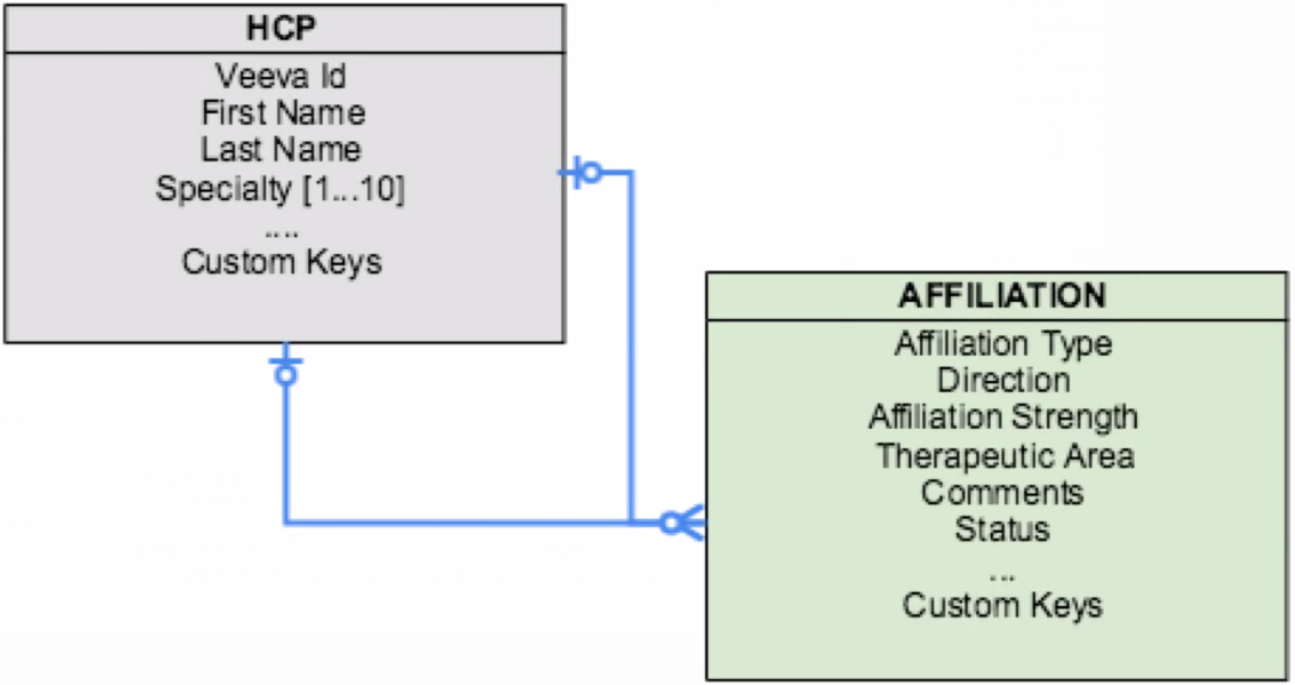
Affiliation object - A Veeva standard relationship object that identifies HCP to HCP affiliations.
The Affiliation object cannot be viewed in the Network interface but it is supported for some Network features; for example, source subscriptions, reporting, and target subscriptions. For more information, see the "About the Affiliation object" section in this document.
These objects are automatically created when the Affiliation widget is enabled in your Network instance.
For information about the roles of these objects in the Affiliation widget, see Affiliation widget objects.
Account Link object
The Account Link relationship object determines the HCPs and HCOs that display in the widget for a health system for a product/therapeutic area. The fields on the Account Link object help users to filter and display metrics in the Affiliation widget.
To view the object, in the Admin console, click Data Model > Data Domains > Customer Master Domain.
Network creates a series of default system fields on the Account Link object. New fields are also created and enabled to support health care systems. Reference codes must be added to some of the new reference type fields to support the widget configuration.
The following fields are used for the affiliation widget:
| Field Name | Description | Reference Type |
|---|---|---|
account_link_product__v
|
Products that are used in your health care systems. |
Product This reference type is created by default but it is empty. You must import the reference codes for your products. These codes will be used in the affiliation widget configuration. |
account_link_status__v
|
Used to indicate if a health care system is Active or Inactive. |
AccountLinkStatus This reference type and the reference codes are created by default. A - Active I - Inactive |
account_link_therapeutic_area__v
|
Identifies the supported therapeutic areas for HCPs; for example, Oncology, Cardiology, and Dermatology. |
TherapeuticArea This reference type is created by default but it is empty. You must import the reference codes that are applicable for your business. These codes will be used in the affiliation widget configuration. |
Affiliation object
The Affiliation object is a relationship object that links HCPs to HCPs. HCP to HCP affiliations cannot be viewed or updated in the Network UI; although, they can be viewed in Network reports. The affiliations must be loaded into Network using a source subscription so they can be viewed in the affiliation widget.
To view the object, in the Admin console, click Data Model > Data Domains > Customer Master Domain.
Network creates a series of default fields on the Affiliation object. Besides the typical system fields (created_date, record_state, and so on) there are fields that are required for the affiliation widget. Reference codes must be added to some of the new reference type fields to support the widget configuration.
Fields that are used in the affiliation widget
| Field Name | Description | Reference Type |
|---|---|---|
affiliation_direction__v
|
Identifies the direction of the affiliation; for example, HCP 1 influences HCP 2, so the affiliation direction is A to B. | AffiliationDirection
The reference codes are created by default: 0 - Neutral (also Null) 1 - A to B 2 - B to A |
affiliation_entity_1_type__v
|
The entity type of the first HCP in the affiliation. | |
affiliation_entity_2_type__v
|
The entity type of the second HCP in the affiliation. | |
affiliation_entity_1_vid__v
|
The Network ID of the first HCP in the affiliation. | |
affiliation_entity_2_vid__v
|
The Network ID of the second HCP in the affiliation. | |
affiliation_strength__v
|
Identifies the amount of influence in the relationship; High, Medium, or Low. For example, if an HCP rarely receives advice from another HCP, the strength of the relationship is probably Low. | AffiliationStrength
The reference codes are created by default: High Medium Low |
affiliation_therapeutic_area__v
|
Identifies the supported therapeutic areas for HCPs; for example, Oncology, Cardiology, and Dermatology. | TherapeuticArea
This reference type is created by default but it is empty. You must import the reference codes that are applicable for your business. These codes will be used in the affiliation widget configuration. |
affiliation_type__v
|
Determines the relationship of the HCPs; for example, Co-authors, advises, and refers. This is a reference type field. | AffiliationType
This reference type is created by default and contains one affiliation reference code: AFF (Affiliated). You can import other reference codes that are applicable for your business. These codes will be used in the affiliation widget configuration. |
| (No related field) | AffiliationTypeDirection
This reference type is created by default and contains one reference code: AFF-0 (Affiliated with). The reference type is not related to a data model field; it is used with the You can import other reference codes that are applicable to your business. |
Export the objects
To export the affiliation data model and view it outside of your Network instance, click Data Model > Data Domain. Select the Customer Master domain and click Export Data Model.
All of the objects in the domain are included in the export.
Set up the Account Link object
The Account Link object is created by default but some data is specific to your business and cannot be predefined. The following updates must be made for the object:
- Create custom fields for metrics - Metrics can be used as filters on the Influence map so users can quickly find HCPs with specific skills or influence; for example, Product Familiarity or Disease Expertise.
- Create reference codes - Reference codes must be imported into your Network instance for the Product and Therapeutic Area fields.
- Update the workflow settings - Ensure that DCRs for the Account Link object are automatically approved.
Create custom fields for metrics
Metrics are specific to your business, so these custom fields must be created.
The custom metric fields are reference type fields. Network provides the reference list, AccountLinkMetric, that you can add to each metric field. A maximum of four metric fields can be added to each Affiliation widget.
On the Influence Map, the metrics display in the Show Metrics box. After metrics are defined, users can rate HCPs on each metric and the affiliation widget canvas can be filtered so users view HCP ratings for the selected product and therapeutic area. In the example below, the Influence Map is filtered to show the Disease Expertise ratings for HCPs for all Neurology products.

Note: Metrics are also supported for HCOs when the Affiliation widget is used in the Network Portal. For more details, see Creating a Network Portal application.
Create metric fields
To create custom metric fields, in the Customer Master domain, click the Account Link object. In the Fields section, click +Add Field.
When you create the metric fields, the following settings must be defined:
- Type - Must be Reference.
- Reference Type: Must be AccountLinkMetric. This predefined reference type contains the rating codes (Very High, High, Neutral, Low, Very Low).
Tip: Use a standard naming convention for all of the metric fields; for example, account_link_scientific_positioning__c and account_link_influence_level__c.
You might add a metric field for Product Familiarity so users can rate HCPs for their knowledge of specific products.

For more information, see Creating custom fields.
Create reference codes
Veeva fields are created by default for the Account Link objects. Some reference type fields are created but do not contain reference codes because the values are specific to your business.
The following reference codes must be created:
- Product - Used for the
account_link_product__vfield. -
TherapeuticArea - Used for the
account_link_therapeutic_area__vandaffiliation_therapeutic_area__vfields.
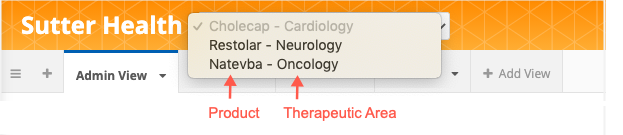
These reference codes are used together in the widget configuration.
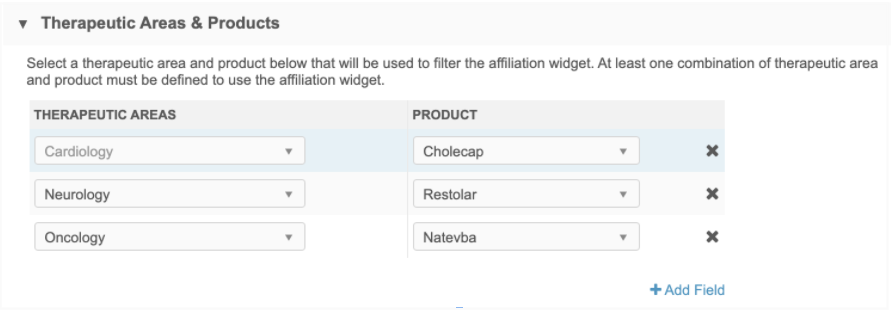
In the Affiliation widget, the values that you defined in the widget configuration are used as top-level filters for the selected health system.
To learn how to import reference codes, see Adding reference codes to a reference type.
Product codes
The account_link_product__v field is used as a filter for the Affiliation widget. Users can filter the selected health system for a specific product to display the related HCPs and HCOs.
For each product that you want to be available in the Affiliation widget, create a reference code.
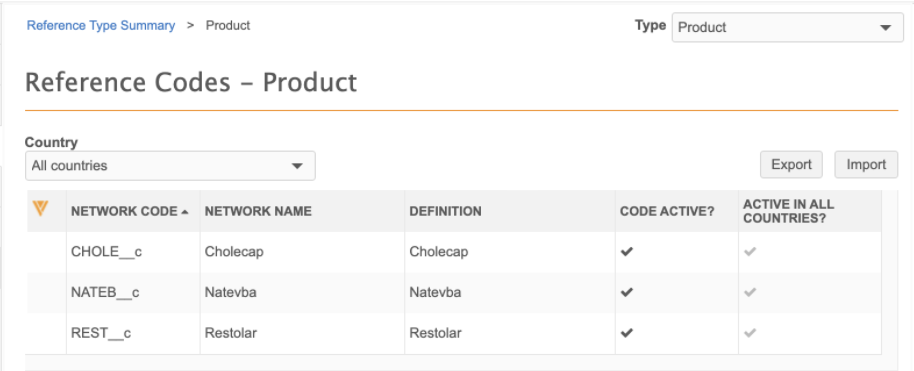
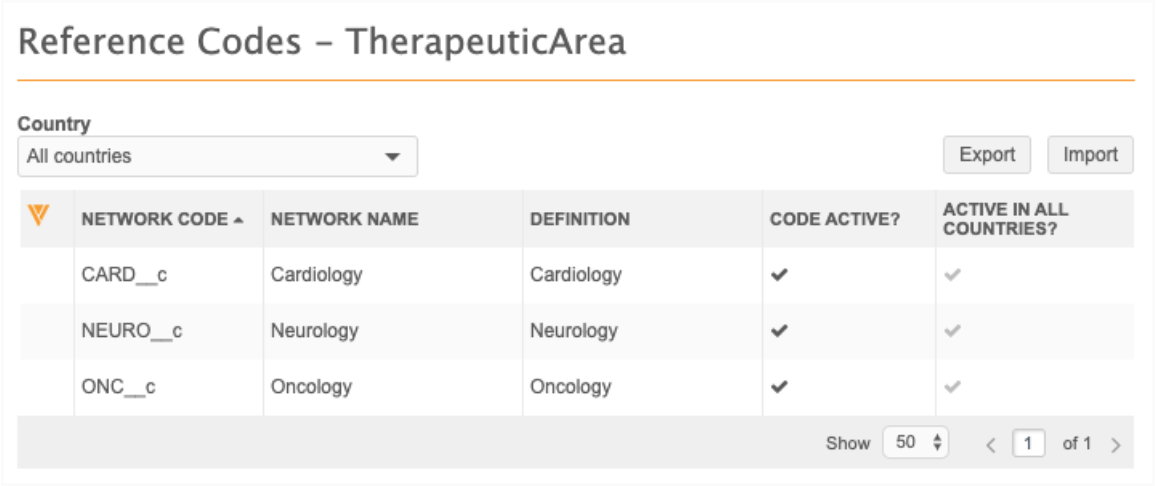
TherapeuticArea codes
The account_link_therapeutic_area__v field is created by default and is used to filter the product for specific uses; for example, Verteo's Restolar product can be used in the treatment of cardiovascular disease and Parkinson's disease, so these therapeutic areas would be added to the TherapeuticArea reference type.
Update the workflow settings
When widget users add HCPs and HCOs to the Influence Map canvas, a data change request is created for the Account Link object. Update the workflow settings for add requests so the request is automatically approved.
To update the workflow settings:
- In the Admin console, click Settings > Workflow Settings.
- In the Auto-Approve Add Requests for New Customer Owned Records section, add the Account Link object to the Sub-Object field.
- Save your changes.
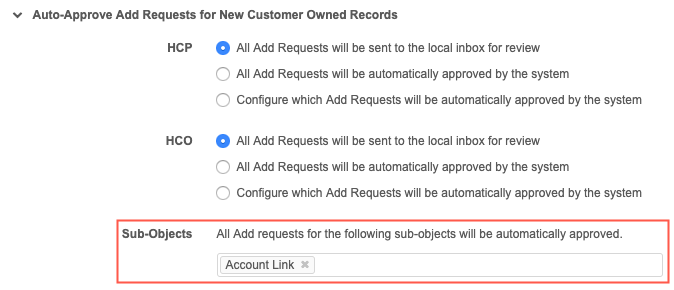
This ensures that the changes are not routed to local Data Stewards.
Set up the Affiliation object
Reference codes must be created to support predefined fields on the Affiliation object
The following reference field is also used by the Account Link object. These are the same codes that you imported for the Account Link object for the account_link_therapeutic_area__v field
-
TherapeuticArea - Used for the
affiliation_therapeutic_area__vfields.
Reference codes for the following fields must be created and imported into your Network instance:
-
AffiliationType - Used for the
affiliation_type__vfields. - AffiliationTypeDirection - Determines the label that displays for the relationship based on the affiliation type and direction field values.
To learn how to import reference codes, see Adding reference codes to a reference type.
Create reference codes
Create codes for the AffiliationType and AffiliationTypeDirection reference types.
AffiliationType
The affiliation_type__v field is created by default and is used to indicate how HCPs are related to each other. For example, HCPs can be affiliated because they co-author a paper together, or one HCP advises or mentors another HCP.
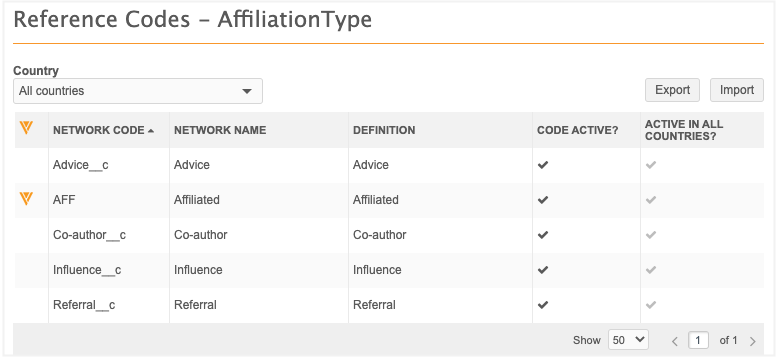
The AFF code is created by default. When an affiliation is drawn on the Influence Map canvas, this code is used by default. You can create and import other terms that are specific to your business so that you can identify more specific relationships.
AffiliationTypeDirection
This reference type is created by default but is not associated to a data model field. The AffiliationTypeDirection code is used in a calculation to describe the relationship between two HCPs. The calculation is based on the affiliation_type___v and affiliation_direction__v values that you select for an affiliation. Network uses the two values to determine which AffiliationTypeDirection code to display as the label in the Relationships column when you view an HCP's affiliations.
Example
HCP_A and HCP_B are affiliated. If the affiliation type is Advice, depending on the direction of the relationship (Neutral, A to B, or B to A) the label of the relationship in the widget could be one of the following when you are looking at HCP_A's affiliations:
- Neutral - Consults with <HCP_B's
first_name__v> - A to B - Gives advice to <HCP_B's
first_name__v> - B to A - Seeks advice from <HCP_B's
first_name__v>

Example reference codes for AffiliationTypeDirection
The reference type contains one reference code, AFF-0 (Affiliated with). This is used as the default value when an affiliation is created.
Calculation of the AffiliationTypeDirection value
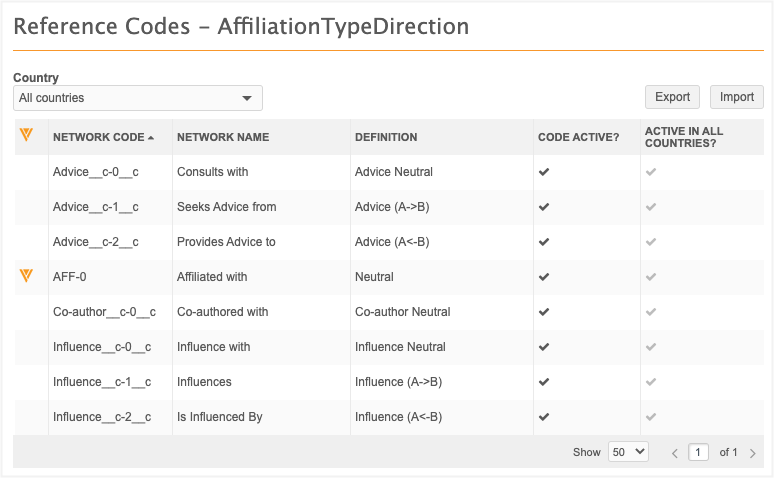
The value that the widget uses for the AffiliationTypeDirection is calculated using the affiliation_type__v and affiliation_direction__v field values. These are example reference codes.
| AffiliationType Code | AffiliationDirection Code | AffiliationTypeDirection Code | AffiliationTypeDirection Name |
|---|---|---|---|
| Advice__c (Advice) | 0 (Neutral) | Advice__c-0__c (Advice Neutral) | Consults with |
| 1 (A to B) | Advice__c-1__c (Advice A→B) | Seeks advice from | |
| 2 (B to A) | Advice__c-2__c (Advice A←B) | Provides advice to | |
| AFF-0 (Affiliated) | 0 (Neutral) | AFF-0 (Neutral) | Affiliated with |
| Co-author__c (Co-author) | 0 (Neutral) | Co-author__c-0__c (Co-author Neutral) | Co-authored with |
| Influence__c (Influence) | 0 (Neutral) | Influence__c-0__c (Influence Neutral) | Influence with |
| 1 ( A to B) | Influence__c-1__c (Influence A→B) | Influences | |
| 2 (B to A) | Influence__c-2__c (Influence A←B) | Is influenced by |
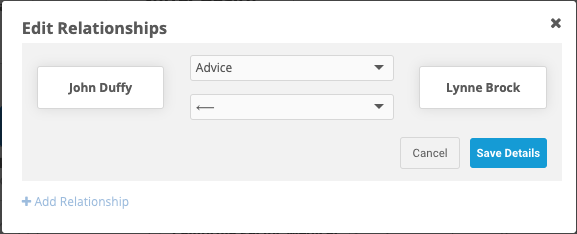
When you add or edit a relationship, you can choose the type of affiliation and the direction. In this example, Advice is the type of affiliation and we'll choose ← (B to A) as the direction.
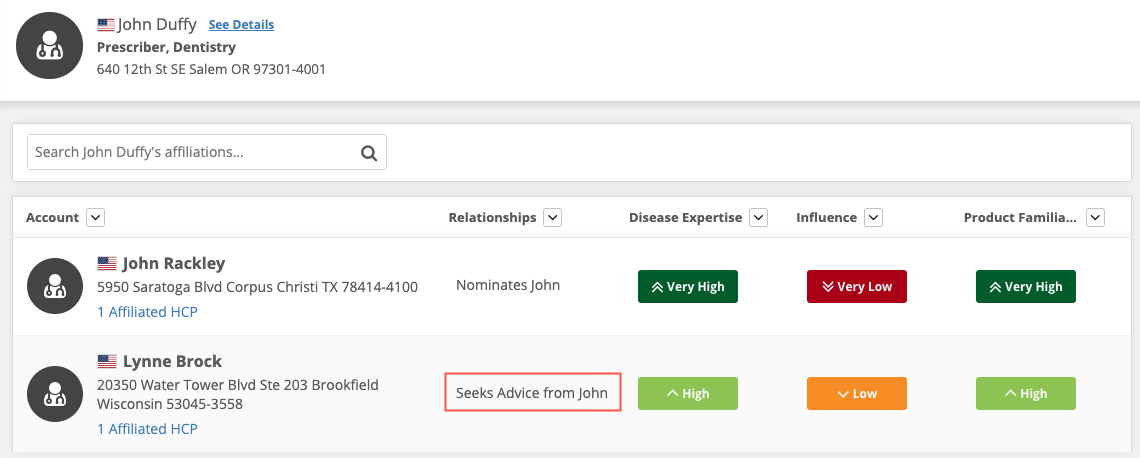
When you view affiliations, you can see that the Relationships label is calculated from the affiliation type and direction that you choose. On John Duffy's profile, the AffiliationTypeDirection is calculated to display that Lynne seeks advice from John.
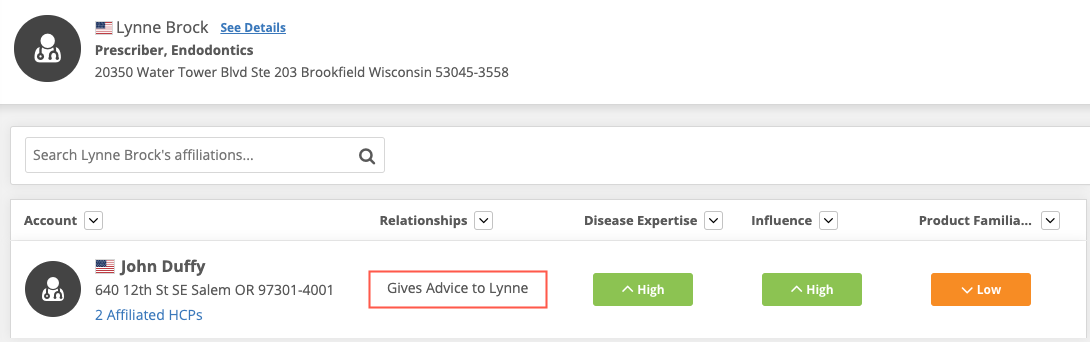
From Lynne Brock's profile, the AffiliationTypeDirection is calculated to display that John provides advice to Lynne.
Default Relationship labels
If AffiliationTypeDirection reference codes are not created, the Affiliation widget will display values based on the type and direction that is selected for the affiliation.
Examples
| Affiliation Type | 0 (Neutral) | 1 (A→B) | 2 (A←B) |
|---|---|---|---|
| Advice | Advice with <B first_name__v> | Gives Advice to <B first_name__v> | Seeks advice from <B first_name__v> |
| Co-author | Co-author with <B first_name__v> | Gives Co-author to <B first_name__v> | Seeks Co-author from <B first_name__v> |
| Referral | Referral with <B first_name__v> | Gives Referral to <B first_name__v> | Seeks Referral from <B first_name__v> |
Define health systems
The Affiliation widget is specific to health systems. To identify the HCOs in your Network instance as health systems, create a custom checkbox field. After you use the field to flag the HCO records in your Network instance, the HCOs will be available as health systems in your widget.
Create the health system custom field
You can use an existing field or create a new field on the HCO object to identify HCOs as health systems. The field must be a checkbox type field. The flagged HCOs will be considered health systems in the Affiliation widget. This field does not display in the Network UI.
On the HCO object, create a field called is_healthsystem__c. This will be used when you configure the affiliation widget.
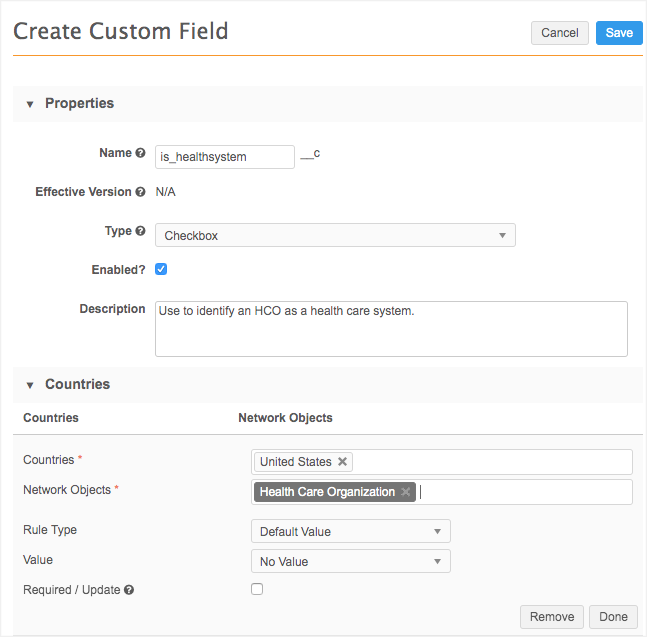
To create the health system field:
- In the Admin console, click Data Model and click the Customer Master data domain.
- In the Objects section, click the Health Care Organization.
- On the Health Care Organization page, click Add Field in the Fields section.
- Type a Name and Description for the new field.
- In the Type list, select Checkbox. The field must be a checkbox field.
- In the Countries section, click Add Country Group.
- Choose the Countries that apply to the affiliation widget.
- Select Health Care Organization in the Network Object list.
- Accept the default values for Rule Type, Value, and Required / Update.
- Click Done.
- Define the Language and Name for the field label. This is the name that will display in the UI.
-
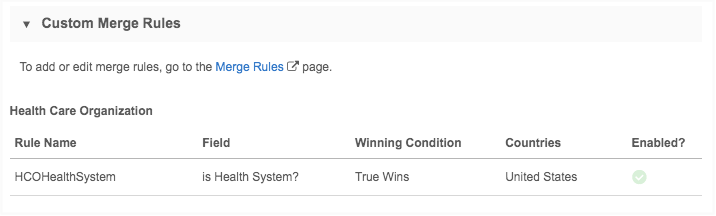
In the Custom Merge Rules section, create a rule so that the record with this field as True wins if it is merged with another record.
- Click Save.
The field will not display in the Network UI (on record profiles) but you can use it in a source subscription file to flag HCOs as health systems for the Affiliation widget. Any HCOs that are flagged will display in the widget if users have access to the HCO through their data visibility profile.