Creating a Network Portal application
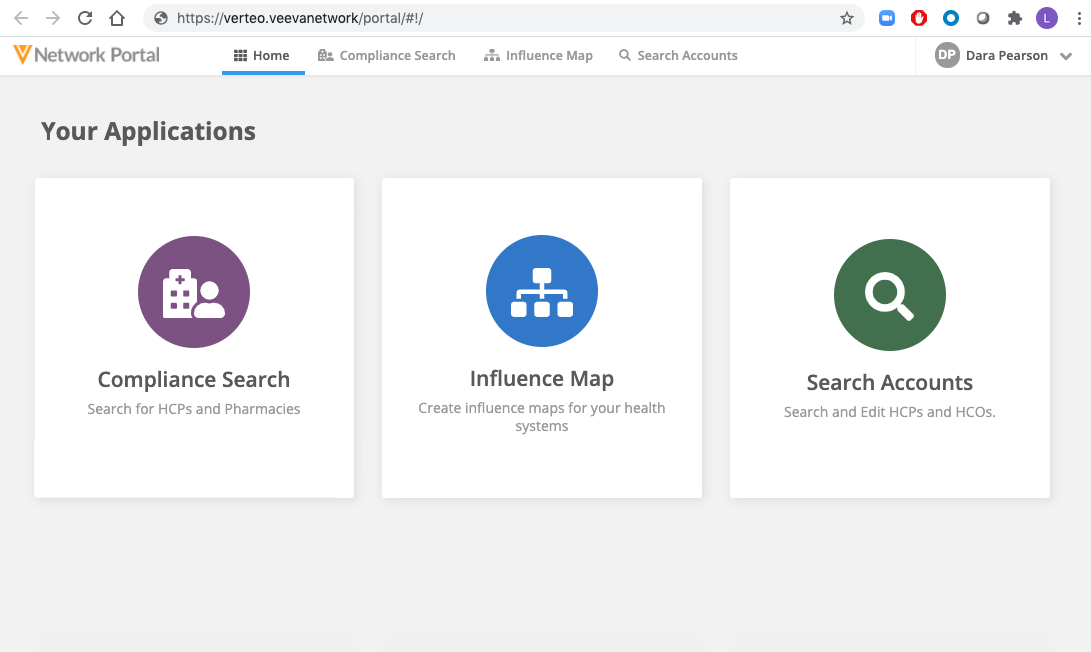
The Network Portal includes a predefined search application, Search Accounts, so users can find and edit HCP and HCO accounts in Veeva OpenData and your Network instance. You can create applications using the Network widgets for your business purposes. For example, you can create an application for searching pharmacies only, or an application for mapping affiliations.
Create an application
You can create applications for your Network Portal in your Network instance.
-
In the Admin console, click Widgets & Portal > Network Portal.
-
On the Network Portal page, click Create App.
-
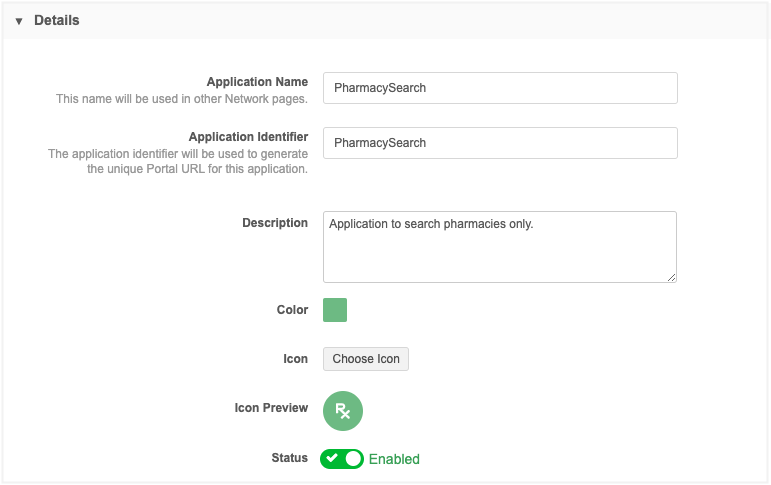
In the Details section, provide the following information:
-
Application Name - The name for your app for the Network Portal configuration page. This is not the name that displays in the Network Portal.
-
Application Identifier - The identifier is used in the unique Network Portal URL for the app. When you click the field, it is populated with the Application Name by default.
Example
When the application is launched from the Network Portal, it has a unique URL.https://verteo.veevanetwork.com/portal/#!/app/{applicationidentifier}/{widgetidentifer}Important: Changing the Application Identifier after it has been set might break any bookmarked or saved links.
-
Description - A description of the application for the Network Portal configuration page. This description does not display in the Network Portal.
-
Color - The color for the app. The default color is a color that has not been previously used for an app. Colors can be reused for multiple applications.
-
Icon - The icon that represents your application. Choose an icon from the library. Icons can be reused for multiple applications.
-
Status - Enable or disable the app. The app is enabled by default.
-
-
The Permissions section defines the users that can access the app in the Network Portal. By default, the All Users Except Integration Users user group is selected.
To provide more granular access to the application, choose Specific Users / User Groups.
-
In the User Groups section, choose the user groups that should have access to the application. You can choose system managed groups, existing custom groups in your Network instance, or you can create a new user group for this application.
When a group is selected, a group Description, Type, count of Active Users in the group, and Status displays in the list. -
In the Users section, choose the users that should have access to the application.
When a user is selected, their User Type, Status, Security Profile, Profile (data visibility profile), and Inbox Task Groups display in the table.
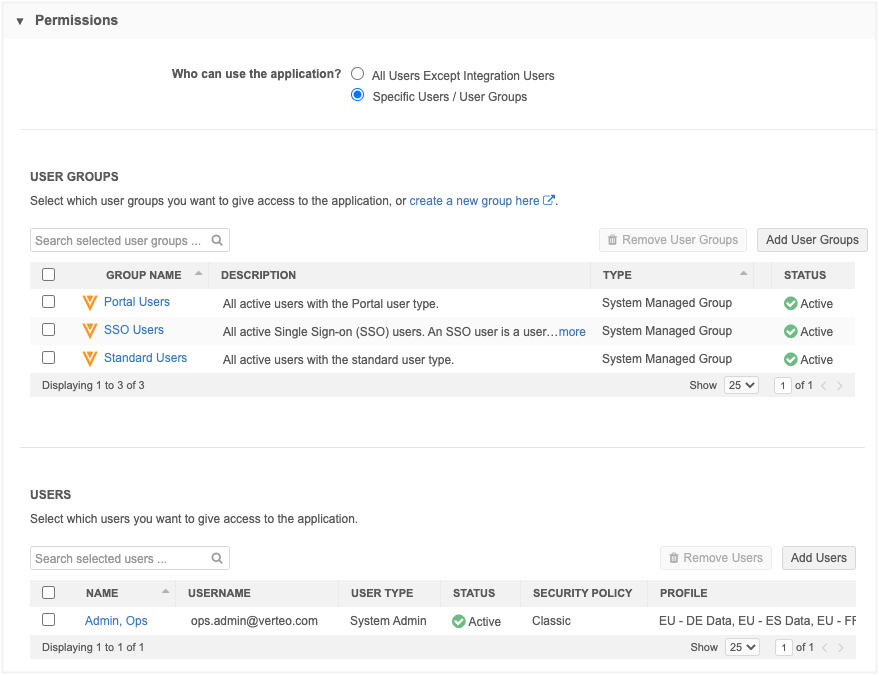
You can remove users and user groups if necessary.
If a user or user group is disabled, they will no longer have access to the application or the Network Portal. If the Network Portal is disabled and becomes enabled again, users with previous access will regain functionality; the same settings will be retained.
-
The Application Labels section defines the application Name and Description that the user will see in the Network Portal.
By default, the English language is selected. You can change the language or add more languages.
-
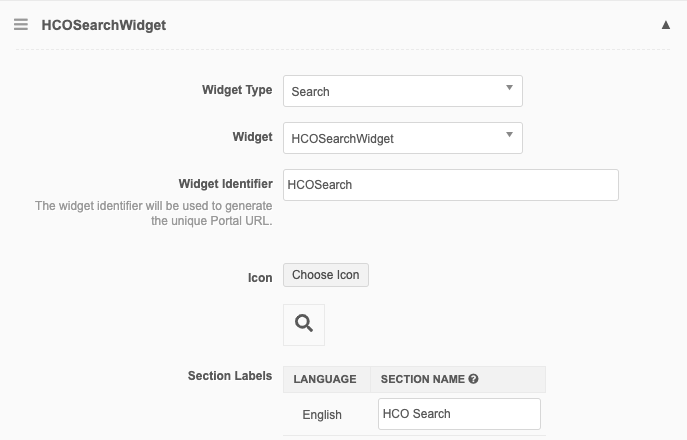
In the Widget Configuration section, define the widgets that will be used in the application.
Provide the following information:
-
Widget Type - Select the type of widget. Search widgets and Affiliation widgets are supported.
Note: The Affiliation widget is available if it is enabled in your Network instance.
-
Widget - Choose the specific widget to use from your Network instance. The list is filtered by the type that you selected.
-
Widget Identifier - The identifier that is included in the unique Network Portal URL.
Example
When the application is launched from the Network Portal, it has a unique URL. If you have multiple widgets in the app, the URL will be unique for each widget.
https://verteo.veevanetwork.com/portal/#!/app/{applicationidentifier}/{widgetidentifer}Important: Changing the Widget Identifier after it has been set might break any bookmarked or saved links.
-
Icon - Choose the icon that will display in the application.
-
Section Labels - The widget label that displays in the application beside the icon.
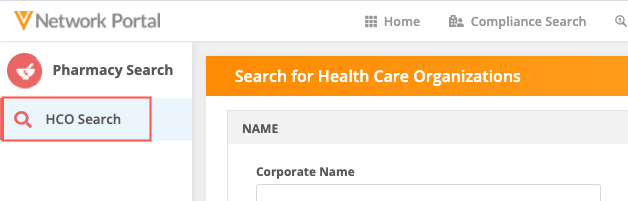
Example - Search widget
The Section Label, HCO Search, displays beside the defined icon in the Network Portal.
-
-
In the Advanced Settings section, the settings depend on the type of widget that's been defined.
Search widget settings
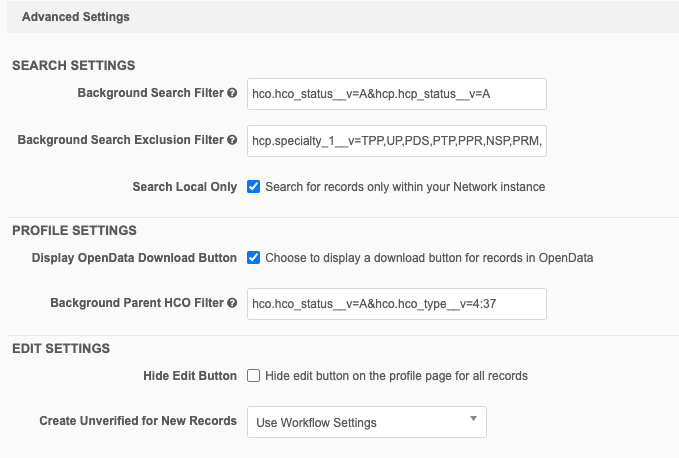
Search Settings
-
Background Search Filter - Add a filter to automatically narrow the search results to meet specific criteria. The filters require API syntax, so an example filter to limit search results for active records displays as a suggestion in the field.
The following syntax rules apply for this filter:
-
Use an ampersand (&) to separate the fields used for filtering.
-
To separate multiple reference codes, you must use a comma (,).
-
Fields must be prefixed with their object (for example, hco.hco_status__v=A)
-
Only reference fields and checkbox fields are supported for filters.
-
Only fields on main objects (HCPs and HCOs) can be used for filtering.
Example
Define a filter to limit the HCO search results to active pharmacies only.
hco.hco_status__v=A&hco.hco_type__v=11:3,11:4,11:1,11:2,11:11,11:12,11:9,11:10,11:7,11:8,11:5,11:6,13:3,11:99,11:97,11:98,6:3,14:10
The filter includes all of the reference values for pharmacies for the
hco_type__vfield. -
-
Background Search Exclusion Filter - Excludes specific records from all search results.
Use this setting to exclude specific records from all search results. For example, if the product and therapeutic area for the health system does not apply to HCPs in pediatric medicine, you can exclude those records from all searches.
This filter uses the same API syntax and rules.
Example API syntax to exclude HCPs with specialize in pediatrics
hcp.specialty_1__v=PD
- Search Local Only - Search results display records that exist only in your Network instance. Records that have not yet been downloaded from Veeva OpenData will not display. This can help to reduce search results and prevent users from seeing results that are not relevant. This setting is not enabled by default.
Profile Settings
-
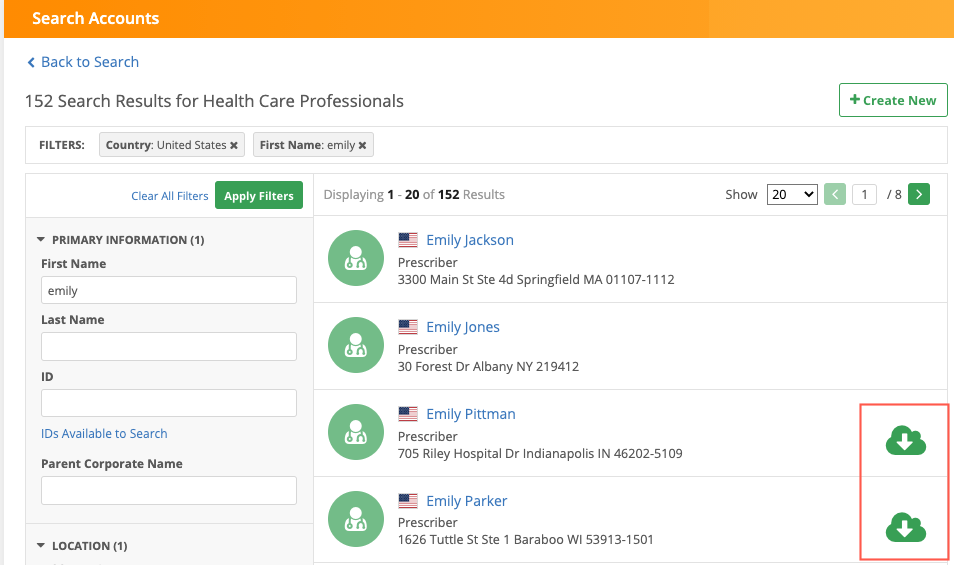
Display OpenData Download Button - Choose whether users can see the option to download the record from Veeva OpenData. When the Download icon displays, users can understand which records are not in their Network instance and download those records from Veeva OpenData. By default, the setting is not selected. When the setting is enabled, the Download button displays in the search results and on the record profile.
-
Background Parent HCO Filter - Define a filter to limit the parent HCOs that are returned in the search results. A filter to limit search results for active records displays as an example of the required syntax. The syntax rules that apply to the Background Search Filter also apply to this filter.
Example
If you want to only see those parent HCOs that are active Health Systems, you can change the Background Parent HCO filter to the following:
hco.hco_status__v=A&hco.hco_type__v=4:37
Edit Settings
-
Hide Edit Button - Prevent users from making changes to data in the Network Portal. This is supported for the Search widget in Network Portal applications only.
The Edit button displays on profiles for records that are in your Network instance. It does not display on records that have not yet been downloaded from Veeva OpenData.
Tip: To make the Search widget in the Network Portal completely read-only, do not select the Add Request setting in the Search widget configuration (Widgets & Portal > Network Widgets). This prevents users from submitting add requests through the Search widget.
- Create Unverified for New Records - Define the behavior for new records that are created in the application.
Yes - Create unverified records. This enables users to submit a new record and immediately make changes to the record. This might override the existing workflow settings. New records will have an Under Review record state.
No - New record requests must be reviewed by data stewards before changes can be made. This might override the existing workflow settings.
Use Workflow Settings - Use the existing Create Unverified setting (Settings > Workflow Settings) to determine the behavior for add requests in the application.
This value is defined by default.
Affiliation widget
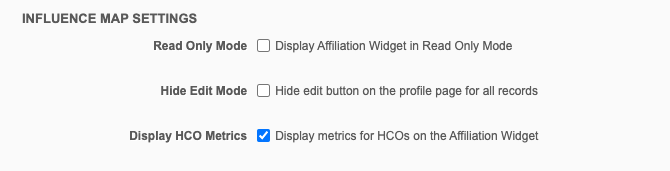
The following optional setting displays in the Influence Map Settings section:
-
Ready Only Mode - Select to display the Affiliation widget in read-only mode; users will not be able to add or edit affiliations.
-
Hide Edit Mode - Prevent users from making changes to data, do not display the Edit button on the profile page.
-
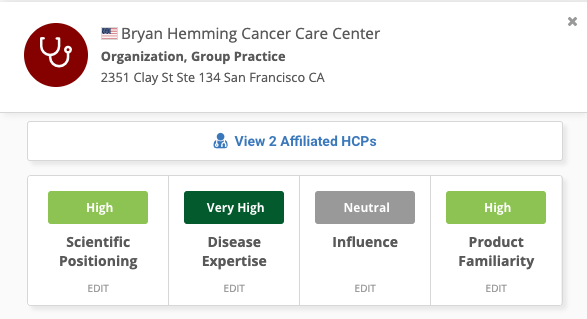
Display HCO Metrics - Display metrics for HCOs. The existing metrics that are used for HCPs can be applied to HCOs.
Note: If you have custom branding applied, the HCO icon colors do not update with the filtered metric. Open the HCO profile to view the individual ratings.
-
-
Add Widget - Add another widget to the application. If you have multiple widgets, use the handle
 to change the order that the widgets display in the application.
 For example, if you include two Search widgets (one for HCPs and one for pharmacies), you can define their display order in the application.
Widgets can be removed after they have been added to the application. Click Remove Widget. An application must have one widget defined.
-
Save your changes.

The application now displays in the list on the Network Portal page. It is enabled by default.