Managing custom hierarchies
DM
Administrators can create and manage custom hierarchies in Network. These hierarchies can be used in the Hierarchy Explorer widget and in Network Reporting.
-
To access the page, click Data Model > Hierarchy Management.
Supported objects
| Network Reporting | Hierarchy Explorer Widget | |
|---|---|---|
| Veeva standard objects (HCPs, HCOs, Parent HCOs) | Yes | Yes |
| Custom objects (for example, Product Master, Employee Master) | Yes | No |
Hierarchy management benefits
General benefits
-
Manage and create your own hierarchies.
-
Control hierarchies per country.
Hierarchy Explorer benefits
-
Choose which hierarchies are available on your Hierarchy Explorer widgets for your different teams.
Example
You can create two widgets and apply specific hierarchies to each widget:-
Neurology Hierarchy Explorer widget: Display the All Hierarchies and Neurology Hierarchy
-
Oncology Hierarchy Explorer Widget: Display the All Hierarchies and Oncology Hierarchy
-
-
Flexibility to view and filter data in Hierarchy Explorer
Flat hierarchy report table
-
Minimize the number of SQL joins required for queries with new fields on the flat_hierarchy table.
-
Add fields to the table (for example, HCO Type or Major Class of Trade).
-
Easier to report on custom objects; for example, Product Master.
-
Manage the schedule to update the flat_hierarchy table.
Default hierarchies
Network provides the following predefined hierarchies:
-
All Hierarchies (flat_hierarchy) - Includes all active and valid HCPs and HCOs for the ParentHCO relationship object.
-
Ownership (flat_ownership_hierarchy) - (US only) Includes HCPs and HCOs for the ParentHCO relationship object that have the relationship type Kaiser, Ownership, or Affiliation.
Note: This table is not available by default in the SQL Query Editor. To use this hierarchy table, click the Update Flattened Hierarchy Table or schedule the data update. After the data is updated, the table will be available.
-
Data Provider Primary Hierarchy (flat_data_provider_primary_hierarchy) - A primary hierarchy to manage roll-ups. The hierarchy definition is based on the Parent HCO object. Use to understand the data you have from Veeva OpenData or IQVIA®.
You can customize these hierarchy configurations.
Custom Hierarchy reporting table
If you had a customized flat_hierarchy table before the Hierarchy Management feature was available, a hierarchy called Custom Hierarchy was created in your Network instance. It contains your customized flat_hierarchy table and the Flattened Hierarchy Reporting table option is disabled in the All Hierarchies hierarchy configuration.

Add a hierarchy
Add a hierarchy to your Network instance so you can standardize it across reporting and your Hierarchy Explorer widgets.
To add a hierarchy:
-
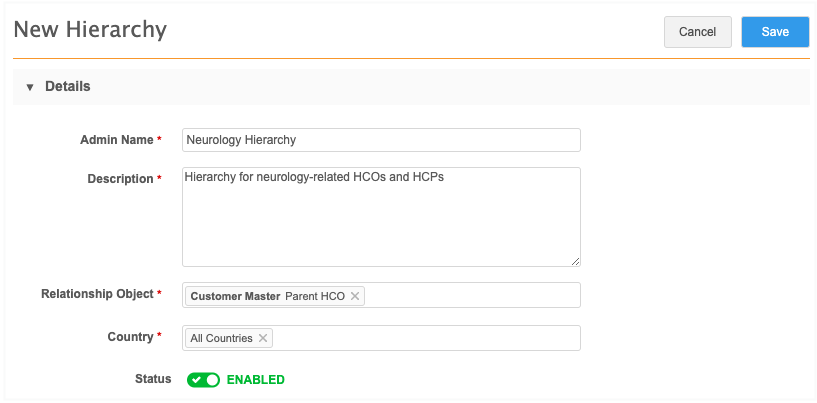
On the Hierarchy Management page, click Add Hierarchy.
The New Hierarchy page displays.
-
Details section, define the following information:
-
Name and Description
-
Relationship Object - Identify the relationship objects that will define this hierarchy. All active relationship objects in your Network display.
Relationship objects are listed by data domain in the list.
-
Country - Choose the countries that the hierarchy will be applied to.
The countries that are available have a data visibility profile configured in your Network instance.
-
-
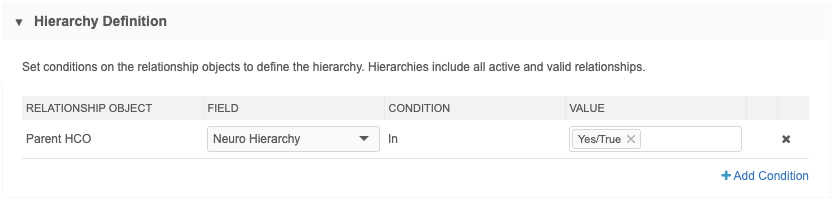
Hierarchy Definition section - Create conditions on the relationship object to define the hierarchy. If no conditions are created, the hierarchy will include all active and valid relationships by default.
To create a condition, click Add Condition.
For each condition, define the following:
-
Field - The field that determines the objects that will display in the hierarchy.
Checkbox, reference type, and primary fields on the relationship object display in the list.
Note: If you choose a custom field as a condition for Hierarchy Explorer, it must be included in the Hierarchy Explorer index. To add the field to the index, contact Veeva Support.
-
Condition - The condition is always In.
-
Value - Choose the field value.
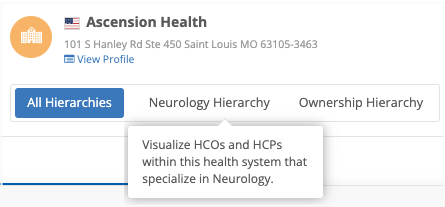
 Example - Neurology related hierarchy
For a neurology-related hierarchy, you might have a custom field on the ParentHCO object to flag HCOs that specialize in neurology.
Add this custom field as the condition so the hierarchy displays only those HCOs and HCPs that roll-up to the parent HCOs in that health system that are flagged as Yes/True.
-
-
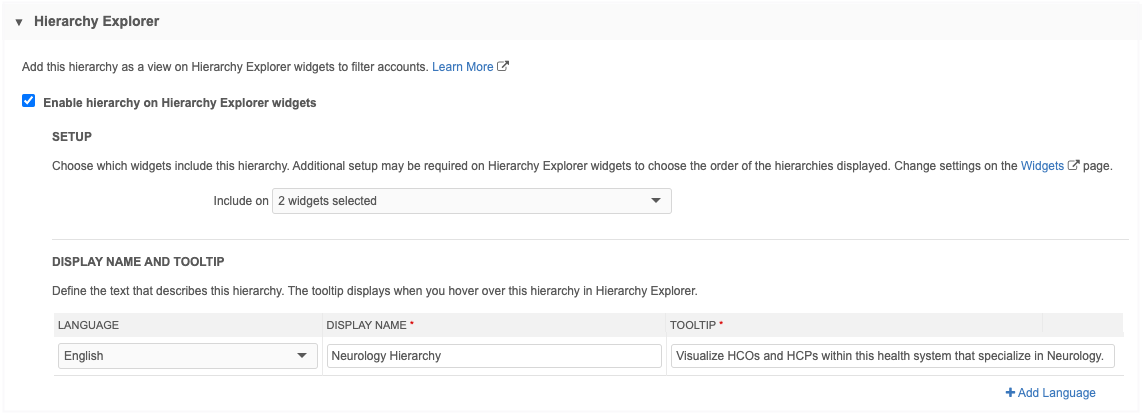
Hierarchy Explorer section - Include this hierarchy on your Hierarchy Explorer widgets.
-
Enable hierarchy view on Hierarchy Explorer widgets - Select this option to add this hierarchy to your widgets.
Note: This option is available only for hierarchies that use parent HCO relationships. Custom relationship objects are not supported for the Hierarchy Explorer widget.
-
Setup - Expand the Show on list to select the widgets to add the hierarchy to. All active and inactive Hierarchy Explorer widgets display.
-
Display Name and Tooltip - Define the name and tooltip that will display in the Hierarchy Explorer widget.
-
Language - Choose the language for this name and tooltip.
-
Display Name - The name that will display in the view tab.
-
Tooltip - A description of the hierarchy that will display when users hover over the view.
Example
To add multiple languages, click Add Language.
-
Note: If you add a relationship object to the hierarchy after this section is configured, a warning displays.
Hierarchy Explorer is supported only for hierarchies that use the ParentHCO object. If another relationship object is added, the hierarchy does not display on the widget. -
-
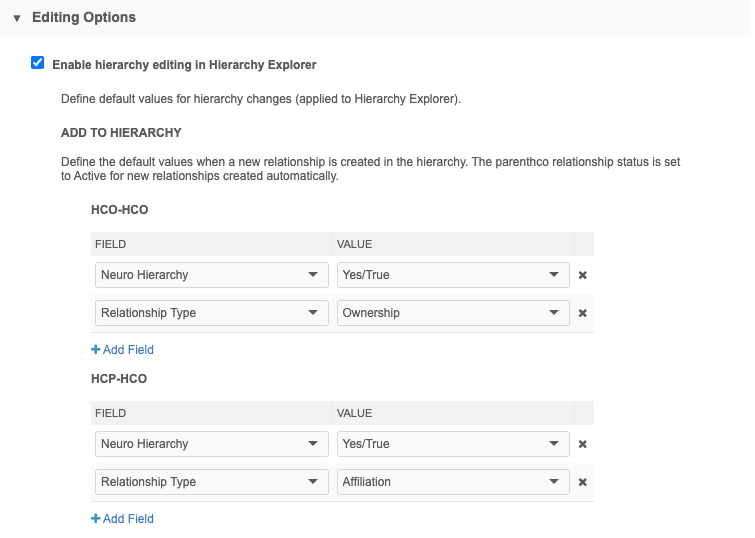
Editing Options - Choose Enable hierarchy editing in Hierarchy Explorer to allow users to add and remove affiliations within the widget.
-
Add to Hierarchy / Remove from Hierarchy - Define the default field values to set when users add or remove affiliations in the widget.
For example, set the Neuro Hierarchy field to Yes/True and the Relationship Type field value to Ownership when users add HCO-HCO relationships.
-
Reference fields that are included in the in the Fields in Hierarchy Index file.
Supported fields
System fields and the Hierarchy Type field does not display.
Note: When a new affiliation is added, the Parent HCO Status field is set to Active by default.
See Editing hierarchies to understand how business users can make changes within the widget.
-
-
Flattened Hierarchy Reporting section - Include this hierarchy as a reporting table to help users more easily report on different levels of the hierarchy.
Typically, reporting on these details is difficult because it requires joining several tables in your SQL query.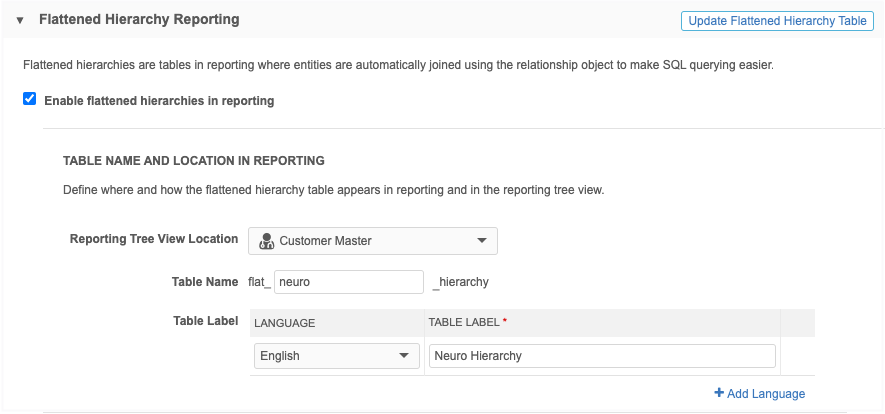
-
Enable flattened hierarchies in reporting - Select this option to add this hierarchy as a reporting table in the SQL Query Editor.
-
Table name and location in reporting - Define the table name and its placement in the reporting tree view.
-
Reporting tree view location - Select the data domain that the table will be added to in the tree view. The domains of the relationship object display in the list.
-
Table name - Define the name of the table. All flattened hierarchy tables have the flat_prefix and the _hierarchy suffix.
The table name must be unique in each Network instance. -
Table label - Choose the language and type a label for the table. To add labels in multiple languages, click Add Language.
When the hierarchy is saved, it will display in the data domain section and in the Flattened Hierarchies section of the tree view.
Example
-
-
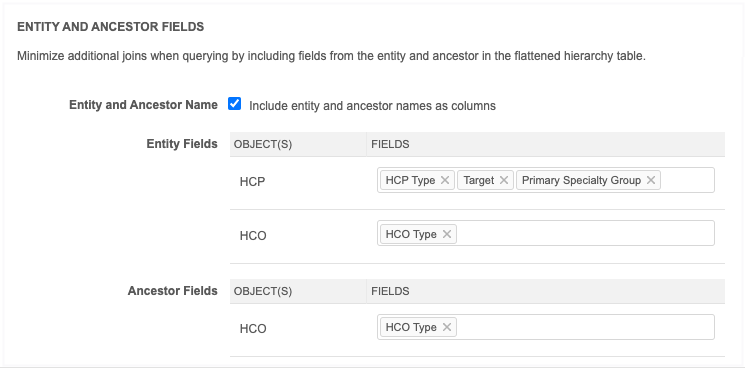
Entity and Ancestor Fields - Add fields to the reporting table to minimize other SQL joins that might be required for queries.
-
Entity and Ancestor Name - Select this option to define additional fields to include in the reporting table.
-
Entity Fields - Add fields for the owner object of each relationship object.
-
Ancestor Fields - Add fields for the non-owner object of the relationship object.
Network automatically adds the Network ID fields for the entity (
entity_vid__v) and ancestor (ancestor_vid__v) for each relationship object in the hierarchy.
Fields that you define are appended with either
_ancestoror_entityin the flattened hierarchy table.Example
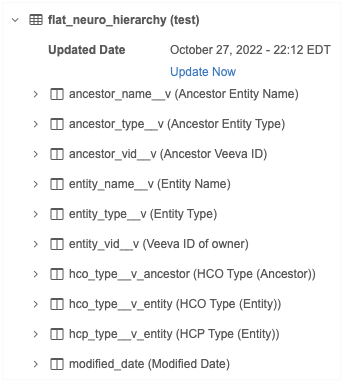
In the report results, the column headings identify the objects as Entity or Ancestor.
If you select the same field for more than one object, it is added to the reporting table for one object only. For example, if you define the
speciality_1__vfield for both the HCP and HCO objects, it is added to the reporting table asspeciality_1__v_entity. -
-
Update Flattened Hierarchy Table - Click to manually update the reporting table.
The button disappears when an update is in progress and is dimmed when the hierarchy configuration has pending changes (changes must be saved before an update can occur).
Refresh the page to see the update progress.
-
-
Schedule section - Choose to update the flattened hierarchy reporting table on a schedule or manually.
-
Scheduled - If you choose to schedule the updates, multiple updates can be scheduled. Schedules display in your local timezone.
-
Manual - If you choose to update the table manually, after you save the hierarchy, use the Update Flattened Hierarchy Table button to start an update.
Note: If you had previously enabled the flat_hierarchy table and set a schedule for data updates, that schedule is preserved in the All Hierarchies hierarchy configuration.
-
-
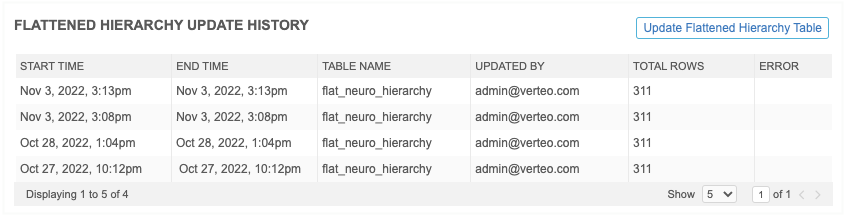
Flattened hierarchy update history - This section displays after the hierarchy is saved and the flattened hierarchy table data is updated for the first time. It identifies the date and time, the user that triggered the update and the total rows of data in the table. Any errors that occur will also display.
-
Update Flattened Hierarchy Table - Click to manually update the table.
-
-
Save your changes.
The hierarchy is now available in Network Reporting and the Hierarchy Explorer widget (if you applied it to the widget).
Hierarchy Explorer widget configuration
Open a Hierarchy Explorer widget (Widgets & Portal) to manage the hierarchy views that display.
The Hierarchies to Display section contains the hierarchies that you have applied to the widget. Hierarchies are listed in order that they were added.
-
Add - To include additional hierarchies, click Add Network Hierarchy.
-
Re-order - Use the Handle
 to change the display order for the hierarchies in the widget.
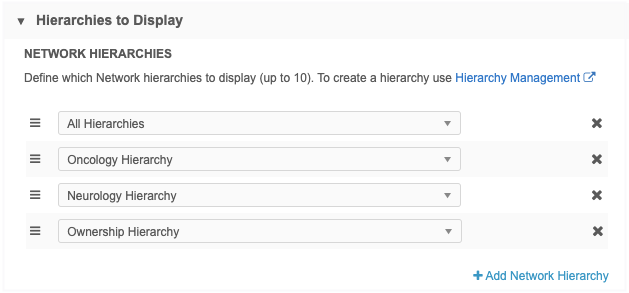
For example, the hierarchy views in this configuration will display in the following order:

Country considerations
Hierarchy views display if the country defined in the configuration applies to the primary country of the root HCO. For example, the Ownership Hierarchy view applies to the US only, so it does not display for a health system in Canada.
Flattened hierarchy reporting
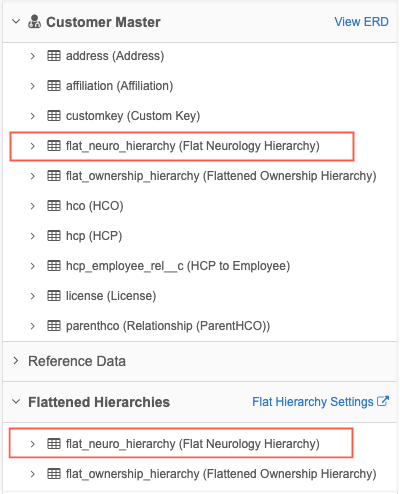
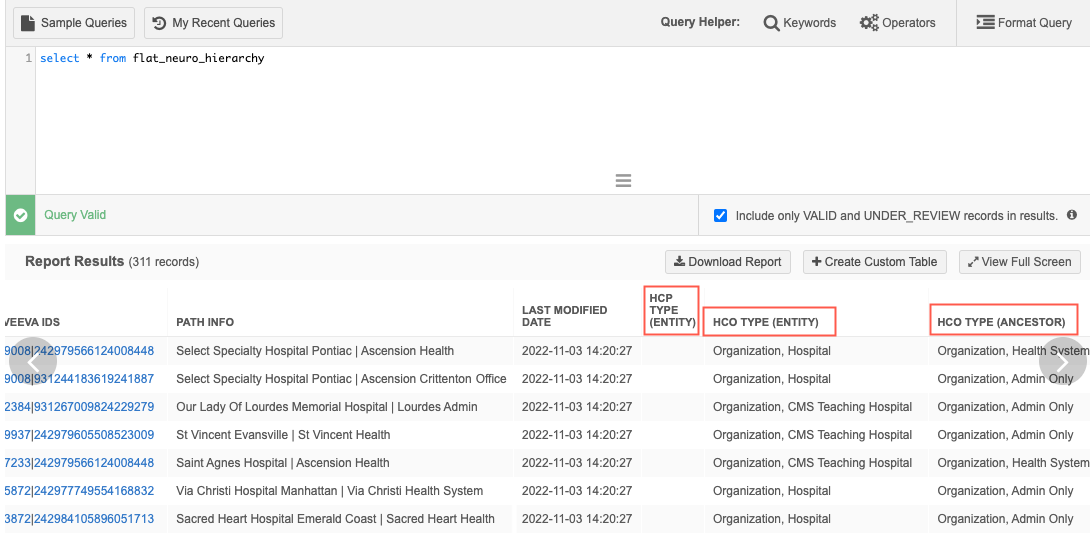
Navigate to Reports > SQL Query Editor to see the flattened table for the hierarchy. The table displays in the data domain and the Flattened Hierarchies categories.
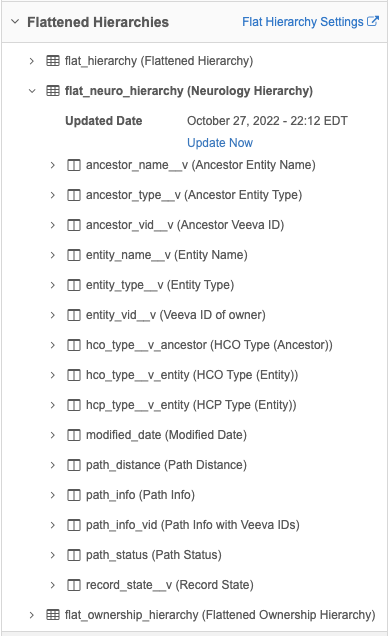
In the Flattened Hierarchies category, you can click Flat Hierarchy Settings to navigate to the Hierarchy Management page.
Expand the table to view the hierarchy details and fields.
Hierarchy updates
The Updated Date displays the last time the hierarchy was updated. Data Managers and Admin can click Update Now to start an update.
Note: The Update Now option does not display if the table has been updated in the last hour. To do an update, go to the Hierarchy Management page.
More reporting details
To learn about the supported relationships and paths and example queries, see Reporting on hierarchies.
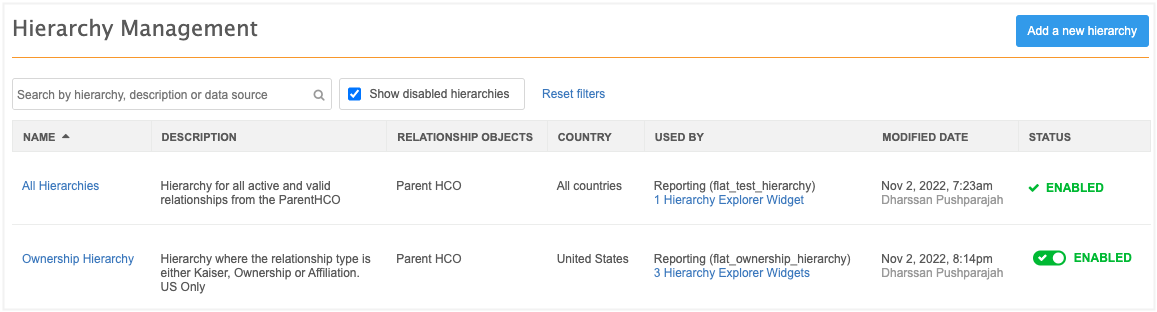
Hierarchy management page
The Hierarchy Management page lists the hierarchies that have been configured in your Network instance.
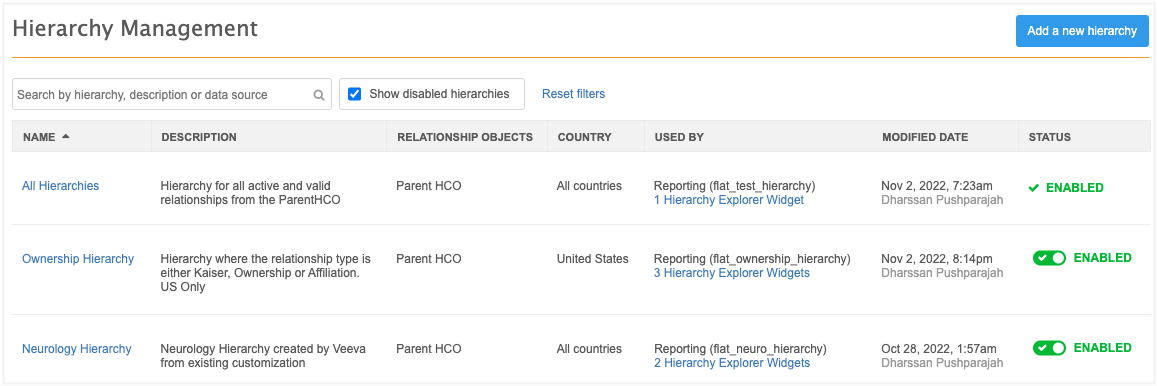
The following summary information is available:
-
Name and description - The hierarchies are listed alphabetical by name.
-
Relationship objects - An alphabetical lists of relationship objects that apply to the hierarchy.
-
Country - The countries that the hierarchy applies to.
-
Used By - Indicates if the hierarchy is used in the following features. The features display if they are enabled in your Network instance.
-
Network Reporting - The name of the flattened hierarchy table.
-
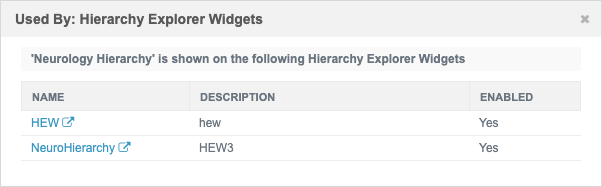
Hierarchy Explorer widgets - A count of widgets that use the hierarchy. Click the link to view a list of the widgets.
-
-
Modified Date - The date that the hierarchy was last modified and the user that made the change. Any hierarchies that were created by the Network team, will display System until a Network user makes changes.
-
Status - Indicates if the hierarchy is enabled or disabled.

The hierarchy was created by Network and cannot be disabled. 
The hierarchy is enabled. 
The hierarchy is not enabled.
Logs
Administrators can track the following changes to the hierarchies in the System Audit Log:
-
hierarchy definition changes
-
Hierarchy Explorer widget configuration changes
-
hierarchy data updates
Managing configurations
Hierarchies can be created in your Sandbox instance for testing and then exported to your Production instance. When you export a hierarchy configuration, the fields in the hierarchy will be added to the export package automatically. The Hierarchy Explorer widget is not automatically added to the export package.
For details, see Managing configurations.