Defining match configurations in Advanced mode
Match configurations can be created in Basic mode (Network MDM UI) or Advanced mode (using XML).
Supported configurations
Advanced mode is supported for the following:
Match configurations
-
Add Request Match Configuration
-
Ad Hoc Match Configuration
-
Match Default Configuration
Subscriptions
-
Source subscriptions
-
Data Deduplication data maintenance subscriptions
Supported objects
Match configurations can be created in Advanced mode for all objects.
Supported objects for match configurations
| Object | Basic Mode | Advanced Mode |
|---|---|---|
| Veeva main objects (HCP, HCO) |
|
|
| Veeva sub-objects (Address, License, ParentHCO) |
|
|
| Custom main objects |
|
|
| Custom sub-objects |
|
|
Create data groups
Group similar incoming data for comparison to streamline the match process.
Basic mode
In Basic mode, groups are defined on the Data Groups tab in match configurations.

Advanced mode
In Advanced mode, only one data group definition can be created, but it can contain any number of data groups. HCP and HCO entities have separate data group definitions.
The example above would be defined as the following:
Data group elements
Data group definitions typically contain the following elements:
<staticBlocker>and</staticBlocker>- These elements must be included as the first and last lines respectively.<archetype>and</archetype>- These elements surround each data group within the overall data group definition.-
<field>and</field>- These elements surround field names used for a data group; for example,<field>corporate_name__v</field>.Data groups can contain multiple fields, each listed within separate
<field>elements. -
<child>and</child>- These elements must surround fields that belong to sub-objects; for example, Licenses or Addresses.Within these elements, the following must be included:
-
<base>and</base>- Indicate the sub-object (Licenses or Addresses) that the sub-object fields belong to; for example,<base>addresses__v</base>or<base>licenses__v</base>. <field>and</field>- A field name for the sub-object; for example,<field>locality__v</field>.-
<allowNullFields>and</allowNullFields>- Specifies a value to indicate whether null values will be considered during the match process. The default istrue.If
false, data groups are only created for records with values in all specified fields.If
true, data groups are created even if one or more fields have null values.
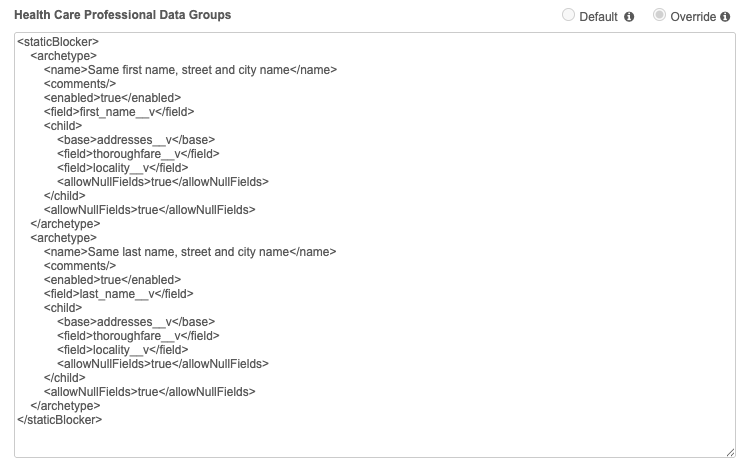
Example data group
The following data group definition groups data into blocks containing the following unique combinations:
- first name (
first_name__v), street (thoroughfare__v), and city (locality__v) - last name (
last_name__v), street (thoroughfare__v), and city (locality__v)
<staticBlocker>
  <archetype>
     <field>first_name__v</field>
     <child>
        <base>addresses__v</base>
        <field>thoroughfare__v</field>
        <field>locality__v</field>
     </child>
  </archetype>
  <archetype>
     <field>last_name__v</field>
     <child>
        <base>addresses__v</base>
        <field>thoroughfare__v</field>
        <field>locality__v</field>
     </child>
     <allowNullFields>false</allowNullFields>
  </archetype>
</staticBlocker>
-
In the first data group, blocks are created for every combination of first name, street, and city.
-
In the second data group, blocks are created for every combination of last name, street, and city.
Subsequently, the number of blocks created by a data group definition can be very large.
Features
Features determine how individual field pairs are matched.
Basic mode
Features are defined on the Match Rules tab for HCP and HCO objects.
Advanced mode
In Advanced mode, features are defined in the Match Rules sections for HCPs and HCOs.
Feature elements
Feature definitions can contain the following elements (additional elements are described in the following samples):
<feature>and</feature>- Must be included as the first and last lines respectively.-
<name>and</name>- Must be included to denote the name of the feature.The name must match what is referenced from corresponding feature sets. It can be anything, but is referenced throughout matching, so should be logical.
- This feature uses Jaro-Winkler to compare the strings, and includes the following options:
-
<usingWinklerExtention>and<usingLargeStringTolerance>- These elements loosen the match comparison and should be set to false for HCP matching. <threshold>and</threshold>- Determine the confidence level for the comparison.This feature has a threshold of 0.82, meaning any string pairing with a score of 0.82 or higher is considered a match.
-
<collate>and</collate>- Required when matching should consider the combined results of multiple fields.<direct>and</direct>- Indicate that the incoming records must be compared by field, for example, first name to first name, and last name to last name.-
<field>and</field>- Surround field names used for the comparison; for example,<field>first_name__v</field>.In this example,
last_name__vis included because comparing first names independently doesn't follow best practice for matching.The collated results of the first name and last name comparisons should be used.
<nullMatching>and</nullMatching>- Determine how null values should be treated when records are compared.
Additional elements are described in the following examples.
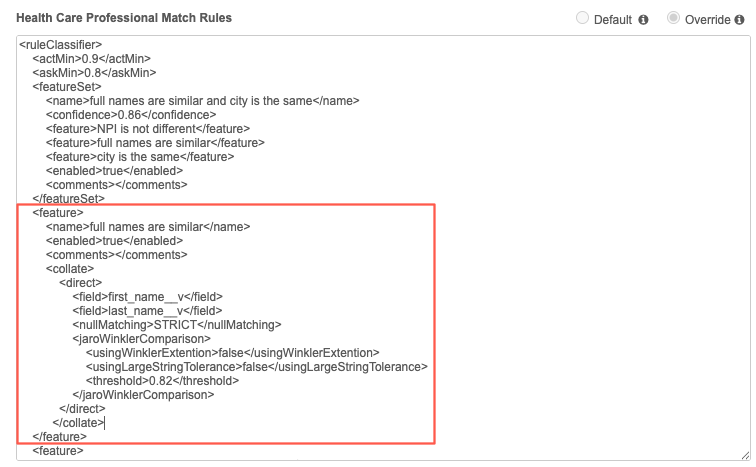
Example match rule
This feature compares HCP records where first_name__v and last_name__v are similar with a high match threshold.
<feature>
    <name>full names are similar</name>
    <enabled>true</enabled>
    <comments></comments>
    <collate>
        <direct>
            <field>first_name__v</field>
            <field>last_name__v</field>
            <nullMatching>STRICT</nullMatching>
            <jaroWinklerComparison>
                <usingWinklerExtention>false</usingWinklerExtention>
                <usingLargeStringTolerance>false</usingLargeStringTolerance>
                <threshold>0.82</threshold>
            </jaroWinklerComparison>
        </direct>
    </collate>
</feature>
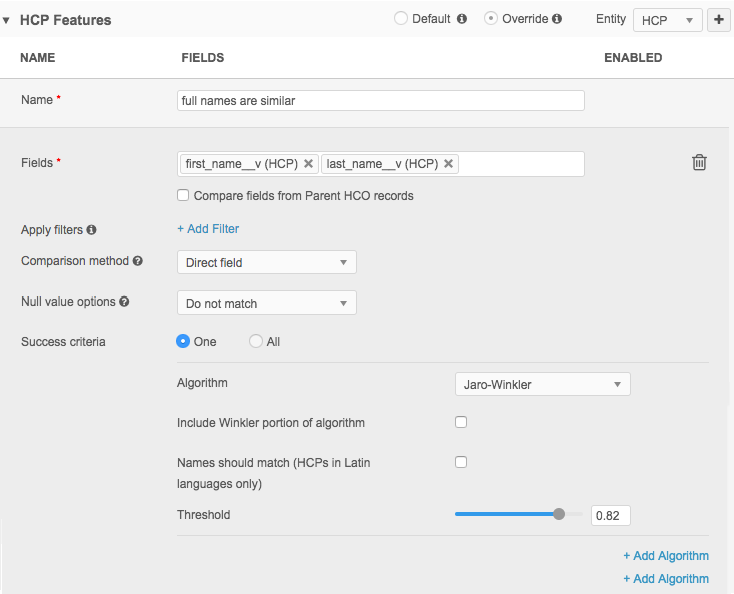
The following example compares full names but with a lower match threshold. Unlike the previous example, this feature would find strings that are less closely matched.
In this situation, lower confidence matches are not automatically merged, but become suspect matches.
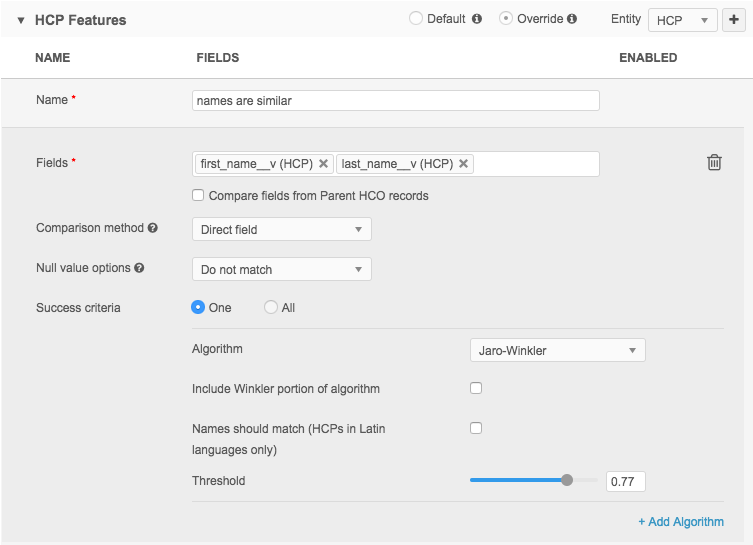
This example looks like this in Advanced mode:
<feature>
    <name>names are similar</name>
    <enabled>true</enabled>
    <comments></comments>
    <collate>
        <direct>
            <field>first_name__v</field>
            <field>last_name__v</field>
            <nullMatching>STRICT</nullMatching>
            <jaroWinklerComparison>
                <usingWinklerExtention>false</usingWinklerExtention>
                <usingLargeStringTolerance>false</usingLargeStringTolerance>
                <threshold>0.77</threshold>
            </jaroWinklerComparison>
        </direct>
    </collate>
</feature>
This example is similar to the previous one, but uses a set collation instead of direct, because the collation is being used to compare a sub-object: licenses, addresses, or parent HCOs.
It uses Jaro-Winkler, but with a high threshold of 0.9 to eliminate over-matching.
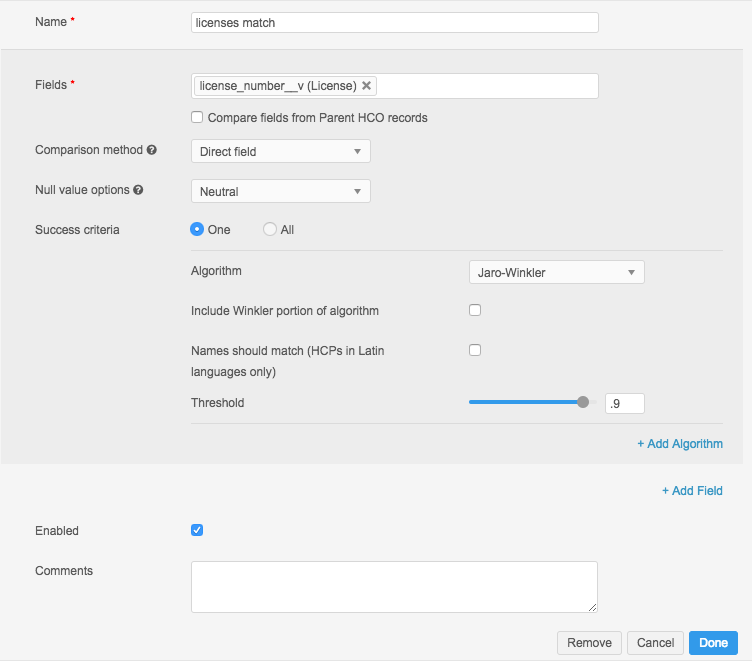
This example looks like this in Advanced mode:
<feature>
    <name>licenses match</name>
    <enabled>true</enabled>
    <comments></comments>
    <collate>
        <set>
            <field>licenses__v</field>
            <setIntersectionComparison>
                <collate>
                    <direct>
                        <field>license_number__v</field>
                        <nullMatching>IGNORE</nullMatching>
                        <jaroWinklerComparison>
                            <usingWinklerExtention>false</usingWinklerExtention>
                            <usingLargeStringTolerance>false</usingLargeStringTolerance>
                            <threshold>0.9</threshold>
                        </jaroWinklerComparison>
                    </direct>
                </collate>
            </setIntersectionComparison>
        </set>
    </collate>
</feature>
<set>and</set>- These elements are used for the collation of a sub-object.- Next, the particular sub- object is specified, in this case
licenses__v. (The other options areaddresses__vorparenthcos__v.) <setIntersectionComparison>- This element begins the section that identifies the fields from the sub-object that are to be compared and how. In this example, only thelicense_number__vfield is being compared, so a direct collation is used.
This example is similar to the license feature, but includes more fields for the direct comparison.
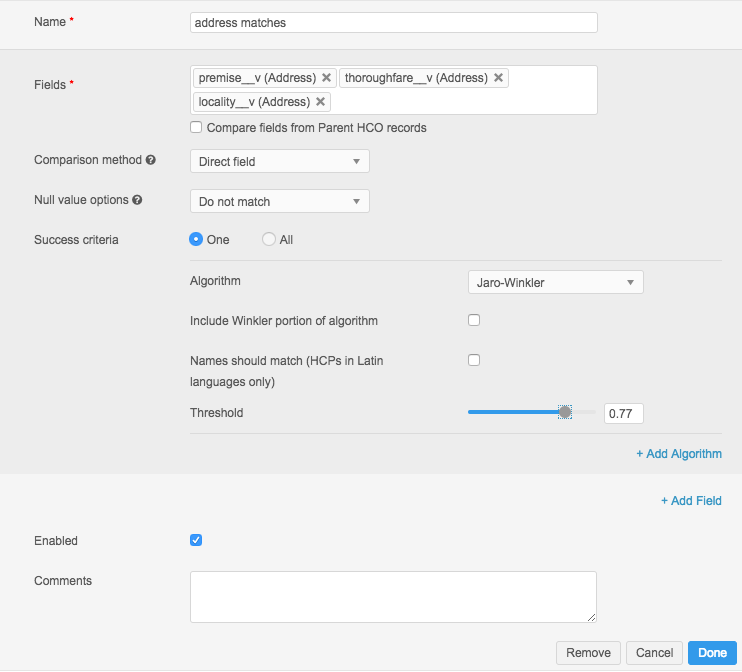
This example looks like this in Advanced mode:
<feature>
    <name>address matches</name>
    <enabled>true</enabled>
    <comments></comments>
    <collate>
        <set>
            <field>addresses__v</field>
            <setIntersectionComparison>
                <collate>
                    <direct>
                        <field>premise__v</field>
                        <field>thoroughfare__v</field>
                        <field>locality__v</field>
                        <nullMatching>STRICT</nullMatching>
                        <jaroWinklerComparison>
                            <usingWinklerExtention>false</usingWinklerExtention>
                            <usingLargeStringTolerance>false</usingLargeStringTolerance>
                            <threshold>0.77</threshold>
                        </jaroWinklerComparison>
                    </direct>
                </collate>
            </setIntersectionComparison>
        </set>
    </collate>
</feature>
This feature uses a Cartesian collation. This collation is used when comparing sets of fields: specialties, credentials, emails, faxes, and so on. A Cartesian comparison compares all fields in the set to each other, instead of comparing just field to field.
Because specialty fields are reference fields, their values are drawn from a fixed list of values. Equal comparison is used because you want an exact match. Other comparison methods would result in incorrect matching because you don't want similar entries to be considered the same.
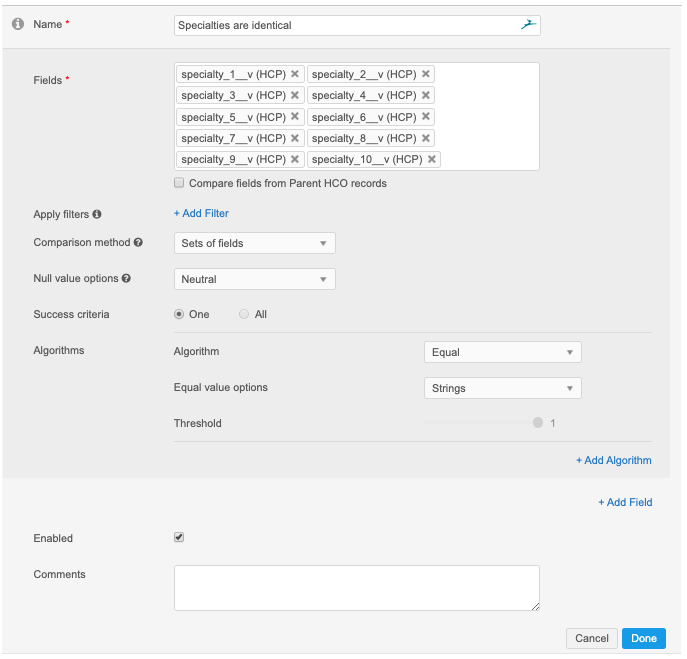
In Advanced mode, a Cartesian collation is indicated by the <cartesian> and </cartesian> elements, following the <collation> element.
<feature>
  <name>Specialties are identical</name>
  <enabled>true</enabled>
  <comments></comments>
  <collate>
    <cartesian>
      <field>specialty_1__v</field>
      <field>specialty_2__v</field>
      <field>specialty_3__v</field>
      <field>specialty_4__v</field>
      <field>specialty_5__v</field>
      <field>specialty_6__v</field>
      <field>specialty_7__v</field>
      <field>specialty_8__v</field>
      <field>specialty_9__v</field>
      <field>specialty_10__v</field>
      <nullMatching>IGNORE</nullMatching>
      <equalComparison/>
    </cartesian>
  </collate>
</feature>
Feature sets
Feature sets group individual features together.
Basic mode
Feature sets are defined on the Match Rules tab for HCPs and HCOs.
Note: In Basic mode, the confidence levels are determined based on the ordering of the feature sets in the Feature Sets sections.
Advanced mode
In Advanced mode, feature sets are included in the Match Rules section for HCPs and HCOs.
Feature set elements
Feature set definitions must contain the following elements:
<featureSet>and</featureSet>- Must be included as the first and last lines respectively.-
<name>and</name>- Denote the name of the feature set.The name should detail what is being compared and how. It can be antyhing, but is referenced throughout matching, so should be logical.
-
<confidence>and</confidence>- Indicate the confidence level you want to assign to the feature set.A value of 0.9 or greater means that any record pair satisfying the feature set rules will be automatically merged by Network MDM; they are an ACT pair.
A value less than 0.9 but equal to or greater than 0.8 means that any record pair satisfying the feature set rules will become a suspect match and is sent to data stewards to review; they are an ASK pair.
If no feature sets have a confidence level of 0.9 or greater, no automatic merges will take place during the load.
-
<feature>and</feature>- Reference a previously defined feature name. This name is case sensitive.Feature sets can contain multiple features, each listed within separate
<feature>elements.
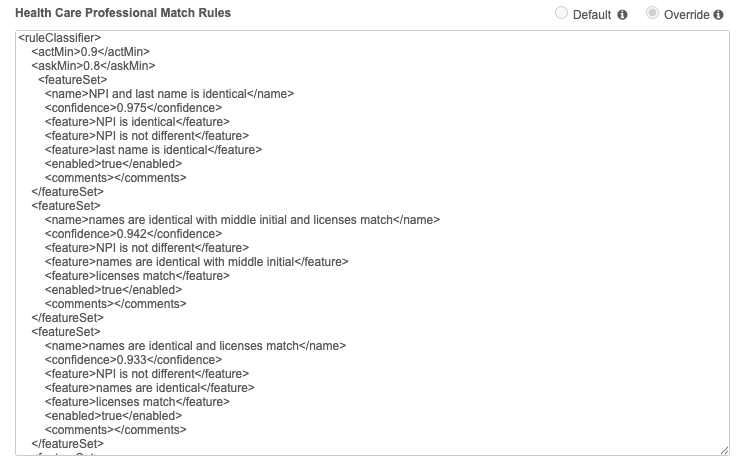
Example feature set
You would define the feature sets as follows.
 <featureSet>
        <name>NPI and last name is identical</name>
        <confidence>0.975</confidence>
        <feature>NPI is identical</feature>
        <feature>NPI is not different</feature>
        <feature>last name is identical</feature>
        <enabled>true</enabled>
        <comments></comments>
    </featureSet>
 <featureSet>
        <name>names are identical with middle initial and licenses match</name>
        <confidence>0.942</confidence>
        <feature>NPI is not different</feature>
        <feature>names are identical with middle initial</feature>
        <feature>licenses match</feature>
        <enabled>true</enabled>
        <comments></comments>
    </featureSet>
<featureSet>
<name>names are identical and licenses match</name>
<confidence>0.933</confidence>
<feature>NPI is not different</feature>
<feature>names are identical</feature>
<feature>licenses match</feature>
<enabled>true</enabled>
<comments></comments>
</featureSet>
Match filters
Match filters can be applied to all match rules in the configuration for a defined object.
Support for sub-objects
Match filters for sub-objects can be added only in Advanced mode.
Basic mode
Filters are defined on the Match Filters tab.
In this example, the filter will apply to match rules that contain HCP fields to ensure that only active HCPs are considered for match pairs.
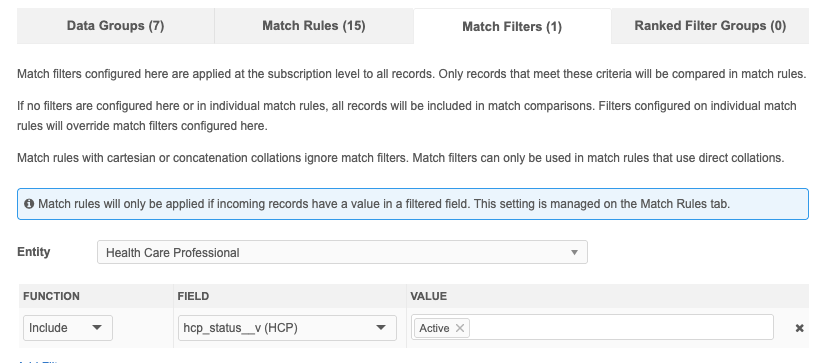
Advanced mode
In Advanced mode, the filter is defined in the Match Rules section for HCPs and HCOs.
Placement in the XML
Match filters can be added in either of the following places in the XML:
-
Before the first <featureSet> tag.
-
Before the last configuration in a match rule (</ruleClassifier>).
When the Advanced configuration is saved, the tag is moved to the bottom (before the </ruleClassifer> tag) in the XML.
Match filter elements
Filters are defined using the <matchFilter> tags in the Advanced XML.
The following elements are required:
-
<scope> - The object to filter on. Required for sub-objects only. For example, addresses__v, licenses__v, parenthcos__v.
-
<field> - The data model field to filter on.
-
<type> - The function. Either INCLUDE or EXCLUDE.
-
<value> - The field value. For reference type fields, use the reference code.
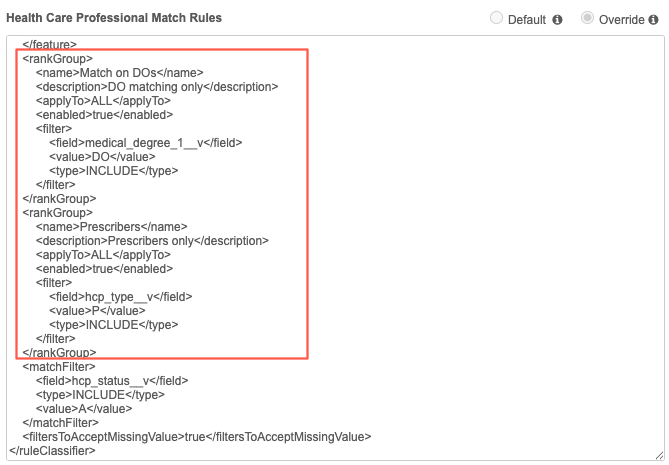
HCP example
<matchFilter>
        <field>hcp_status__v</field>
        <type>INCLUDE</type>
        <value>A</value>
    </matchFilter>
Address example
Add a filter to ensure that only active addresses are considered for match pairs.
In this example, the match filter for the Address object is added before the first <featureSet> tag.
<ruleClassifier>
    <actMin>0.9</actMin>
    <askMin>0.8</askMin>

     <matchFilter>
        <scope>addresses__v</scope>
        <field>address_status__v</field>
        <type>INCLUDE</type>
        <value>A</value>
    </matchFilter>

    <featureSet>
The filter will be applied to match rules that are configured for addresses on the Match Rules tab.
Apply filtered match rules to incoming records
When filters are applied, the rules can consider incoming records even if they are missing the field value of the filter.
Basic mode
These options are defined on the Match Rules tab.

Advanced mode
In the Advanced XML, the following tags map to the options on the Match Rules tab.
| Basic mode (Match Rules tab) | Advanced XML |
|---|---|
| Apply match rules whether incoming records have a value in the filtered field or not. | <filtersToAcceptMissingValue>true</filtersToAcceptMissingValue> |
| Apply match rules only if incoming records have a value in a filtered field. | <filtersToAcceptMissingValue>false</filtersToAcceptMissingValue> |
Placement
Add the incoming record option tags in either of the following places in the Advanced XML:
-
Before the first <featureSet> tag.
-
Before the last configuration in a match rule (</ruleClassifier>).
When the Advanced configuration is saved, the tag is moved to the bottom (before the </ruleClassifer> tag) in the XML.
Example
    </feature>

    <matchFilter>
        <scope>addresses__v</scope>
        <field>address_status__v</field>
        <type>INCLUDE</type>
        <value>A</value>
    </matchFilter>
    <filtersToAcceptMissingValue>true</filtersToAcceptMissingValue>

</ruleClassifier>
Ranked filter groups
Ranked filter groups can be defined to apply to all match rules for an entity in a match configuration. They are ranked so they are applied in a specific order.
Basic mode
Filter groups are defined on the Ranked Filter Groups tab.

Advanced mode
Filter groups are defined in the Match Rules section for HCPs and HCOs.
Placement
Ranked filter groups can be added in either of the following places in the Advanced XML:
-
Before the first <featureSet> tag.
-
Before the last configuration in a match rule (</ruleClassifier>).
When the Advanced configuration is saved, the tag is moved to the bottom (before the </ruleClassifer> tag) in the XML.
Elements
Ranked filter groups are defined using the <rankGroup> tags in the Advanced XML.
The following elements are required:
| Element | Details | |
|---|---|---|
| <name> | Filter group name. | |
| <description> | Description of the filter group. | |
| <applyTo> |
Data to apply the filters to. Supported values:
|
|
| <enabled> | Indicates that the filter group is enabled. (true) or not (false) | |
| <filter> |
The field value. For reference type fields, use the reference code. It includes the following sub-elements:
|
Example
In this example, the ranked filter group for the HCP object is added before the first <featureSet> tag.
   <rankGroup>
        <name>Match on DOs</name>
        <description>DO matching only</description>
        <applyTo>ALL</applyTo>
        <enabled>true</enabled>
        <filter>
            <field>medical_degree_1__v</field>
            <value>DO</value>
            <type>INCLUDE</type>
        </filter>
    </rankGroup>
    <rankGroup>
        <name>Prescribers</name>
        <description>Prescribers only</description>
        <applyTo>ALL</applyTo>
        <enabled>true</enabled>
        <filter>
            <field>hcp_type__v</field>
            <value>P</value>
            <type>INCLUDE</type>
        </filter>
    </rankGroup>
    <dropIfNotRanked>true</dropIfNotRanked>
Choose if a match should continue
If a match is not found in the defined groups, there are options to determine the matched pair.
-
Continue matching within the records not covered by the groups - All match pairs found throughout the match process are included.
-
Do not continue matching - Match pairs that are not found in these filter groups are excluded. These records will be treated as unmatched.
Note: Use this setting with caution because duplicate records might be created.
The options on the Ranked Filter Groups tab map to the following XML for Advanced mode.
| Basic mode (Ranked Filter Groups tab) | Advanced mode |
|---|---|
| Continue matching within the records not covered by the groups | <dropIfNotRanked>false</dropIfNotRanked> |
| Do not continue matching | <dropIfNotRanked>true</dropIfNotRanked> |
Basic mode
These options are dimmed and cannot be selected until ranked filter groups are configured.