Merge records manually
DS
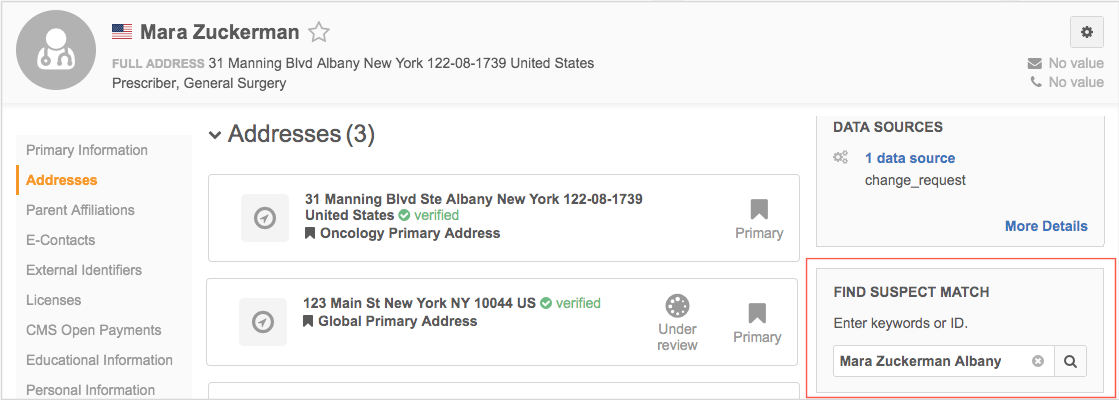
From any HCO, HCP, or custom object record profile, Data Stewards and Data Managers can use the Find Suspect Match box to search for suspect matches![]() The identification of multiple records that are suspected to be duplicates of one another, but without high enough confidence for automatic resolution. and merge applicable matches.
The identification of multiple records that are suspected to be duplicates of one another, but without high enough confidence for automatic resolution. and merge applicable matches.
You can search for matches based on the target record’s Network ID, or for broad results, search using keywords. This functionality enables you to manually match and merge records that might not be discovered as matches during data load.
Supported records
-
Locally managed HCOs, HCPs, and custom objects.
Requirements
Records can be merged only if the following is true:
-
They are the same object type.
-
They have the same primary country.
Merge instructions
Manually merging records with the Find Suspect Match feature uses the merge_request__v subscription, an internal Network MDM subscription. The merge instruction of this subscription is Exclusive Merge, which means that the values on the winning records always win. If the winning record does not have a value in a field, then the value in the losing record will be kept.
The subscription also uses the following properties for sub-objects:
"job.merge.allowCustomerOwnedChildren": "true"- all locally managed sub-objects are retained when locally managed records are merged into Veeva-owned records"job.merge.allowCustomerOwnedChildren.<CHILD>": "true"- specific locally managed sub-objects are retained on the winning Veeva-owned record
By default, the value of these properties is true.To change the value of these properties for the merge_request subscription, contact Veeva Support.
For more information about these properties, see Advanced subscription settings.
Using Find Suspect Match
To search for a suspect match from a record profile:
-
In the Find Suspect Match preview box, accept the default search terms (first name, last name, and city) or clear the text and type a different search term; for example, a Network ID.
-
If you searched by name or another search term, the search results display.
The records are sorted by distance, in ascending order. The sort options can be changed using the Sort by list. The suspect match results are pinned on the map.
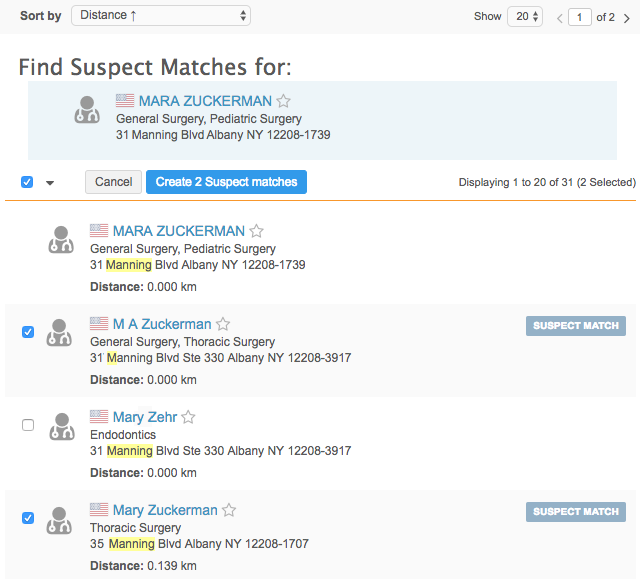
Select one or more matches for the original record.
-
At the top of the suspect match list, click Create Suspect matches.
-
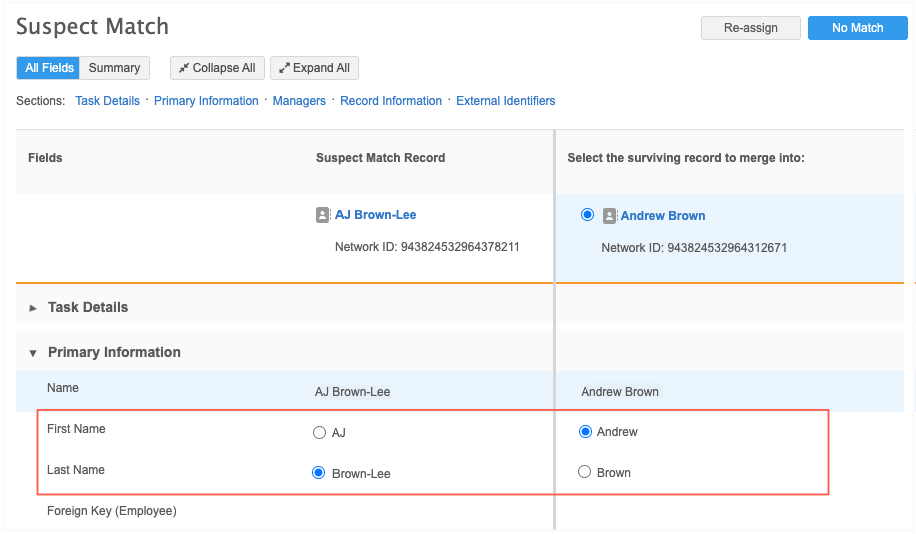
On the Suspect Match page, select the surviving record.
The rows that match the original record are highlighted.
To clear the selected record, click Reset to remove the selection.
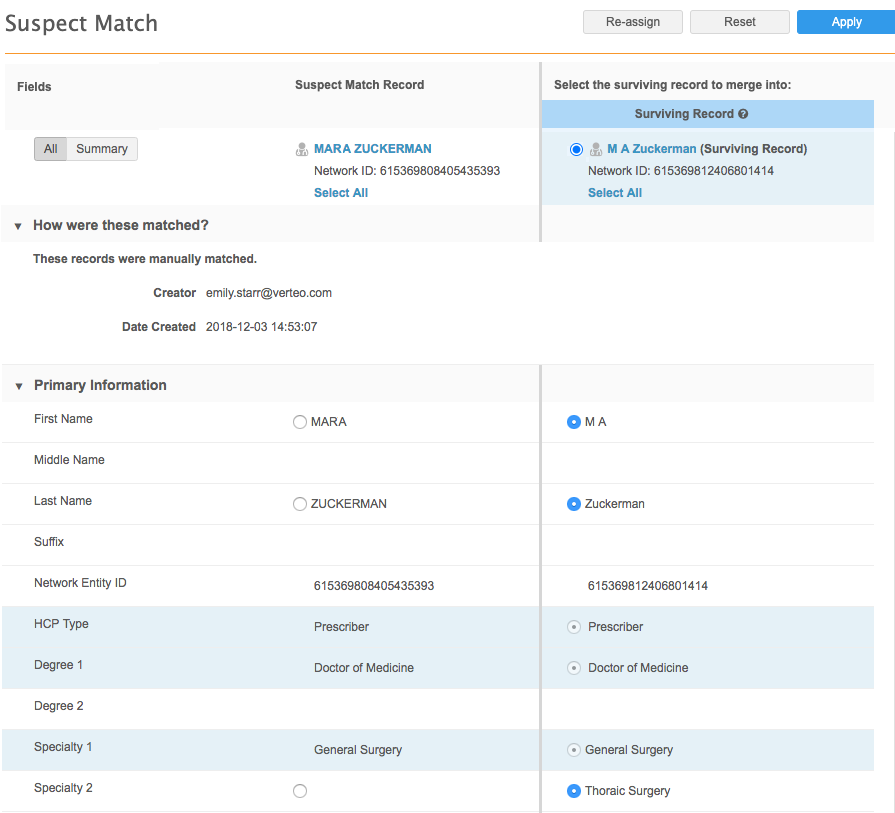
Specific information displays beside the record name so you can quickly identify different types of records to help you determine if the record is appropriate to match.
The following record status will display:
- Dead (HCP only)
- Inactive
- Retired (HCP only)
- Undetermined
The following record information will display:
- Candidate
-
Opted Out (HCPs only)
If an opted out record is also a candidate record or has one of these statuses, Opted Out displays; the opted out information takes precedence over the other statuses or candidate information.
-
Select the fields to retain on the surviving record.
-
Fields have different values - Select the field value to retain on the surviving record. (Supported for HCPs and HCOs only; attribute values cannot be selected on custom objects).
-
Field does not have a value - a button still displays so you can choose the blank value.
-
Select all - When a record is selected, a Select All link might display below the record heading. If you click Select All, the link will be dimmed to indicate that no further actions are required for the individual field values.
-
- To process a suspect match task and merge records together, click Apply at the top right of the task.
-
In the Apply Suspect Match dialog, type a resolution note
 Comments that can be used by data stewards to explain the rejection or approval of a data change request. and click Apply.
Note: If you opt to go to the next task from the resolution note, the merge will continue in the background.
A system message at the top of the page indicates that the process has started. Results of the merge will display when they are available. You do not have to remain on the page for the operation to complete successfully.
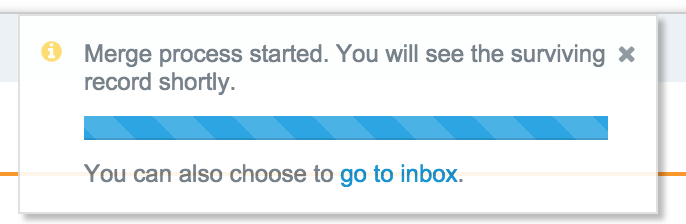
When the operation completes, a system message indicates that it has completed and provides a link to the related task. The new record resulting from the merge appears.
-
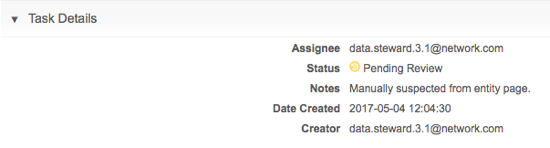
To view the related task, click the Review the task link.
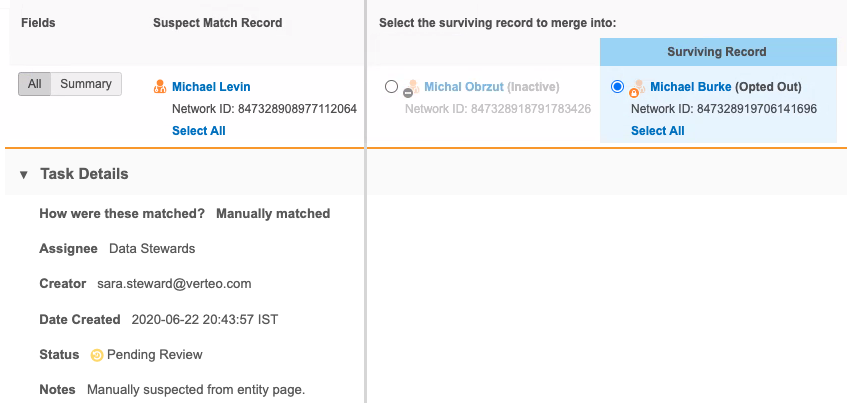
The suspect match task Task Details section includes information about how the task was created (manually by a data steward, in this case) to help other data stewards triage the task.
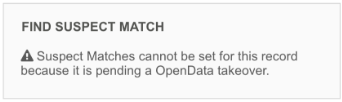
Records that have been sent to Veeva OpenData as add requests cannot be included in a suspect match task. A message displays in the preview box to advise that the record has been sent to Veeva OpenData.
If you searched by Network ID, the Suspect Match page opens immediately. Go to Step 4.
Merging custom object records
-
Data Stewards and Data Managers can manually merge custom objects using the Find Suspect Match feature.
-
Administrators can merge duplicate records using bulk merge in source subscriptions.
Requirements
-
Records can only be merged if they are the same custom object type; for example, a STUDY record cannot be merged into a TRAINING record.
-
The records must have the same primary country.
Merging duplicate records through data load
For deduplicating custom object records, source subscriptions use the default suspect match rules if no match rules have been defined for the custom objects.
Tasks are generated for each pair of records that meet the suspect match criteria.
Manually merging records
Using the Find Suspect Matche feature, data stewards can find matching records of the same entity type using a search keyword or a Network ID.
On the suspect match task, Data Stewards can compare the records side by side and select the attributes from each record that will be copied to the winning record.
Merge behavior
If Data Stewards merge two custom objects, the following actions occur:
- All existing external IDs are copied to the surviving record and then they are deactivated on the losing record.
- Duplicate sub-objects and custom relationship objects are removed.
- Relationships are repointed to the surviving record. Relationship are removed if they point to the losing record in the merge.
Unmerge custom objects
Custom object records can be unmerged if the source system setting, Unmerge Ability allows (System Interfaces > Systems).
On the unmerged records, a new Network ID is assigned to custom objects and custom sub-objects.
Merging OpenData records
Veeva OpenData records cannot be manually merged.
To ask OpenData to review potential duplicates, submit a Veeva Support ticket for the OpenData team.