Extracting data from Salesforce
Customers that use Network MDM and Veeva CRM can extract object data from Salesforce® and publish the .csv files directly to Network MDM's FTP server.
Supported objects
-
Veeva standard objects
-
Custom objects
Overview of tasks
To extract data from Salesforce, the following tasks must be completed:
- Add Salesforce credentials to Network MDM - The credentials are used to connect to Salesforce.
- Create a connector - Connect to Salesforce to extract the object data using SOQL and publish the files to Network MDM's FTP server.
The following sections describe how to complete these tasks.
Add Salesforce credentials
Add the Salesforce credentials so they are saved in Network MDM and you can refer to them when you are creating the Veeva Connector configuration for Salesforce.
To add the Salesforce credentials:
- In the Admin console, click Settings > External Credentials.
- Click Add Credentials.
- In the New External Credential dialog, select Salesforce. Click OK.
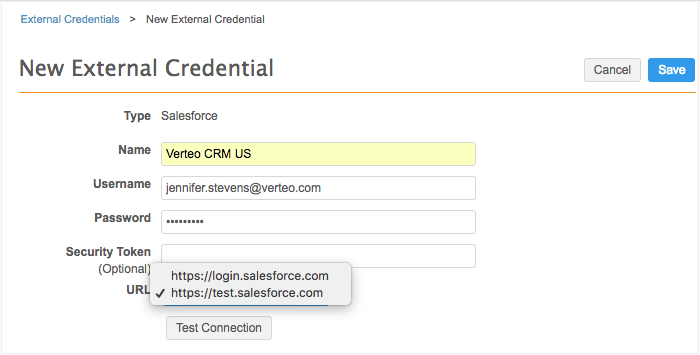
- On the New External Credential page, provide the following information:
- Name - Type a name for the credential. For example, Verteo CRM US. Names must be unique.
- Username - The Veeva CRM integration user ID.
- Password - The password for the Veeva CRM integration user.
-
In the URL list, choose one of the following URLs for the Salesforce domain:
- https://login.salesforce.com - Use for production instances.
- https://test.salesforce.com - Use for test instances.
-
Click Test Connection to ensure that the credentials are correct.
A panel displays to provide information about the environment the credential is connecting to and to indicate if the credentials are valid or if there were issues connecting to the Salesforce server (not credential-related). Warnings display if you are potentially connecting to the wrong environment
- Save your changes. If you did not test the credentials, they will be tested now. Invalid credentials will not be saved.
The credentials are stored and can be used in the Veeva Connector configuration for Salesforce
Create a connector to Salesforce
Create a Veeva Connector so you can extract the object data and load it to your Network MDM FTP.
- In the Admin console, click System Interfaces > Veeva Connector.
- Click Add Veeva Connector.
-
In the Add Veeva Connector dialog, expand the lists to select the following values:
- Connector Type - Salesforce
- Operation - Extract
Click Next.
-
Details section - define the following settings:
- Connector Enabled - Choose Yes.
- Name - Type a meaningful name for the connector.
- System - Choose a system. If you do not have a system configured for CRM, create one by navigating to System Interfaces >System.
The Connector Type and Operation cannot be changed.
-
Connection Settings section - Expand the Salesforce Credential list and select the credential.
Click Test Connection to ensure that the credentials are valid.
A panel displays to provide information about the environment the credential is connecting to and to indicate if the credentials are valid or if there were issues connecting to the Salesforce server (not credential-related). Warnings display if you are potentially connecting to the wrong environment
-
Extract Settings section - define the following settings:
-
FTP Path - The Network MDM FTP path to store the .csv files that will be extracted from Salesforce.
Tip: Define the FTP path that you will use to load the data into Network MDM using a source subscription.
-
Extract File Format - Define how you want the extracted files to be formatted.
-
Uncompressed (Default) - Extract each object in individual .csv files.
-
Compressed single file - Compress the extracted .csv files into a compressed .zip file.
Tip: Select this option if you will use the extracted files in a source subscription because multiple files must be loaded from a compressed single file or a unique sub-folder.
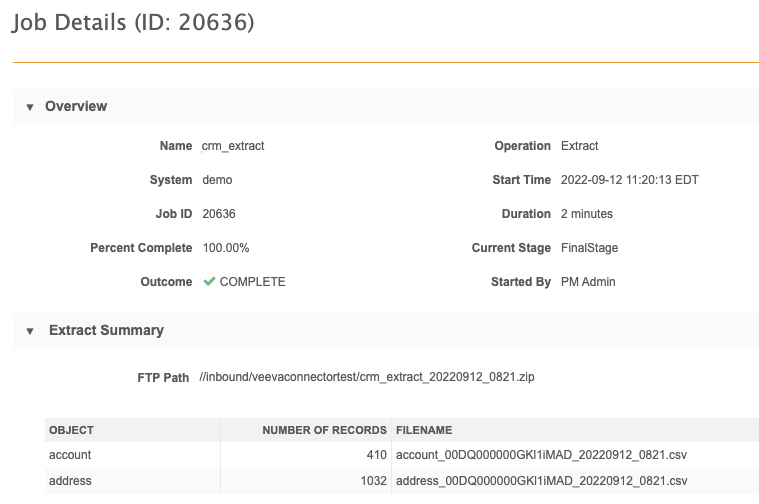
The compressed file will be saved to the FTP path with the following name format: <veeva_connector_name>_<date_and_time>.zip.
On the Job Details page, the Extract Summary section will display the compressed file name and the individual .csv file names.
-
-
-
Extraction Objects - Specify the objects that will be taken from Salesforce. For each object, define the following details:
- Object - The Veeva CRM object name; for example, Account.
-
File Prefix - The prefix for the .csv file that will be saved to Network MDM FTP server.
The .csv file name is the following format:
<prefix>_<organization_id>_<timestamp>.csv.Example:
account_5014000000C8cuI024_20190825_1345.csv - Extraction SOQL - The Salesforce Object Query Language (SOQL) query to extract the object from Salesforce.
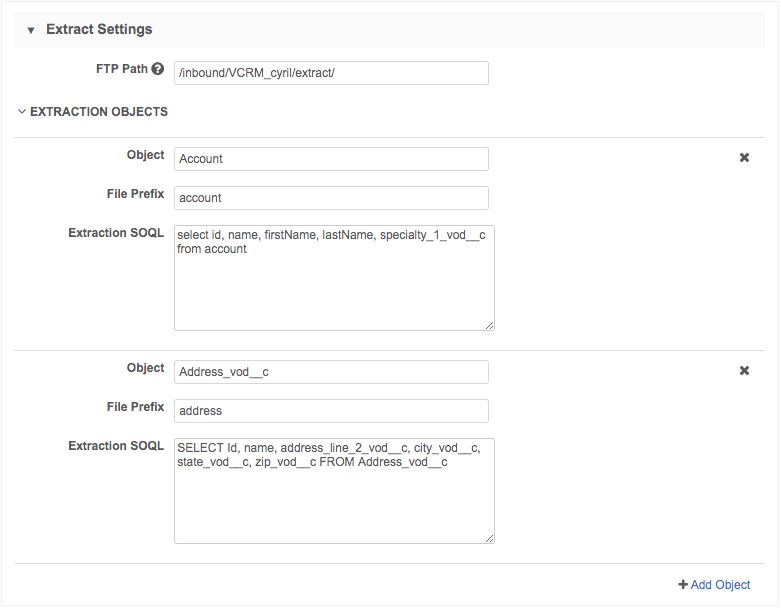
To include more objects, click + Add Object.
-
Job Trigger Configuration section - Define the schedule for the job and any subsequent actions that will start when this job finishes.
Job Schedule - Run the job manually or on a scheduled basis. If you select Manual, the job only runs when you click the Start Job button on the configuration page.
Job Triggers - Trigger other actions to start after a job runs.
Available triggers:
- Send email - Specify users that should be notified for successful and unsuccessful job outcomes.
- Start a job - Start a subsequent job when this job successfully completes. For example, you can start a source subscription to load the data into Network MDM when the Salesforce extract job completes.
For more information, see Subscription job triggers.
- Save your changes.
The Veeva CRM integration is complete. When the extract job runs, Network MDM will connect to Salesforce to retrieve the object data and load the .csv files to Network MDM's FTP server. To load the data into Network MDM, create a source subscription. For more information, see Add a source subscription.