Creating profile validation rules
DM
Administrators create and manage profile validation rules in their Network MDM instance.
- In the Admin console, click System Interfaces > Profile Validation Rules.
-
On the Profile Validation Rules page, decide the entity that the rule applies to and click Add Rule in that section.
- HCP - Rules that apply to HCP records and their sub-objects and custom keys only.
- HCO - Rules that apply to HCO records and their sub-objects and custom keys only.
- Custom objects - Rules that apply to that custom object record and its sub-objects and custom keys only. Custom objects display on the Profile Validation Rules page as soon as they are enabled in your Network MDM instance.
-
Sub-Objects - Rules where the sub-object or field applies to all records (HCP, HCO, and custom objects). If you add a new custom object that uses an existing sub-object, the existing rules will apply to those custom object records too. For example, if you add a Payer custom object and it uses the Address sub-object, all existing profile validation rules for addresses will also apply to the Payer records. Also, use for creating rules only for sub-objects: Address, License, and Parent HCO, and custom sub-objects and relationships.
-
Type a unique Rule Name. The name cannot have spaces; for example: HCPType.
When you create a rule in a main object section, the rule name is automatically appended with the main object name. When you create a rule in the Sub-Object section, the Rule Name field is not populated with the object name because the object type is not known yet.
- Type a Description. This description ensures that users can see a relevant message if a rule fails when they are submitting changes to a record.
- Select the Countries that this rule applies to.
Tip: If the rule applies to many countries, choose Select All and then remove the countries that the rule does not apply to.

-
In the User Types section, Data Stewards, Data Managers, and System and Data Admin users are added by default and cannot be removed.
Type Standard User or System Admin, or both, if you want the rule to run when these users submit add or change requests.
It can be helpful to include Standard Users and System Admins to rules to ensure that when they submit an add or change request, the request contains the information that the Data Steward needs to process the record. For example, to ensure that all HCP records have at least one address defined, the rule will fail when a Standard User creates an add or change request that does not include an address. The request cannot be submitted until an address is added.
 Tip: Exclude change requests
If you want a profile validation rule to run only when these users submit add requests, you can define a filter on each rule that excludes change requests. This ensures that rules do not fail on change requests for information the user is not aware of. For example, if a Standard User changes a field value on a record that originated from a source subscription, or a record that hasn't been updated in a long time, profile validation rules run on the entire record. The user should not be responsible for cleaning up missing information for the entire record.
To add the filter to exclude change requests, in the Group section, select the Created Date field and choose Is Null from the Condition list.
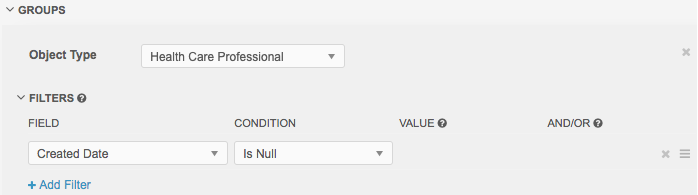
This filter excludes change requests from a rule because change requests have a create date. Now the rule only runs when a Standard User or an Administrator submits an add request.
- The Enabled checkbox is selected by default. Clear the checkbox if you do not want to enable the rule immediately after it is created.
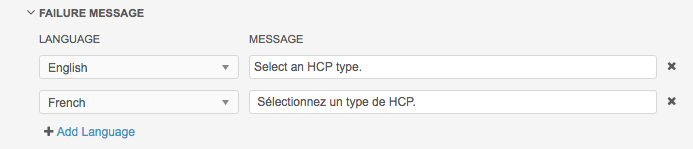
- Expand the Failure Message section and click Add Language. At least one language and message must be defined.
- Select the Language from the drop-down list.
- Type the Message, in that language, that the Data Steward, Data Manager, or System and Data Admin user will see in the profile validation rule. The message should be clear and short; for example, for a rule that checks that each HCP has a type, a good message is Select an HCP Type.
- Click Add Language to add more languages and your own translated message.
If a language and message isn't defined for a language selected on the Data Steward's, Data Manager's, or System and Data Admin's profile, the default language of your Network MDM instance is used.
Note: This is the only message that a Data Steward, Data Manager, or System and Data Admin sees when they are processing a change. If they have issues with validation rules, they will reference this message. Ensure that it is unique and informative.
-
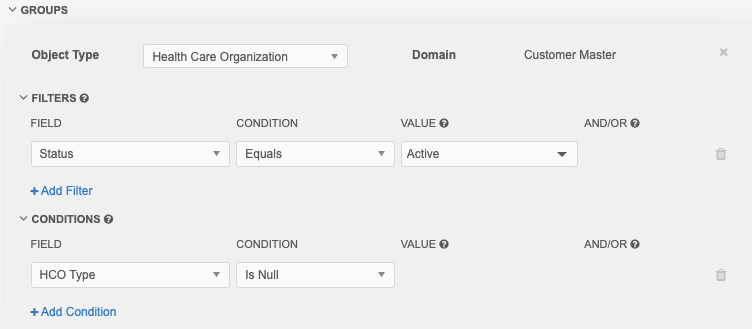
In the Groups section, click Add Group and select the Object Type.
The Domain field displays all of the domains the object is in. This information is particularly useful for rules for sub-objects and relationship objects to understand what main objects they are associated with.
Main objects
When you create a rule in a main object section (HCP, HCO, or custom object) the Object Type is automatically applied. If the rule applies to a sub-object or relationship object on this main object, expand the list to select one of those objects.
Example
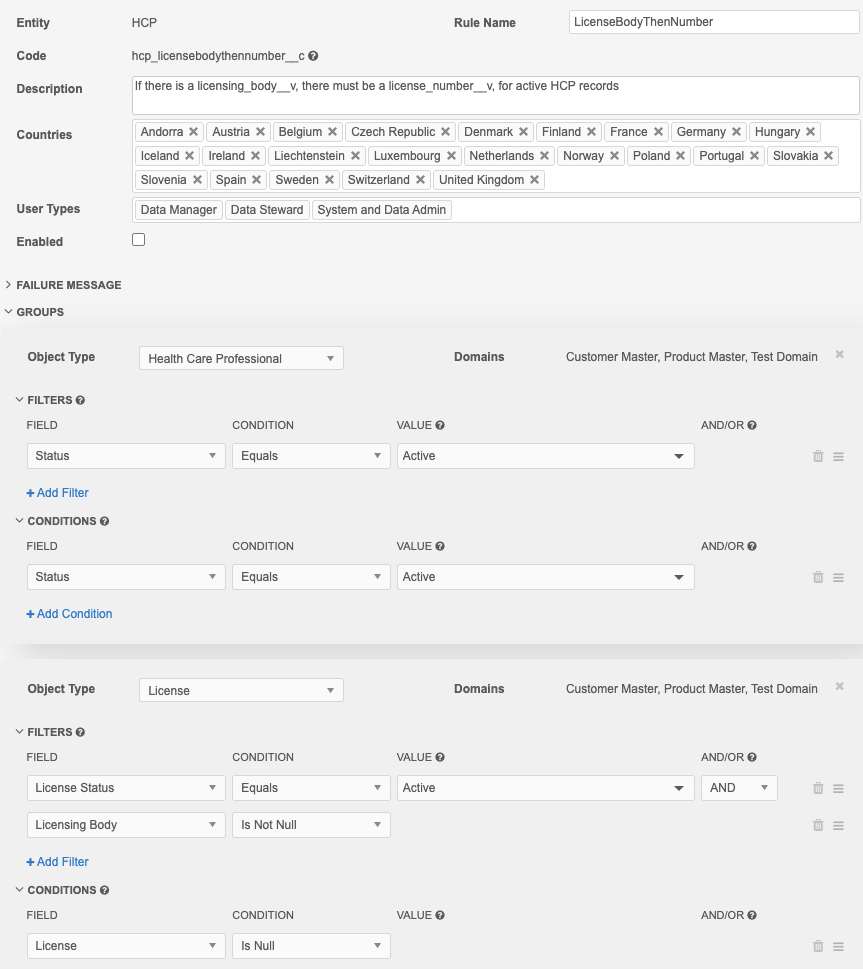
To create a rule that ensures that active HCP records have a license, create a rule in the HCP section with the License object type. The rule will run on HCP records only.
The rule first checks that the HCP record is active and then checks that the License record is active and includes a licensing body and number.
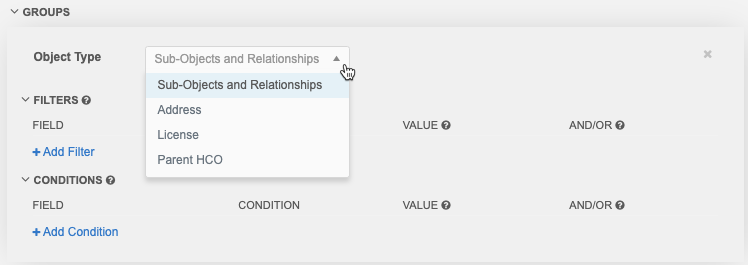
Sub-objects and relationship objects
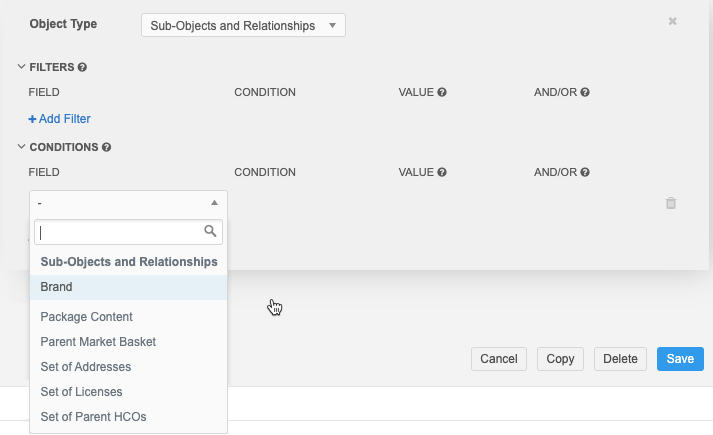
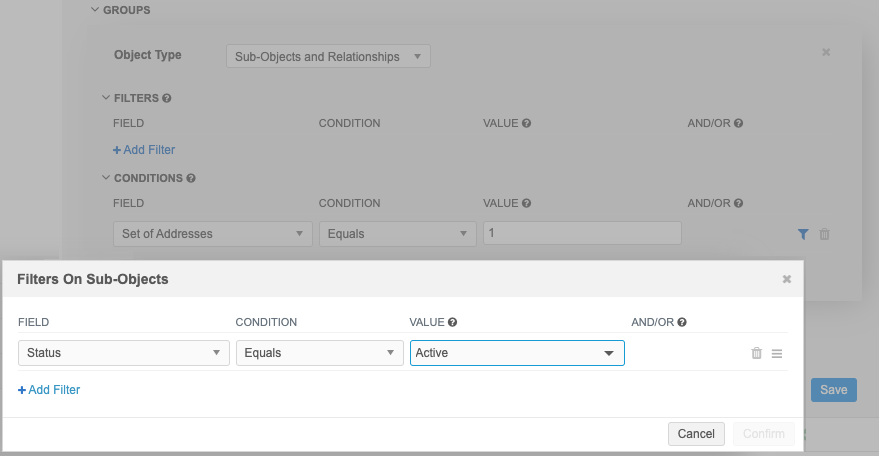
When you are creating a rule in the Sub-Objects section, all the enabled sub-objects and relationship objects in your Network MDM instance display. Additionally, the Sub-Objects and Relationships option can be selected.
Object type
-
Individual objects (Address, License, Parent HCO, custom sub-objects and relationship objects) - Use to look at attributes on individual objects (for example, check that an address is active).
-
Sub-Objects and Relationships - Use to look for data quality issues about the sub-objects on the record as a whole. For example, look at all addresses on the record to find duplicates, addresses that are completely missing, or the wrong count of addresses.
For more details about the Sub-Objects and Relationships option, see Create rules for sub-objects and relationships.
-
-
Optional. In the Filters section, click Add Filter to limit your rule to run on specific records.
Example
If you want the rule to apply only to active records, add a status filter (Field = HCP Status, Condition = Equals, Value = Active).
-
Field - Choose the field for this filter. The fields in the drop-down list apply to the object selected for this rule.
Groups of similar fields can be selected to make it easier to create rules; for example,
All Credentials,All Emails.Note: If you create a rule but a country doesn't use some of the fields, the rule does not fail; the rule recognizes that the fields do not apply in that country.
-
Condition Choose one of the available conditions.
-
Value - If the Condition that you chose requires a value, type the value. The value might be free text (for example, type a name) or a list of options. Multiple values can be defined.
-
And/Or - This is available only if multiple filters are defined and defaults to AND if there are multiple filters.
-
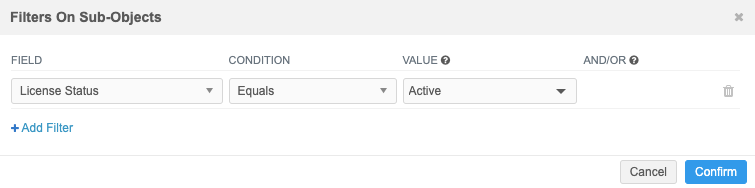
If you selected a set of fields (
Set of Addresses,Set of Licenses,Set of Parent HCOs) an additional Filter icon displays so that you can filter on sub-objects within that set.
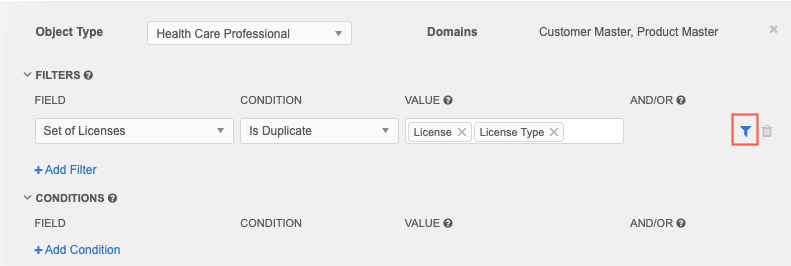
Click the Filter
icon and define the sub-object filter.
If you add a sub-object filter, the Filter
 icon turns blue to indicate a filter is added.
 -
To define more filters, click Add Filter.
-
- In the Conditions section, click Add Condition and define the condition that will cause the rule to fail.
For example, you can apply a condition so that any active HCPs (filtered in Step 9) that do not identify an HCP type causes the rule to fail (Field = HCP TYPE, Condition = IS NULL).
Field- Choose the field for this condition. The fields in the drop-down list apply to the object selected for this rule.
Groups of similar fields can be selected to make it easier to create rules. The following group fields are available:
- All Credentials (
credential_1__vtocredential_5__v) - All Emails (
email_1__vthroughemail_10__v) - All Medical Degrees (
medical_degree_1__vandmedical_degree_2__v) - All Phones (
phone_1__vthroughphone_10__v) - All Specialties (
specialty_1__vthroughspecialty_10__v) - All URLs (
url_1__vandurl_2__v)
If you create a rule but a country doesn't use some of the fields, the rule does not fail; the rule recognizes that the fields do not apply in that country.
- All Credentials (
- Condition - Choose one of the available conditions.
- Value - If the Condition that you chose requires a value, type the value. The value might be free text (for example, type a name) or a list of options. Multiple values can be defined.
- And/Or - This is available only if multiple conditions are defined and defaults to AND if there are multiple conditions.
- If you selected a set of fields (
Set of Addresses, Set of Licenses, Set of Parent HCOs) an additional Filter icon displays so that you can filter on sub-objects within that set. If you add a sub-object filter, the Filter icon turns blue to indicate a filter is added.
- To add another object, click Add Group and add filters and conditions for that object.
- Save your rule.
When Data Stewards, Data Manager, or System and Data Admin users process records, the enabled rule runs on any records that it applies to. If the conditions are met, the rule fails and the Data Steward or Data Manager sees the validation message. The record cannot be processed until the issue is addressed.
If you included Standard Users or Administrators on the rule, the rule runs when these users submit add and change requests. If the conditions are met, the rule fails and the request cannot be submitted until the issue is addressed.
Creating rules for Sub-Objects and Relationships
When you create a rule in the Sub-Objects section, you can choose to create the rule for the Sub-Objects and Relationships object type.
Use this option to look for data quality issues about one of the sub-objects as a whole. For example, you can choose Set of Addresses to look for duplicate addresses on a record, addresses that are missing (for example, the record must have at least one address) or the wrong count of addresses ( for example, the record can have no more than three addresses).
When you expand the Field list for a Filter or Condition, you can choose the set of sub-objects or relationship objects to apply the rule to.
Available fields
The Fields list in the Filters and Conditions section contains the sets of sub-objects and relationship objects available for the rule.
Veeva standard objects
The standard objects are grouped into "sets". These sets of fields do not display in the data model.
-
Set of Addresses
-
Set of Licenses
-
Set of Parent HCOs
Custom objects
Custom sub-objects and relationship objects display using the labels that you define in the object configuration.
-
Sub-objects - The singular label for the custom sub-object displays.
-
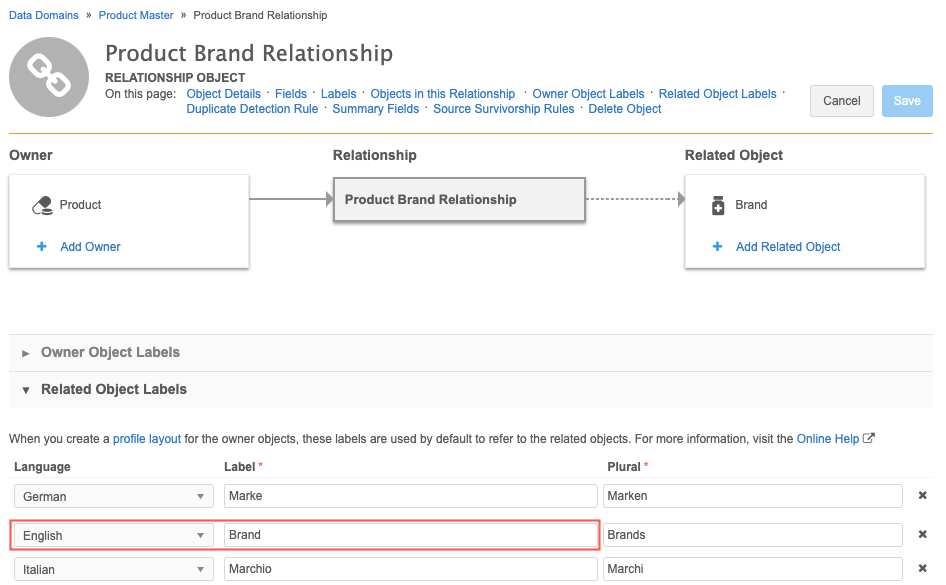
Relationship objects - The Related Object Label displays. For example, if the custom relationship object is called Product Brand Relationship but the Related Object Label (in the object configuration) is Brand, Brand displays as the relationship object name for the profile validation rule.
Validate the count of objects
The Sub-Objects and Relationship object type is useful for creating rules to check for a specific count of sub-objects and relationship objects, to check for duplicates, or to check for the existence of that sub-object.
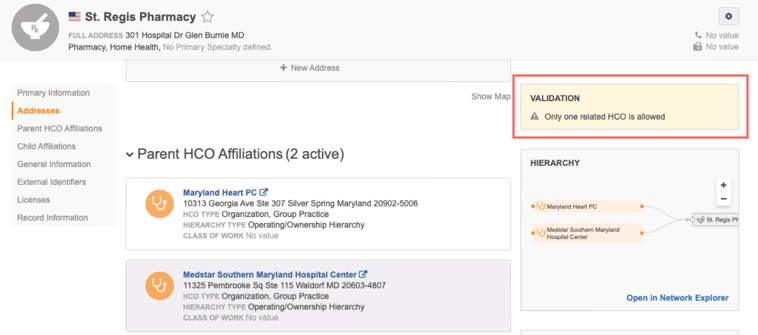
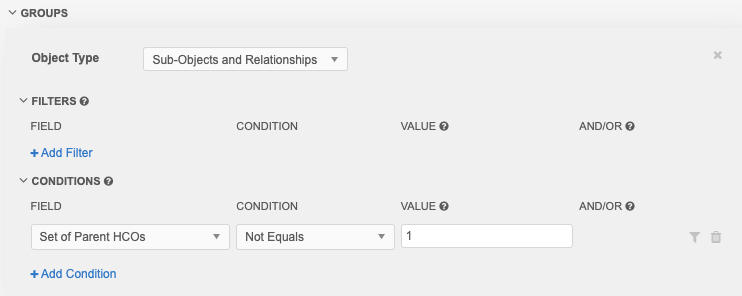
Example 1: Records can have one Parent HCO only
Create a profile validation rule to ensure that records have only one Parent HCO. Use the Not Equals operand to fail the rule for any entity that has more than one Parent HCO.
Example 2: Records must have one address that is active
This rule looks for the existence of one address, and that address must be active. The main purpose of the rule (Condition) is to check for the existence of one address, and then you can use a filter on the condition to look only at active addresses. You'd use the set of addresses option to do that.
Note: When you create a rule for the Address object (instead of the Set of Addresses), you can't check for the existence of one address. Using the Address object, you can create a rule that checks that all addresses are active, but the rule is skipped if no addresses exist.
Field sets are supported for any main object. For example, when you create a rule for HCPs, you can choose a set of fields for any sub-object.
Creating rules for custom keys
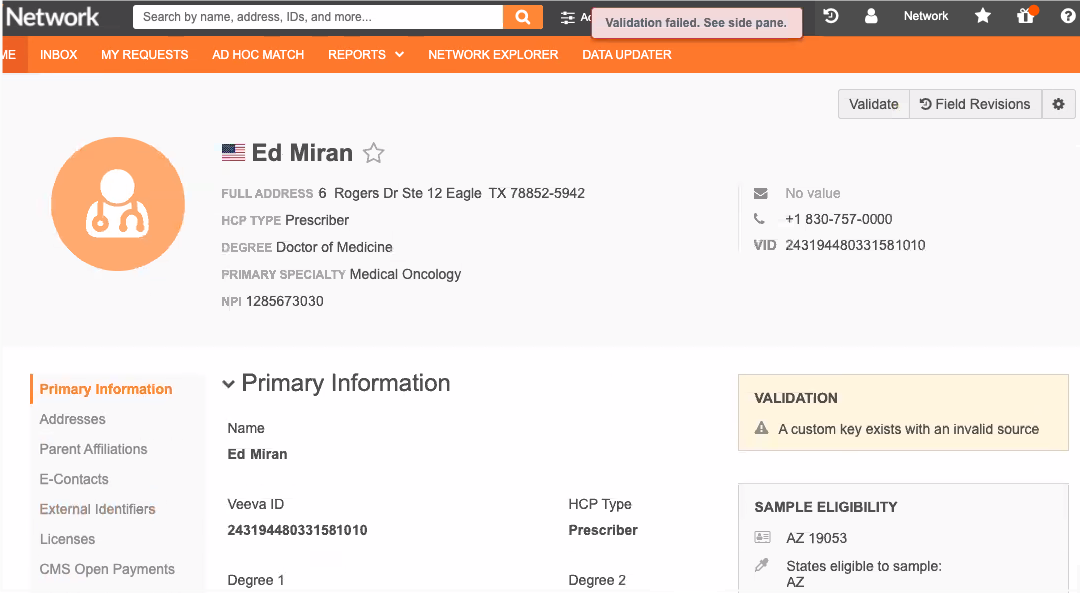
Creating rules for custom keys on HCP, HCO, and custom main objects is helpful if you manually maintain custom keys and need to validate the Source and Value fields; for example, to check for specific sources and the length of values.
Important: Profile validation rules should run only on custom keys that have just been manually created on a record profile. When custom keys are saved, they are read-only and cannot be edited. If validation rules fire for existing custom keys, Data Stewards cannot resolve the issue on the profile page; it must be resolved through data loading. For this reason, these profile validation rules must be thoroughly tested before they are used in production.
Supported objects
Custom keys supported for HCPs, HCOs, and custom objects only. Custom keys are not supported for sub-objects or relationship objects because custom keys cannot be edited for sub-objects or relationship objects on the profile page.
Clean up existing keys
Before you create profile validation rules for custom keys, clean up existing custom keys. Use reports to query existing custom keys and ensure that the Source and Value fields for the custom keys are correct. Existing custom keys are read-only and can conflict with the new rules. If a rule fails on an existing custom key, it must be addressed through data load.
Create a profile validation rule for a custom key
- In the Admin console, click System Interfaces > Profile Validation Rules.
-
In the HCP, HCO, or a custom object section, click the Add
 icon to add a new rule.
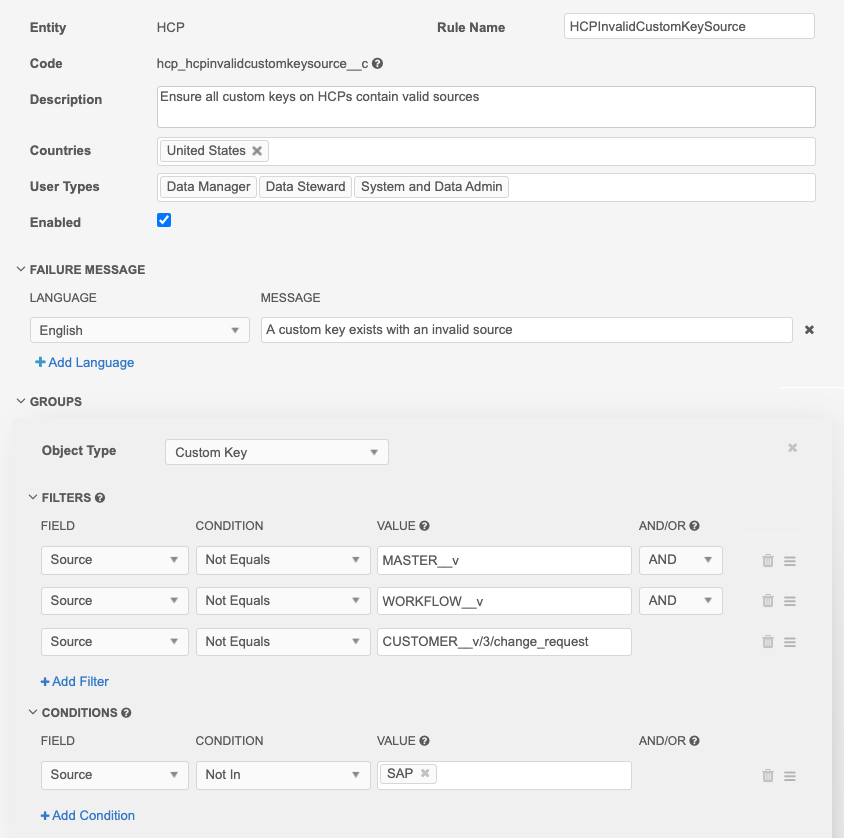
 - Type a Description for the rule. For example, Ensure all custom keys on HCPs contain valid sources.
- Select the Countries that this rule applies to.
- In the Failure Message section, click Add Language. Choose the Language and type the Message. For example, A custom key exists with an invalid source. This is the error that Data Stewards will see on the profile page.
- Expand the Groups section and choose Custom Key as the Object Type.
-
Click Add Filter to limit the rule to run on specific records. For example, these profile validation rules should run only on custom keys that are manually created, so exclude custom keys that are automatically generated when records are added in the UI or loaded from master sources.
- In the Field list, choose Source.
-
In the Condition list, choose Not Equals.
-
In the Value list, type the source name; for example, MASTER__v for Veeva OpenData custom keys.
Every record that is downloaded has a default custom key with MASTER__V as the source, so this source should always be added as a filter. When records are created using the Network MDM UI, custom keys with the sources WORKFLOW__v and CUSTOMER__v/3/change_request are automatically added. These sources should also be excluded from the rules.
For more information about custom keys to exclude, see Generated custom keys.
- Click Add Filter to specify additional sources to exclude. Choose the AND operator for the filters.
-
Click Add Condition to define the condition that will cause the rule to fail. For example, we want the profile validation rule to fail if the source is not SAP.
-
In the Field list, choose Source.
Only the fields that are visible in the Network MDM UI are available in the list: Item Type, Source, Status, and Value. This ensures that a Data Steward can edit the field value to resolve the validation error.
-
In the Condition list, choose Not In.
Note: If you use the Not Find or Not Equals conditions, custom keys that are automatically added to records (WORKFLOW__v and CUSTOMER__v/3/change_request) can cause issues. Ensure that you add filters for these sources so profile validation rules do not run for them.
- In the Value list, type the source name; for example, SAP.
-
- Save the profile validation rule.
Example 1 - Validate the source
Create a profile validation rule to check that a custom key source name matches the predefined list of sources. In this example, the only source is SAP.
The rule ensures that any custom keys from Veeva OpenData (MASTER__v) or from records that were added using the Network MDM UI (WORKFLOW__v and CUSTOMER__v/3/change_request) are excluded from the rule.
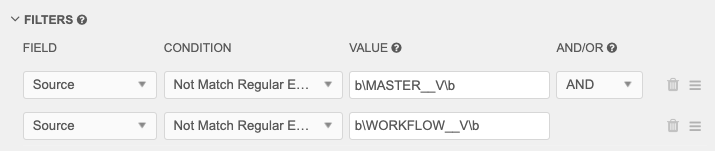
Case sensitive sources
For case sensitive sources, use regular expression conditions. The Find, Not Find, Equals, and Not Equals comparisons are not case sensitive. Also, wrap the source name text with \b; for example, \bMASTER__V\b. Spaces can be included without quotations.
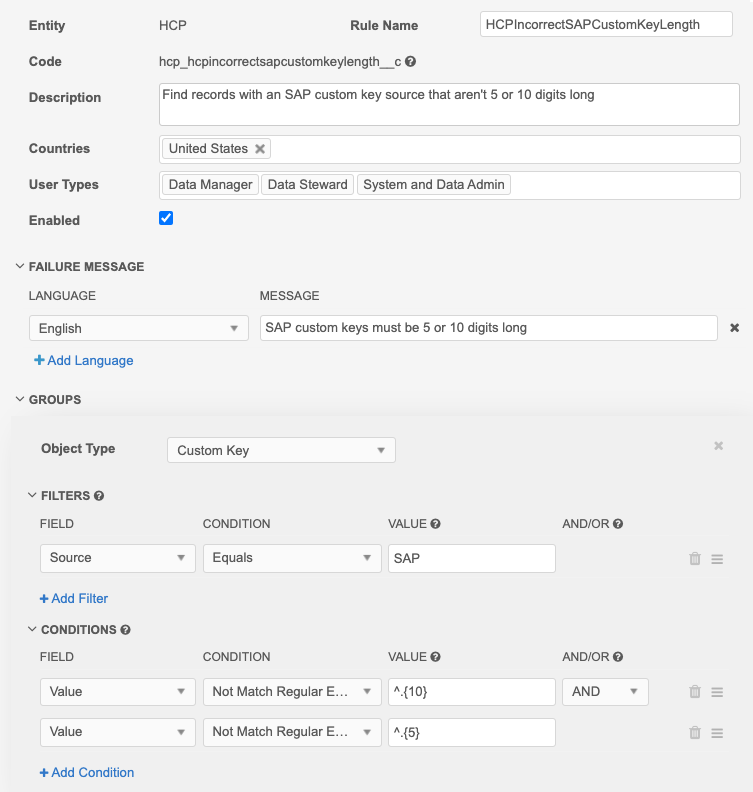
Example 2 - Validate the value length of the custom key
In this example, if the Value field of the custom key is not 5 digits or 10 digits long, the rule will fail. The rule only validates custom keys from the SAP source.
Note: The AND operator must be used for the condition. If OR is used, the rule will always fail.
Testing validation rules
Profile validation rules should be thoroughly tested before they are used in production. Create the profile validation rules in your Sandbox instance. You might need to adjust the rule or adjust the data manually using source subscriptions. If data stewards encounter a rule that fails for an existing custom key, it cannot be edited on the profile page. The steward will need an administrator to either edit or disable the rule, or to run a source subscription and adjust the custom key values.
Tip: To validate the rules before finalizing them, run reports that mimic the rule criteria.
After the rules have been tested, export the rules to your Production instance using the Export Configurations feature. Custom fields or reference codes are not exported by default when you export the custom key. These dependencies must be independently added to the export.
New sources
When new sources are added, update your profile validation rules.