Creating custom tables using transformation queries
DM
Transformation queries can pre-process or post-process data during subscription jobs. When the transformation query runs during the job, the query output can be saved as a custom table.
Example use cases
Save transformation query output as custom tables for the following activities.
Outbound transformation query examples
-
Create snapshots of current data in Network MDM.
This could be a snapshot of data for a data model object, a reporting table, a lookup table, or another custom table.
-
Prevent intermediate files in target subscription export packages.
When target subscriptions include multiple transformation queries that run in sequence, you might not want the output from the intermediary queries included in the export. To prevent query output from being exported to downstream systems, choose custom tables as the output type of any intermediary queries so that data remains in Network MDM.
-
Post-process source view files
Save the exported source data. For example, save the output as custom table so you can report on data lineage.
Inbound transformation query example
-
Create a source subscription that loads data from a source file into a custom table.
For example, load data into a custom table that you want to store in your Network MDM instance and report on but does not need to be in custom object (the data does not require search, revision history, data lineage, data change requests, and other features).
Supported types of data load:
-
Replace - Each time the subscription runs, the custom table is replaced with the full data load from the source file (default behavior).
-
Upsert - Using a delta file (new records and updates), join the data from the existing custom table and the source file. The source file can add new data and update existing data in the custom table.
-
Append - Using a delta file (only new records), union the data from the existing custom table and the new data from the source file.
-
For more information, see the detailed examples below.
Creating custom tables from queries
Queries are configured separately (System Interfaces > Transformation Queries) and then they are linked to a target or source subscription.
To create a transformation query that loads the query output to a custom table:
-
On the Transformation Queries page, click Add Query.
-
In the Details section, type a Name and Description.
Choose the Query Type:
-
Inbound - Transform inbound data using source subscriptions.
-
Outbound - Transform outbound data using target subscriptions.
-
-
In the Query Output section, define the following:
-
Custom table - The output of the transformation query will be saved in a custom table.
-
Table Name and Table Description - Provide a meaningful name and description for the query.
The table name will automatically be appended with the __ct suffix.
-
Save To Folder - Choose the folder in the SQL Query Editor where the custom table will be saved.
If you have folders created in the Shared Folders category in the SQL Query Editor, they will display in this list. If a folder is not selected, the custom table will be created on the top level (No Folder) of the Shared Folders category.
Transformation query output cannot be saved to personal folders (My Custom Tables) because the data is loaded through subscriptions, which are not applied to users.
-
-
Table Name Options - Choose the naming option for the custom table.
-
Static table name - The table name is always the same. This means that the existing custom table with the same name is replaced each time the query runs. For example: hco_table__ct.
-
Add timestamp to table name - Append a timestamp to the table name. For example: hco_table_20221102t045341z__ct.
The date format uses the ISO8601 standard and the UTC (Coordinated Universal Time) timezone.
-
Add job ID to table name - Append the subscription job ID to the table name. For example: hco_table_15953__ct
-
-
Save the transformation query and link it to a target or source subscription.
When the subscription runs, the query output will be saved to the custom table.
Example 1 - Create snapshots of current data
Use a target subscription to export an object or a table so you can take a snapshot of the current data. The transformation query reads from the file export or table and persists the query output as a custom table.
Example
You might want to take snapshots of hierarchies so you can track any HCOs or HCPs that are dropped and added each quarter because it could affect compensation processes. You can do this by taking snapshots of Network MDM's flattened hierarchy table using a transformation query so you can compare the data in the custom tables each month.
Tip: You can also use snapshots for monthly reporting on health systems and to freeze hierarchies so you can compare data over different time periods.
Process
-
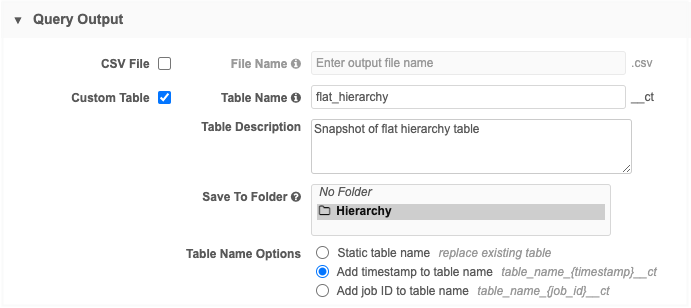
Create a transformation query that queries the flat_hiearchy reporting table. Configure the transformation query to create a custom table which includes a timestamp in the table name.
-
Apply the query to a target subscription.
-
Run the target subscription monthly or quarterly to create a custom table so you can compare data.
Create the transformation query
Create an outbound transformation query so you can apply it to a target subscription.
Key settings in the transformation query configuration:
-
Details section - Choose Outbound as the Query Type.
-
Query Output section - Define the following settings:
-
Choose Custom Table.
-
Define a Table Name and Table Description.
-
Save the custom table to a shared folder in the SQL Query Editor. If there are no folders in the list, it is saved to No Folder (top level of the Shared Folder).
-
In the Table Name Options list, choose Add timestamp to table name. This ensures that you have the date of the snapshot as part of the table name.
-
-
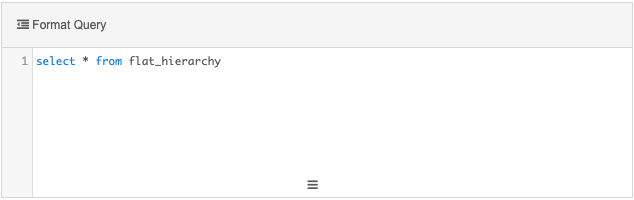
Transformation Query section - Add a simple query to return all of the data from the flat_hiearchy table.
select * from flat_hierarchy
-
Save the transformation query.
Create a target subscription
Create a new target subscription and configure it so that no files are exported; only the custom table is created.
Key details:
-
General Export Options section - Accept the default setting values in this section.
-
File & Field Selection section - Choose the Export None export option. This sets all of the objects to Do Not Export.
-
Transformation Queries section - Add the transformation query to the source subscription.
-
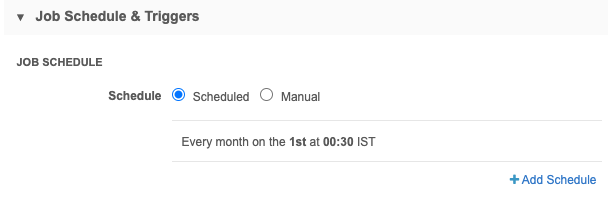
Job Schedule & Triggers section - Schedule the job to capture snapshots of the flat_hierarchy reporting table. For example, schedule it to run quarterly or monthly.
-
Job Details - After the job runs, the Transformation Queries section on the Job Details page displays the custom table and number of records that were processed.

Click View Query to open a dialog that contains the original transformation query.
Review the custom table in the SQL Query Editor
The Shared Tables section contains the custom table that was created by the job.
Expand the table to see the metadata; the subscription name and Job ID that created the table and the transformation query name.
![]()
You can add the table to a query to return the results from the flat_hierachy table for this date.
To review the original query, hover over the custom table and click the Copy Source Query to Clipboard icon. Paste the query to the SQL Query Editor box.
![]()
Result
Each time the target subscription runs, it will create a custom table with a timestamp. Use the custom tables to compare the data between different time periods.
![]()
Example 2 - Prevent intermediate files in subscription packages
Some target subscriptions might include multiple transformation queries that run in sequence. For example, the first query runs and produces the results that are read by a second query. Each time a query runs, an output is generated. When a query produces an intermediate result set, choose Custom Table as the query output type instead of CSV File to ensure that the data remains in Network MDM as a custom table and unnecessary files are not exported.
Process
-
Create a transformation query that is configured to create a custom table.
-
Create another transformation query that will read the results of the first transformation query. Configure the query output as a .csv file that will be exported.
-
Create a target subscription that will export the .csv file created by the second transformation query.
Create transformation queries
In this example, we'll create two transformation queries to export HCP data. The output of the first query will be read by the second query.
Query 1
Key settings in the transformation query configuration:
-
Details section - Choose Outbound as the Query Type.
-
Query Output section - Define the following settings:
-
Choose Custom Table.
-
Define a Table Name and Table Description.
-
Table Name Options - Choose Static table name. Each time the query runs, the table will be replaced.
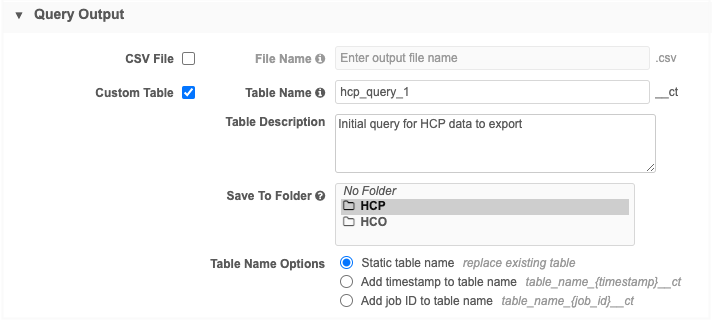
-
-
Transformation Query section - Add the query that will generate the results that will be read by Query 2.
Example query
This query will return all HCPs that are doctors.

Query 2
This is the query that will return the results that we want to export.
-
Details section - Choose Outbound as the Query Type.
-
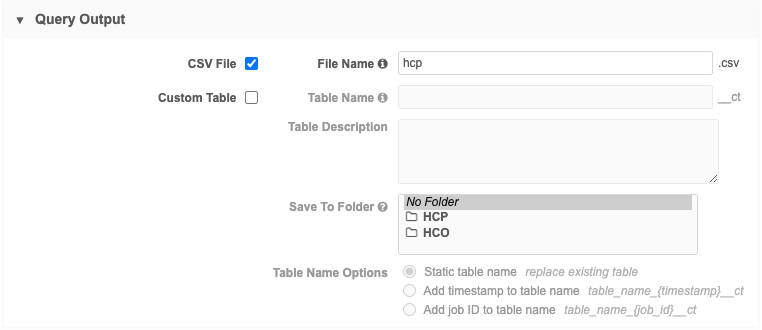
Query Output section - Define the following settings:
-
Choose CSV File.
-
Define a Table Name and Table Description.
-
-
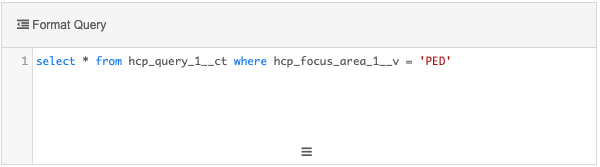
Transformation Query section - Add the query that will read the results from Query 1.
Example query
This query reads from the custom table output of Query 1 to return all HCPs that are doctors and whose focus area is pediatrics.
Create a target subscription
Create a subscription and configure it so only the HCP object and fields are exported.
Key details:
-
General Export Options section - Configure the settings as you would typically do for an HCP export.
-
File & Field Selection section - Choose the Export None export option. This sets all objects to Do Not Export.
Then, choose Select Which Objects and Fields to Export and set the Health Care Professional object to Export All Fields or Export Some Fields depending on your data.
-
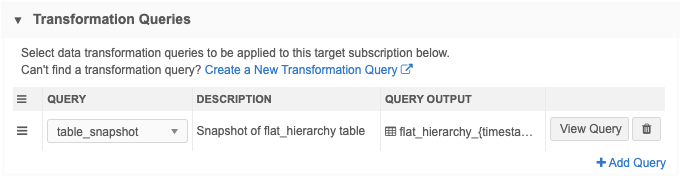
Transformation Queries section - Add both transformation queries to the target subscription.
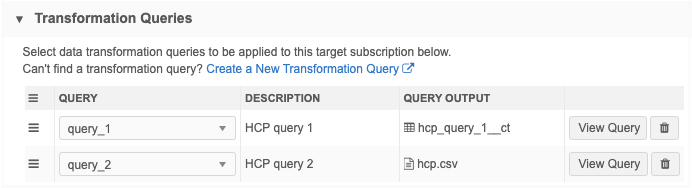
-
Job Details page - After the job runs, both queries are listed in the Transformation Queries section on the page.

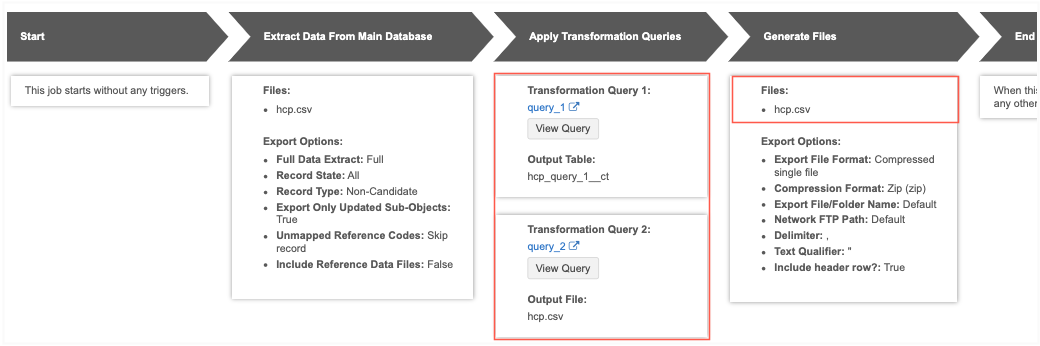
-
Data flow view - The Generate Files section confirms that each query generated output, but the only file that will be exported is the hcp.csv output file from the second query.
Review the custom table in the SQL Query Editor
The custom table created from the first query is saved to the Shared Custom Tables section.
Expand the table name to review the metadata.
This was created as a static table, so it will be replaced each time the target subscription runs.
![]()
Result
Using a custom table as the output of Query 1 ensures that the only file that is included in the export is the data intended for downstream systems.
Example 3 - Post-process source view data
Use transformation queries to process source view files in outbound transformation queries. For example, you can save the exported source data as a custom table so you can report on data lineage.
About source views
Data lineage source views contain field values that are loaded through source files or were added through data change requests. The values may or may not be applied to records depending on your source rankings.
When you export source views in a target subscription, source view files are exported for every object that is exported. Object source files are saved in the export file with a specific file name; for example, hcp_source.csv.
![]()
Example scenario
For this example, we will process the source view data and save the query output as a custom table so we can report on the data lineage information. Data lineage tables are not available through Network MDM Reporting.
To do this, we'll follow this process:
-
Transformation query - Create a transformation query that will save the source file output as a custom table.
We'll create an outbound transformation query that processes the hcp_source.csv source file output as a custom table.
-
Target subscription - Configure a subscription to export source data. Link the transformation query to the target subscription.
-
Report - Use the custom table to query the source view data.
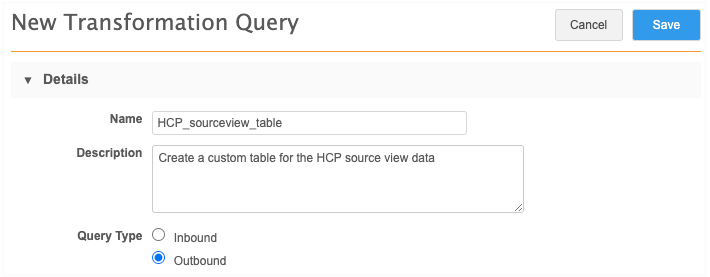
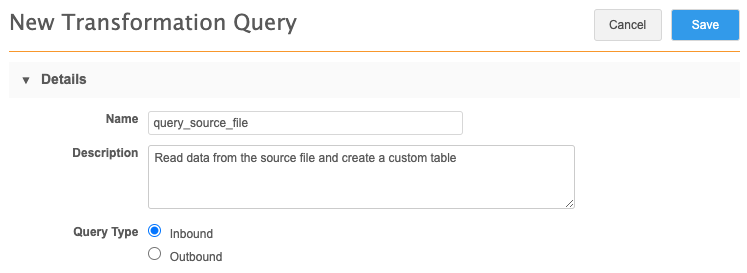
Create the transformation query
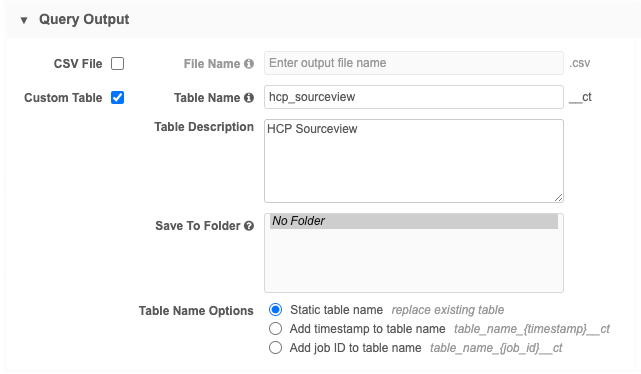
Configure an outbound transformation query that persists the output in a custom table.
-
In the Admin console, click System Interfaces > Transformation Queries.
-
Click Add Query
-
Type a Name and Description.
-
Beside Query Type, choose Outbound.
The Outbound query type will post-process data before it is exported using a target subscription
-
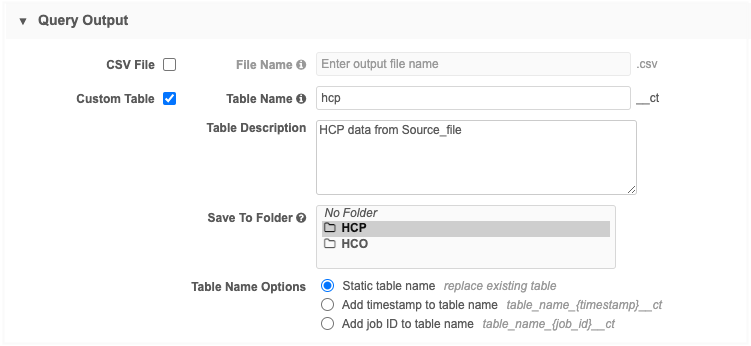
In the Query Output section, select Custom Table.
Note: All output options can be selected if you also want the data in a .csv file or lookup table.
-
Type a Table Name and Table Description.
The table name will automatically be appended with the __ct suffix.
-
Choose the folder where the table will be saved. If you have folders created in the Shared Folders category in the SQL Query Editor, they will display in this list.
Transformation queries cannot be saved to personal folders (My Custom Tables) because the data is exported through subscriptions, which are not applied to users.
-
Choose one of the Table Name Options:
-
Static table name - The table name is always the same, so it means any existing custom table with the same name is replaced each time the query runs. For example: hcp_sourceview__ct.
-
Add timestamp to table name - Append a timestamp to the table name. For example: hco_table_20221102t045341z__ct.
-
Add job ID to table name - Append the subscription job ID to the table name. For example: hco_table_15953__ct
For this example, we will choose Static table name. Each time the target subscription runs, the table will be replaced.
-
-
-
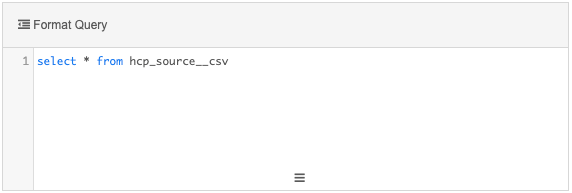
Create the SQL query that will read the source view file .
Example query
select * from hcp_source__csv
Paste the query into the query box.
Create the target subscription
Configure your target subscription to export only the source view data. Link the transformation query to the subscription so the query output saves as a custom table.
-
In the Admin console, click System Interfaces > Target Subscriptions.
-
Open an existing subscription or click Add Subscription to create a new one.
-
Details section - Configure the following settings:
-
Type a Name and Description for the subscription.
-
Type - Choose Data. Transformation queries are not supported for subscriptions that export DCRs.
-
System - Choose the source system.
-
Status - The subscription is enabled by default.
-
-
General Export Options section - Select Include Source Data view in export files to export data lineage information.
By default, all sources that are configured in your environment are selected. Expand the list to clear any sources you do not want to include in the export file.
Important: Select only the sources that you want to report on. Source view files can contain millions of rows (records multiplied by sources). Limit the number of sources to minimize the processing time and to prevent transformation queries from timing out. If there are several sources that you want to process, consider splitting up the source view exports into different target subscription jobs.
For more information about this setting, see Including source data.
Accept the other default settings in this section.
-
Field & Field Selection section - Choosing the Include Source Data view in export files setting enables all of the objects and sub-objects in this section for export.
-
Object Export Options section - Use this section to filter any records you do not want to export.
-
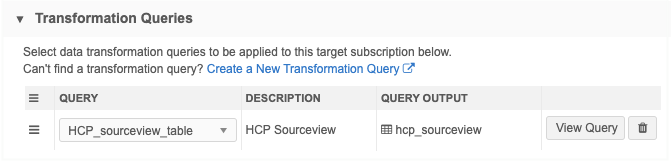
Transformation Queries section - Click Add Query to add the transformation query to the subscription.
The Query Output column lists the custom table that will be created when the job runs. If the file name is truncated, hover over the column to see a tooltip with the complete file names.
-
Job Trigger Configuration - Optionally add a schedule and any emails or jobs that should be triggered for this subscription.
-
Save your changes.
Report on source views
To report on the data in the exported source view, create a query using the custom table.
-
In the , click Reports > SQL Query Editor.
-
Expand the Shared Custom Tables category in the tree view.
Review the metadata (for example, the target subscription name, job ID, transformation query name) and the fields.
-
Use the table or fields in a query to report on the data from those sources.
Example query
select * from hcp_sourceview__ct
![]()
Example 4 - Loading data directly from source subscriptions
You can create custom tables automatically by loading data through subscription jobs.
In this example, we'll configure a source subscription to process a file containing HCP data on our FTP server. The data won't be loaded into the HCP object; it will be loaded into a custom table so we can report on the data to review the potential updates.
About the source subscription process
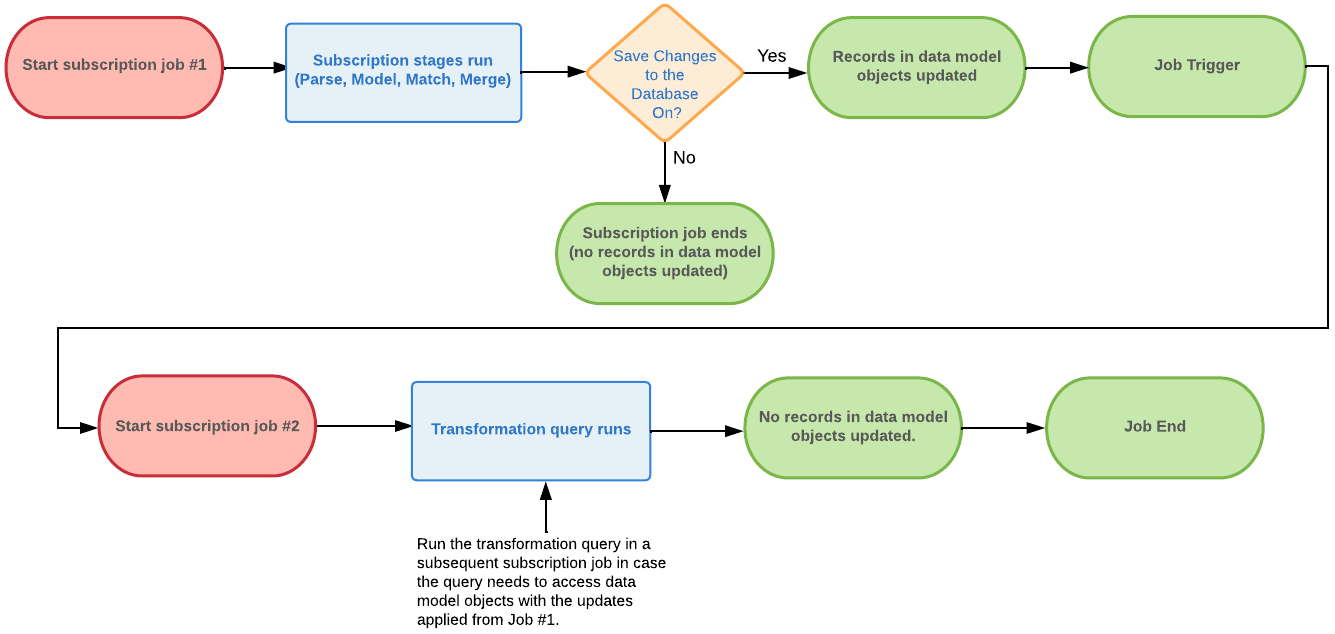
Transformation queries are the first thing that is run in a source subscription. This means transformation queries always run before any changes to Network MDM data model objects are applied.
This is important to know for the following reasons:
-
The transformation query will always be run, even if the job is run in test mode (default) or if the job fails in a later stage. This means the data in the custom table will be updated or replaced.
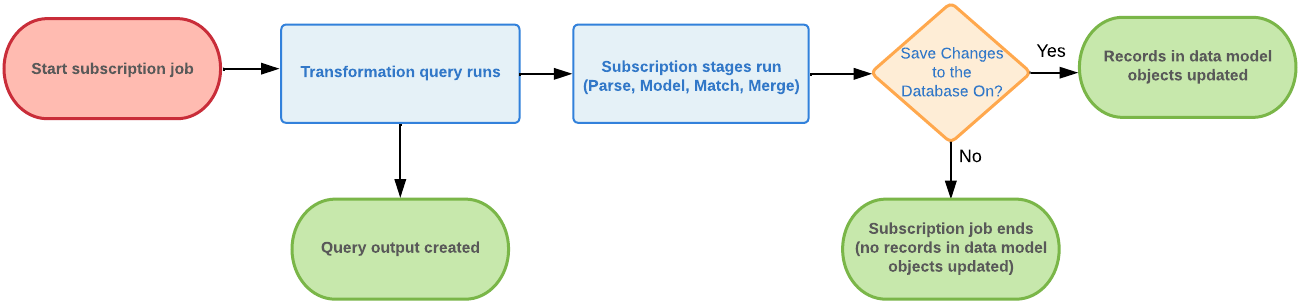
-
Since the transformation query runs first in the job, the custom table is created when the reporting database is in a pre-commit state. This means that if your transformation query accesses any data model objects (for example, HCOs, HCPs, or addresses) using reporting, these objects/tables do not contain the subscription job updates.
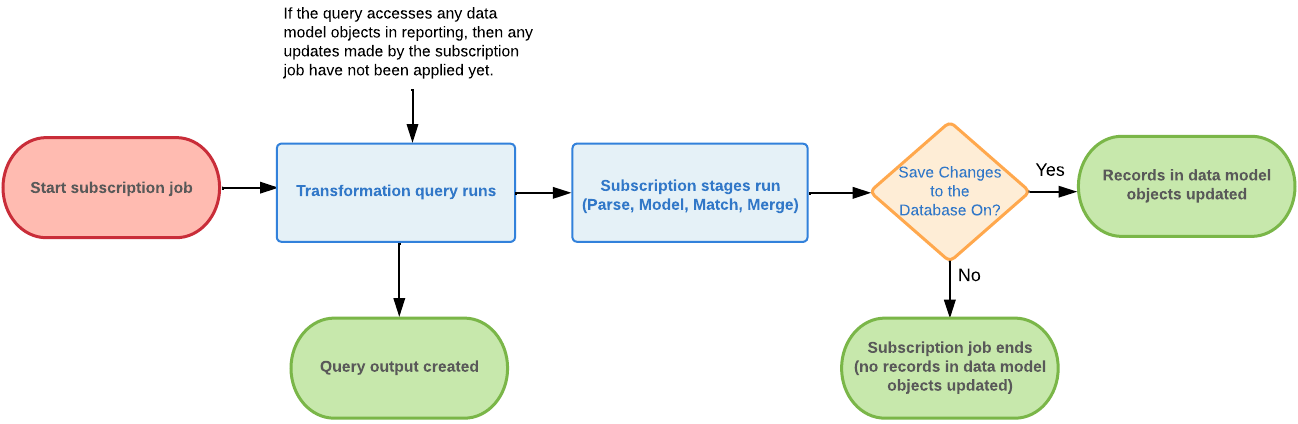
If it is important that the query access the reporting database when it is in a post-commit state (the updates have been made to data model objects from the subscription job), create two subscription jobs.
-
Job 1 (no transformation query) - The job runs and updates the data model objects. A job trigger starts Job 2.
-
Job 2 (with transformation query) - The job runs and creates the custom table containing all of the data model updates from Job 1.
-
Process
-
Create a transformation query that queries a source file (full data load) on your FTP server.
-
Apply the query to a source subscription.
-
Run the source subscription to create a custom table. Each time the subscription runs, the custom table is replaced.
Create a transformation query
Create an inbound query to load data from a source file directly to a custom table.
Key details in the transformation query configuration:
-
Details section - Choose Inbound as the Query Type.
-
Query Output section - Define the following settings:
-
Choose Custom Table.
-
Assign a Table Name and Table Description.
-
Save the custom table to a shared folder in the SQL Query Editor. If there are no folders in the list, it is saved to No Folder (top level of the Shared Folder).
-
In the Table Name Options, you can choose any naming convention depending on your desired outcome.
For this example, we will choose Static table name so the table will be replaced each time the source subscription runs.
-
-
Transformation Query section - Add the query.
Example
Change input_file__csv to the name or alias of the file that the subscription will read from on your FTP server.
select * from input_file__csv
Note: The source file name or file alias (defined in the source subscription) can be used in the query. Using the file alias is recommended.
Create a source subscription
Using Classic Mode, configure a source subscription to load the data into a custom table.
Key details:
-
Job Run Outcome - Accept the default option, Run Job in Test Mode. The source subscription will not be processing the data, it will be loading the data into the custom table only.
-
Settings section - Accept the default values.
-
Source files section - Files that are used by the transformation query must be defined here. Add the source file that contains the data that the query will read from.
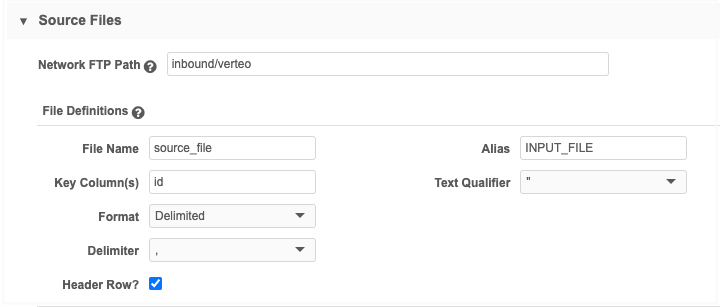
Note: The source subscription in this example does not process any data to be loaded into data model objects, so Field Normalizations, Model Map definitions, Network Expression Rules, and Match Configuration are not required.
-
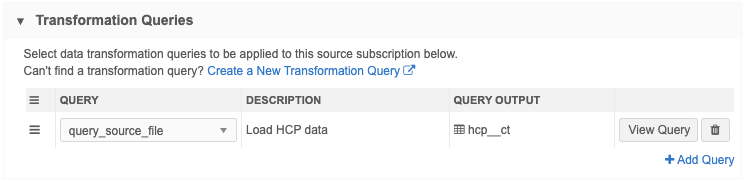
Transformation queries section - Add the transformation query to the source subscription.
-
Job Details page - After the job runs, the Files Loaded Summary and Data Load Summary sections identify the files that were loaded and the rows of data that were read and parsed.
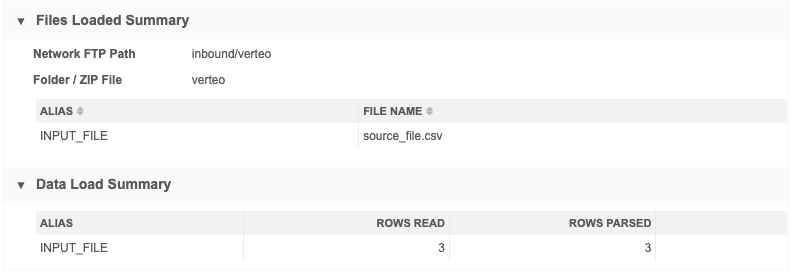
Note: There are no counts for objects listed in the Processed Data Summary, Match Summary, and Job Result Summary sections.
Transformation Queries section - This identifies the query that ran, the custom table name for the output file, and the number of records included in the table.

Review the custom table in the SQL Query Editor
The custom table created by the source subscription is available in the Shared Custom Tables section.
-
Expand the table name to review the metadata.
-
Add the table to a query to review the data that was loaded.
![]()
Result
There are three HCP records in the custom table.
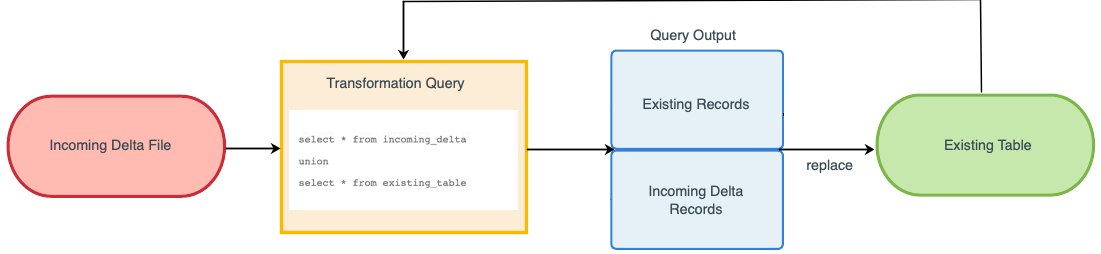
Example 5 - Upserting or appending delta data to a custom table
Example 4 describes the process for creating a custom table using full data loads. Because we created a custom table with a static table name, the table will be replaced each time the subscription runs.
You might want to make regular updates to the custom table. Instead of manually updating the custom table, you can schedule a source subscription to update the table using transformation queries.
There are two ways to update an existing custom table:
-
Upsert data - Add new records and update changed records.
-
Append data - Add new records only.
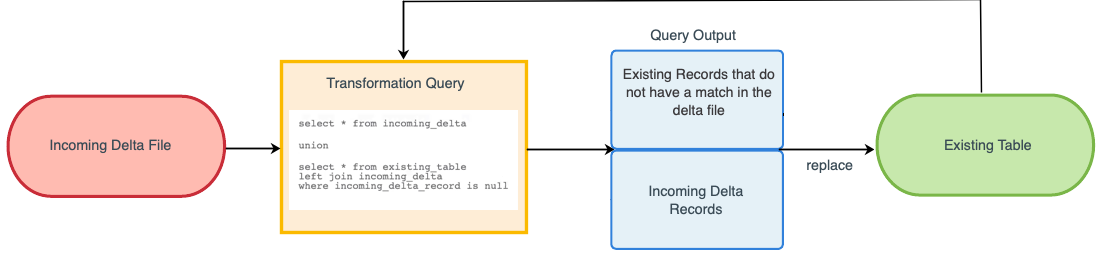
The custom table will be replaced, but the transformation query can union the two data sets from the incoming delta file and the existing custom table.
Upsert data example
We can create a transformation query to update the custom table (hcp__ct) that we created in Example 3.
To add new records and update changed records in the existing custom table, you can load a delta file. Create a transformation query that will union the incoming records from the delta file with the existing records in the custom table.
Use a LEFT JOIN and a WHERE clause to remove any existing records in the custom table that match on the same ID in the incoming delta file.
Important: There must be an ID in the file and table so you can reliably join the two data sets. Any record where there is a matching ID will be taken from the file (and not from the table) and will overwrite the matching record in the table.
Example query
SELECT
        id,
        first_name,
        last_name,
        specialty
    FROM
        source_file_delta__csv
UNION
SELECT
        hcp__ct.id,
        hcp__ct.first_name,
        hcp__ct.last_name,
        hcp__ct.specialty
    FROM
        hcp__ct LEFT JOIN source_file_delta__csv
            ON hcp__ct.id = source_file_delta__csv.id
    WHERE
        source_file_delta__csv.id IS NULL
Results
The existing custom table, hcp__ct, had three records.
![]()
The source_file_delta__csv had a new record and one changed record.
![]()
After the subscription runs, the transformation query joins the data from the existing hcp__ct custom table with the data from the source_file_delta.csv file.
The existing hcp__ct custom table is replaced with the new hcp__ct custom table and contains the joined data.
![]()
Append example
To append a delta file to a custom table, the transformation query should simply union the incoming records from the delta file with the existing records in the custom table. An append means that all records from the incoming file are added to the data in the existing custom table.
Important: Ensure that the incoming delta file includes only new records and no changes to existing records; otherwise, the custom table will have duplicated records.
Example query
SELECT
         id,
         first_name,
         last_name,
         specialty
     FROM
         source_file_delta__csv
 UNION
 SELECT
        id,
        first_name,
        last_name,
        specialty
    FROM
        hcp__ct
Results
The existing custom table, hcp__ct, had three records
![]()
The source_file_delta__csv had two new records.
![]()
After the subscription runs, the transformation query joins the data from the existing hcp__ct custom table with the data from the source_file_delta.csv file.
The existing hcp__ct custom table is replaced with the new hcp__ct custom table and contains the joined data.
![]()
Exporting queries to target environments
Transformation queries can be exported to a target environment through Configuration Export or Import jobs. .
If you import queries into a target environment, Network MDM will try to use the same shared folder if it is found in the target environment to create the custom table. If the shared folder does not exist, the custom table is saved to the root level of the Shared Folder.
Dependencies
When you export transformation queries, source subscriptions and target subscriptions are not automatically added to the export package. They must be manually added.
For more information about creating export packages, see Exporting configurations.