Create an ad hoc match
DM
DS
ST
Use the Ad Hoc Match feature to match an external source, such as a marketing campaign list, to the data in Network MDM without persisting the data.
The match report produces high confidence matches that you can export along with your original source data.
Supported objects
-
HCPs and HCOs
Custom objects are not supported.
Required permissions
The ad hoc match feature is available for all Network MDM users if the required permissions are set on your data visibility profile (DVP)![]() A user-assigned profile that contains permissions and the profile layouts that are used when viewing HCP or HCO records. (DVP). Administrators must set the permissions.
A user-assigned profile that contains permissions and the profile layouts that are used when viewing HCP or HCO records. (DVP). Administrators must set the permissions.
The following DVP permissions are required:
- Ad hoc match - At least one DVP for a user must be set to True so Ad Hoc Match displays on the .
-
Data Read-only access - Must be set to False to create new match jobs. The Match New File button does not display for read-only users.
If at least one DVP for a user has this permission set to True, the Match New File button does not display on the Ad Hoc Match page.
These permissions must be set for each data visibility profile assigned to your user account.
Before you begin
To create an ad hoc match, create a .csv file containing the records you want to match.
Only data that exists in your file and that is included in the ad hoc match rules are used in matching. If there's a match rule for a field but that field isn't in your file, no matching is done using that field. For example, if there is no NPI field in your file, NPI numbers are not considered for matching. Similarly, if there's data for a field in your file but that field isn't listed in the match rules, no matching is done using that field.
Match a file
-
On the Network menu bar, click Ad Hoc Match.
-
On the Matched Files page, click Match New File.
-
On the Match New File page, select the type of records in your file: Health Care Professionals (HCPs) or Health Care Organizations (HCOs).
-
Select the country that applies to the records for this job. The countries are listed alphabetically.
An option to Match against OpenData might display. This enables you to match against OpenData records that have not been downloaded to your Network MDM instance. This option displays only when all of the requirements are met.
 Match against OpenData requirements
-
You subscribe to Veeva OpenData for all records in that country. If you subscribe to only a sub-set of records in the country, this option is not available.
Note: Match against OpenData is not available for OpenData subscriptions for China.
- The setting to ad hoc match against Veeva OpenData is enabled in your Network MDM instance. Contact Veeva Support to enable the feature.
-
The Search OpenData setting is enabled in the Admin console (Settings > General Settings) for your Network MDM instance.
- In your data visibility profile, the Ad Hoc Match and Ad Hoc Match Against OpenData permissions are enabled.
Administrators can enable an additional setting so the match process continues to look in the Veeva OpenData instance for the best possible match, even if a match has been found in your Network MDM instance.
-
- In Step 3, add a description of your file. The description displays on the Matched Files page and is helpful for identifying your match job.
- Upload your file. The file must be in .csv format and contain 10,000 rows or less.
-
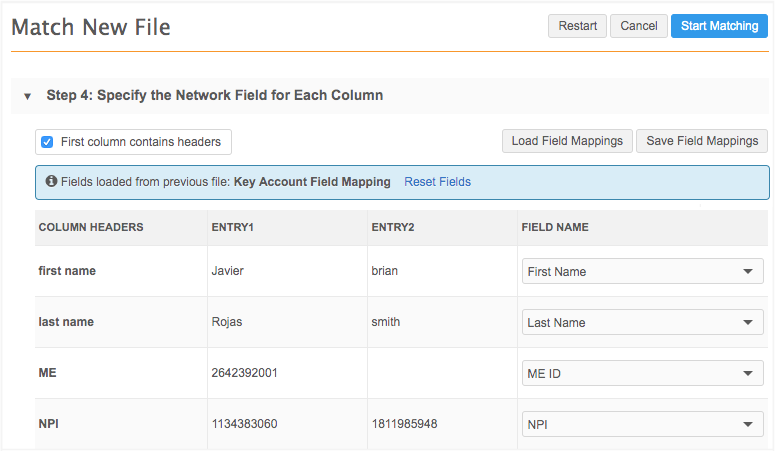
In Step 4, map Network MDM fields to the columns in your file.
- If you have previously created ad hoc match jobs and have field mappings saved, click Load Field Mappings and select the mappings that you want to use for this job. An informational message displays with the name of the saved file. Click Reset Fields to remove the field mapping.
-
To create new mappings, use the Field Name column to select the field that maps to the data in each row.
The Primary Country field is no longer available to map to incoming fields. The country is already selected earlier in the ad hoc match configuration, so the field is removed from the field mapping to avoid negatively impacting the match outcome.
If your saved mappings include the
primary_country__vfield, that mapping no longer displays. - To save the mappings from this job, click Save Field Mappings. In the Save Field Mappings dialog, you can overwrite existing mappings or create a new mapping.
Select First column contains headers if the Entry 1 column contains headers from your external file. The table updates to identify that data as Column Headers and the data will be ignored during the match job; it will not impact the job.
-
In Step 5, select the fields that you want to export in the match file for each object type. You can also order the selected fields.
All of the object types contained in your external file display in the table. The Fields Selected column displays the field names that will be exported. If there are many fields selected, a count of any fields that could not be listed also displays. Click the Edit icon to view the additional fields.
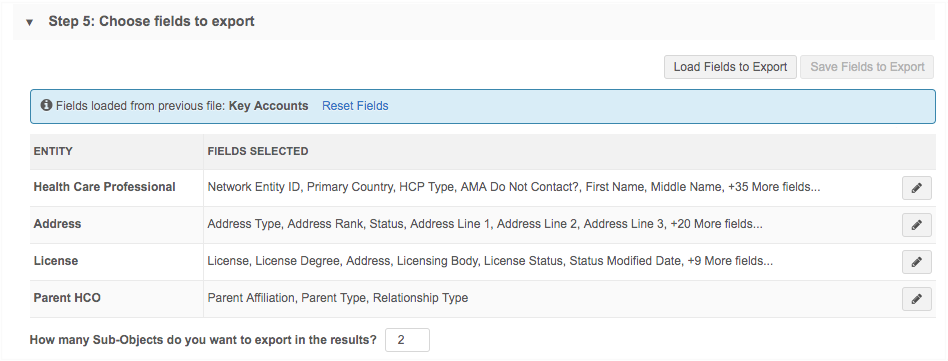
- To select field selections that you have saved from previous ad hoc match jobs, click Load Field to Export and select the saved fields that you want to use for this job. An informational message displays with the name of the saved file. Click Reset Fields to remove the saved fields.
-
To select or update fields, click Edit to display the Field Selection and Order dialog for that object.
The dialog contains the available fields and selected fields. Custom fields are included.
-
Move any fields between the Available Columns pane and the Selected Columns pane using the directional arrow buttons in the middle.
- To reorder the fields in the Selected Columns pane, highlight a field to display the directional arrow buttons. Use the buttons to move the field into the desired position. You can also use the handle
 to move the field.
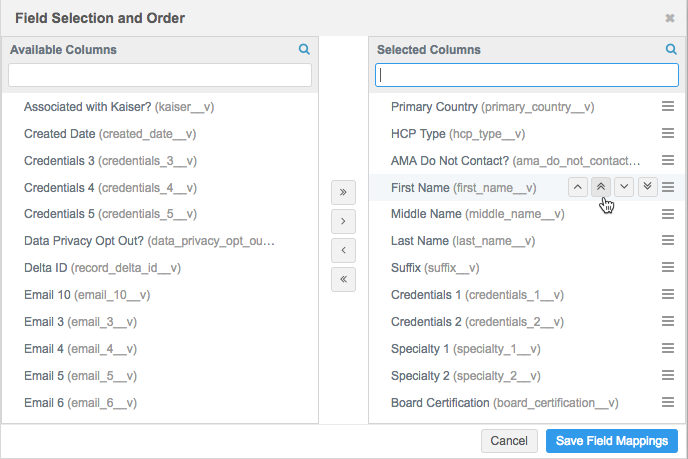
-
Click Save Field Mappings to close the dialog.
-
- To save your field selections and ordering so you can use it for future ad hoc match jobs, click Save Fields to Export. In the dialog, you can choose to overwrite an existing configuration or create a new one. The next time you create an ad hoc match, you can load the saved field configuration using the Load Fields to Export.
-
Specify the sub-objects to export in the results.
By default, two objects for each object type are exported; for example, two addresses, two licenses, and two Parent HCOs will be exported. You can select a maximum of 15 objects for each object type; however, if there are only five objects, only five will be exported.
Network exports the objects based on the Network ID in ascending order.
- Click Start Matching to run the ad hoc match job.
View the match result
When the job completes, in the Match Result column on the Matched Files page, click the Download Match link to save the exported file to your local computer.
The ad hoc match file contains the fields that you selected in the order that you defined.
Match Status column
- Match Found - Confident match to a Network MDM record. Each row with this status includes data from the matched Network MDM record.
- Ambiguous Match - Possible match to a Network MDM record, but not a high confidence match. This indicates that the incoming record matches at least one Network MDM record, but none of the matches had a solid confidence rating. Network MDM data is not shown for these records.
- No Match - There is no match to any Network MDM records. These records did not match any Network MDM record with any confidence. Network MDM data is not shown for these records.
Match Source column
-
Local - Matches that occurred within your Network MDM instance. This includes locally managed, Veeva OpenData managed, and third-party master records.
-
OpenData - Matches with records that are in the Veeva OpenData master instance and have not yet been downloaded to your Network MDM instance.

Note: When the Match Against OpenData option is enabled, if you include an OpenData record in your input file and it has been unsubscribed in your Network MDM instance, it will be found as a Local match in the Match Source column in the exported match file. It will not be identified as an OpenData match because the record exists in your Network MDM instance. For more information about unsubscribed records, see Unsubscribing from OpenData records.
Opted out records
If a match is found to an opted-out record using key matching, field values can be masked or blanked in the match log.
For details, see Data Privacy opt out.
Ad hoc match configuration
If an incoming record matches to a record that doesn't seem accurate, notify your Network MDM administrator.
Administrators can examine the match rules used by ad hoc match and tweak them accordingly.
Sort order for exported sub-objects
When you create an ad hoc match file, you can configure the number of sub-objects that you want to export in the results. The rules that determine which sub-objects are exported ensure that the most relevant ones are included in your results. There are specific sorting rules for each sub-object type.
The addresses that are included are determined using the following sort order:
- Ordinal (
address_ordinal__v) - In ascending order (highest (1) to lowest). - Status (
address_status__v) - Active (A) before Inactive (I). - Type (
address_type__v) - Sorted in the following order:- Professional (P)
- Professional and Preferred Mail (B)
- Mail Only (M)
- Address (U)
The licenses that are included are determined using the following sort order:
- Best state license (
best_state_license__v) - Records with this field set to Y followed by licenses with this field set to any other value. - Status (
license_status__v) - Active (A) before Inactive (I) before Status Unknown (X). - Most recently modified licenses (
modified_date__v)
The Parent HCOs that are included are determined using the following sort order:
- Status (
parent_hco_status__v) - Active (A) before Inactive (I). - Most recently modified Parent HCOs (
modified_date__v).
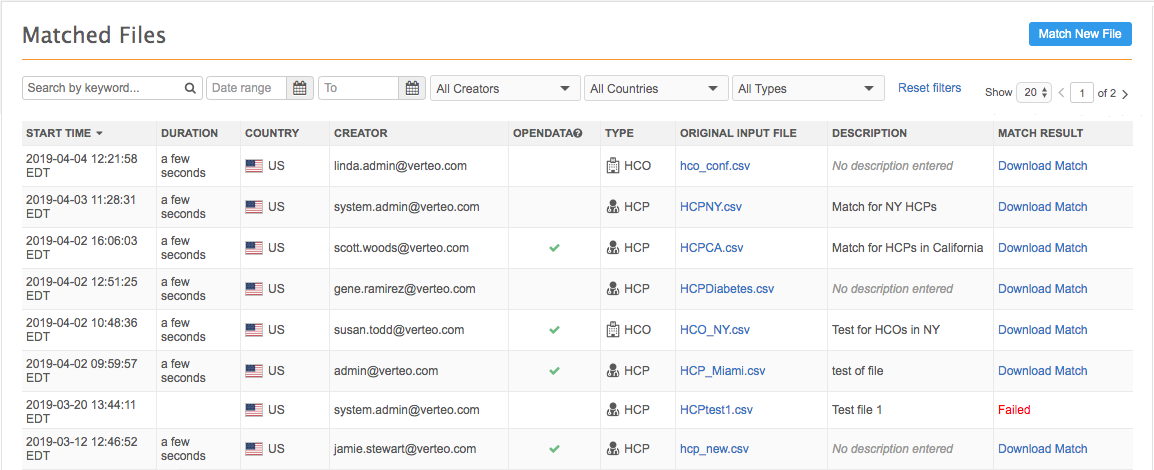
View all match jobs
The Matched Files page displays information about each of your match jobs and provides a link to download the input file that you used for each match job. Only the jobs that you submitted display on the page.
System Administrators can view the jobs for any users in their Network MDM instance that share the same data visibility profile. This allows administrators to support users with their ad hoc match jobs. System and Data Admin users currently do not have access to view the ad hoc match jobs of other users.
Table columns to note:
- Country - Use this column to easily find jobs that you created for specific countries.
- Creator - (Administrators only). Identifies match jobs by user.
- OpenData - A green checkmark in this column indicates that you chose to match against the Veeva OpenData database during the match job. An empty column indicates that the option wasn't available, or wasn't used.
- Original Input File - The file name for the external data that you used in the ad hoc match job. Click the link to download the file to your local computer. This is helpful for investigating previous jobs.
- Description - This column displays the description you provided for the match job or "No description entered".
- Match Result - Download the exported ad hoc match file to your local computer.
Filter matched files
Administrators can view ad hoc match jobs submitted by all other users in the Network MDM instance that share the same data visibility profile. This includes inactive users in case administrators need to investigate jobs by those users. If your data visibility profile changes and you can no longer view records for a country, the ad hoc match jobs for the country no longer display on the Matched Files page.
To easily find specific jobs, you can filter the table using the following methods:
- Search - Find a job using a keyword; for example, search for a term in the file name. The search function applies to the jobs displayed on the current page only; 20 jobs display by default.
- Date - Define a data range. This filter applies to all of the jobs you have access to view.
- Creator - Filter the table by user. All creators are listed by default. (Administrators only).
- Country - Select a country in the list. All countries that you have access to through your data visibility profiles (DVPs) display by default. Changes to your DVP might alter your list, but not the list seen by an Administrator.
- Type - Filter the view for HCP or HCOs. Custom objects are not supported for ad hoc match. All types are listed by default.
Use the Reset filters link to return to the default view that displays all of the jobs available to you through your data visibility profile.
Logs
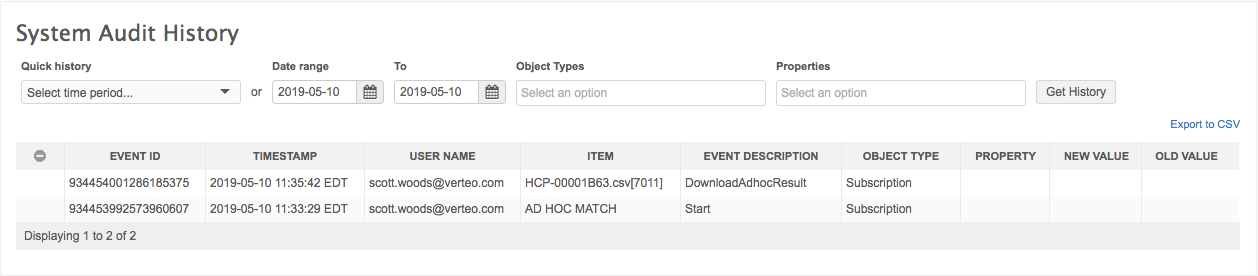
All ad hoc match actions are tracked in the System Audit History log. Administrators can view when the actions occurred and by which user.
Logged actions:
- running jobs
- downloading input files
- downloading match results
- deleting jobs