Drill down by entity group
DM
DS
When you drill down by entity group![]() A way to group results (similar to HCPs or HCOs) for data quality analysis; for example, hospitals in France, Nurses in Germany, or MDs in the EU., you can edit the entity group query and see detailed results for all test cases
A way to group results (similar to HCPs or HCOs) for data quality analysis; for example, hospitals in France, Nurses in Germany, or MDs in the EU., you can edit the entity group query and see detailed results for all test cases![]() A quality report that identifies a single problem or symptom of poor data quality; for example, a list of active HCPs without active addresses. for the selected entity group.
A quality report that identifies a single problem or symptom of poor data quality; for example, a list of active HCPs without active addresses. for the selected entity group.
From the Data Quality Reports dashboard, click an entity group heading in the results.
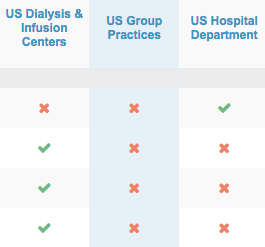
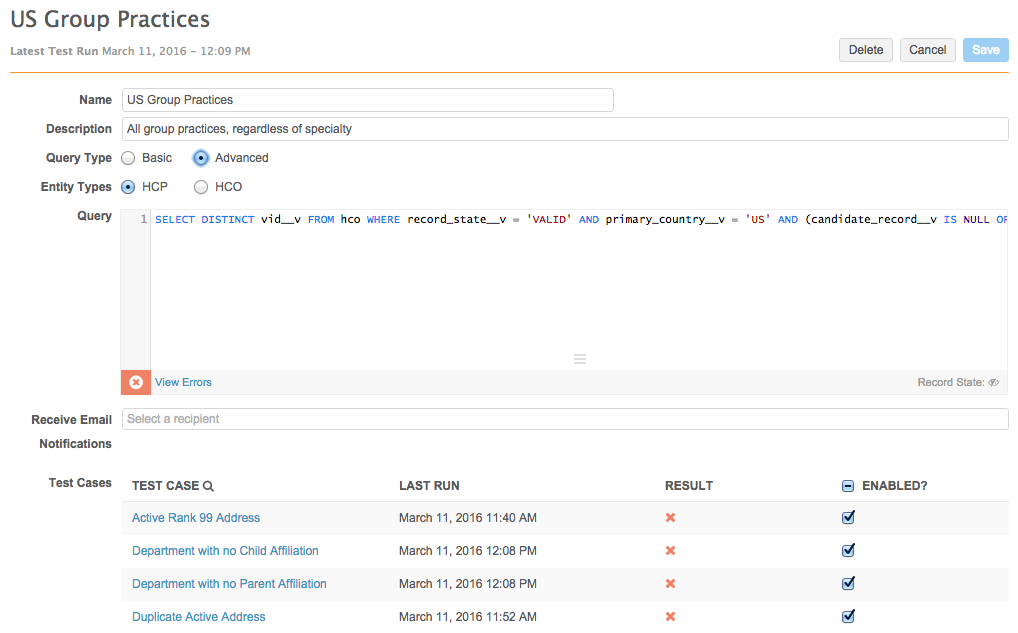
The entity group page displays the query editor containing the query that defines the entity group, as well as a list of the test cases and their corresponding results.
From the entity group page, you can perform the following actions:
- Define the name, description, entity type, and query for the entity group.
- Add users to receive email notifications for the entity group.
- Drill through to test cases.
- Enable test cases to run for the entity group.
- Add test cases to run for the entity group.
- Customize or add language translations.
Create or update the entity group query
Entity groups enable you to group report results (for example, by country and entity) so that test cases can be used globally, without additional modification.
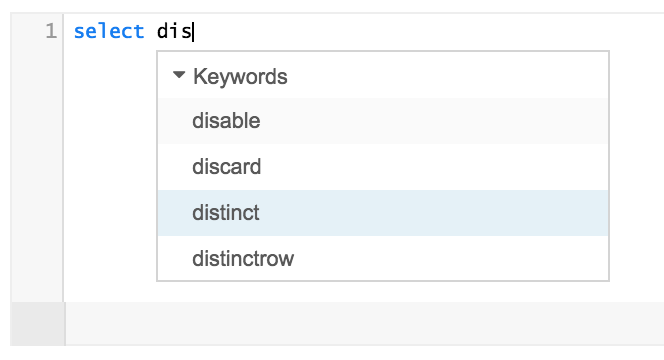
The query editor used for editing entity groups includes the same functionality as the SQL Query Editor in Network MDM Reports. The query editor offers tools for auto completion, as well as easy access to quick lists of available keywords, tables, fields, and operators. As you construct your query, the editor automatically validates it.
Rules for defining entity groups
When you add or update an entity group, the following rules apply:
- SELECT statements must include
vid__vandis_veeva_master__v - The DISTINCT clause is required
- UNIONS are only allowed in sub-queries
- No semicolon at end of the query
For example:
SELECT DISTINCT vid__v
FROM hcp
WHERE hcp_type__v = 'O'
Add or update a query
If you are updating an existing entity group, from the Data Quality Report dashboard, select an entity group from one of the columns in the test case results table. The entity group page appears with the defined query and list of test cases.
If you are creating a new entity group, from the Data Quality Report dashboard, click the + (add) button at the top right of the page and select Entity Group.
Tip: If you are creating an entity group that is similar to an existing group, clone the existing group. Entity groups contain many test cases, so cloning an existing group enables you to create a group more easily without having to add all of the test cases. To clone, select an entity group and click Clone.
The entity group page appears with the list of test cases and results. By default, all test cases are enabled for the new entity group and the query mode is set to basic.
- Type or edit the name and description for the entity group.
- Select HCO or HCP as the Entity Types.
- The Query Type should be Basic by default. If it is not, select the Basic radio button.
- Click each of the HCP Type, Countries, and Medical Degrees (or Major Class of Trade for HCOs) fields to refine the entity group.
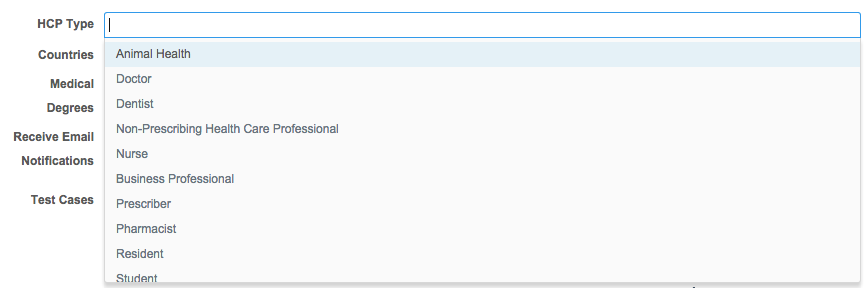
You can begin typing to refine the values in the drop-down list. Select a value to add it to the field and click the field to open the drop-down list and add more values. You can remove a value by clicking the x to the right of the value.
- Skip to the Email notifications and Manage test cases sections to add email notifications and enable or disable test cases.
Note that you can click Delete at the top right of the page to delete the test case. A confirmation dialog appears before the test case is deleted.
Create an entity group in advanced mode
To add or update the entity group query in advanced mode:
- Type or edit the name and description for the entity group.
- Select the Advanced radio button. The query editor appears on the page.
- Select HCO or HCP from the Entity Types radio buttons.
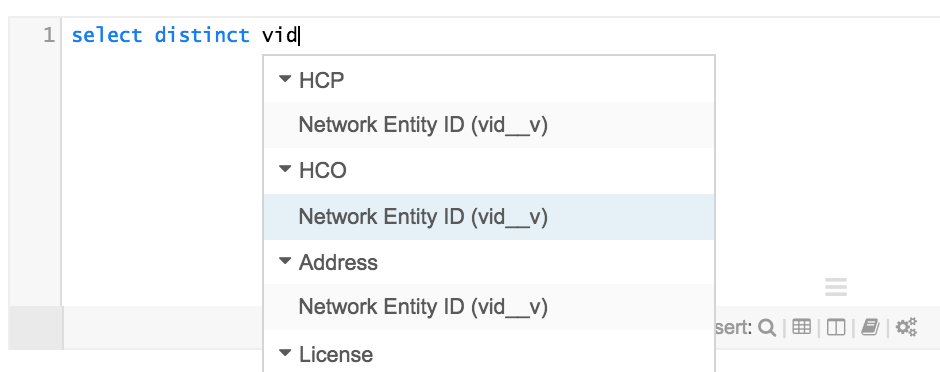
- Begin typing your SQL code in the text area. While you type, you can press Control-Space to display auto complete options for keywords, tables, fields, and operators. Double-click a selection in the drop-down list to use it in your code.
Note that as you type, an icon appears to the lower left indicating whether your code is valid. See the Validate the query section for information on automatic query validation. - Click the corresponding links at the bottom of the text area to view valid keywords, tables, fields, reference data, or operators.
View or hide invalid records
The Record State icon at the bottom right of the editor, by default, is set to hide any records with a state of INVALID, DELETED, or MERGED_INTO from the results. You can choose to display these records in your results by clicking the icon. When these record states are unhidden, the Eye icon appears open. You can click the icon again to hide these record states.

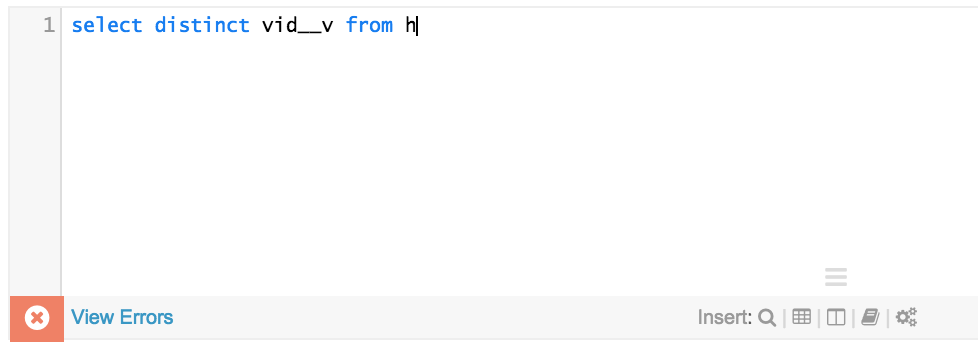
Validate the query
As you type your query, an icon appears to the lower left indicating whether or not your code is valid. Note that until you finish complete sections of code, the icon will appear as an x.
Once you have completed a successful section of code, it should appear as a check mark, indicating that the code is valid.

If your code is not validating successfully, you can click the View Errors link next to the x icon to see the errors in your code.
Note that if you leave this option enabled, the error messages will resolve as you fix the code, and re-appear as you type additional code, until the code is complete and valid. You can click the Hide Errors link next to the x icon to hide these messages. Note that some validations only occur after you’ve saved the code.
Once you have completed your code and it validates successfully, the green check mark icon will re-appear in the lower left corner.
Define languages
Reports and report emails are now displayed in a user’s preferred language, for all languages currently supported in Network MDM.
For other languages (as well as those already translated), you can customize or add translations at the bottom of the Test Group page.
