Outbound transformation query examples
DM
Review these examples to understand how data transformation queries can be used to reconstruct the data you export.
Examples
-
-
Example 1 - Flatten a product hierarchy
Combine Product, Brand, and Package data into a single file so it can be exported to downstream systems.
-
Example 2 - Concatenate indications
Create an export file that includes Product and Indication data in the same file.
-
-
Loss of exclusivity (LOE) indicator
When Product data is exported, flag products that have become generic.
-
Filter data for data warehouses
Use transformation queries to filter data that is exported to the data warehouse.
-
Transform data for the Veeva Upsert Connector
Product catalog data in Veeva CRM can be managed in Network MDM using relationships. If the relationship is inactivated or invalidated in Network MDM, transform the value of the foreign key field (lookup value) so the records can be properly updated in Veeva CRM.
-
Export data directly from the data warehouse to avoid the export limitations of saved reports.
-
Triggering a report through the Network MDM API
Use a target subscription to execute a report and then retrieve its output in the Network MDM API. It's not possible to do this with a saved report in the API.
Custom table examples
These examples highlight how to load outbound data into custom tables using transformation queries.
See these examples in Creating custom tables using transformation queries.
-
Create snapshots of current data
Use a target subscription to export an object or a table so you can take a snapshot of the current data and use it to compare the data each month.
-
Prevent intermediate files in subscription packages
When target subscriptions include multiple transformation queries that run in sequence, an output is created for each query. To prevent query output from being exported to downstream systems, you can create custom tables as the output of any intermediary queries so that data remains in Network MDM.
-
Use transformation queries to process source view files in outbound transformation queries. For example, you can save the exported source data as a custom table so you can report on data lineage.
Flatten a product hierarchy
The typical data model for a Product Master domain in Network MDM is highly normalized. It could have a different main entity for brand, product, package, and so on, and different sub-objects, for example, for indications.
If you export this data in a target subscription, a separate file is generated and exported for each object type, for example:
-
brand_v__c.csv
-
product_v__c.csv
-
package_v__c.csv
-
indications_v__c.csv
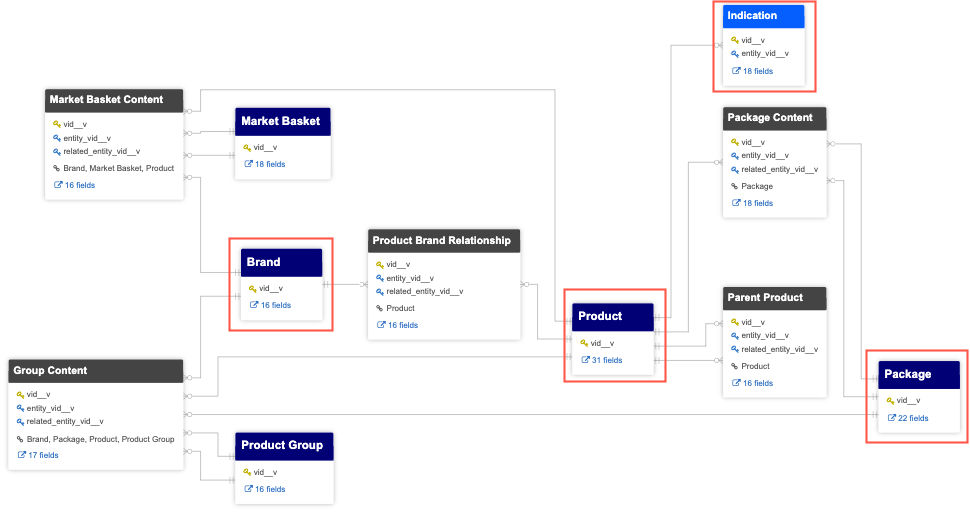
Some downstream systems require a simplified view of the hierarchy. For example, they expect just one output file that contains product, brand, and package data.
Or, for example, a downstream system might require a file that contains product data and indications in the same file with the indications sorted alphabetically in a comma separated list.
Using data transformation queries in target subscriptions, you can join the entity tables so the generated file contains the flattened hierarchy with specific conditions.
Example 1: Flatten the product hierarchy
This example demonstrates how to combine the product, brand, and package data to a single file so it can be exported to a downstream system.
Data transformation query
We'll create a data transformation query that joins the product, brand, and package tables.
Query name - Flatten_Product_Hierarchy
Query description - The query reads from the product_v__c file in the target subscription and then joins the product table with the brand and package tables.
Important: The query reads from the product_v__c export file, so the _csv suffix must be added to that table name whenever it is referenced in the query. If the suffix is not added, the query reads from the product_v__c table in the reporting database.
SELECT
        product_v__c__csv.vid__v,
        product_v_name__c,
        product_v_dosage_form__c,
        product_v_form_strength__c,
        product_v_type__c,
        product_v__c__csv.primary_country__v,
        brand_v_name__c,
        package_v_name__c,
        package_v_type__c
    FROM
        -- join products with their brand and packages
		product_v__c__csv LEFT JOIN product_brand_v_rel__c
            ON product_v__c__csv.vid__v = product_brand_v_rel__c.entity_vid__v LEFT JOIN brand_v__c
            ON brand_v__c.vid__v = product_brand_v_rel__c.related_entity_vid__v LEFT JOIN package_content_v_rel__c
            ON product_v__c__csv.vid__v = package_content_v_rel__c.related_entity_vid__v LEFT JOIN package_v__c
            ON package_v__c.vid__v = package_content_v_rel__c.entity_vid__v
    ORDER BY
        product_v__c__csv.vid__v
Tip: Use table aliases in the query so you only need to add the _csv suffix in one place instead of every mention of a table in the query.
In this example, the _csv suffix is added only once to the product table and the product table alias is used elsewhere.
SELECT
         product.vid__v,
         product_v_name__c,
         product_v_dosage_form__c,
         product_v_form_strength__c,
         product_v_type__c,
         product.primary_country__v,
         brand_v_name__c,
         package_v_name__c,
         package_v_type__c
     FROM
         -- join products with their brand and packages
 		product_v__c__csv product LEFT JOIN product_brand_v_rel__c
             ON product.vid__v = product_brand_v_rel__c.entity_vid__v LEFT JOIN brand_v__c
             ON brand_v__c.vid__v = product_brand_v_rel__c.related_entity_vid__v LEFT JOIN package_content_v_rel__c
             ON product.vid__v = package_content_v_rel__c.related_entity_vid__v LEFT JOIN package_v__c
             ON package_v__c.vid__v = package_content_v_rel__c.entity_vid__v
     ORDER BY
         product.vid__v
Query output file - product_v__c.csv. The target subscription will overwrite the original target subscription file with the new file.
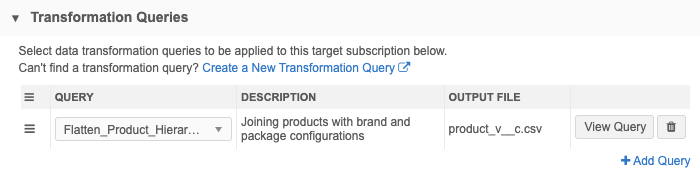
Target subscription
Configure a target subscription and include the data transformation query.
Key settings
-
File & Field Selection section - Set the Product object to Export All Fields.
All other objects should be set to Do Not Export. This tells the target subscription job exports one file: product_v__c.csv.
Tip: To avoid setting each object, choose Export None to set all of the objects to Do Not Export. Then choose Select Which Objects and Fields to Export and set the Product object to Export All Fields.
- Transformation Queries section- Add the Flatten_Product_Hierarchy query.
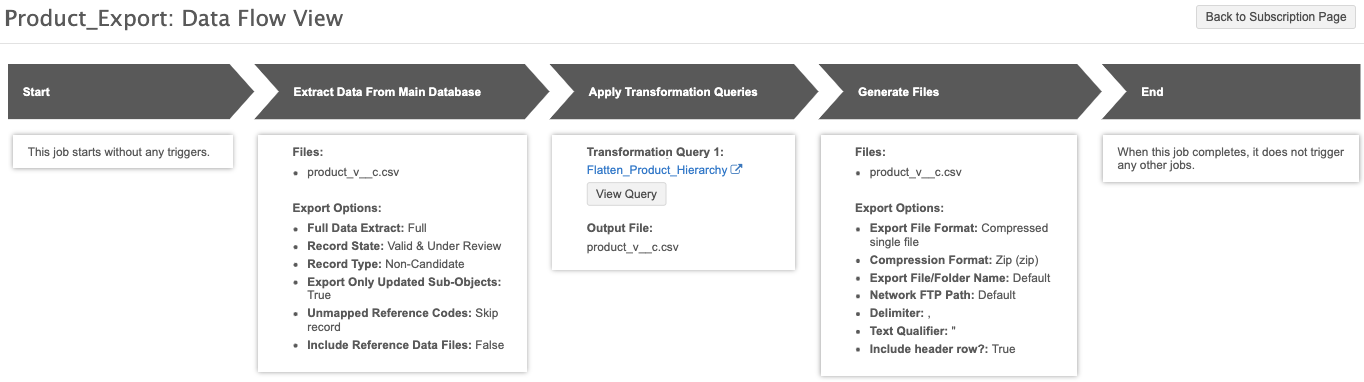
After you save the target subscription, click the Data Flow View thumbnail to view the job flow. You can use this view to verify the files and settings that are used to export the data.
Job details and output
After the target subscription runs, you can review the job details to see the number of records that were exported.
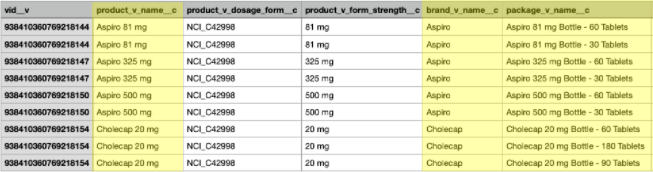
In this example, you can see the total number of Product records that were exported. The output of the query is higher because the brand and package records were joined with the product records in the file that was created by the query.
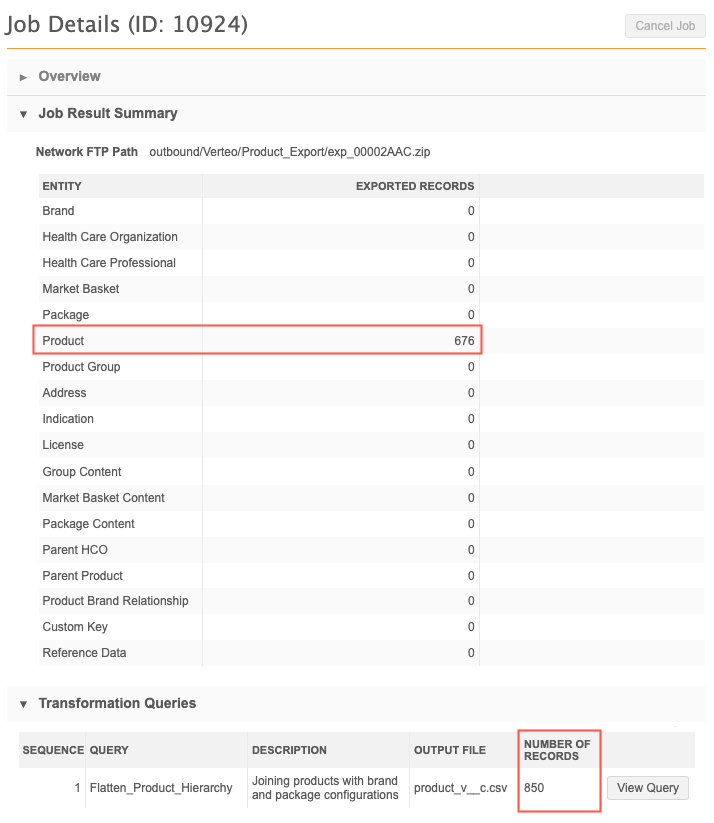
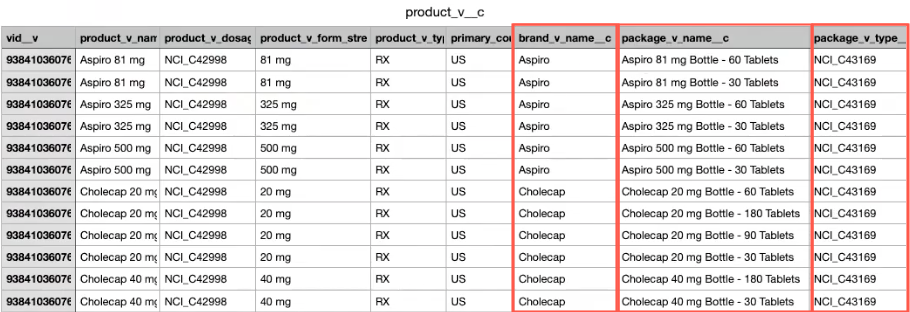
In the file output, we can see that the brand and package data is now included in the product_v__c.csv file.
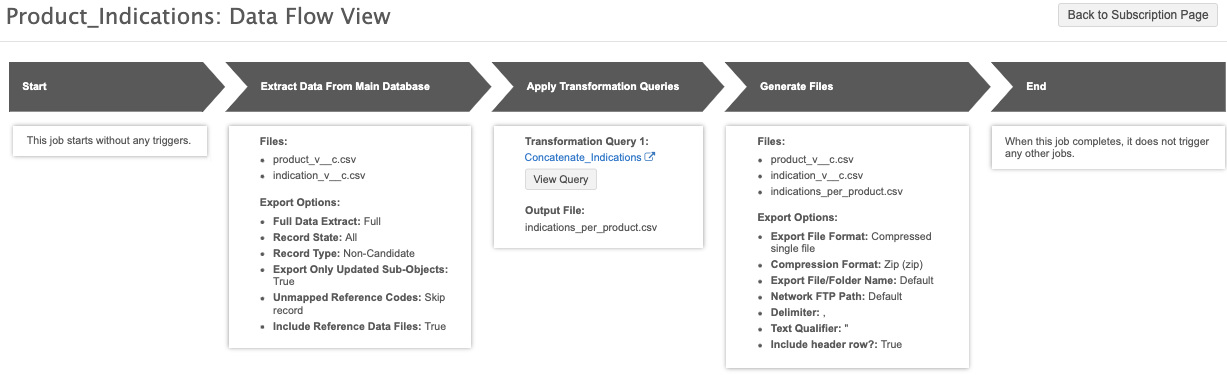
Example 2: Concatenate indications
In this example, we'll create a query and generate a new export file that includes the product data and indications in the same file. The indications will be sorted alphabetically (by their English label) in a comma separated list.
Data transformation query
This query reads from the indication_v__c and product_v__c files. We'll also include the reference_csv file because indications are a reference type. Instead of displaying the reference code, we want to sort the indications alphabetically by their English label.
Query name - Concatenate_indications
Query description - The query first joins the indication_v__c file with the reference_csv file so the output file displays the English indication labels, not the reference code. Then, the indications are concatenated and sorted alphabetically in a comma separated list with the product data in a new export file.
Important: The query reads from the product_v__c and indication_v__c export files, so add the _csv suffix to those tables in the query. If the suffix is not added, the query will read from those tables in the reporting database.
-- join indications with reference file to get English labels
WITH indications AS (
    SELECT
            entity_vid__v,
            indication_v_indication__c,
            en AS indication_en_label
        FROM
            indication_v__c__csv JOIN reference__csv r
                ON indication_v_indication__c = r."Network Code"
        WHERE
            r."Reference Type" = 'Indication_v__c'
)
-- concatenate indications sorted alphabetically
SELECT
        p.vid__v,
        p.product_v_name__c,
        LISTAGG (
            DISTINCT indication_en_label,
            ', '
        ) within GROUP (
        ORDER BY
            indication_en_label
        ) AS indications
    FROM
        indications JOIN product_v__c__csv p
            ON indications.entity_vid__v = p.vid__v
    GROUP BY
        p.vid__v,
        p.product_v_name__c
Query output file - indications_per_product.csv. The target subscription will export this file along with the product_v__c.csv and indication_v__c.csv files.
Using the WITH clause
The WITH clause in SQL creates a table view that exists as long as the query runs. This is helpful to use if you have intermediate outputs, but don't want additional intermediate file outputs in your file package.
In this query, we use the WITH clause to create a table view called indications, which we then join on in the actual query.
If we did not use the WITH clause, we would have to create two transformation queries: one that joins the indications with the reference file, and a second that joins the output of the first query with the products. This would have added another file to the file package (the output of the first transformation query).
Target subscription
Configure the target subscription to export the product_v__c.csv and indication_v__c.csv files. When the data transformation query is injected into the job, a third file, indications_per_product.csv will also be created.
Key settings
-
Reference Data section - Select Include Reference Data Files so the English labels for the indications will be included in the export.
-
File & Field Selection section - Set the Product and Indication objects to Export All Fields.
All other objects should be set to Do Not Export. This tells the target subscription to generate only the product_v__c.csv and indication_v__c.csv files.
Tip: To avoid setting each object, choose Export None to set all of the objects to Do Not Export. Then choose Select Which Objects and Fields to Export and set the Product and Indication objects to Export All Fields.
- Transformation Queries section - Add the Concatenate_Indications query.
After the target subscription is saved, click the Data Flow View thumbnail to view the job flow. We can use this view to verify the files and settings that are used to export the data.
Job details and output
After the target subscription runs, review the job details to see the number of records that were exported.
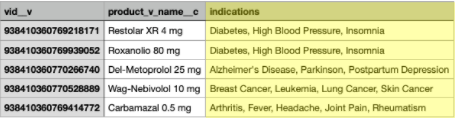
In the Job Results Summary, you'll see the total number of Product and Indication records and the Reference Data that was exported. The number of records in the Transformation Queries section represents the count that resulted from the indications being concatenated with the product data in the new file, indications_per_product.csv.
Output file
The output file includes the products and the indications that are alphabetically sorted in a comma separated list.

Loss of exclusivity (LOE) indicator
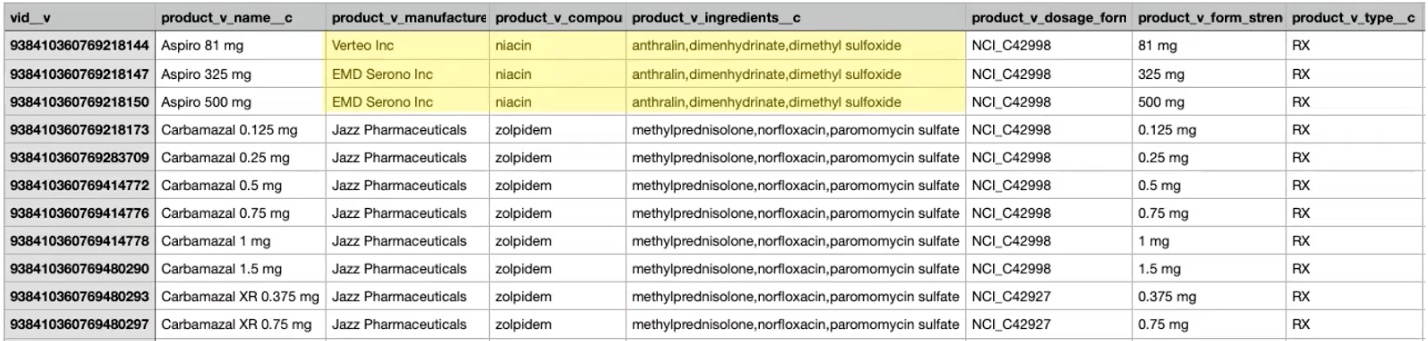
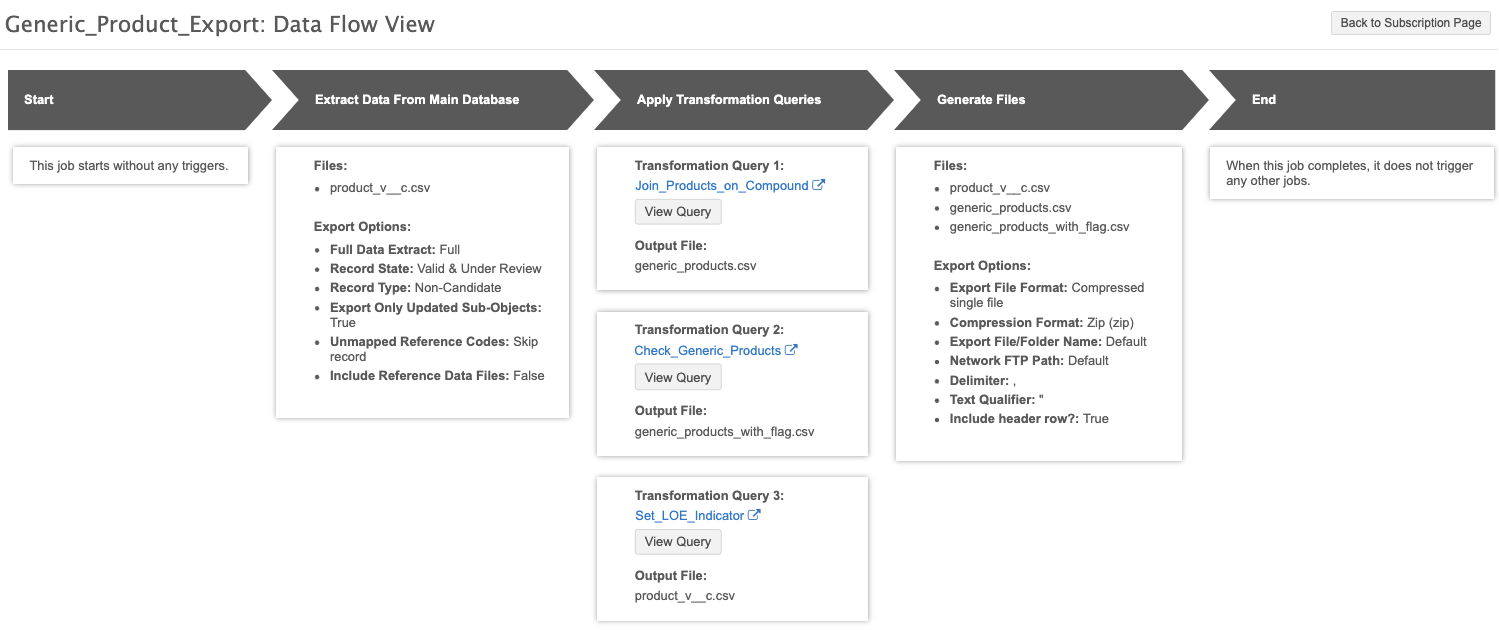
In this example, we're exporting product data to a downstream system, but we want to set a flag if a product has become generic. A product can be identified as generic if it has exactly the same compound and the same ingredients but has a different manufacturer.
The target subscription will export one file: product_v__c.csv. The original product_v__c.csv file will be overwritten by the transformation queries to add a flag to the generic products.
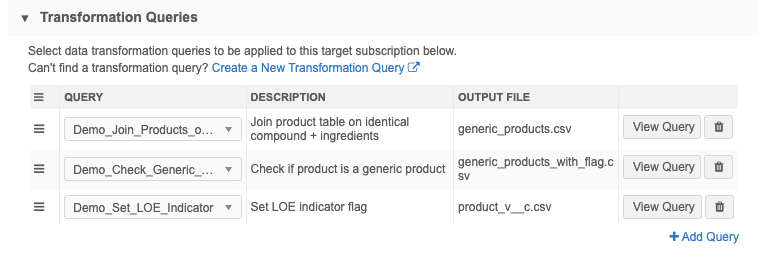
Three queries are required for this use case.
Query 1
Query name: Join_Products_on_Compound
Query description: This query joins the product table with itself to check for other product records from a different manufacturer but with exactly the same compound and ingredients. The output is the list of products that are generic.
Important: The query reads from the product_v__c export file, so add the _csv suffix to that table in the query. If the suffix is not added, the query will read from the product table in the reporting database.
SELECT
        DISTINCT l.vid__v,
        l.product_v_manufacturer__c,
        l.product_v_compound__c,
        l.product_v_ingredients__c
    FROM
        -- join products with products from different manufacturer to check if compound/ingredients is identical
		product_v__c__csv l JOIN product_v__c__csv r
            ON l.product_v_manufacturer__c <> r.product_v_manufacturer__c
        AND l.product_v_compound__c = r.product_v_compound__c
        AND l.product_v_ingredients__c = r.product_v_ingredients__c
Query output file: generic_products.csv.
Query 2
Query name: Check_Generic_Products
Query Description: This query reads from the output file, generic_products, of the first query and joins the generic products with all other products so we have all products in your export.
Important: The query reads from the generic_products output file from the previous query and from the product_v__c export file from the target subscription, so add the _csv suffix to those tables in the query. If the suffix is not added, the query will read from the product table in the reporting database.
SELECT
        product.vid__v,
        product.product_v_name__c,
        product.product_v_manufacturer__c,
        product.product_v_compound__c,
        product.product_v_ingredients__c,
        product.product_v_dosage_form__c,
        product.product_v_form_strength__c,
        product.product_v_type__c,
        generic_products__csv.vid__v AS generic_vid
    FROM
        -- left join all products with generic products to flag products that are generic
		product_v__c__csv product LEFT JOIN generic_products__csv
            ON product.vid__v = generic_products__csv.vid__v
Query output file: generic_products_with_flag.csv.
Query 3
Query name: Set_LOE_Indicator
Query description: The final query overwrites the original product_v__c export file and sets the generic flag, loe_indicator__c, to True or False.
Important: The query reads from the generic_products_with_flag output file from the previous query, so add the _csv suffix to that table in the query.
SELECT
        product.vid__v,
        product.product_v_name__c,
        product.product_v_manufacturer__c,
        product.product_v_compound__c,
        product.product_v_ingredients__c,
        product.product_v_dosage_form__c,
        product.product_v_form_strength__c,
        product.product_v_type__c,
        CASE
            WHEN generic_vid = ''
            THEN 'FALSE'
            ELSE 'TRUE'
        END
            AS loe_indicator__c
    FROM
        generic_products_with_flag__csv product
Query output file: product_v__c.csv
Target subscription
Configure the target subscription to export the product_v__c.csv file. When the data transformation queries are injected into the job, the output files from the queries, generic_products.csv and generic_products_with_flag.csv, will also be created.
Key settings
-
File & Field Selection section - Set the Product object to Export All Fields.
All other objects should be set to Do Not Export. This tells the target subscription to generate only the product_v__c.csv files.
- Transformation Queries section - Add the three queries.
Note: It is very important to list the queries in the correct order because they read from the output files of the previous query.
After the target subscription is saved, click the Data Flow View thumbnail to view the job flow and verify the files and settings that are used to export the data.
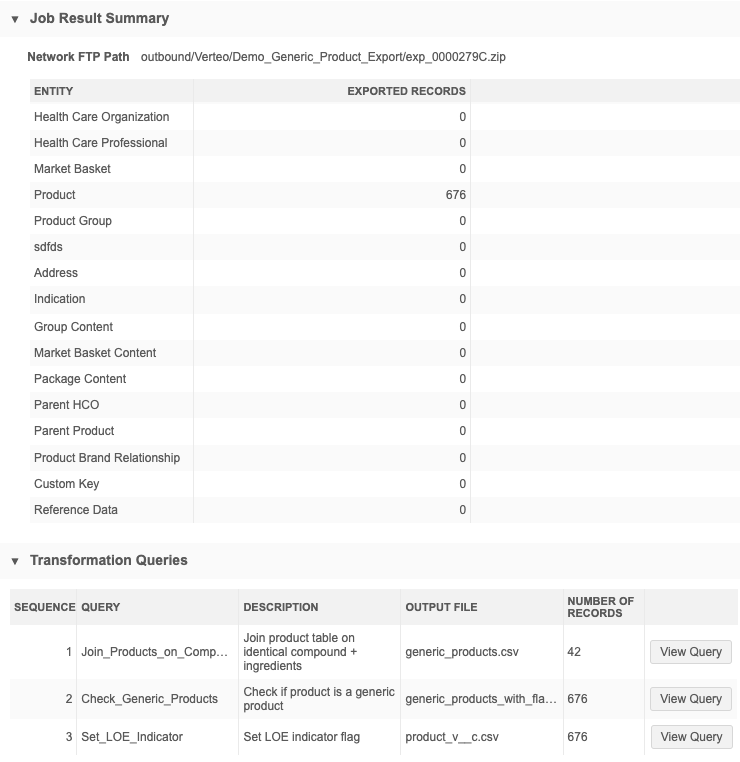
Job details
The Job Result Summary provides a count of the Product records that were exported by the target subscription job.
In the Transformation Queries section, you can see the list of queries (in the order that they ran during the job) and the records that were included in each output file. In this example, 42 generic product records were identified by the first query, and then those records were joined with the total product records.
Output
When you open the product_v__c.csv export file that was generated by the target subscription, the loe_indicator__c column is added to the list of all products and the flag is set to True to identify the generic products and it is set to False for all other products.

Filtering data for data warehouses
Filtering data during export can be easy using WHERE clauses in transformation queries, but you should also consider what happens if an object previously met the filter criteria but doesn't anymore. The object will no longer meet the criteria to be exported, so the existing object in the data warehouse does not get updated.
Example
We want to export only Professional type addresses to the data warehouse, not any other type of addresses. However, after time, if a Professional address is changed to a Mail Only address type in Network MDM, the address no longer meets the filter criteria in the WHERE clause. That address will remain an active Professional address in the data warehouse.

To resolve this, we'll use transformation queries to join the revision history table as well to also include those objects that used to meet the filter criteria.
Network Bridge considerations
Do not use transformation queries to filter relationships or addresses for Veeva CRM using the Network Bridge. The Network Bridge does not just use exported files, it also involves other processes (data change requests, Network Account Search, direct downloads through the API, and so on) that do not use transformation queries.
Query
Query name: Address_Filter
Query description: The query has two result sets.
-
The first set includes all the records that meet the filter criteria (Professional addresses), and we'll set the address_status field to indicate that the addresses are active.
Then, we need to UNION the first set with the second set.
-
In the second set, we join on the revision history table. Now we're including all of the records that met the criteria in the past but with their current address type, so they also get updated in the downstream system. And in this set, we'll set those addresses to inactive.
-- set 1 = all records that meet the filter criterion
 SELECT
        entity_vid__v,
        vid__v,
        address_type__v,
        'ACTIVE' AS address_status,
        address_line_1__v,
        postal_code__v,
        locality__v,
        country__v
    FROM
        address__csv
    WHERE
        address_type__v = 'P'
        AND address_status__v = 'A'
UNION
-- set 2 = all records that ever met the filter criterion, but with their current value
 SELECT
        a.entity_vid__v,
        a.address_type__v,
        'INACTIVE' AS address_status,
        a.address_line_1__v,
        a.postal_code__v,
        a.locality__v,
        a.country__v
    FROM
        address_revision JOIN address__csv a
            ON address_revision.vid__v = a.vid__v
    WHERE
        address_revision.address_type__v_old = 'P'
        AND a.address_status__v = 'A'
        AND a.address_type__v <> 'P'
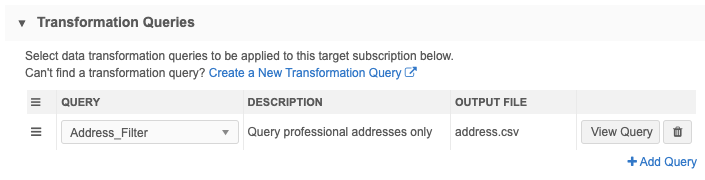
Query output file: address.csv. The output file from the query will overwrite the exported file from the target subscription.
Target subscription
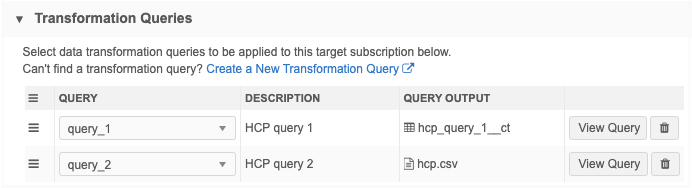
Configure the target subscription to export the hcp.csv and address.csv files.
Key settings
-
File & Field Selection section - Set the Health Care Professional and Address objects to Export All Fields.
All other objects should be set to Do Not Export. This tells the target subscription to generate only the hcp.csv and address.csv files.
-
Transformation Queries section - Add the Address_Filter query.
After the target subscription is saved, click the Data Flow View thumbnail to view the job flow and verify the files and settings that are used to export the data.
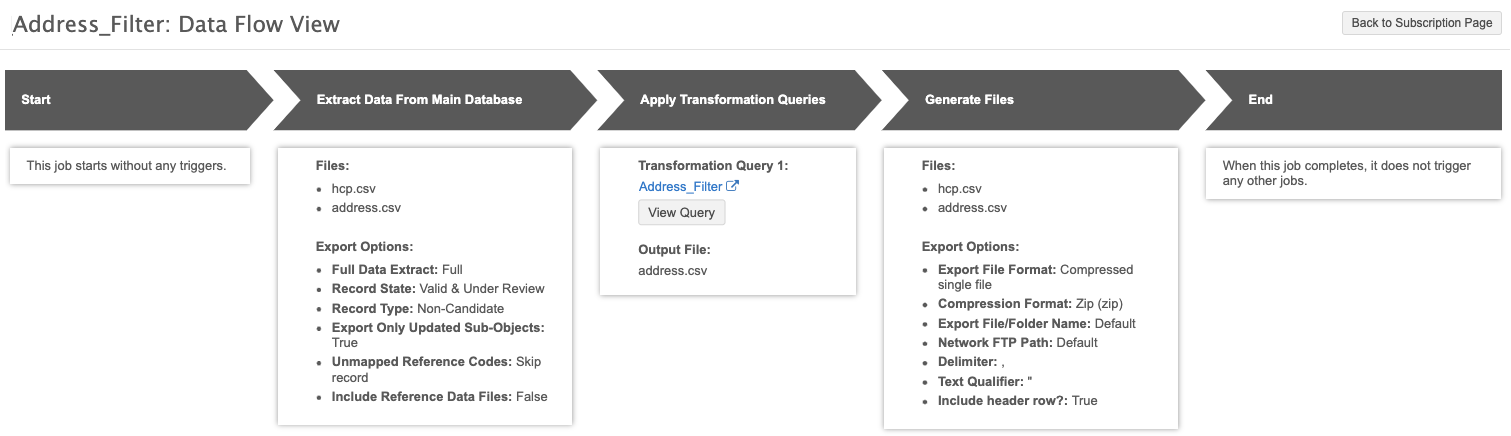
Job details
The Job Result Summary provides a count of the Health Care Professional and Address records that were exported by the target subscription job.
In the Transformation Queries section, you can see the number of address records that met the filter criteria and were included in the output file.
Output
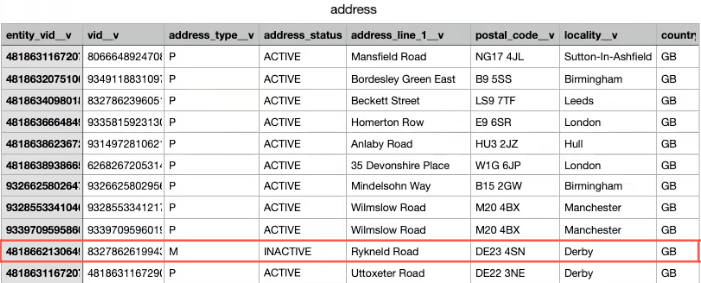
When you open the hcp.csv export file that was generated by the target subscription, the addresses that meet the filter criteria display as ACTIVE. Any addresses identified by the query that have changed (were previously Professional but are now a different type) are included and the address status is INACTIVE.
Transforming data for the Veeva Upsert Connector
Some customers manage their product catalog in Network MDM and use the Upsert Connector to put the product definitions in Veeva CRM. In order to mimic the product catalog data model as defined in CRM, you would use a limited, recursive relationship. If the relationship is inactivated or invalidated in Network MDM, the foreign key field is set to -1 and that value is not supported in Veeva CRM.
You can use transformation queries to replace the -1 value with the equivalent Salesforce value, #N/A, so the records can be properly updated in Veeva CRM.
About the product catalog
The product catalog data model in Veeva CRM has a relationship that points to itself; the field Parent_Product_vod__c on the product catalog object is a foreign key that refers to the ParentProduct.
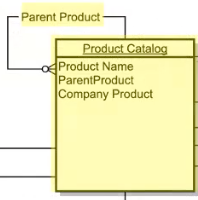
This type of data model is supported in Network MDM as well using a limited, recursive relationship. The recursive relationship contains the Network VID of the Product (vid__v) and the foreign key (related_product_v_vid__c) that points to the ParentProduct. When you inactivate the relationship in Network MDM, the foreign key pointing to the ParentProduct is set to -1, which means that there was a ParentProduct in the past but the relationship was inactivated or invalidated.
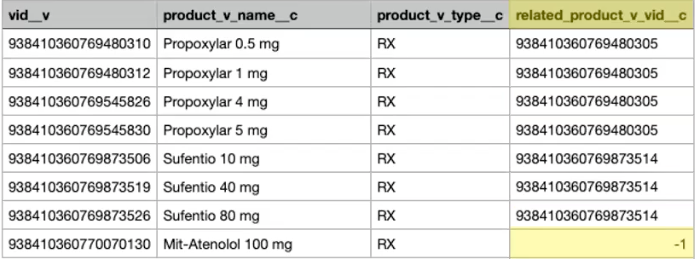
If you try to export this data through a target subscription into the Veeva Connector and it tries to upsert -1 into CRM, you will get an error.
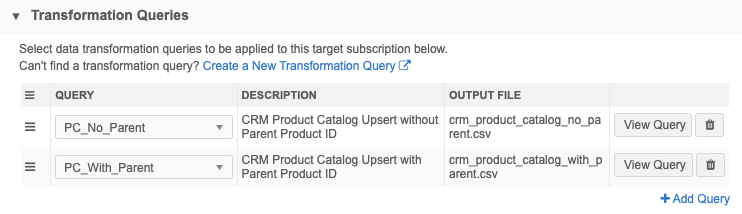
Using the following two transformation queries, we can export the product catalog and ensure that any -1 values are replaced with #N/A.
Query 1
Query name: PC_No_Parent
Query description: This query checks the product records that don't have a parent and replaces the Network MDM value, -1, with the Salesforce default value, #N/A.
Important: The query reads from the product_v__c export file, so add the _csv suffix to that table in the query. If the suffix is not added, the query will read from the product table in the reporting database.
SELECT
        vid__v,
        product_v_name__c,
        replace( related_product_v_vid__c, '-1', '#N/A' ) AS related_product_v_vid__c
    FROM
        product_v__c__csv
    WHERE
        related_product_v_vid__c = '#N/A'
Query output file: crm_product_catalog_no_parent.csv.
Query 2
Query name: PC_With_Parent
Query Description: This query reads from the product_v__c export file to check for the records where the related_product_v_vid__c value is not #N/A. These are the records that have a parent.
Important: The query reads from the product_v__c export file from the target subscription, so add the _csv suffix to those tables in the query. If the suffix is not added, the query will read from the product table in the reporting database.
SELECT
        vid__v,
        product_v_name__c,
        replace( related_product_v_vid__c, '-1', '#N/A' ) AS related_product_v_vid__c
    FROM
        product_v__c__csv
    WHERE
        related_product_v_vid__c <> '#N/A'
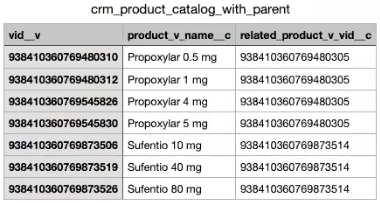
Query output file: crm_product_catalog_with_parent.csv.
Target subscription
Configure a target subscription to export the product_v__c.csv file and include the data transformation queries.
Key settings
-
File & Field Selection section - Set the Product object to Export All Fields.
All other objects should be set to Do Not Export. This tells the target subscription job exports one file: product_v__c.csv.
Tip: To avoid setting each object, choose Export None to set all of the objects to Do Not Export. Then choose Select Which Objects and Fields to Export and set the Product object to Export All Fields.
- Transformation Queries section - Add the PC_No_Parent and PC_With_Parent queries.
After you save the target subscription, click the Data Flow View thumbnail to view the job flow. You can use this view to verify the files and settings that are used to export the data.

Job details and output
After the target subscription runs, you can review the job details to see the number of records that were exported.
In this example, you can see the total number of Product records that were exported. The number of records in the Transformation Queries section displays the records that were output for each query.
The target subscription job exports three files to the Network MDM FTP that we can use in the Veeva Upsert Connector configuration:
-
product_v__c.csv - Creates or updates the products in CRM. This file contains all of the product records.
-
crm_product_catalog_with_parent.csv - Product catalog records that have a parent.
-
crm_product_catalog_no_parent.csv - Product catalog records that have no parent.
Any product records from the product_v__c.csv file that had the -1 value in the related_product_v_vid__c column are updated to #N/A.

Veeva Upsert Connector
We will then use a Veeva Connector upsert job to push the data from the three exported files to Veeva CRM. To do that, we need to map each file to the Product_vod__c object in CRM and map the file column headers to the corresponding CRM fields.
In the FTP path field, define the path in the Network MDM file system where the target subscription exports the files after the job completes.
Tip: You can create a job trigger on the target subscription to start the CRM Upsert job when the target subscription job completes.
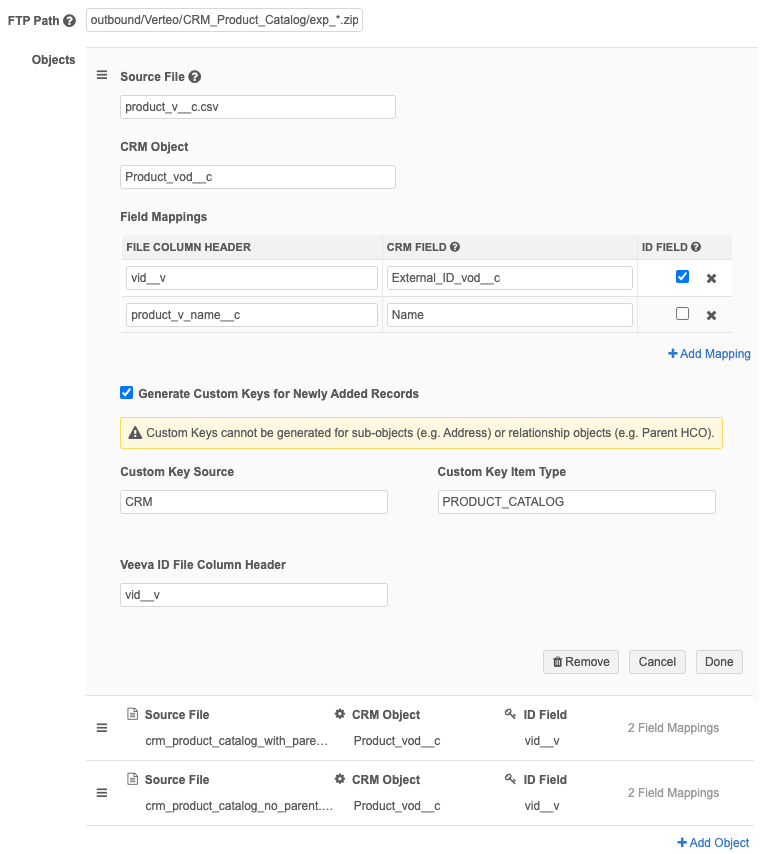
In the Objects section, add each of the files that were generated by the target subscription. The CRM Object for all three files is Product_vod__c.
For each file, assign the following field mappings:
-
product_v__c.csv - We use this file to create or update the product data in CRM.
Map the product name and ID to the corresponding CRM fields.
File Column Header CRM field vid__v External_ID_vod__c product_v_name__c Name -
crm_product_catalog_with_parent.csv - This file is the output of the transformation query that contains product catalog records that have a parent.
Map the ID and the foreign key field (
related_product_v_vid__c) to the external ID of the parent product.Note: The syntax, Parent_Product_vod__r:External_ID_vod__c, is required so the Connector replaces the Veeva parent ID to the Salesforce parent ID.
File Column Header CRM field vid__v External_ID_vod__c related_product_v_vid__c Parent_Product_vod__r:External_ID_vod__c -
crm_product_catalog_no_parent.csv - This file is the output of the transformation query that contains product catalog records that have no parent.
Map the ID and the parent product field from Network MDM to the parent product field in CRM. This is the field that has the #N/A value.
File Column Header CRM field vid__v External_ID_vod__c related_product_v_vid__c Parent_Product_vod__c
When the upsert job runs, the product data will be added or updated in Veeva CRM.
For more information about the Veeva Connector, see Upserting data to Veeva CRM.
Export data from reporting
Saving or scheduling reports to export data to the Network MDM FTP server can be done but it has limitations compared to target subscriptions. For example, you have less options for specifying the folder or file name, you cannot configure the compression format, use a specific delimiter, or export to an Amazon S3 bucket.
To export data from the data warehouse with these capabilities, you can run the report within a target subscription using a transformation query.
This means that the target subscription gets the data directly from the data warehouse; it doesn't export any files directly.
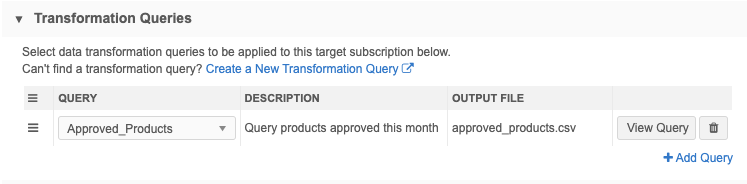
Query
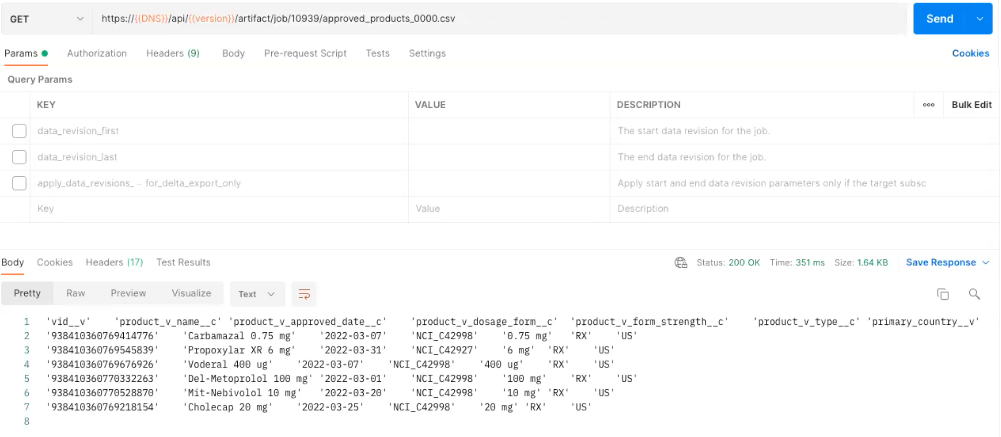
Query name: Approved_Products
Query Description: The query finds all products that have been approved this month.
Tip: If you want the output to contain valid records only, remember to add a WHERE clause to your query (add record_state__v = 'VALID'). Queries created in the SQL Query Editor include only Valid and Under Review records by default, but transformation queries do not filter by default.
SELECT
        vid__v,
        product_v_name__c,
        product_v_approved_date__c,
        product_v_dosage_form__c,
        product_v_form_strength__c,
        product_v_type__c,
        primary_country__v
    FROM
        product_v__c
    -- query products that are approved in this month
	WHERE
        date_part (
            'year',
            product_v_approved_date__c
        ) = date_part (
            'year',
            CURRENT_DATE
        )
        AND date_part (
            'month',
            product_v_approved_date__c
        ) = date_part (
            'month',
            CURRENT_DATE
        )
        AND record_state__v = 'VALID'
Query output file: approved_products.csv
Target subscription
Configure a target subscription and include the data transformation query. This is where you can use the target subscription settings to configure the output of the report query.
For example, you can configure the report for any the following:
-
In the File Format section, you can specify the delimiter, compression format, or customize the file and folder names.
-
In the Export Locations section, you can define a custom folder on the Network MDM FTP server or choose to export the output file to cloud storage.
-
In the Job Trigger Configuration section, you can trigger another job to run when the job finishes.
Key settings
-
File & Field Selection section - Set all objects to Do Not Export.
This tells the target subscription job that no files should be exported.
- Transformation Queries section - Add the Approved_Products query.
After you save the target subscription, click the Data Flow View thumbnail to view the job flow. You can use this view to verify the settings and that only the output file of the transformation query will be exported.

Job details and output
After the target subscription runs, you can review the job details.
Because we were exporting data directly from the reporting database, no records were exported by the target subscription. The number of records in the Transformation Queries section displays the records that were output for the query.
In this example, we've configured the target subscription to display the report results with a tab delimiter, which for example, cannot be done with a saved report.

Create snapshots of current data
Use a target subscription to export an object or a table so you can take a snapshot of the current data. The transformation query reads from the file export or table and persists the query output as a custom table.
For example, you might want to take snapshots of hierarchies so you can track any HCOs or HCPs that are dropped and added each quarter because it could affect compensation processes. You can do this by taking snapshots of Network MDM's flattened hierarchy table using a transformation query.
Tip: You can also use snapshots for monthly reporting on health systems and to freeze hierarchies so you can compare data over different time periods.
Process
-
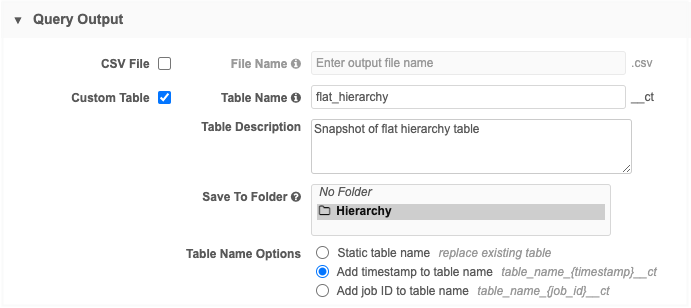
Create a transformation query that queries the flat_hierarchy reporting table. Configure the transformation query to create a custom table which includes a timestamp in the table name.
-
Apply the query to a target subscription.
-
Run the target subscription monthly or quarterly to create a custom table so you can compare data.
Create the transformation query
Create an outbound transformation query so you can apply it to a target subscription.
Key settings:
-
Query Output section- Define the following settings:
-
Choose Custom Table.
-
Assign a Name and Description.
-
Save the custom table to a shared folder in the SQL Query Editor. If there are no folders in the list, it is saved to No Folder (root level of the Shared Folder).
-
In the Table Name Options, choose Add timestamp to table name. This ensures that you have the date of the snapshot as part of the file name.
-
-
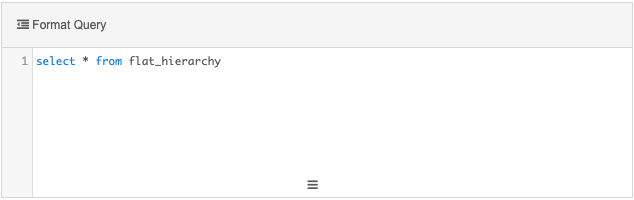
Transformation Query section - Add a simple query to return all of the data from the flat_hierarchy table.
select * from flat_hierarchy
Create a target subscription
Create a new target subscription and configure it so that no files are exported; only the custom table is created.
Key details:
-
General Export Options section - Accept the default setting values in this section.
-
File & Field Selection section - Choose the Export None export option. This sets all of the objects to Do Not Export.
-
Transformation Queries section - Add the transformation query to the source subscription.
-
Job Schedule & Triggers section - Schedule the job to capture snapshots of the flat_hierarchy reporting table. For example, schedule it to run quarterly or monthly.
-
Job Details - After the job runs, the Transformation Queries section on the Job Details page displays the custom table and number of records that were processed.

Click View Query to open a dialog that contains the original transformation query.
Review the custom table in the SQL Query Editor
The Shared Tables section contains the custom table that was created by the job.
Expand the table to see the metadata; the subscription name and Job ID that created the table and the transformation query name.
![]()
You can add the table to a query to return the results from the flat_hierachy table for this date.
To review the original query, hover over the custom table and click the Copy Source Query to Clipboard icon. Paste the query to the SQL Query Editor box.
![]()
Result
Each time the target subscription runs, it will create a custom table with a timestamp. Use the custom tables to compare the data between different time periods.
Prevent intermediate files in subscription packages
Some target subscriptions might include multiple transformation queries that run in sequence. For example, the first query runs and produces the results that are read by a second query. If the transformation query output is .csv files, each time a query runs, a file is created and included in the export file package. This means that some files are exported unnecessarily.
To prevent these files from being exported to downstream systems, you can create custom tables as the output of any intermediary queries. This ensures that the data remains in Network MDM as a custom table and unnecessary files are not exported.
Process
-
Create a transformation query that is configured to create a custom table.
-
Create another transformation query that will read the results of the first transformation query. Configure the query output as a .csv file that will be exported.
-
Create a target subscription that will export the .csv file created by the second transformation query.
Create transformation queries
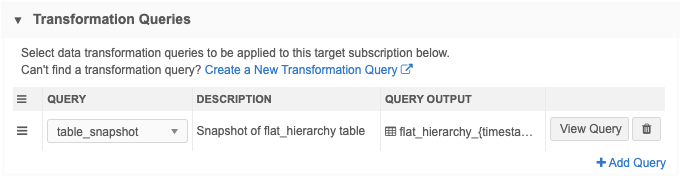
In this example, we'll create two transformation queries to export HCP data. The output of the first query will be read by the second query.
Query 1
-
Create an outbound query and define the output as a Custom Table.
-
Choose the Static table name option so the table is replaced each time the query runs.
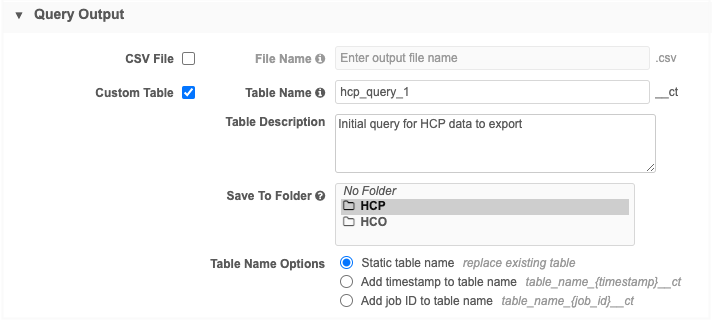
-
Add the query that will generate the results that will be read by Query 2.
Example query
This query will return all HCPs that are doctors.

Query 2
This is the query that will return the results that we want to export.
-
Create an outbound query and choose CSV File as the output. Provide a file name.
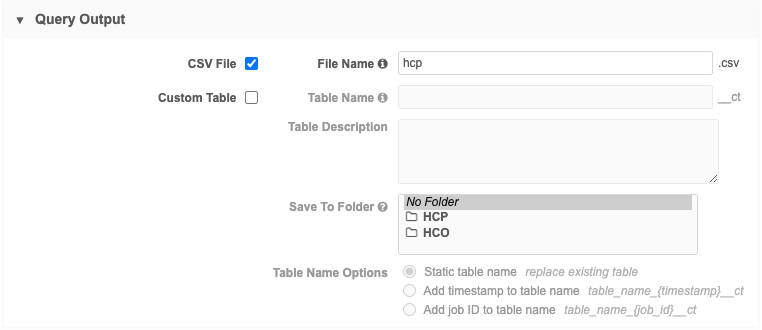
-
Add the query that will read the results from Query 1.
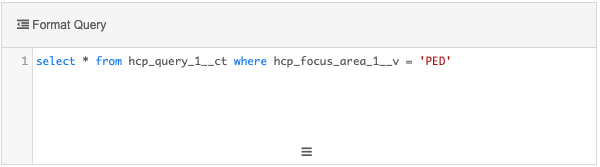
Example query
This query reads from the custom table output of Query 1 to return all HCPs that are doctors and whose focus area is pediatrics.
Create a target subscription
Create a subscription and configure it so only the HCP object and fields are exported.
Key details:
-
General Export Options - Configure the settings as you would typically do for an HCP export.
-
File & Field Selection - Choose the Export None export option to set all objects to Do Not Export. Then, choose Select Which Objects and Fields to Export and set the Health Care Professional object to Export All Fields or Export Some Fields depending on your data.
-
Transformation Queries - Add both transformation queries to the target subscription.
-
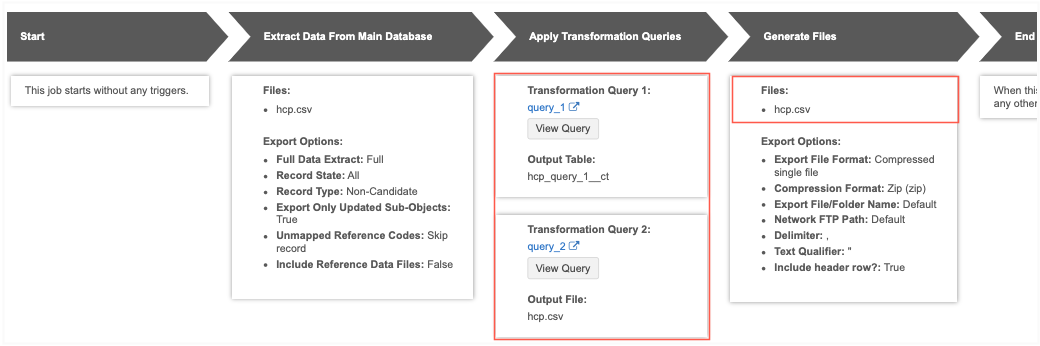
Job Details - After the job runs, both queries are listed in the Transformation Queries section on the Job Details page.

-
Data flow view - The Generate Files section confirms that the only file that will be exported is the hcp.csv output file from the second query.
Review the custom table in the SQL Query Editor
The custom table created from the first query is saved to the Shared Custom Tables section.
Expand the table name to review the metadata.
This was created as a static table, so it will be replaced each time the target subscription runs.
![]()
Result
Using a custom table as the output of Query 1 ensures that the only file that is included in the export is the data intended for downstream systems.
Triggering a report through the Network MDM API
Using transformation queries within a target subscription enables you to trigger a report and then retrieve its output in the Network MDM API. It's not possible to do this with a saved report in the API.
Using the Approved Product reports example above, we can do the following:
-
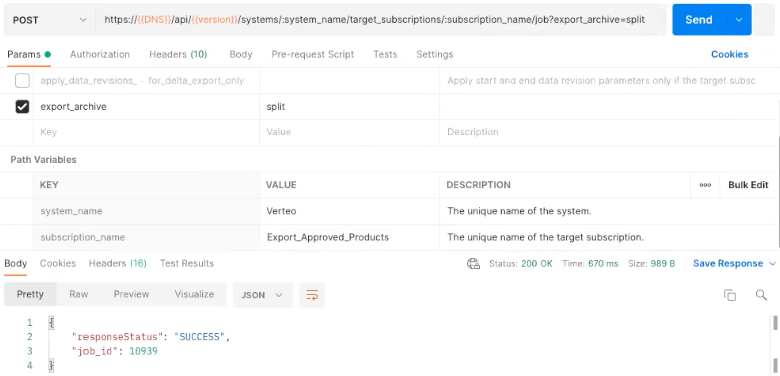
Trigger the target subscription through the API.
In order to retrieve the output of the target subscription using the bulk export API, make sure to add ?export_archive=split to the URL.
-
Then, retrieve the target subscription job status. The result will include information about the exported files.
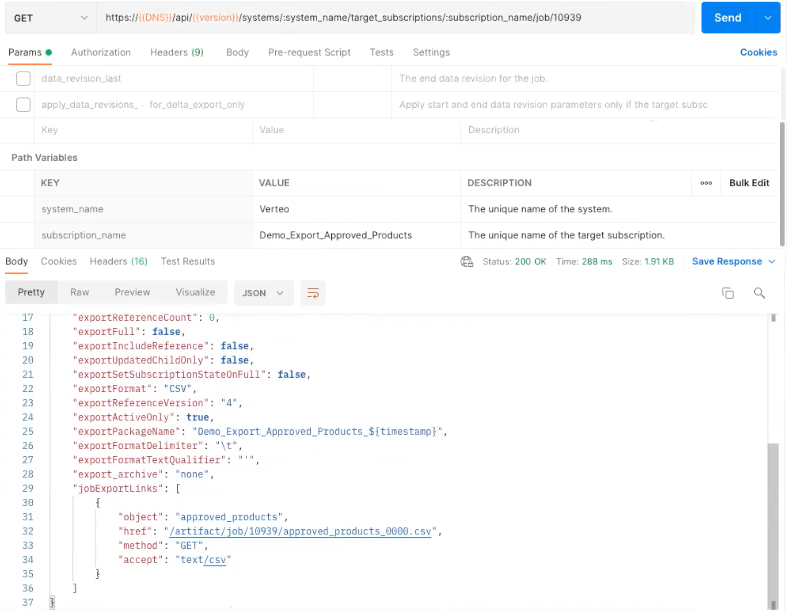
-
After your target subscription job has completed successfully, you can retrieve the contents of the files, or artifacts, for each entity exported in the job.