Creating custom relationship objects
DM
Relationship objects create relationships between main objects.
Custom objects can be created and edited only in your Network Sandbox instance. After the objects are enabled and tested, you can export them to your Production instance.
Prerequisites
Required objects
A main object must exist in the data domain before you can create a custom relationship object.
Relationship type
Custom relationship objects can have a many-to-many relationship or they can be limited to a many-to-one relationship. Before you create the relationship object, decide which type of relationship it will be.
For more information, see Understanding relationship objects.
Create a custom relationship object
To create a custom relationship object in your Sandbox instance:
- In your Sandbox instance, click Admin > Data Model.
-
Open a data domain and click Add Object.
If the button is dimmed, ensure that you are logged into your Sandbox instance.
-
In the Add Object to Domain dialog, choose Create a new object and select Relationship from the list.
-
In the Object Details section, define the Object Name and Description.
Note: The Object Name cannot be edited after the object is saved.
The following details are read-only:
- Type - The object type that you chose in the Add Object to Domain dialog.
- Domains - The data domains that the relationship object belongs to. New objects list the current domain. When you edit an existing custom relationship object, any domain that it belongs to will display.
- Status - New custom objects are saved as Disabled. You can enable this relationship object after it is saved.
- Fields - Lists the default fields that are created for new custom relationship objects. After this object is saved, you can add custom fields.
-
Labels - Type the singular Label and Plural label that will be used for the custom relationship object in the Network UI for all of the languages required.
The following special characters are not supported for labels: slash (/), asterisk (*), brackets ([]), backslash (\), colon (:), question mark (?).
-
Objects in this Relationship - Choose the main entities that are linked by this relationship object and the number of relationships are supported for each owner.
-
Owner - The object that owns the relationship. Permission to view and edit the relationship are available from the owner object on record profiles.
-
Relationship - Set the maximum number of relationships that are allowed for the owner object.
-
Unlimited - Supports many-to-many relationships. This is the default value.
Example: An HCP can participate in many studies and a study can include more than one HCP.
-
1 - Supports many-to-one relationships.
Example: One plan belongs to one payer, but one payer can have many plans.
-
- Related Object - The other object in the relationship. Users can view the relationship but cannot edit it from the related object on a record profile.
Click the +Add Owner link and expand the list to choose the object. Main objects from any data domain can be selected. Click the +Add Related Object link to choose the other main object in the relationship.
For information about defining relationships with owner and related objects, see Understanding relationships.
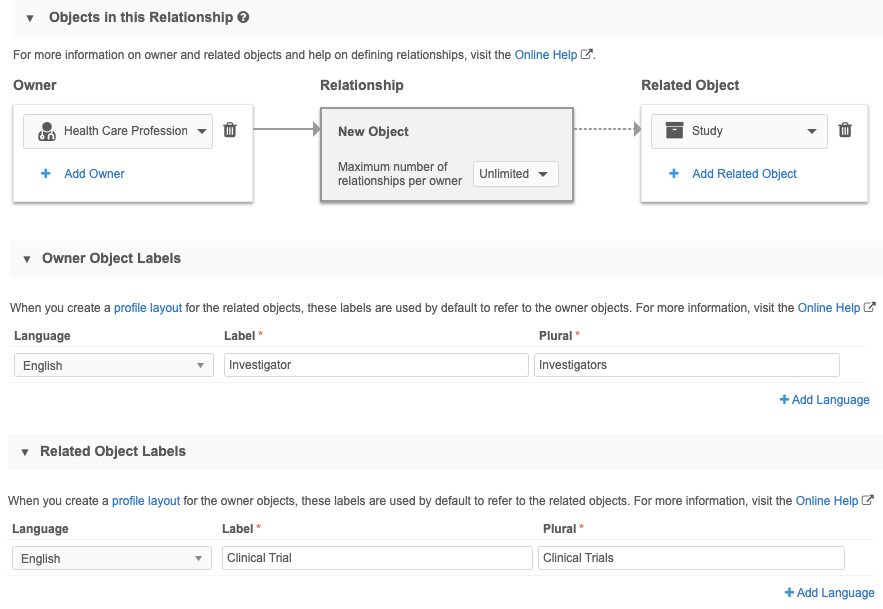
The next step is to add the perspective labels. These labels are used on the profile page to refer to the other object in the relationship.
-
-
Owner Object Labels - The object name of the owner object is automatically added as the perspective label in the Label and Plural fields. You can accept the name or change it. For example, if HCP is the owner object, you might want it to be called Investigator from the related object's record profile.
-
Related Object Labels - The object name of the related object is automatically added as the perspective label in the Label and Plural fields. You can accept the name or change it. For example, if the STUDY__C custom object is the related object, you might want it to be called Clinical Trial from the owner object's record profile.
Note: If more than one object is selected as the owner or as the related object, the labels are not automatically populated. You must define specific labels for those types of relationships.
- (Optional) Duplicate Detection Rule - Define the unique fields for Network to use for determining duplicates and merging custom relationship object records. By default, records are matched using keys.
- Define the priority of sources for the custom object in the Source Survivorship Rules section.
-
Save the new custom relationship object.
When the object is saved, it is automatically associated with the domain of the owning object. Custom relationship objects are saved as disabled. Administrators must explicitly enable custom objects.
In the following sections, configure the details for the object.
Edit custom relationship objects
After a custom relationship object has been created, the following configuration details can be edited in your Sandbox instance or Production instance.
Changes can be made to the following details:
- Description
- Labels for the relationship object
- Perspective labels for the owning and related objects
- Source rankings
- Object icon
- Summary fields
- Status
- Duplicate detection rules
Updates can be made to fields and the main objects in the relationships.
- Add new custom fields
-
Enable or disable editable fields
Fields that have a toggle
 in the Status column can be enabled or disabled. Fields that do not have a toggle are read-only.
 -
Add owner and related objects
Main objects that belong to any data domain can be added.
Delete custom relationship objects
For information on deleting custom relationship objects, see Removing custom objects.