Add a single country Network Bridge
DM
Network administrators and data managers can create a Network Bridge. A bridge is typically created for a country or for each Veeva CRM org.
To create a Network Bridge to manage the configuration for several countries, see Add a multi-country Network Bridge.
Prerequisites
Ensure that you have completed the required tasks before creating the bridge.
Create a Network Bridge
- In the Admin console, click System Interfaces > Network Bridge.
-
On the Network Bridge page, click Add Bridge and choose Single-Country Bridge.
The New Network Bridge page displays.
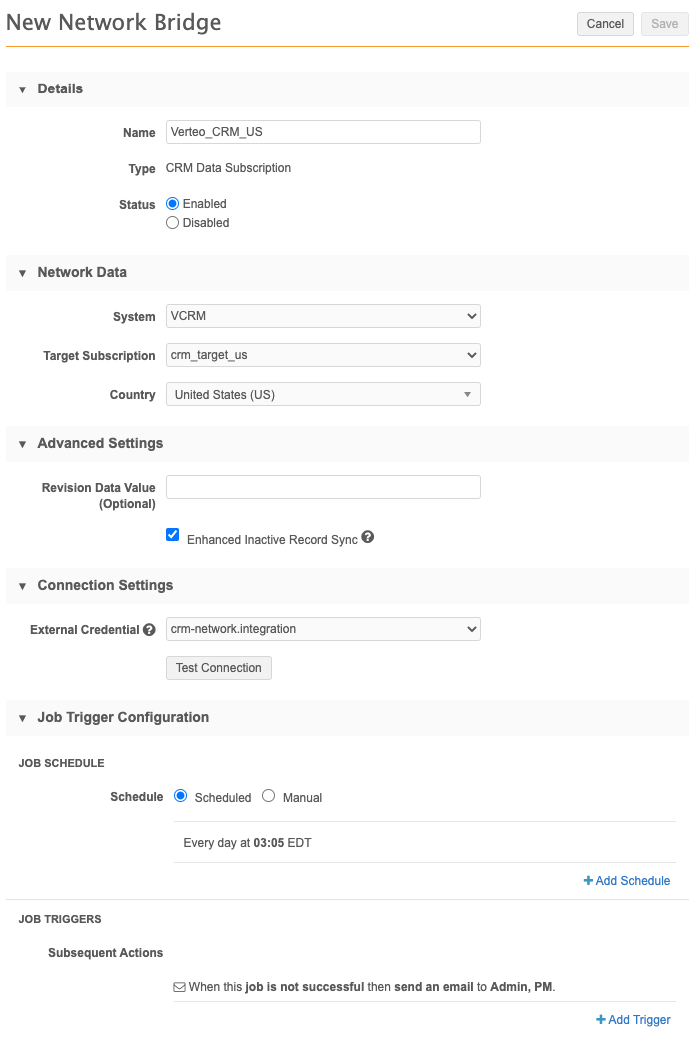
- In the Details section, complete the following details:
- Name: Type a name for the subscription; for example, US_DS, or UK_DS.
Status: Choose Enabled so you can run the subscription after the bridge is configured.
Network Bridge subscriptions can be inactivated when they are no longer regularly used. For more information, see Inactive subscriptions.
-
In the Network Data section, complete the following information:
- System: Select the source system for the subscription. Typically, this is the org ID of the Veeva CRM org.
- Target subscription: Select the target subscription for exporting the records. The list is filtered by the source system you selected.
- Country: Select the applicable country.
If the Bridge is linked to an incorrectly configured target subscription, a warning displays. The warnings will prevent data issues in Veeva CRM.

Common issues for target subscriptions
The Record State setting is set to Valid & Under Review
Records that are INVALID or MERGE_INTO state are not sent downstream so merges don't occur; duplicate records will be created in Veeva CRM.
The Full Data Extract setting is set to Full instead of Delta
When the full set is exported, entities that haven't changed are continually sent to Veeva CRM. This increases the Network Bridge job time and increases the time to sync and download to mobile devices.
Click the link in the warning to review the details. On the dialog, click the name of the target subscription to open the subscription details.
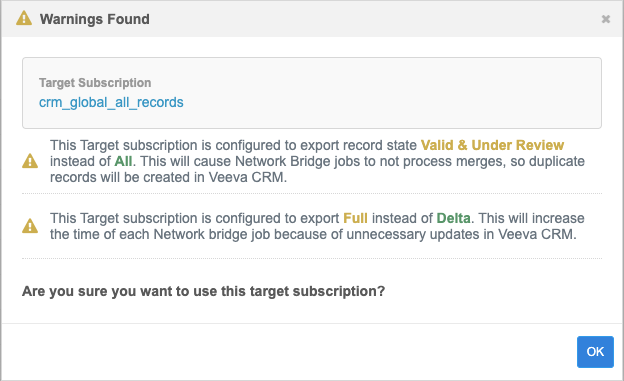
Click OK to close the dialog. You can choose a different target subscription or keep the defined subscription understanding that possible issues can occur.
-
In the Advanced Settings section, define optional settings for the export to Veeva CRM:
- Revision Data Value (Optional): Type the delta start ID that you want the target subscription to run from. For example, if you want to run a subscription starting with the last record from the previous export, you can add the Network ID of the record here. The Delta start and end IDs are available in the Job History section on the target subscription page or in the Job Details page. Typically, this value should be left empty.
- Enhanced Inactive Record Sync: Select this option if you want Veeva CRM to be updated to reflect inactive records in Network.
In the Veeva CRM Help: Filter inactive records setting must also be enabled for the inactive records to sync between the two applications.
-
In the Connection Settings section, select the following credentials:
- Network Integration User: Select the name of the Network integration user. The list is populated with the integration users in your Network instance.
- External Credential: Select the CRM org credential or Salesforce credential that is stored in Network on the External Credentials page.
Click Test Connection to validate the credentials.
A panel displays information about the environment you are connecting to. If there are issues, warnings might display. The credentials must be validated before the Network Bridge configuration can be saved.
Tip: If the credentials are not validating, see Add Network IP addresses to the CRM allowlist.
-
In the Job Trigger Configuration section, define how and when you want the subscription job to run.
- Manual: Select so that the job runs only when you click the Start Job button on the subscription page.
- Scheduled: Define the schedule settings for the subscription based on the timezone defined in your user profile. Multiple schedules can be defined for each subscription.
-
Under the Job Triggers heading, you can choose to trigger other actions to start after a job runs. The available triggers include sending emails for various job outcomes or starting another job when the original job successfully completes.
To schedule a subsequent action:
- Click + Add Trigger.
-
Expand the When this happens list and choose the job outcome that will trigger the action.
-
Expand the Do this list and select one of the options:
- send an email (available for all job outcomes)
- start another job (available only for the job completes successfully outcome).
- If you selected send an email, expand the recipients list and select all of the Network users that should receive an email for that job outcome. Multiple recipients can be selected.
- If you selected start another job, expand the subscription list and choose the job to start. The subscriptions are categorized by type. For example, you might want to schedule a target subscription to start when the bridge subscription completes so you can send updates to your data warehouse.
- Click Save.
When the Network Bridge job runs, the target subscription files are transformed into the format required for Veeva CRM accounts. Your Veeva CRM org will be updated with the data from Network.
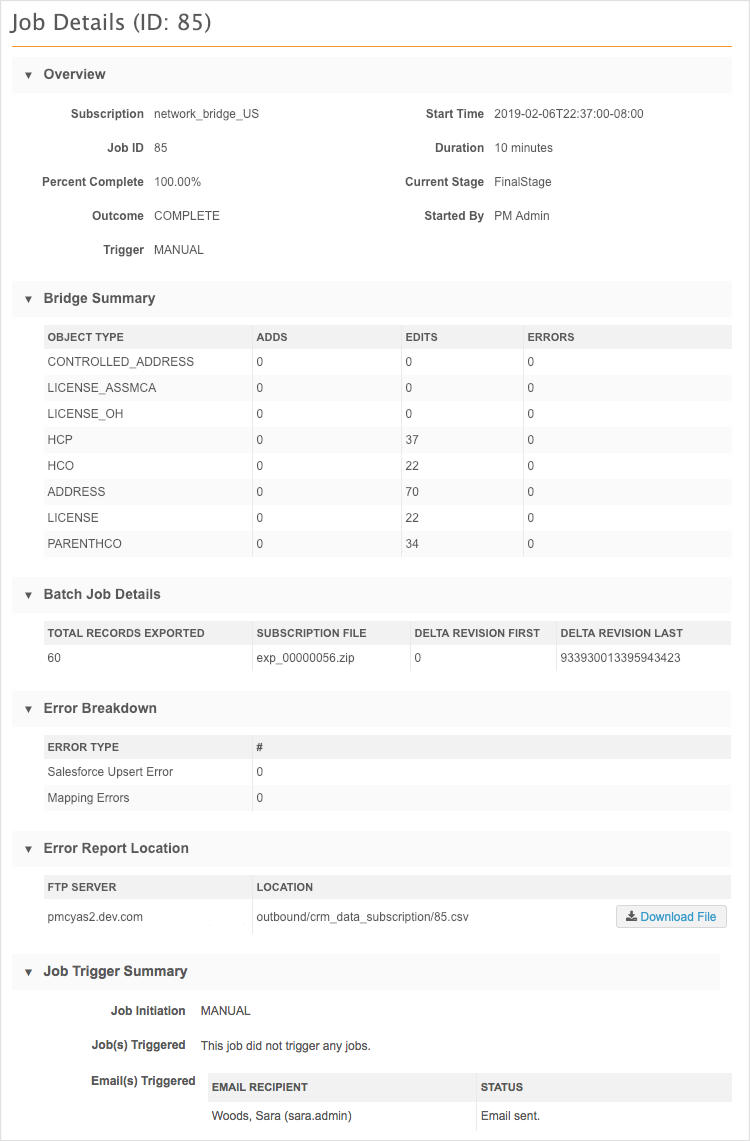
Review the job details
After a data subscription job completes, review the Job Details page.
To access the Job Details page, click the job ID in the Job History section at the bottom of the Network Bridge page. The Job History section displays after the first Network Bridge subscription job runs.
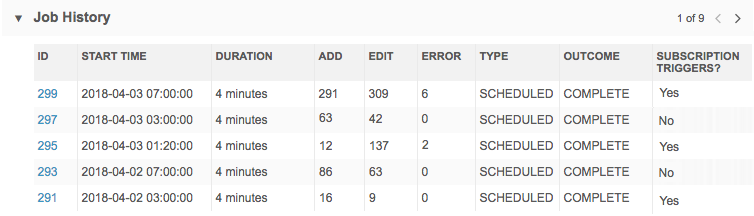
This page provides information about the outcome (complete or failed), the objects that were added and edited, and any errors that occurred.
Job results
This section highlights the Veeva CRM records that have been added and updated and any errors that occurred during the job. If errors occurred, a count for each record-level category displays in the Error Type table. Click Download Error Report Log review the errors in more detail.
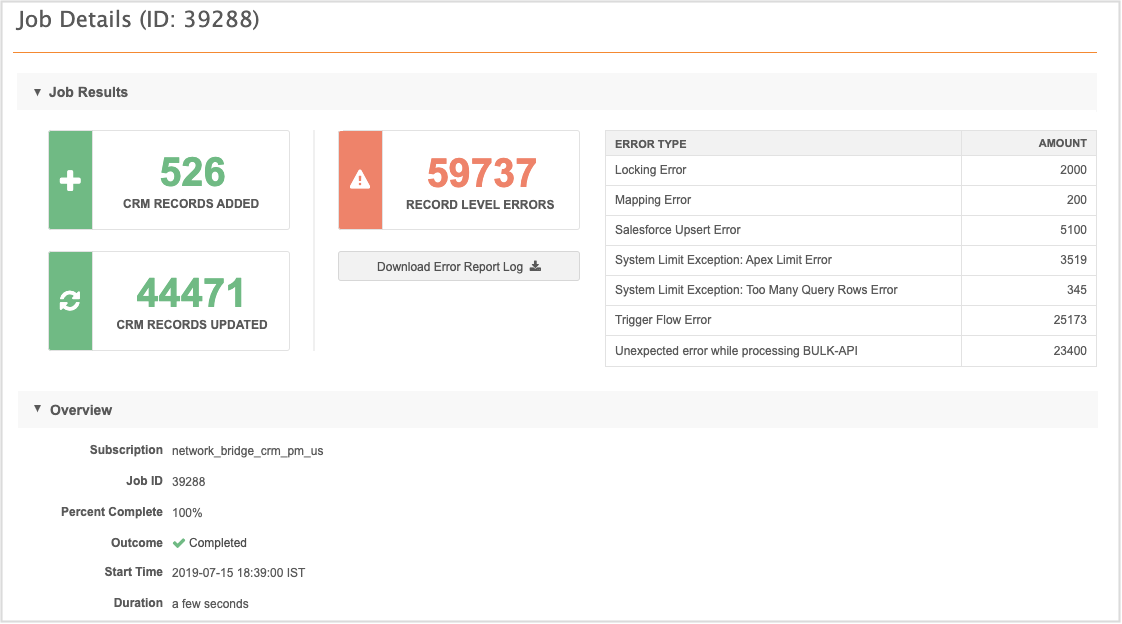
Tip: To run reports on these errors, see Record level Network Bridge errors.
Error types
| Error Category | Error Message | Reason for Error |
|---|---|---|
| Locking Error | UNABLE_TO_LOCK_ROW or TooManyLockFailure |
Two or more processes are trying to update a record. This is usually caused by CRM custom triggers that update other records. |
| System Limit Exception: Apex Limit Error | System.LimitException: Apex |
Customizations in CRM exceed the Apex Governor Limits. Examples CPU time limit exceeded. Heap size is too large. More information |
| System Limit Exception: Too Many Query Rows | System.LimitException: Too many query rows | Customizations in CRM are trying to perform too many queries. |
| Trigger Flow Error | CANNOT_EXECUTE_FLOW_TRIGGER |
A custom CRM workflow is causing issues with processing records from the Bridge. These errors occur when the flow tries to update records. |
| Unexpected error while processing BULK-API | Got an unexpected error while processing BULK-API |
This is a Salesforce™ gack response. A gack occurs when an error is thrown and Salesforce didn't catch or handle it. More information |
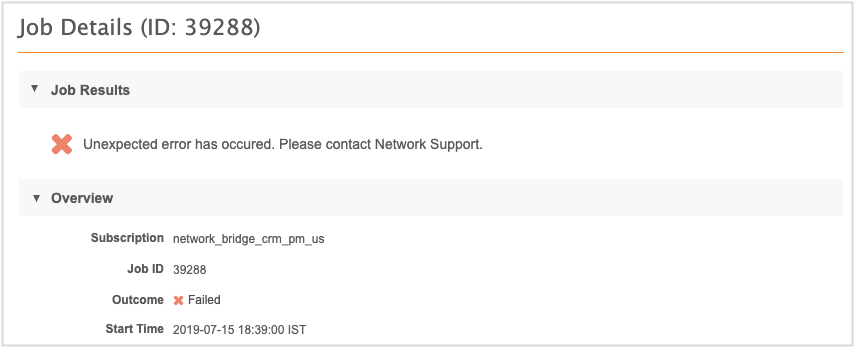
If a job fails, the reason for the failure displays.
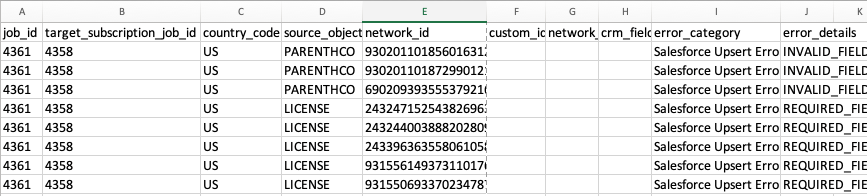
Error Report Location
This section displays the FTP server and site (/outbound/crm_data_subscription/<job_id>.csv). If the job contained no errors, the file is still created but it will be empty.
To download the log to your local server. :
- Click Download Error Report Log in the Job Results section.
-
In the pop-up, choose to download the log in Microsoft Excel™ or CVS format.
Tip: When .csv files are opened in Microsoft Excel, the Network IDs are automatically rounded. Exporting directly to Microsoft Excel ensures that the Network IDsdo not change so you can easily view and copy the Network IDs from the file.
Error report log
The error log includes a column for the Bridge job ID, job_id, and a column for the target subscription job ID, target_subscription_job_id.
Job Trigger Summary
This section identifies how this Network Bridge job started. It could have been started from a job trigger on another subscription (for example, an OpenData subscription or a source subscription).
The Job Initiation value could be any of the following:
- Manual
- Scheduled
- Job ID - The job ID link displays if this job was triggered by the successful completion of another job.
If subsequent jobs or emails were triggered by this job, the details displays beside those headings.