Publishing Network MDM data to Nitro
Use the Veeva Connector to publish data to Veeva Nitro.
Integration highlights
The following steps have been automated in the Veeva Connector to support the upload process:
- Exporting CSV files in individual .gz files
-
Generating Nitro control files (CTL) in Network MDM using Intelligent Load.
The runTaskJob in the CTL file is set to
jb_ftp_intelligentload__v. - Uploading .gz files and CTL files from Network MDM to Nitro SFTP for processing
Overview of tasks
To publish Network MDM data to Nitro, the following tasks must be completed:
- Add Veeva Nitro FTP and API credentials to Network MDM - The credentials are used to publish files to Nitro's FTP server and to connect to Veeva Nitro.
- Create a system - The system for Nitro is used for target subscriptions and the Veeva connector.
- Create a target subscription - Export the Network MDM data in individual files to your FTP server.
- Create a connector - Connect to Veeva Nitro to publish the Network MDM data to Nitro's FTP.
The following sections describe how to complete these tasks.
Veeva Nitro requirements
Veeva Nitro must also be configured to enable the integration with Network MDM. For more information, contact your Veeva Nitro representative.
Add Nitro credentials to Network MDM
Add the Nitro FTP and API credentials so Network MDM can access Nitro.
FTP credentials
Add the FTP credentials so Network MDM can publish files to your Nitro FTP server.
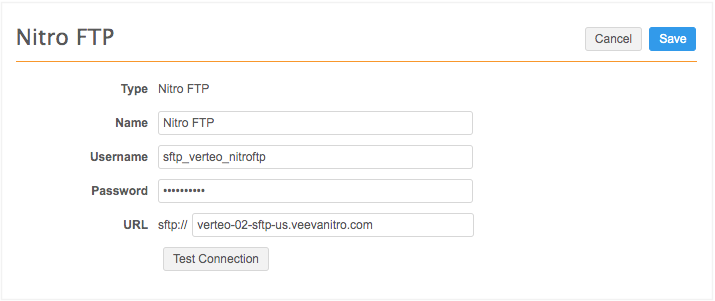
To add the FTP credentials:
- In the Admin console, click Settings > External Credentials.
- Click Add Credentials.
- In the New External Credential dialog, select Nitro FTP. Click OK.
-
Type the credentials and the URL to the appropriate server.
The Nitro FTP URL must match the following regular expression pattern:
*.veevanitro.com
- Click Test Connection to ensure the credentials are correct.
- Save your changes.
API credentials
These credentials are used to connect to Veeva Nitro.
To add the API credentials:
- On the External Credentials page, click Add Credentials.
- In the New External Credential dialog, select Nitro API. Click OK.
-
Type the credentials that can be used to log into your Nitro application.
-
Type the URL to the Nitro server.
The URL must match the following pattern:
https://*.veevanitro.com
- Click Test Connection to ensure the credentials are correct. Network MDM will connect to Nitro using the SFTP protocol.
-
Click Generate API Key. The Nitro API key is used in the CTL file generation.
If the password changes for these user credentials, the API key becomes invalid. A new key must be generated.
- Save your changes.
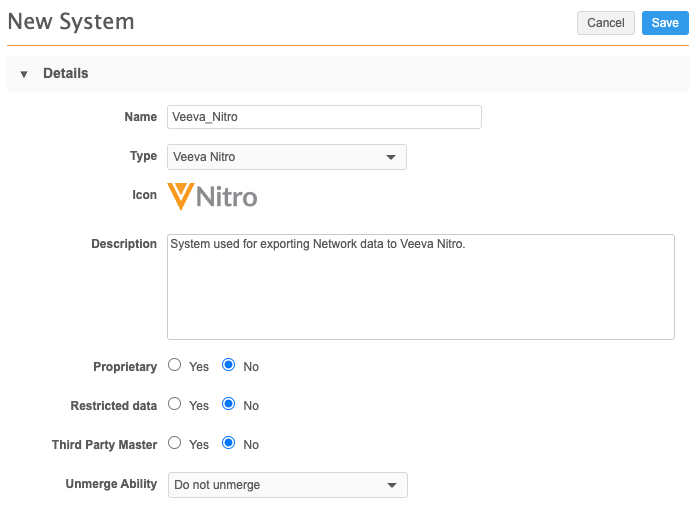
Create a system
Create the system (System Interfaces > Systems) that you will use for target subscriptions and the connector. The settings for the system are minimal. Ensure that the Name and Description specifically identifies the system’s purpose to avoid confusion.
Example Nitro system
Create a target subscription
Use a target subscription to export data from Network MDM in individually compressed (zip) files so the Network MDM data can be uploaded to the Nitro FTP server.
To create the target subscription:
- In the Admin console, click System Interfaces > Target Subscriptions.
- Click Add Subscription.
-
Configure the subscription Details and General Export Options sections as usual.
For information about target subscription settings, see Add a target subscription.
- In the Export File Format section, select Compressed Individual Files.
- Choose the Gzip compression format.
- Save the target subscription.
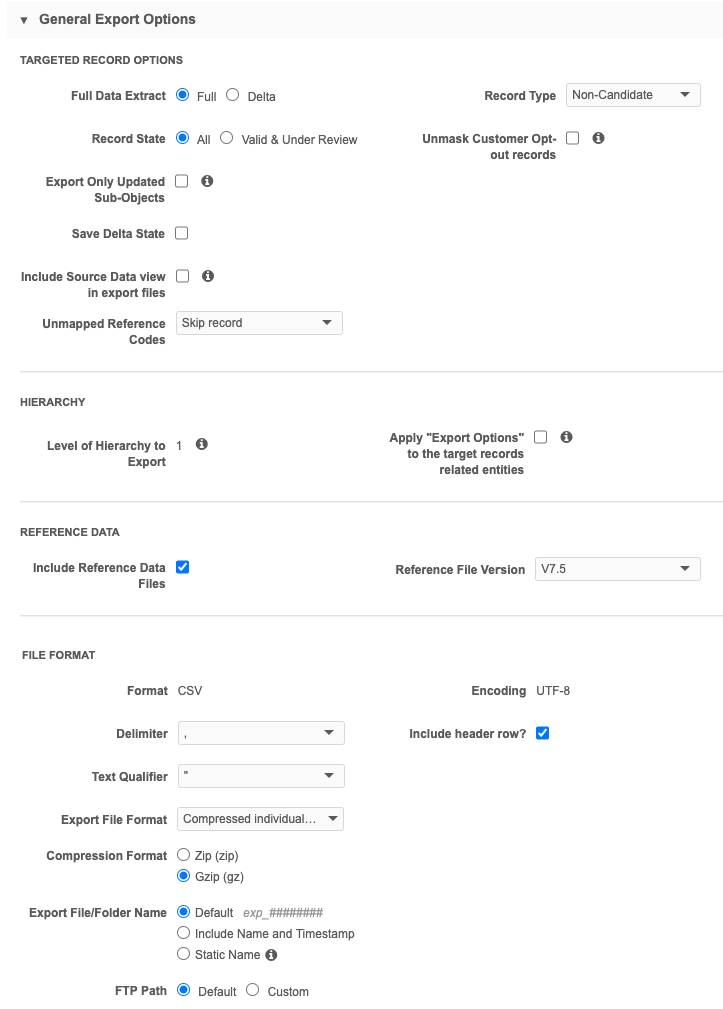
On the Job Details page, the FTP Path indicates if the files were zipped individually.
Example path format:
/outbound/<system>/<target subscription name>/<sub directory with archive files>
Next steps
The Nitro Connector will run the target subscription and upload the files to your Network MDM FTP server. Create a connector to Nitro so you can publish the data to Nitro's FTP server.
Create a connector to Veeva Nitro
Configure the Veeva Connector to upload the target subscription data to Nitro's FTP server.
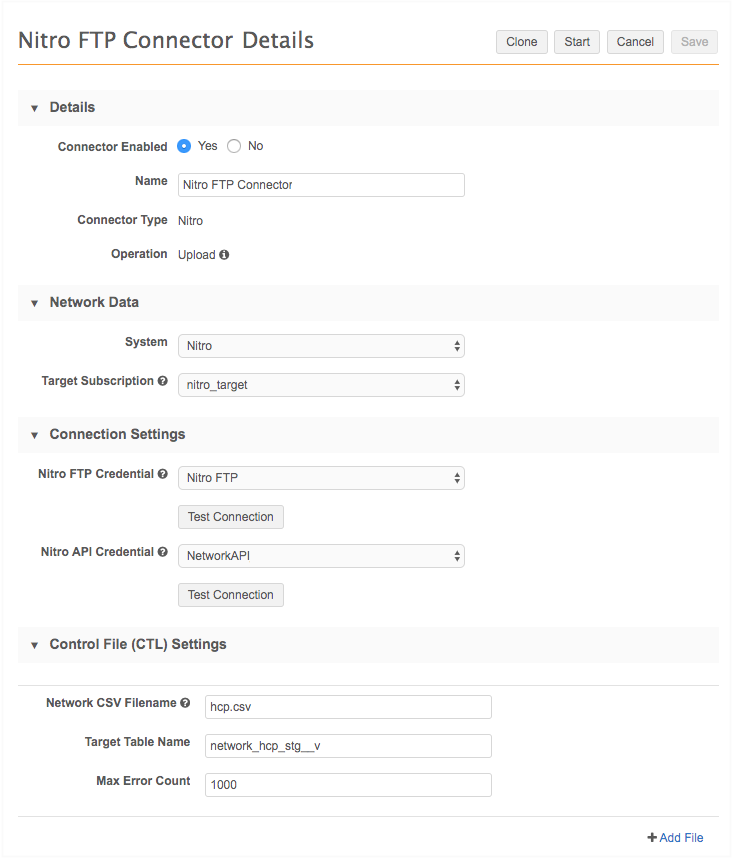
- In the Admin console, click System Interfaces > Veeva Connector.
- Click Add Veeva Connector.
-
In the Add Veeva Connector dialog, expand the lists to select the following values:
- Connector Type - Nitro
- Operation - Upload
Click Next.
- In the Details section, choose Enabled and type a Name for the connector.
-
Define the following details in the Network Data section:
- System - Select the Nitro system that you created.
- Target Subscription - Select the target system that you used to export the data for Nitro.
-
Specify the Nitro credentials in the Connection Settings section:
- Nitro FTP Credential - Choose the credential that you created for Nitro FTP.
- Nitro API Credential - Choose the credential that you created for Nitro API.
For each credential, click Test Connection to ensure that the credentials are valid.
-
In the Control File (CTL) Settings section, define the following details:
- Network CSV Filename - The name of the .csv file that you exported in the target subscription; for example, hcp.csv or address.csv.
- Target Table Name - The name of the staging table in Veeva Nitro.
- Max Error Count - Set a maximum number of errors that can occur before the job stops processing.
To include more files, click + Add File.
-
In the Job Trigger Configuration section, define the schedule for the job and any subsequent actions that will start when this job finishes.
Job Schedule - Run the subscription manually or on a scheduled basis. If you select Manual, the subscription only runs when you click the Start Job button on the subscription page.
Job Triggers - Trigger other actions to start after a job runs.
Available triggers:
- Send email - Specify users that should be notified for successful and unsuccessful job outcomes.
- Start a job - Start a subsequent job when this job successfully completes.
For more information, see Subscription job triggers.
- Save your changes.
When the job runs, Network MDM generates the .ctl files and connects to the Nitro FTP to publish the files.