Reporting tree view
DM
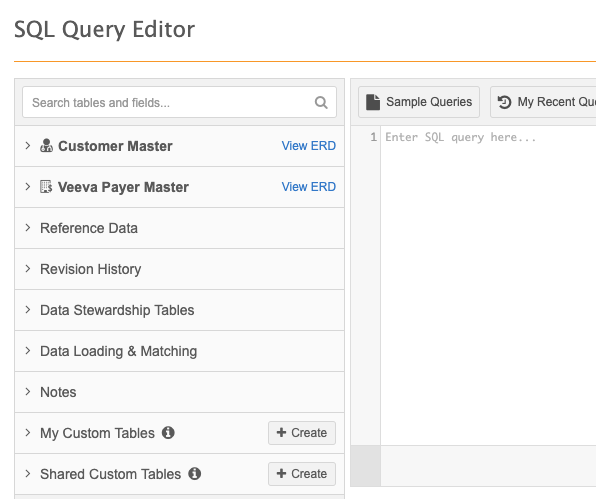
The SQL Query Editor contains a tree view of the data domains and additional reporting tables available to you to query against in your Network MDM instance.
Highlights
The tree view gives you the visibility to see your data model and reporting structure to help you create queries.
-
Expand each data domain and reporting table category to view its tables, fields, field metadata, and reference codes.
-
Use the view to understand the data model structure and to help you build your query by understanding the fields that can be joined.
-
Reporting users that do not have access to the data model can see the data that is available to query.
View a quick video about the Reporting tree view.
About the tree view
The left pane of the SQL Query Editor contains the tree view. Use this hierarchical structure to understand the tables, fields, field metadata, and reference codes that are available to query.
The view contains the following information:
-
Data domains - The Customer Master domain displays at the top by default. Custom domains are listed in alphabetical order after the Customer Master domain. Expand each data domain to view its tables, fields, and field metadata.
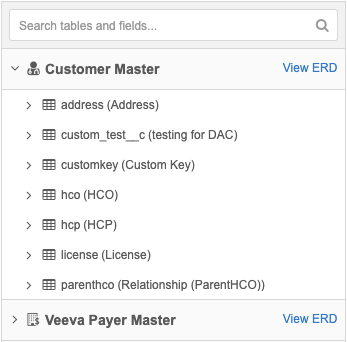
- Tables - Tables are listed alphabetically in the respective domain or the appropriate reporting table category; for example, change request tables are located in the Data Stewardship Tables category.
-
Fields - Expand the table to see the available fields.
Note: Fields display only if they are enabled and are populated with data.
Primary keys and foreign keys are listed first. The remaining fields are listed alphabetically.
- Primary key
 - This field uniquely identifies the object.
 - Foreign key
 - The primary key field from a main object that is used to reference a main object on a sub-object or relationship object.
 The foreign key metadata includes the JOIN() description. This is helpful when you want to include multiple tables in the same SQL query.
Example
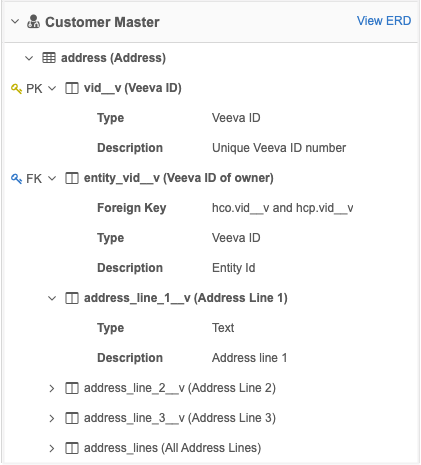
To understand how to join the Address table and HCP table in a query, use the metadata in the Address table's foreign key.
from hcp INNER JOIN address ON hcp.vid__v = address.entity_vid__v
- Primary key
-
Field metadata - Expand each field to see the type and description. Reference type fields also contain the types and codes.
-
Reference Data - When you expand a reference type field, the reference type name and codes display.
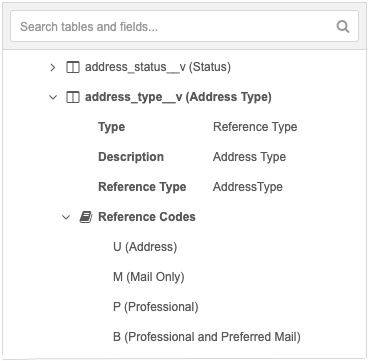
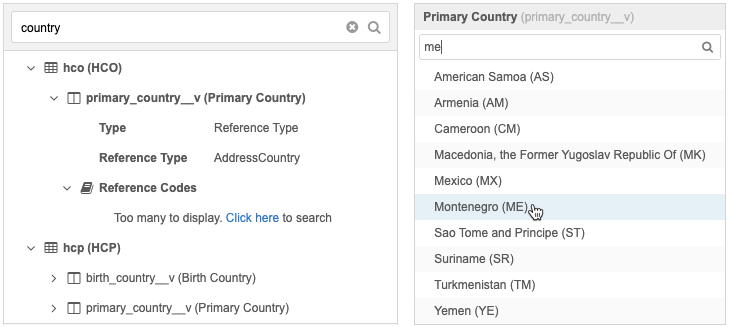
If there are more than ten reference codes for the reference type, click the link to display the full list in a pop-up. Each pop-up contains a search bar so you can quickly find a code.
The following reporting category tables are only accessible through the SQL Query Editor.
- Revision History - This category contains the revision history tables.
- Data Stewardship Tables - This category contains change requests and suspect match tables.
- Data Loading & Matching - This category contains the job tables from source subscriptions.
- Lookup Tables - This category displays if you have uploaded one or more lookup tables in your Network MDM instance.
- Data - This category displays if you have an Affiliation widget enabled in your instance.
- My Custom Tables - Data tables that you create for your private use. No other users can access the tables in this category.
-
Shared Custom Tables - Data tables created by you and other users in your instance. These tables are available to everyone in your Network MDM instance that has access to SQL Query Editor.
For more information, see Custom tables.
Available actions
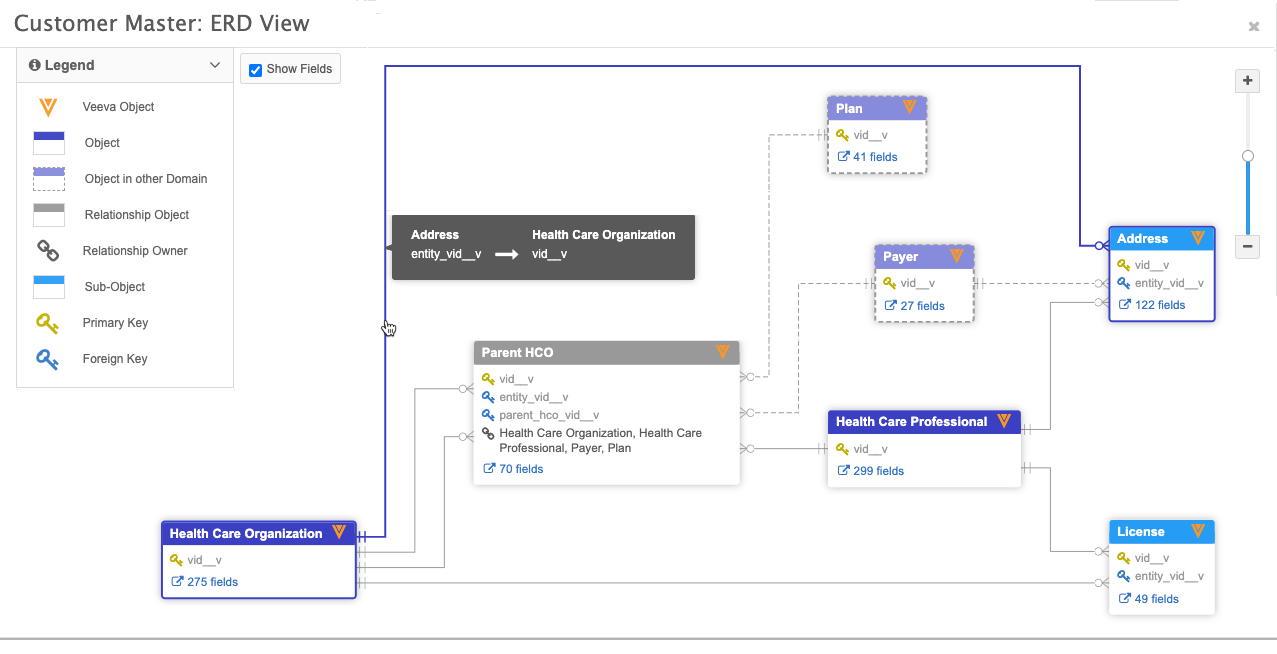
View ERD
Click the View ERD link beside each data domain to open a window that displays a relationship diagram. Click the line between two objects to see the fields that you can use to JOIN those object tables.
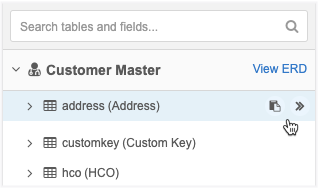
Copy to clipboard
Click the Copy to Clipboard ![]() button to copy the table or field name from the tree view to your clipboard. The button displays when you hover over any table or field name.
button to copy the table or field name from the tree view to your clipboard. The button displays when you hover over any table or field name.
Add to query
Click the Add to Query ![]() button to insert the table, field, or reference code into your SQL query editor box. The text will be inserted wherever your cursor is located in the query box.
button to insert the table, field, or reference code into your SQL query editor box. The text will be inserted wherever your cursor is located in the query box.
Tip: You can also drag and drop tables, fields, and reference codes into the SQL query editor box. When an element is inserted, it remains highlighted. Spaces are automatically added before and after the element you drop into the query. Press the right-arrow key to continue writing your query.
Search
Use the search bar at the top of the pane to find tables and fields. Reference codes do not display in these search results. If a reference type contains more than ten codes, a pop-up displays and includes a search bar.
As you type, the list automatically refines to display matches for any table and field name or label. The tables will automatically expand so you can quickly view all of the results.
Example - Create a SQL query
Create a query to find all of the doctors with active addresses in Austria.
To create this query, we need to find all of the addresses that meet the following criteria:
- The address status is active.
- The country is Austria.
- The address belongs to an HCP with the HCP type Doctor.
In the report result, we want to display the following fields:
|
|
To create the query:
- Begin the query with a SELECT statement.
-
Add the fields that you want to see in the report results.
- To find the HCP Prefix field, type prefix in the search box.
-
Find the field in the search results and click Add to Query or drag and drop it into the SQL editor box.
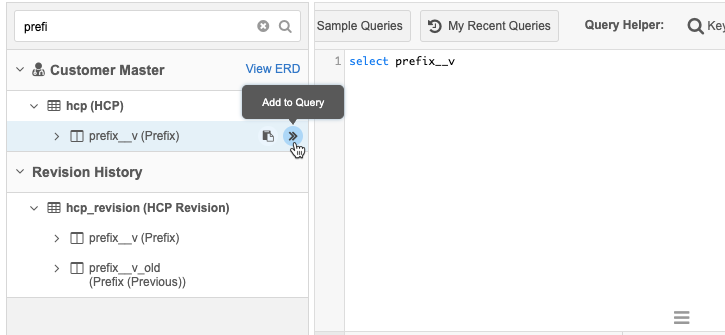
The
prefix__vfield is inserted after the SELECT statement.Tip: When you use the Add to Query button, the element is inserted wherever your cursor is in the SQL editor box, so leave spaces and punctuation whenever applicable.
- Continue searching for the remaining fields and insert them into the query.
-
Use a FROM statement to tell the query which tables to use. To find the addresses that belong to HCPs, we need to join the HCP and Address tables.
- To understand how to join the HCP and Address table, expand the foreign key on the Address table.
-
Based on the foreign key description, we can see that the field
entity_vid__von the Address table (address.entity_vid__v) joins to the fieldvid__von the HCP table (hcp.vid__v). - You can copy and paste the
hcp.vid__vfield into the SQL editor box. -
On the foreign key, click Add to Query to insert it into the query. Ensure that you preface the foreign key with address.; for example,
address.entity_vid__v.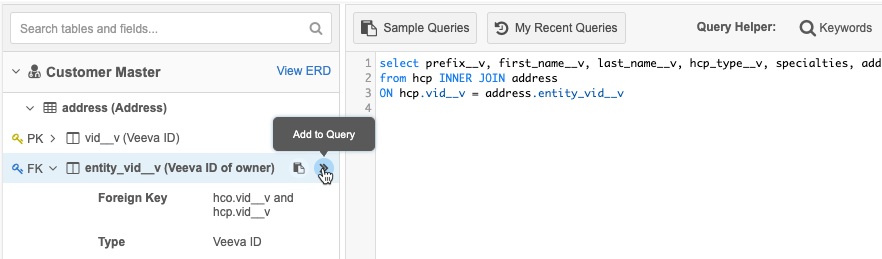
- To understand how to join the HCP and Address table, expand the foreign key
-
Create a WHERE statement to insert the criteria for the query.
-
The HCP type must be Doctor - Search for the HCP Type field and add it to the query. To find the reference code for Doctor, expand the Reference Codes for the
hcp_type__vfield and click the link to display the codes. Click Doctor (D) to add the code to the query.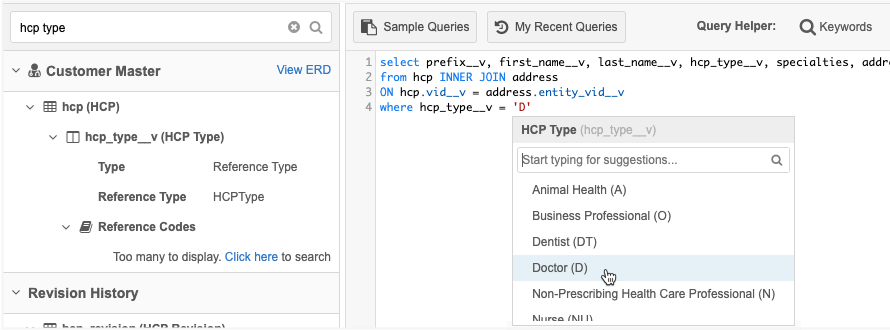
- The Address status must be active - Search for the address status field in the tree view pane and click Add to Query. Expand the
address_status__vfield to find the reference code for Active. Add the reference code to the query. -
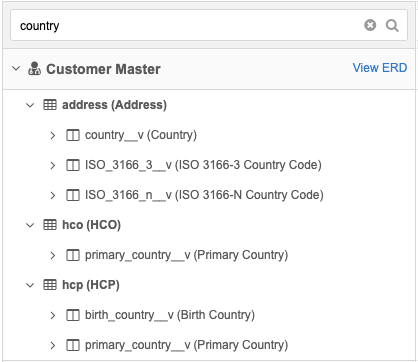
The country must be Austria - Search for the country field in the tree view pane and click Add to Query. Under the
country__vfield, expand Reference Codes and click the link to find the code for Austria. Add the reference code to the query.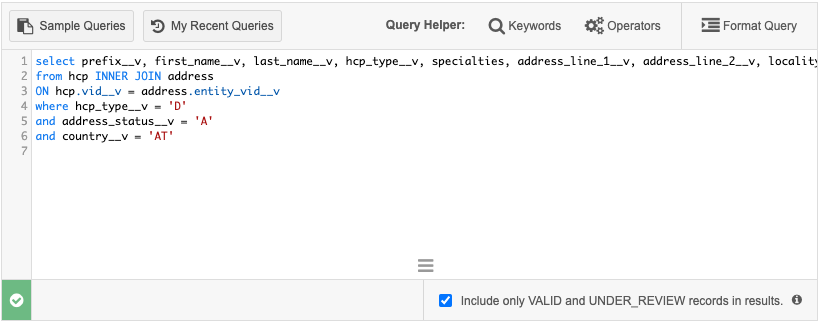
-
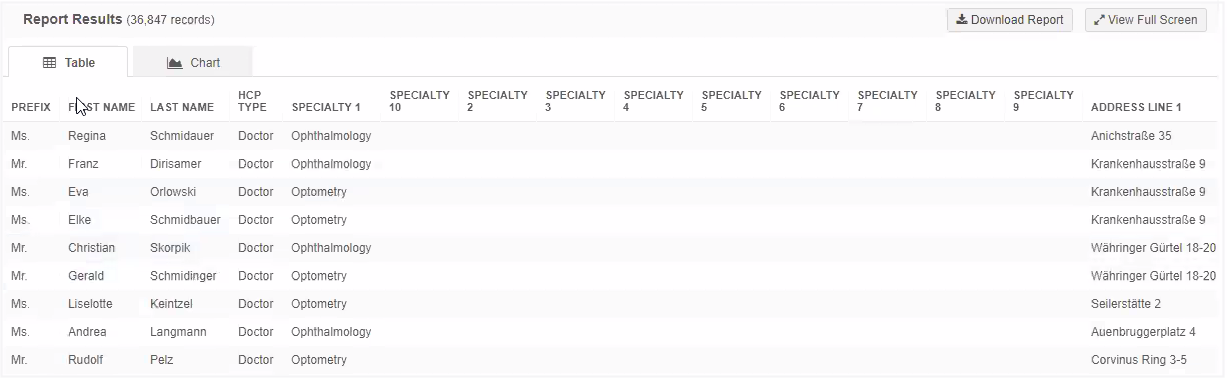
- Ensure that the query is valid.
- Click Run Query to see the report results.
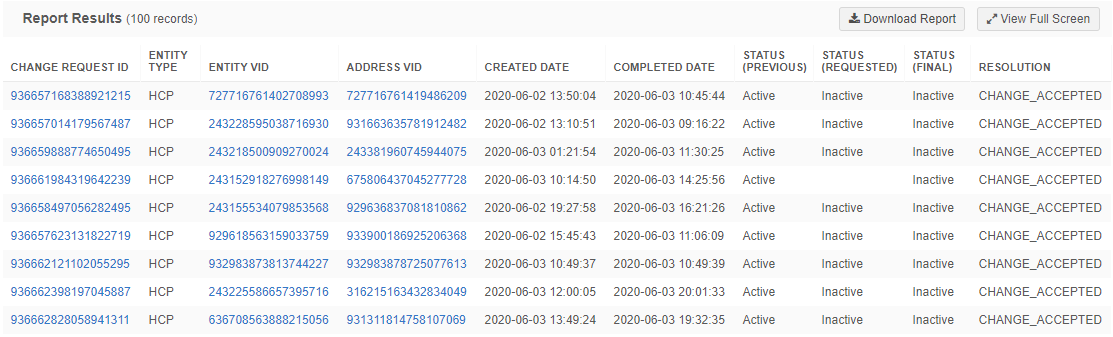
Example - Create a change request query
Use the change request tables to find all of the DCRs in the last six months where the address status changed.
To create this query, we need to find all of the addresses that meet the following criteria:
- The address status (old) and address status (final) are not equal
- The DCR completed date is within the last six months
In the report result, we want to display the following fields:
|
|
- Begin the query with a SELECT statement.
-
Add the fields that you want to see in the report results.
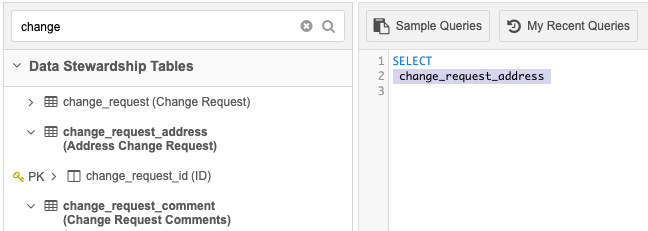
- To find the change request ID field for the change request address table, type changein the search box. The change request tables are in the Data Stewardship Tables category.
-
Find the table and field in the search results. Drag and drop the table and field into the SQL editor box.
When you drag and drop elements, they remain highlighted. Spaces are automatically added before and after the element. After dropping an item into the query box, press the right-arrow key to continue writing your query.
- Continue searching for the remaining fields and insert them into the query.
-
Use a FROM statement to tell the query which tables to use. To find the addresses that were submitted in change requests, we need to join the Change Request and Address Change Request tables.
- To understand how to join the Address Change Request and Change Request table, you'll notice that both of these tables have a primary key field called
change_request_id. These two primary keys JOIN with one another. -
You can add the table and field references into the SQL editor box.
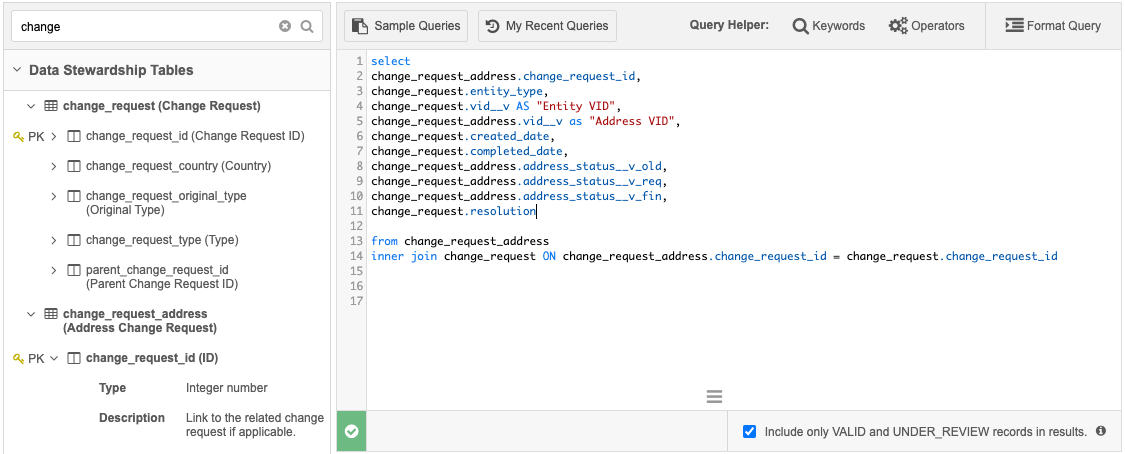
- To understand how to join the Address Change Request and Change Request table, you'll notice that both of these tables have a primary key
-
Create a WHERE statement to insert the criteria for the query.
-
The Address Status (Previous) must not equal the Address Status (Final) - Search for the address status fields and add them to the query.
-
The change must have been completed within the last six months - Search for the completed date field in the tree view pane and click Add to Query.
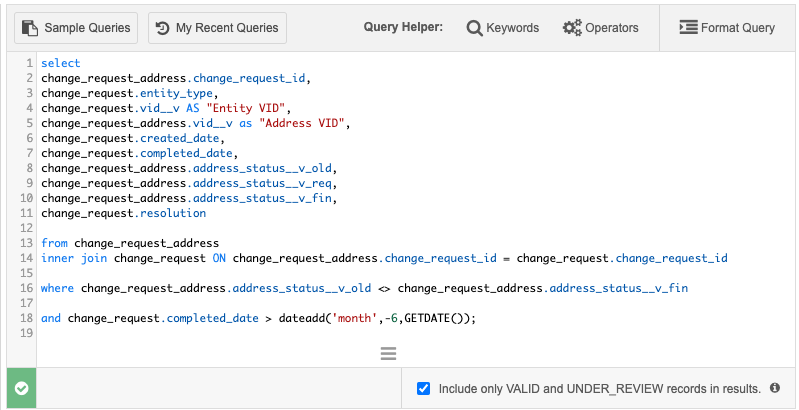
Final query
select change_request_address.change_request_id, change_request.entity_type, change_request.vid__v AS "Entity VID", change_request_address.vid__v as "Address VID", change_request.created_date, change_request.completed_date, change_request_address.address_status__v_old, change_request_address.address_status__v_req, change_request_address.address_status__v_fin, change_request.resolution from change_request_address inner join change_request ON change_request_address.change_request_id = change_request.change_request_id where change_request_address.address_status__v_old <> change_request_address.address_status__v_fin and change_request.completed_date > dateadd('month',-6,GETDATE()); -
- Ensure the query is valid.
-
Click Run Query to run the report.