Soft deleting custom object records
DM
Administrators and data managers can soft-delete custom object records using a data maintenance job. When records are deleted, the associated sub-objects and relationship objects are also deleted or inactivated. The data maintenance job soft-deletes the records, so you can update downstream systems if records were previously exported before you hard delete them in Network MDM. The data maintenance job deletes custom object records by object type.
Note: To hard delete custom object records in order to remove the custom object from your Network MDM instance, see Hard deleting custom object records.
Soft delete behavior
When you soft delete custom object records, the following behavior occurs:
-
Record state of the main object is set to DELETED.
-
Record state of associated sub-objects and relationship objects are set to DELETED.
If the relationship object is owned by the other main object in the relationship, its record state is set to INVALID.
-
All custom keys are inactivated.
-
Pending tasks will be rejected and removed from the inbox.
Pending tasks on Merged_Into records remain in the inbox until Data Stewards click the task.
Deleted objects cannot be reversed.
Supported custom object records
All main custom object records can be deleted. Sub-objects and relationship object records cannot be deleted on their own.
Exceptions
Main objects cannot be deleted if the record state is MERGE_INTO or PARENT_MERGED.
Create a deletion job
To create a job to delete custom object records:
-
In the Admin console, click System Interfaces > Data Maintenance Subscriptions.
-
Click Add Subscription.
-
In the Add Subscription dialog, expand the list and choose Delete Custom Object Records.
The subscription page displays.
-
In the Details section, provide the following:
-
Name - Type a meaningful name for the subscription.
-
Action - Identifies the job that you chose. This cannot be changed.
-
Delete Records for Object - Expand the list and select a custom object. All of the enabled custom objects in your Network MDM instance display.
The affected sub-objects and relationship objects display below the selected object.
-
Description - Provide a meaningful description.
-
Status - New subscriptions are Enabled by default. They can be disabled when they are no longer needed.
-
-
In the Settings section, select the job options for the subscription.
-
Allow File Reprocessing - Process the feed again, even if the files in the feed were previously processed. When this option is set, all files in the source folder will be loaded, regardless of whether or not they have previously been loaded. This setting is enabled by default.
-
Apply All Enabled Job Validation Rules - Apply validation rules to the job to ensure that the job isn't unintentionally deleting records. (Off by default).
You can create job validation rules for custom objects. For example, to check for Employee records being unintentionally deleted, create a rule for the Employee custom object. Use the HCPIsDeleted rule as an example. The rule will fail the Delete Custom Object Records job if the job tries to delete more Employee records than the rule threshold allows. For details, see Job validation rules.
-
Job Error Log - Export the error log for the source subscription to your FTP server.
Choose where the logs should be stored in your Network MDM FTP:
-
Default - The default error log path is logs/<source system>.
-
Custom - Define a custom directory.
The folders will be created in FTP when the subscription runs. For details, see Custom error log directory.
-
-
-
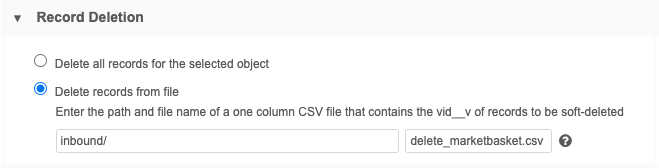
In the Record Deletion section, choose the records that you want to delete for the custom object:
-
Delete all records for the selected object - All records for the custom object will be deleted.
If you choose this option, a table displays the objects that will be deleted by the subscription job. A count of the records that will be impacted and the update to the
record_state__vfield displays.
-
Delete records from file - Specific records that are defined in a .csv file will be deleted.
Create a .csv file that contains a one-column list of Network IDs that you want to delete. Network IDs and object type are validated during the delete job.
Store the file on your FTP server so it can be retrieved during the job.
In the fields, type the FTP path and .csv file name.
-
- In the Job Schedule & Triggers section, you can create a job or email trigger. For example, when the job complete, you could trigger a target subscription to update your downstream systems.
- Save your data maintenance configuration.
- Click Start Job to run the subscription.
Job details
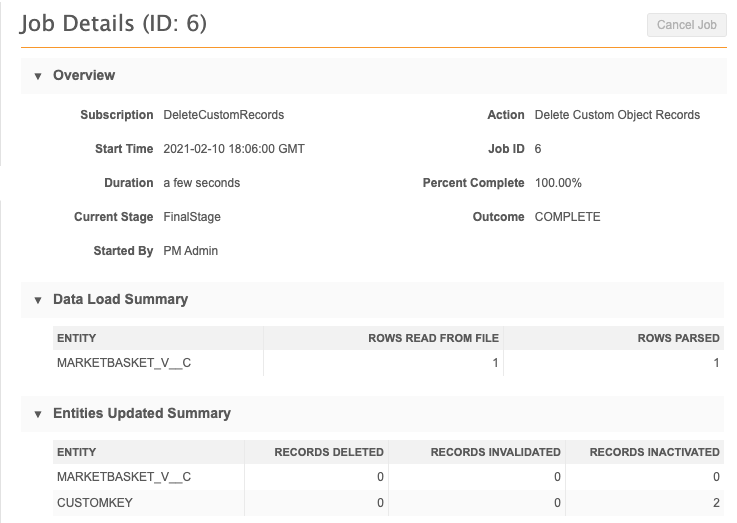
When the job completes, the Job History section is updated. Click the ID column to open the Job Details page.
The Job Details displays the counts of all main object, sub-object, and relationship object records that were deleted, invalidated, and inactivated (custom keys).
Change requests
When you delete objects, any pending tasks are automatically rejected and removed from the inbox and the My Requests page.