Merging records with the Data Updater
DM
Administrators and data managers can use the Data Updater feature to bulk merge records using .csv files and Microsoft Excel (.xlsx) files. The file only requires you to include the Network ID of the losing and winning record of the merge. The data is validated and a summary of the merges is provided before the merge job runs. Data updater jobs are ad hoc jobs; they cannot be scheduled.
Veeva standard objects and custom objects are supported.
Data updater benefits
- Users can merge records without using the bulk merge option in Network MDM's robust source subscriptions feature.
- Microsoft Excel® and .csv file are supported. Microsoft Excel files must be .xlsx files only.
- Files that you upload can be stored locally. Users do not need access to your FTP server.
- Data is scanned to ensure it is valid before records are merged.
Supported merge behavior
A locally managed record can be merged into any other record.
- locally managed record > locally managed record
- locally managed record > Veeva OpenData record
- locally managed record > third party mastered record.
Veeva OpenData records and third party mastered records cannot be merged into another record.
Note: Records can only be merged if they have a Valid record state.
Merge permissions
Administrators and data managers can access the data updater feature, but permission to use the merge operation is required for each user. If the permission is not enabled on your user account, the merge operation isn't available in the Data Updater.
Administrators can assign merge permissions to users.
- In the Admin console, click Users & Permissions > Users.
- Open a user account.
-
In the Additional Permissions section, expand the list beside Data Updater - Merge Records and choose Allow.
For new and existing users, the value is set to Do Not Allow by default.
- Save your changes.
That user can now use the Data Updater feature to merge records.
Create a file
To merge records in your Network MDM instance, create a .csv or Microsoft Excel (.xlsx) file that includes the Network ID of the winning and losing records that you want to merge. Each file should contain updates for individual objects; for example, create one file for HCPs and one file for HCOs.
File requirements
The following requirements must be met so the file upload does not fail:
-
File data - The file must include two columns:
- vid_loser - The Network ID of the losing object of the merge. This record must be a locally managed record.
- vid_winner - The Network ID of the winning object of the merge.
Any other columns in the file are ignored.
-
Format - The file format must be either .csv or .xlsx.
If you are uploading a Microsoft Excel (.xlsx) file, ensure that the cells in the VID field column are defined as a text; otherwise, the VIDs might be trimmed in the file.
- Size - A maximum of 50,000 merges can be included in the file.
Example file
The columns identify the losing and winning record for the merge.

Upload the file
Add a file to merge the records in your Network MDM instance.
-
On the Network MDM menu bar, click Data Updater.
This tab displays for administrators and data managers only.
-
Click New Data Operation.
-
On the Select a New Data Operation dialog, choose Merge Records.
If the Merge Records option is dimmed, you do not have permission to the operation through your user account.
-
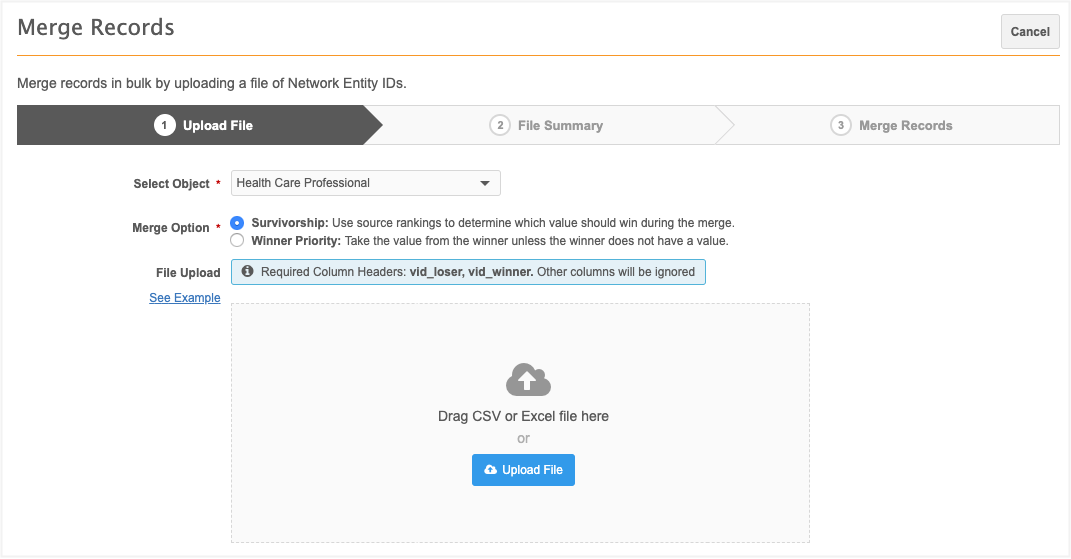
The Upload File tab specifies the object and merge operation. The following details are required:
- Select Object - Choose the object type that you are updating. The list displays main objects (HCPs, HCOs, and any custom objects that are enabled in your Network MDM instance that you have access to through your data visibility profiles).
-
Merge Option - Select the merge behavior to apply to this file.
-
Survivorship - Use source rankings to determine the field value that is retained on the winning record.
This option uses the job.merge.mergeInstruction": "InclusiveMerge" property and value.
-
Winner Priority - The field value on the winning record is retained. If the winning record does not have a value, keep the value from the losing record.
This option uses the job.merge.mergeInstruction": "ExclusiveMerge" property and value.
-
- File Upload - Drag your file into the box or click Upload File to choose a file.
When the file is added, it is scanned to validate the data. If there are any issues with the file, a message displays.
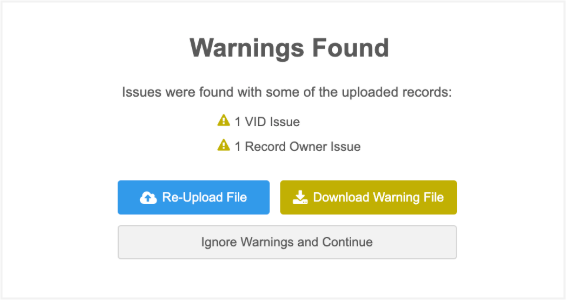
Possible issues:
- Missing VID - A Network ID is missing from a column in your file.
- VID Issues - A Network ID is not valid. Ensure that each VID is 18-digits and that the VIDs are correct for the records in the file.
- Record State Issue - The record state is not supported for update. Only VALID record states are supported for these jobs.
- Record Owner Issue - The losing record is not locally managed. Only locally managed records can be merged into winning records.
- Primary Country Issue - The primary country of the losing and winning records do not match. Both records must have the same primary country.
A count for each issue is provided.
Fix the issues and upload the file again. If the file contains warnings only, you can download the file and fix the warnings, or ignore the warnings and upload the file.
The upload will fail for specific errors (for example, the file format is not valid) or if at least half of the records have issues; otherwise, the file will be uploaded.
Review the file summary
When the file is uploaded, you can view a summary of the data before you commit the changes to Network MDM.
-
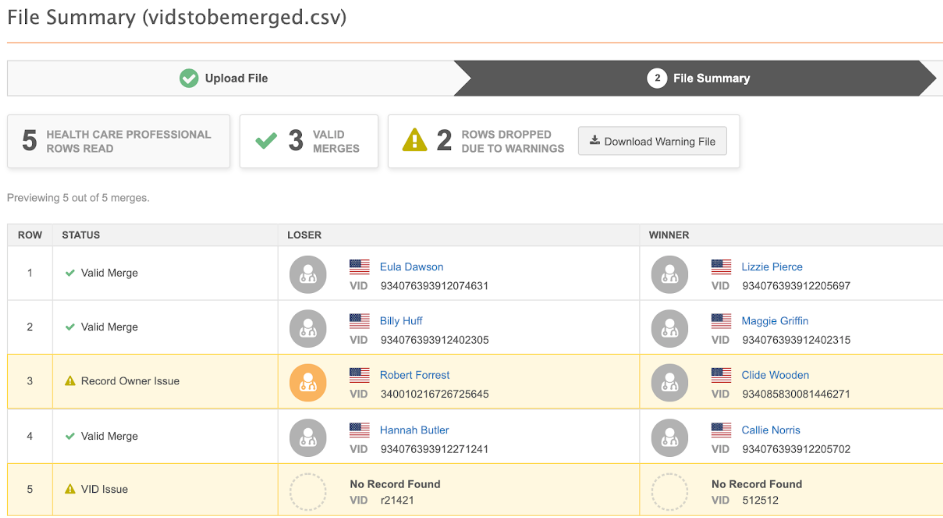
Review the details on the File Summary page.
A count for the following details display at the top of the summary:
- Rows read - The total number of rows included in the file for the object.
- Valid Merges - The number of merges that can be completed in the file.
-
Rows Dropped due to Warnings - A count of warnings.
Download the error or warning file to identify the records with issues. The file downloads as a Microsoft Excel file. The file can contain a maximum of 250,000 errors. If the limit is reached, errors will stop being written to the file.

The first 10 merges display.
- To commit your changes, click Merge Records.
- In the Confirm Record Updates dialog, you can add details to the Job Notes box. This can be helpful to provide context about the updates and will display on the Job Details page after the Data Updater job runs.
- Click Yes, Merge Records.
Merge records
When you confirm the merge, the Data Updater summary page opens and a message displays to notify you that the job is started. The Status column displays the progress of the job.

On the Data Updater page, data managers can see the jobs that they have run; administrators can see all of the jobs run by any user in the Network MDM instance. Filter the list of jobs by operation type, object type or source system (all merge operations use the merge_request source system).
Click the link in the Job ID column to open the Job Details page.
Job details
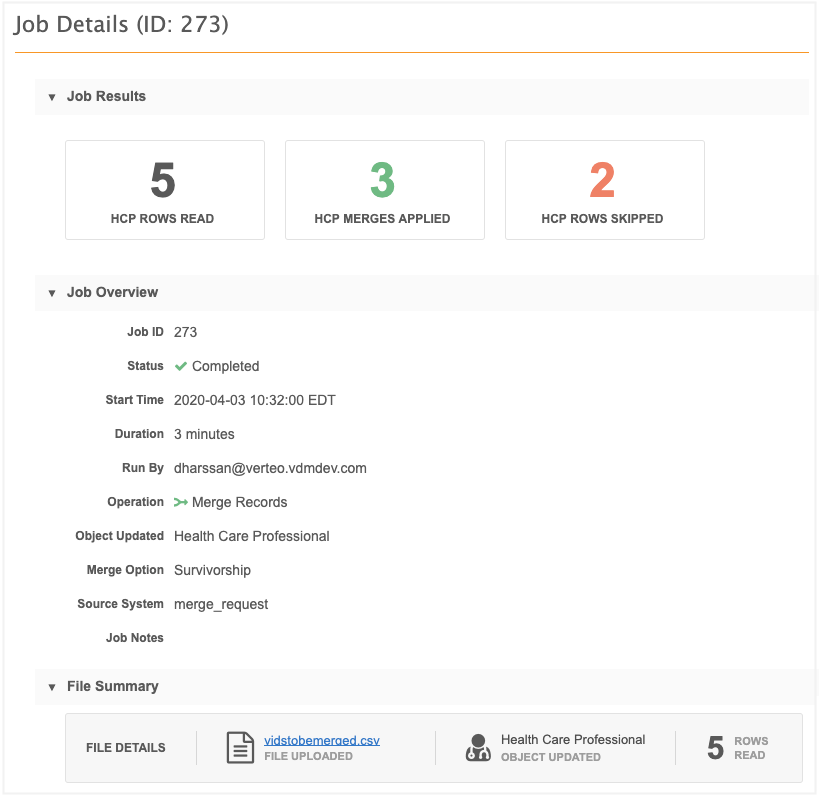
The Job Details page provides a summary of the data updater job.
Job Results
This section provides an overview of the records that were updated.
The following counts display:
- Rows Read - The number of merges that were included in the file.
- Merges Applied - The merges that occurred during the job.
- Rows Skipped - A count of merges that did not occur because of warnings or errors.
Job Overview
This section displays the job information, including any job notes that you provided.
Note: The Source System, merge_request, is an internal system that the Data Updater uses for these merge jobs.
File Summary
Review the file details, selected object, and merges that were included in the file.
Job Error Log
This section displays if the job included any errors.
Reporting
Data updater job statistics are available in Network MDM reports.