API
Data update API
Use the Data Update API to perform efficient, small-batch record changes without requiring a full source subscription.
Unlike the Change Request API—which defaults all updates to the change_request source—you can define a specific source for each update. This ensures that changes are accurately reflected in the record's data lineage and that Network MDM’s source rankings are correctly applied to the data.
API version
The Data Update API is supported for version 37.0 and later.
User access
Users can update records through the API if they have the following requirements defined on their user profile (Users & Permissions > Users).
| User Requirement | Details |
|---|---|
| User Type | System Administrator, System and Data Admin, Integration User |
| User Permission |
API Access - Set to one of the following:
|
| System Access |
API Access must be granted for the system defined in the API call. |
Supported updates
-
Objects - All Network MDM objects except Custom Key.
Multiple object types are supported for each API call.
-
Job size - A maximum of 100 records in each API call.
-
Record status - Valid records only.
-
Synchronous updates - Receive immediate confirmation in the response for time-sensitive changes.
Actions not supported
-
Updating custom keys.
-
Creating records.
PUT data
PUT https://{{DNS}}//api/{{version}}/objects
Parameters
These parameters are required.
| Parameters | Required Values | Required? |
|---|---|---|
| entities | vid_key - The ID of the record.
Supported formats:
|
Yes |
| systemName | The source system for updating the records. | Yes |
| fields | API field names of the associated object. | Yes |
Example
{
    "entities": [
        {
            "vid_key": "Network:Entity:932315773830225247",
   		"fields": {
			 "nickname__c": "Paul"
			 }
        },
        {
            "vid_key": "VCRM-vpm.verteo:Account:0017e00001vUoGTAA0",
            "fields": {
			"nickname__c": "Paul"
			}
        },
        {
            "vid_key": "AlternateId:alt_id__c:ALT-152HE8V73",
            "fields": {
			 "nickname__c": "George"
			}
        },
	    {
            "vid_key": "Network:Entity:932315773830000000",
            "fields": {
			"nickname__c": "DNE"
			}
        }
    ],
    "systemName": "hcp_portal"
}
Response
The API response returns the final attribute values for each record update. Use the response to confirm if your submitted changes were successfully applied to the record in Network MDM.
| Name | Description | |
|---|---|---|
| job_id | The job ID. | |
| responseStatus |
The status of the response in Network MDM.
|
|
| entities |
The record information.
|
Example response
{
    "responseStatus": "PARTIAL_SUCCESS",
    "jobId": 35301,
    "entities": [
        {
            "responseStatus": "SUCCESS",
            "entityId": "941617580124866148",
            "entityType": "HCP"
        },
        {
            "responseStatus": "FAILURE",
            "errors": [
                {
                    "type": "INVALID_DATA",
                    "message": "No entity found with given Id Network:Address:100"
Failed updates
If a record was not updated during the API call, the response contains an error message to state the reason.
| Type | Message | Details | |
|---|---|---|---|
| Error | Insufficient_Access | User does not have sufficient privileges to perform the action. | The user does not have API access to the system.
To resolve the issue: In the Additional Permissions section on the user profile, add the system to the API Access permission or choose Allow All Systems. |
| Error | Invalid_Data | Multiple requests for some same entity: <Network ID>, Vidkey: Network:Entity:<Network ID>. | Duplicate records were submitted in the API call. |
| Warning | No_Data_Changes | No changes in values - record not updated | The record had no update applied during the API call.
For example, if you submit a field value change by a system with a lower source ranking than the current field value, the change will not applied to the master record. |
Logs
Network Administrators can now access a complete history of Data Update API calls directly within Network MDM. Use the Data Update API Audit History log to track how and when records were updated and to troubleshoot issues.
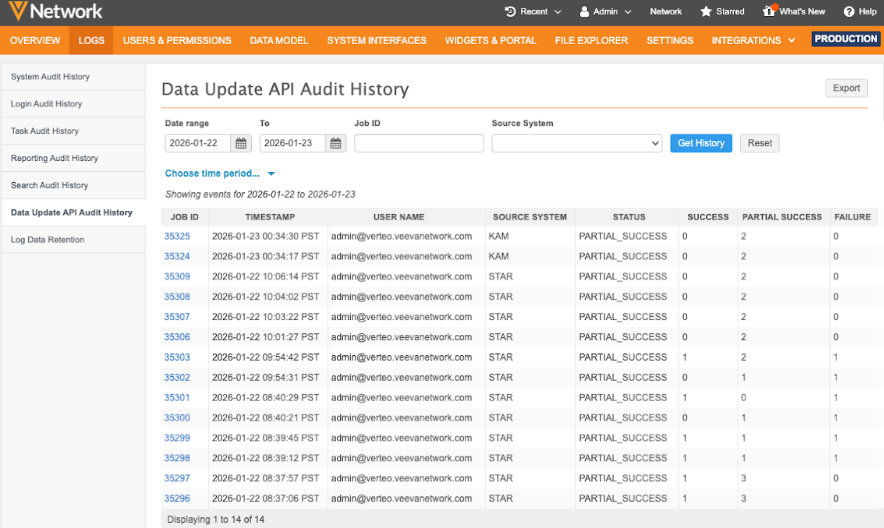
To view the log:
-
In the Admin console, click Logs > Data Update API Audit History.
-
Quickly find the events by filtering the table using one of the following:
-
Date Range - Select the range of dates.
-
Job ID - Type a specific ID.
-
Source System - Filter the table by system.
-
Time Period - Choose one of the predefined periods.
-
-
Click Get History to view the results.
-
(optional) Click Export to download the results as a .csv file.