Hierarchy Explorer widget
Hierarchy Explorer is a Network widget that you can use to see all levels of an HCO's structure, making it easy to visualize their hierarchy and find new targets.
To enable Hierarchy Explorer in your Network instance, contact Veeva Support.
The following enhancements have been added for the Hierarchy Explorer widget in this release.
Create tabs for HCOs and HCPs
Widget users can create tabs to organize HCOs and HCPs on key networks. This enables users to see the segments of data without filtering the hierarchy each time they visit the widget. For example, you can create tabs to organize hospitals, 340B Accounts, Records with Sales Tied to it, and oncologists.
This enhancement is enabled by default.
About tabs
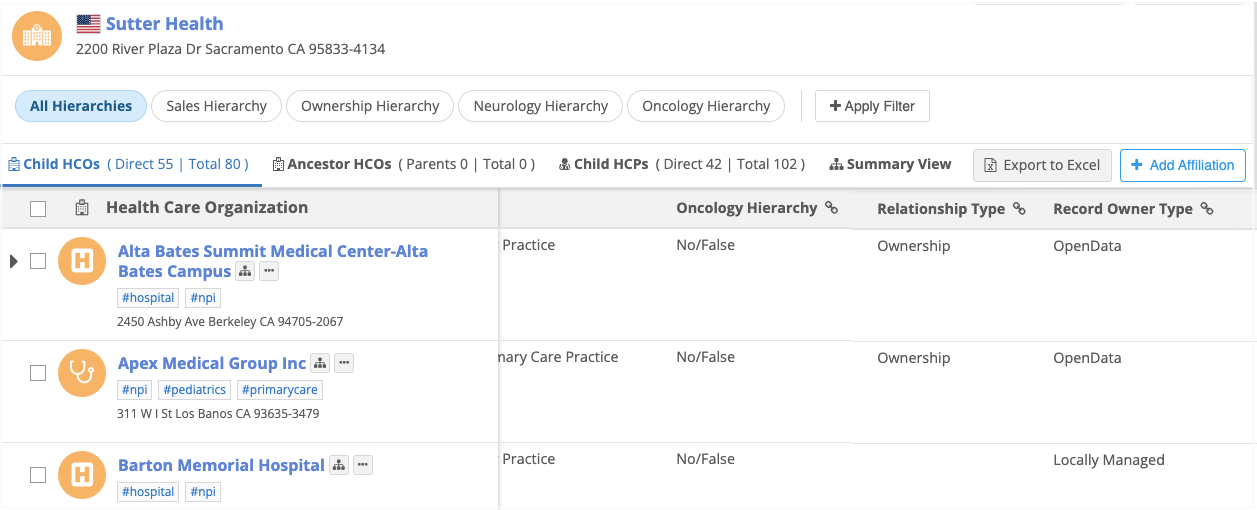
The following system tabs always display for a health system:
-
Child HCOs
-
Ancestor HCOs
-
Child HCPs
-
Summary View
Users can now create their own tabs and access any shared tabs created by a widget admin.
Important: Tabs are applied to all hierarchies and health systems in the widget. They display if they are relevant to the country of the root HCO.
Supported users
All Network users can create tabs in the widget.
| User Type | Create Private Tab | Create Public Tab |
|---|---|---|
| Portal User |

|
|
| Standard User |
|
|
| Data Steward |
|
|
| Data Manager |
|
|
| System Administrator |
|
|
| System and Data Admin |
|
|
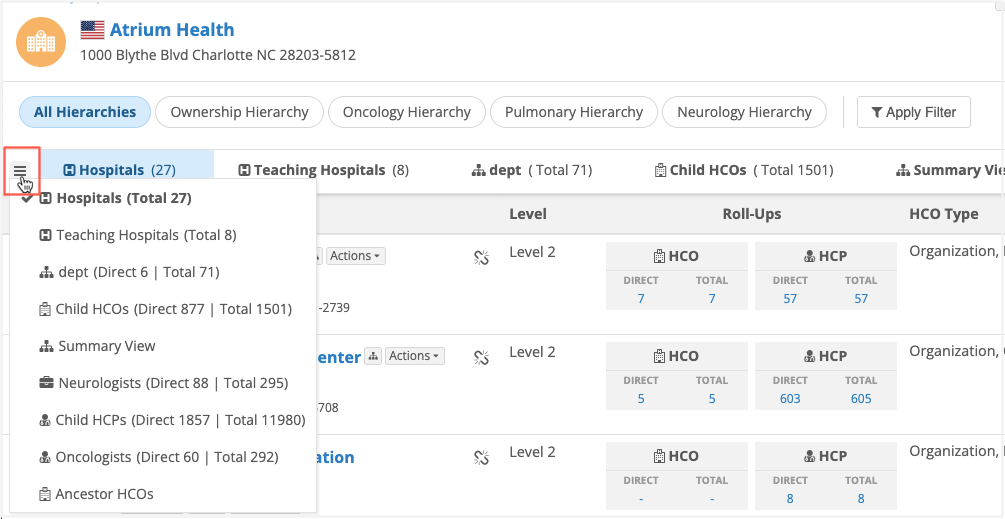
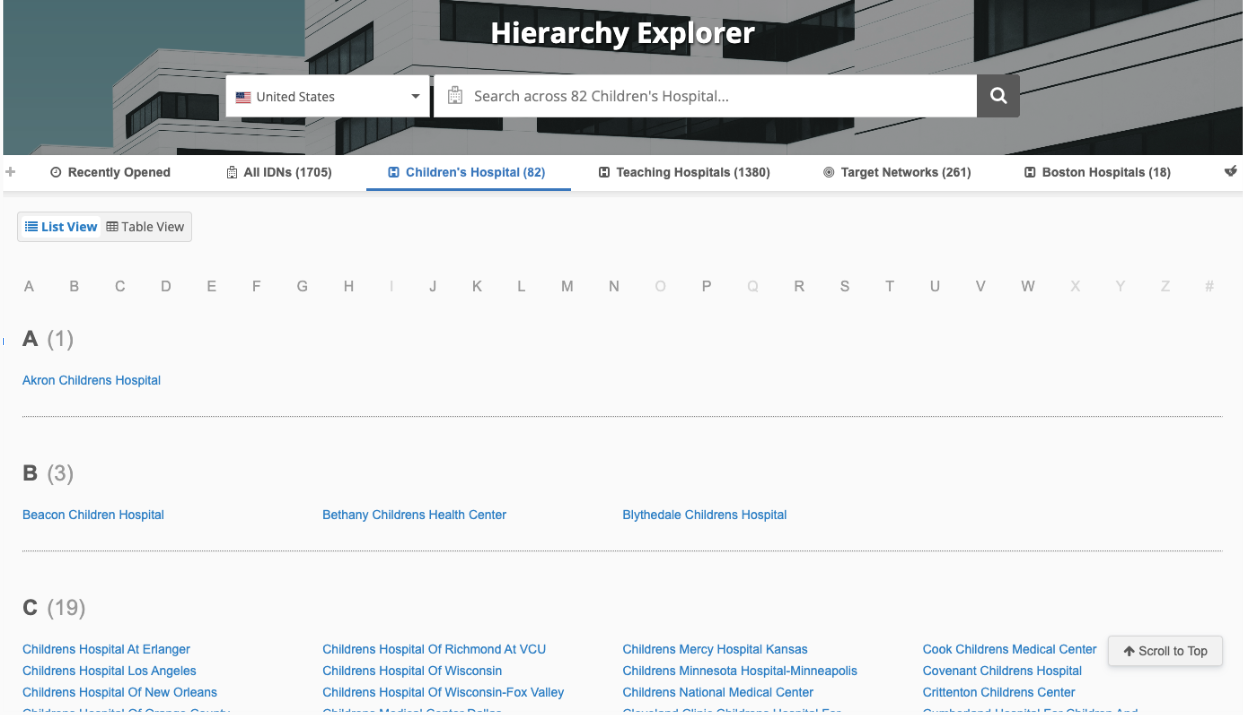
Tab list
If the hierarchy contains many tabs, you can scroll through the tabs.
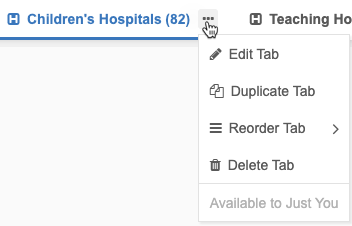
To quickly open a tab, click the Menu icon to display a list of all tabs for the health system.
The tab that is currently open is highlighted in bolded font and displays a Checkmark beside the tab name.
Click a tab to open it.
Create a tab
-
On the health system, click Actions > Add Tab.
-
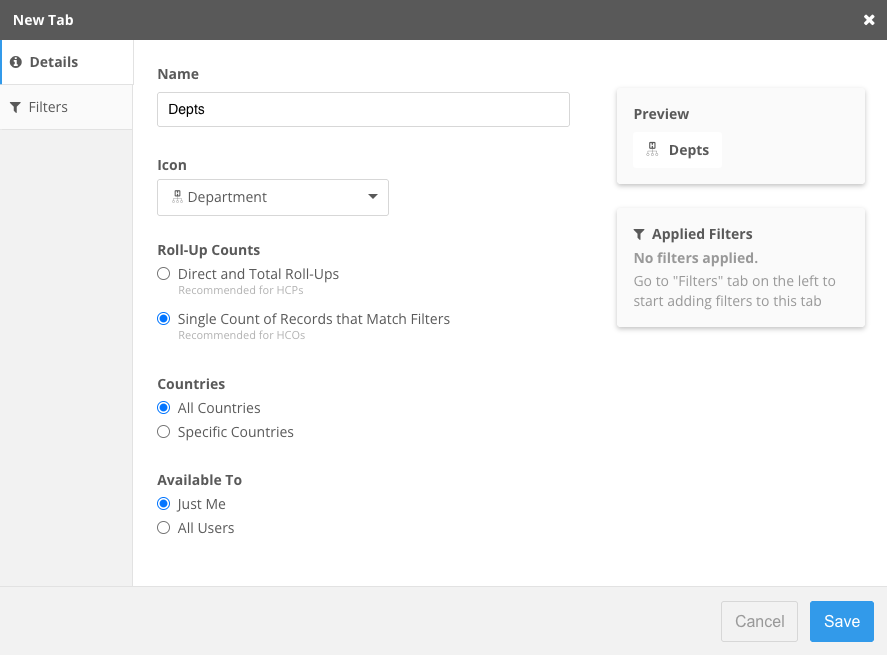
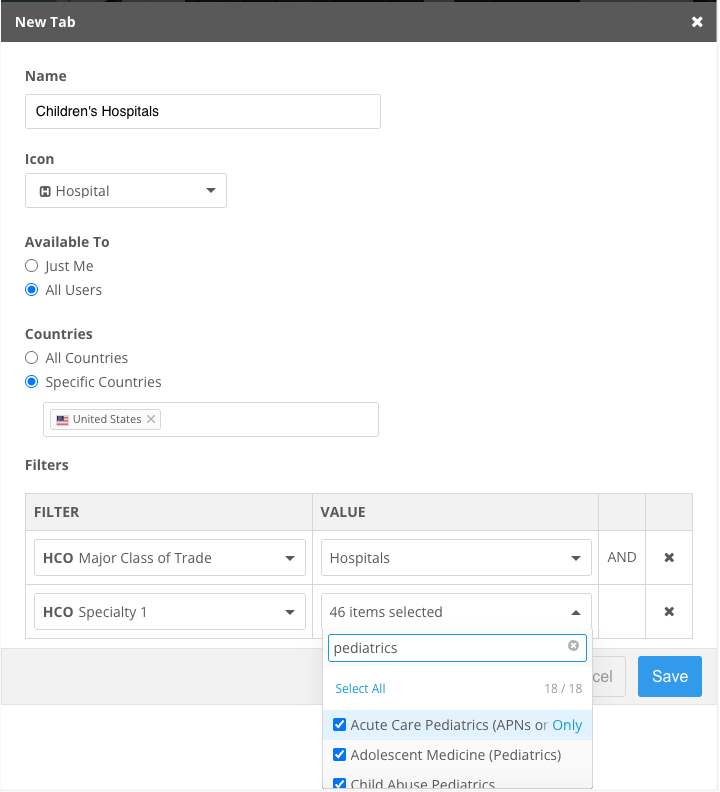
On the New Tab dialog, define a meaningful Name. The name will display to all users that can access the tab.
Names can contain a maximum of 25 characters.
-
Icon - Expand the list and choose an appropriate icon.
-
Roll-Up Counts - Define the counts to display for the tab.
-
Direct and Total Roll-Ups - Recommended for HCPs.
-
Single Count of Records that Match Filters - Recommended for HCOs.
-
-
Countries - Define the countries for the tab. Users can access the tab if they have a data visibility profile for that country.
-
All Countries
-
Specific Countries - Select the countries.
The list displays countries that are defined for the widget and that you have access to through your data visibility profiles.
-
-
Available to me - Define who can access the tab.
-
Just Me - The tab is private. No other users can access the tab.
-
All Users - The tab is public. All widget users can access the tab.
Displays only for Administrators and Data Managers.
-
-
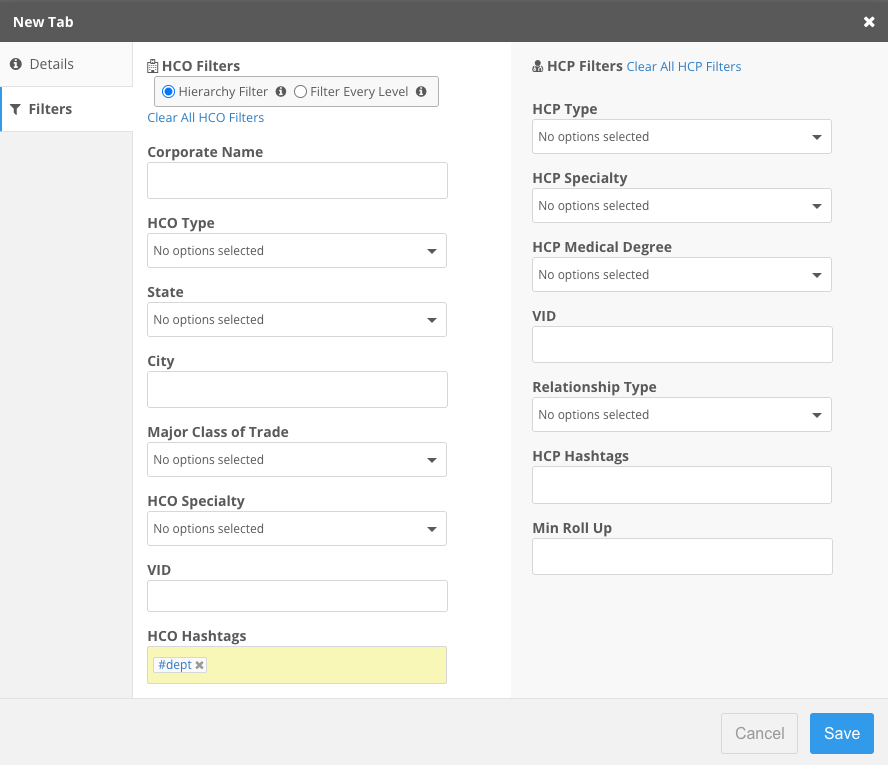
Click Filters - Define the field and value to use to segment the accounts.
Filters are limited to the fields in the Hierarchy Index file. HCO fields and Address fields are supported.
-
Save your changes.
The tab displays on the health system's hierarchy and contains the records defined by the filters. The count of records displays beside the tab name.
Choose HCO Tab or HCP Tab.
Manage tabs
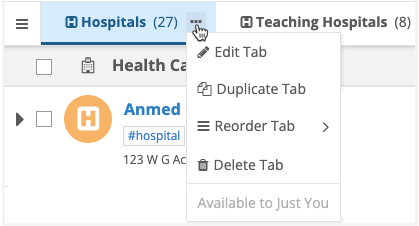
Hover over the tab name and click the More (...) icon to open the tab options.
Available actions
The actions that display depend on the type of tab (public or private) and your user type.
Some actions are also available for system tabs.
| Action | Description | Key Details |
|---|---|---|
| Edit tab | Edit any of the details on the tab. |
|
| Duplicate tab | Make a clone of the tab to include all of the copied settings. |
|
| Reorder tab |
Move the tab to a different position.
- Move Right - Move Left - Move First - Move Last Tip: You can drag and drop a tab to any position. |
|
| Delete tab | Remove the tab from the widget. |
A message at the bottom of the menu identifies if the tab is private (Available to just you) or public (Available to Everyone).
Export data
Click Actions > Export to Excel to download a file containing only the data on the current tab.
The file is exported with the following naming convention: <tab name> in <health system name> <date and time>.xlsx. For example, Hospitals in Atrium Health 2025-11-11T21_23_35.xlsx.
Search widget integration
Administrators can include a Search widget in Hierarchy Explorer, so users can search for affiliations in Veeva OpenData and submit add requests for new HCOs and HCPs. Previously, affiliations could be added only from your Network instance.
This enhancement is available by default. Administrators can define the Search widget to access in the Hierarchy Explorer widget configuration.
Add a Search widget to Hierarchy Explorer
Administrators can define a Search widget that users can access from the Hierarchy Explorer widget.
If you do not have an existing Search widget, see the Search widget topics.
To add the Search widget:
-
In the Admin console, click Widget & Portal and open a Hierarchy Explorer widget configuration.
-
In the Quick Links panel, click Editing Options to scroll to that section in the configuration.
-
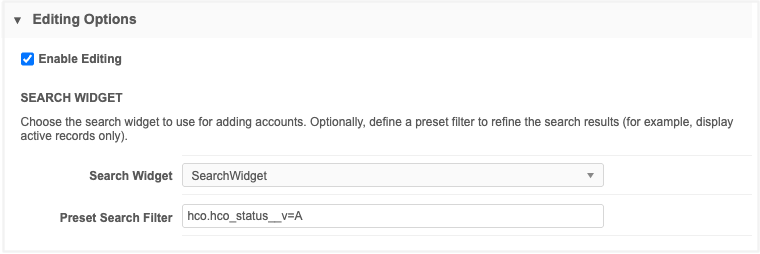
Select Enable Editing so users can manage hierarchies in the widget.
-
Expand the Search Widget list and select the widget users can access within the Hierarchy Explorer widget.
-
Optionally add a Preset Search Filter. For example, to ensure that only active HCOs can be added as affiliations, define the following filter: hco.hco_status__v=A. When users access the Search widget from Hierarchy Explorer, the results will display active HCOs only.
-
Save your changes.
Find an affiliation in the Search widget
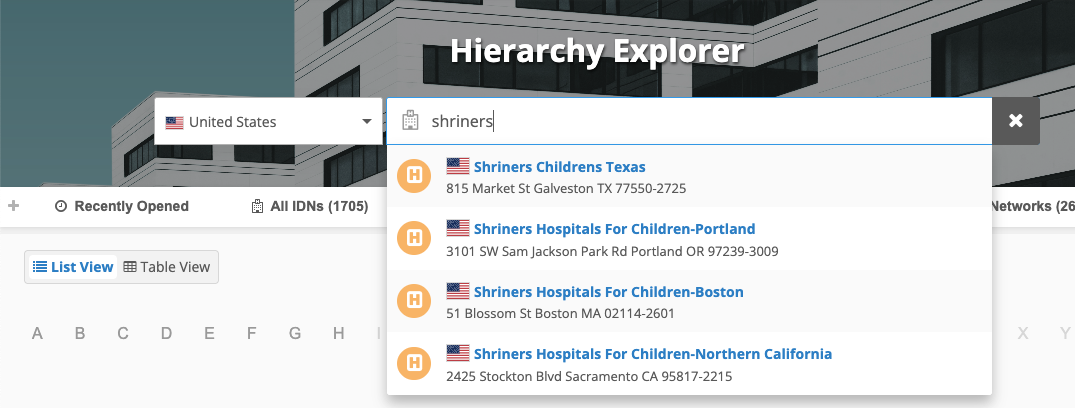
Hierarchy Explorer users can access the Search widget if they can't find the affiliation in the Hierarchy Explorer search results.
The Hierarchy Explorer search results display accounts in their Network instance only. The Search widget displays accounts in their Network instance and accounts that have not yet been downloaded from Veeva OpenData.
To add an affiliation using the search widget:
-
In Hierarchy Explorer, open a health system.
-
Add an affiliation in one of the following ways:
-
Top level affiliation - Click Add Affiliation.
-
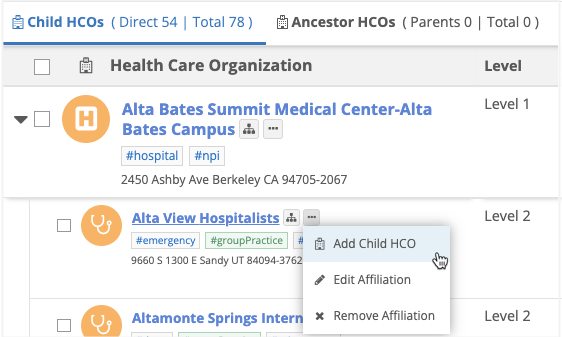
Child HCO - On the Child HCOs tab, beside an HCO, click Actions > Add Child HCO.
-
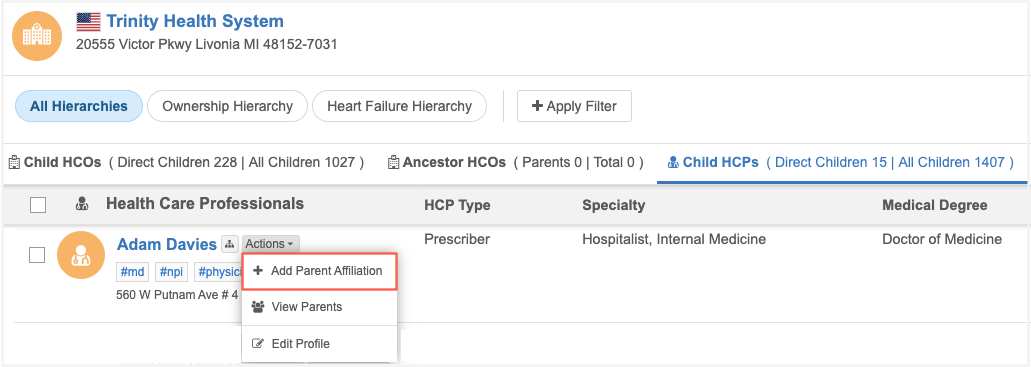
Parent Affiliation - On the Child HCPs tab, beside an HCP, click Actions > Add Parent Affiliation.
-
-
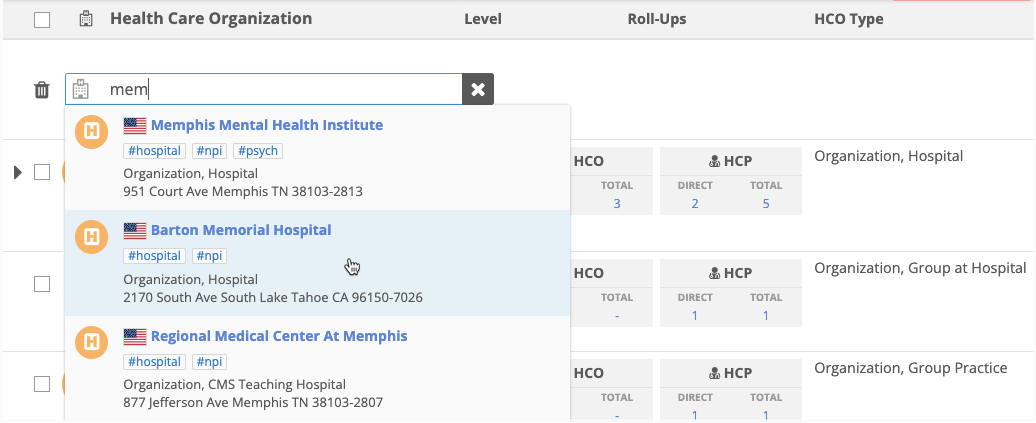
In the row that displays, type a keyword to the search bar.
-
If the account you are looking for cannot be found, click Search More at the bottom of the search results.
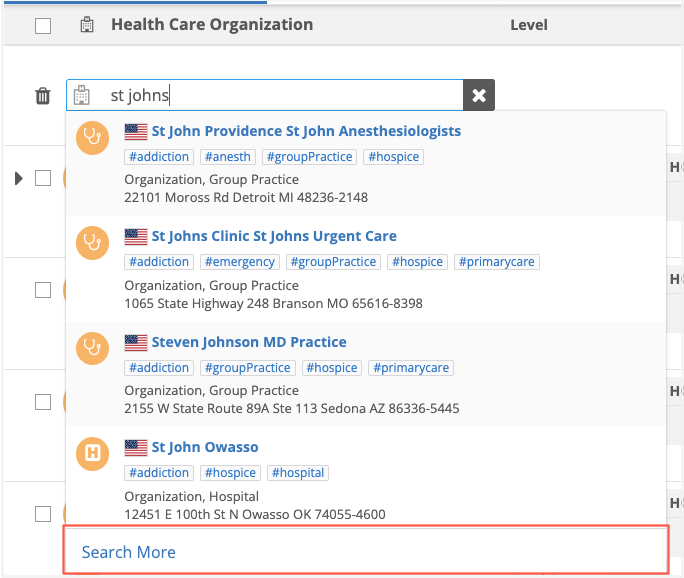
-
The Search widget opens and displays the search results for your keywords. Only results for the object type (HCO or HCP) you are adding display.
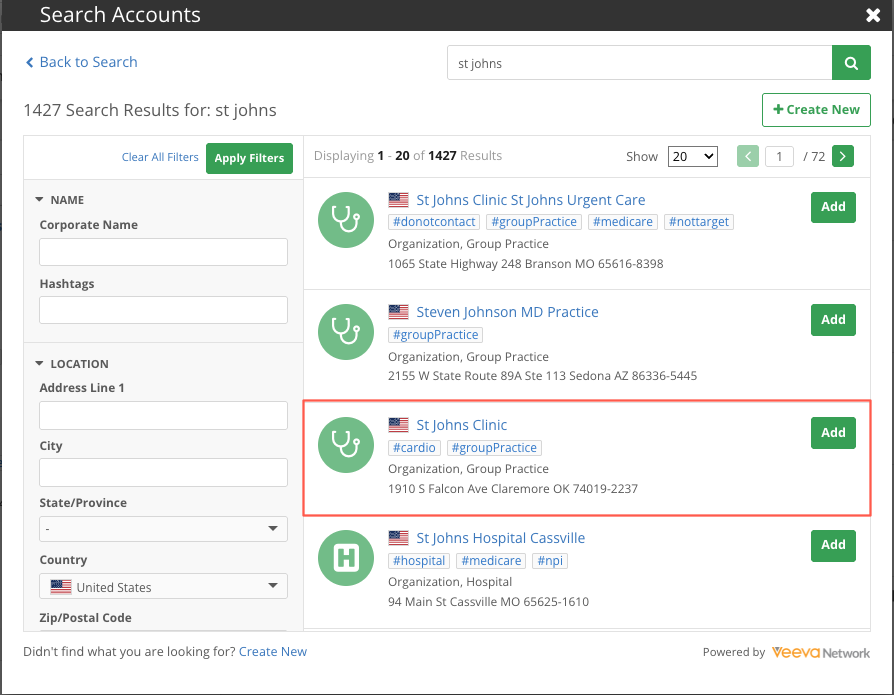
-
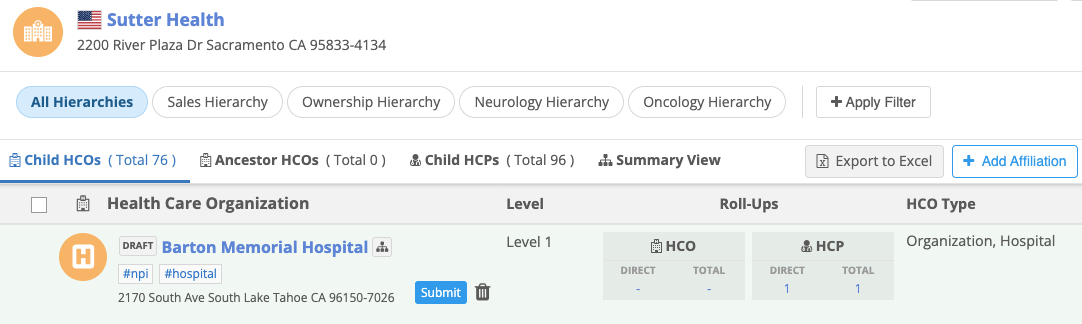
If the account is found, click Add.
The Search widget closes and the account is added as a draft to the first row of the hierarchy.
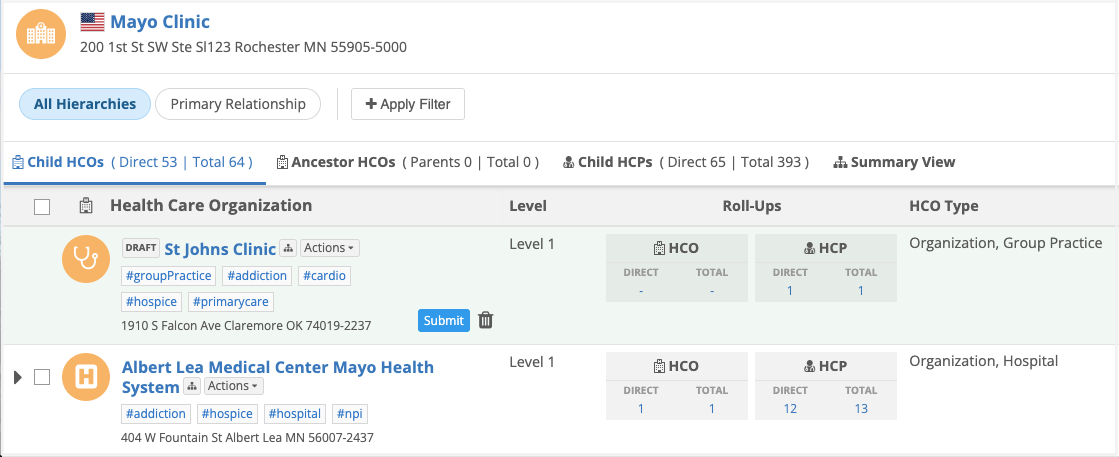
-
Click Submit.
-
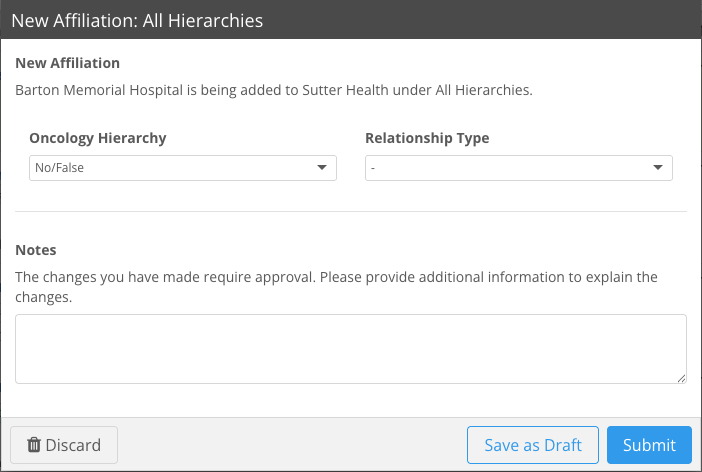
In the New Affiliation dialog, confirm the details and add notes to help Data Stewards to quickly action the DCR.
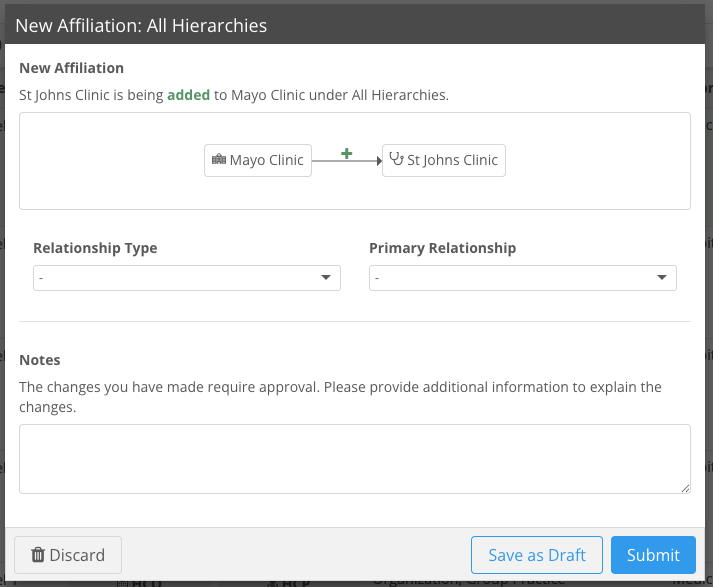
-
Click Submit to send the data change request.
When the DCR is approved, the affiliation will be added.
Search widget options
If the account did not display in the Search widget results, you can start a new search or add the account.
-
Start a new search - In the search results, click Back to Search. The Search widget basic search page displays.
Click Advanced Search to define additional keywords.
-
Add account - Click Create New.
Add the details for the new account and submit the changes as a data change request.

The new account displays as a Draft affiliation on the hierarchy until the data change request is processed.
Add parent affiliations to HCPs
Widget users can now easily add parent HCOs to HCPs in the widget.
This enhancement is available by default.
Prerequisite
Administrators must enable editing for the widget.
-
In the Admin console, click Widgets & Portal > Network Widgets.
-
Select a Hierarchy Explorer widget configuration.
-
In the Editing Options section, select Enable Editing.
Add a parent affiliation
To add an HCP to a parent HCO, add a Parent Affiliation to the HCP.
-
Parent Affiliations can be added from the Child HCPs tab in the following places:
-
Beside an HCP name, click Actions > Add Parent Affiliation.
-
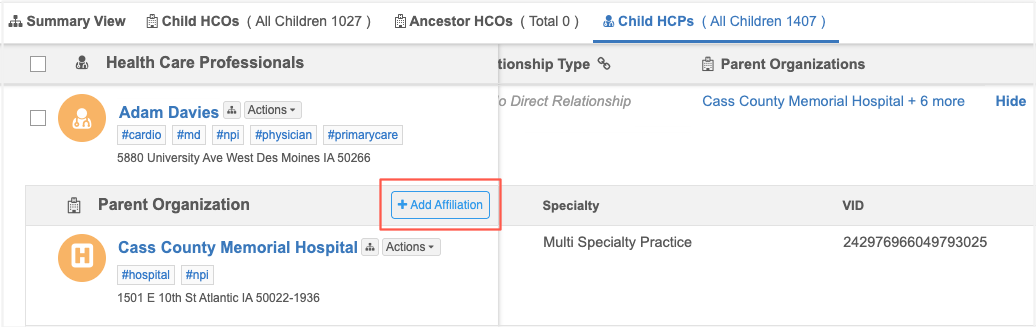
In an HCP row, scroll to the Parent Organizations column. Click the link to open the Parent Organization details and click Add Affiliation.
-
-
A row is created in the Parent Organization table. Begin typing the affiliation name in the Search field.
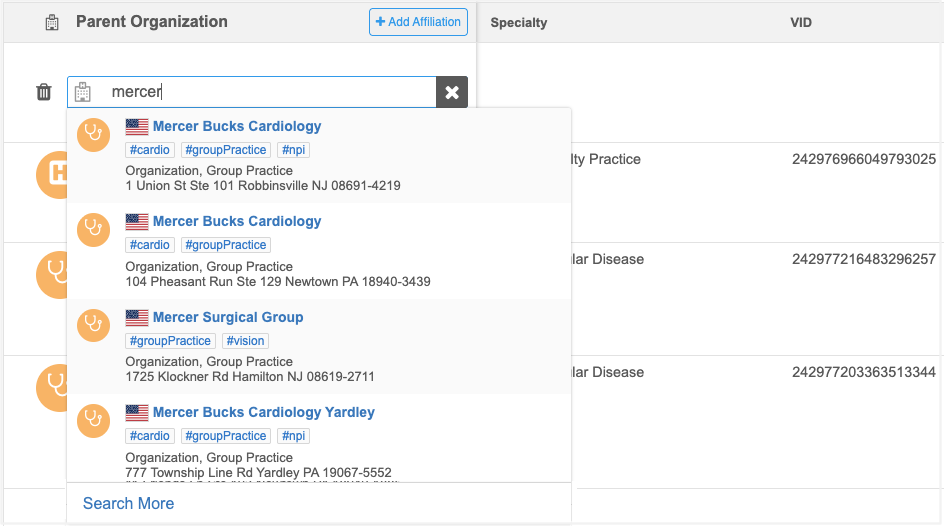
Results begin displaying accounts from your Network instance that match the keywords.
-
Select an HCO to add as a parent affiliation.
-
The HCO is added as a row. The Draft icon displays beside the account name.
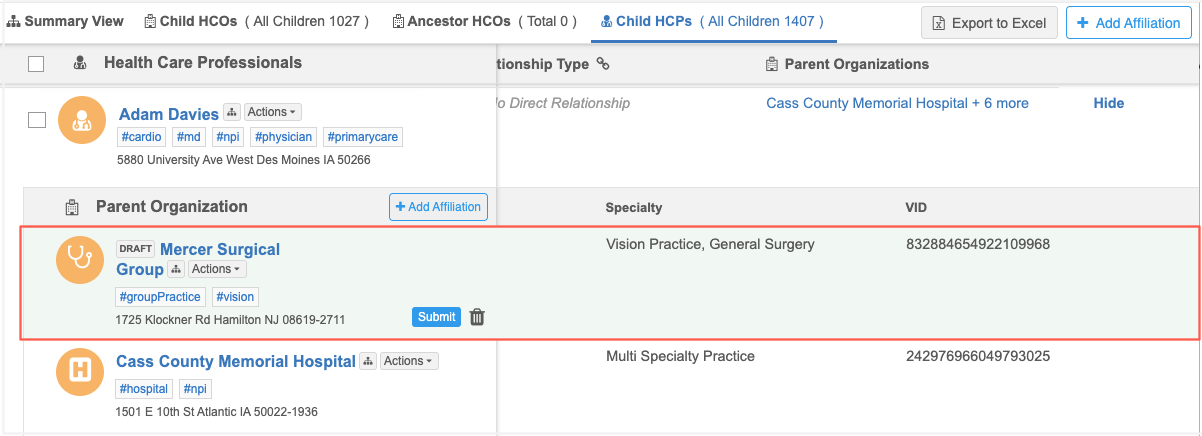
Available actions:
-
Submit - Click to send a DCR so the affiliation can be added to the account.
-
Delete - Click the Trash icon to remove the draft affiliation.
-
-
If you click Submit, the New Affiliation dialog displays.
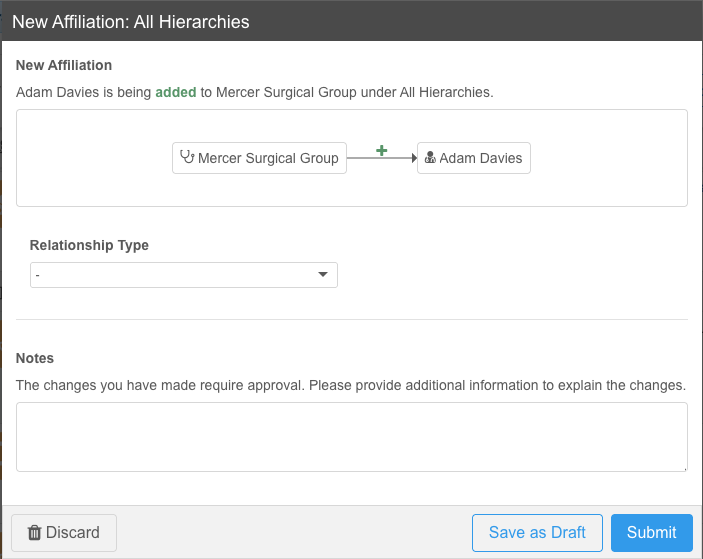
Add the following details:
-
Fields - Add or change the field values that will be included on the DCR.
-
Notes - Add details to help the parent affiliation changes to be quickly approved.
Available actions:
-
Submit - Click to send a DCR so the parent affiliation can be added to the account.
-
Save as Draft - Click to keep the parent affiliation as a draft change.
Drafts are temporary and are removed when you leave or refresh the page.
-
Delete - Click the Trash icon to remove the draft parent affiliation.
-
-
If you submitted the change, a DCR is created.
The HCO remains highlighted in green and displays a Pending Review
 icon. Click the icon to display details and the task ID.
 When the DCR is approved, the Parent Affiliation is added.
Feature message
Hierarchy Explorer is a Network widget that you can use to see all levels of an HCO's structure, making it easy to visualize their hierarchy and find new targets.
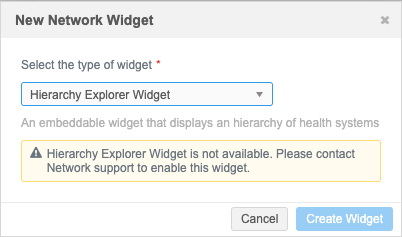
The widget is not available by default.
If Hierarchy Explorer is not enabled in your Network instance, a message displays when you try to add the widget:
Hierarchy Explorer Widget is not available. Please contact Network support to enable this widget.
Hierarchy Explorer tabs
Widget users can create tabs on the homepage to organize segments of data. Previously, Administrators had to create multiple widgets for each of the data segments their users wanted to access (for example, hospitals, IDNs, Pharmacies).
This enhancement is enabled by default. Tabs can be created by any user.
Key highlights
-
Tabs can be created to filter on segments of data.
-
Tabs can be specific to countries or available to all countries.
-
Administrators and Data Managers can create private tabs and public tabs for all users.
-
All users can create private tabs.
Supported users
All Network users can create tabs in the widget.
| User Type | Create Private Tab | Create Public Tab |
|---|---|---|
| Portal User |
|
|
| Standard User |
|
|
| Data Steward |
|
|
| Data Manager |
|
|
| System Administrator |
|
|
| System and Data Admin |
|
|
Create a hierarchy tab
To create a tab:
-
On the Hierarchy Widget homepage, click Add Tab.
-
On the New Tab dialog, define a meaningful Name. The name will display to all users that can access the tab.
Names can contain a maximum of 25 characters.
-
Icon - Expand the list and choose an appropriate icon.
-
Available to me - Define who can access the tab.
-
Just Me - The tab is private. No other users can access the tab.
-
All Users - The tab is public. All widget users can access the tab.
Displays only for Administrators and Data Managers.
-
-
Countries - Define the countries for the tab. Users can access the tab if they have a data visibility profile for that country.
-
All Countries
-
Specific Countries - Choose from the list of countries defined for the widget.
-
-
Filters - Define the field and value to use to segment the accounts.
Filters are limited to the fields in the Hierarchy Index file. HCO fields and Address fields are supported.
-
Save your changes.
The tab displays on the widget homepage. A count of records displays beside the tab name.
Manage tabs
Hover over the tab name and click the More (...) icon to open the tab options.
Available actions
The actions that display depend on the type of tab (public or private) and your user type.
| Action | Description | Key Details |
|---|---|---|
| Edit tab | Edit any of the details on the tab. |
|
| Duplicate tab | Make a clone of the tab to include all of the copied settings. | |
| Reorder tab |
Move the tab to a different position.
- Move Right - Move Left - Move First - Move Last Tip: You can drag and drop a tab to any position. |
|
| Delete tab | Remove the tab from the widget. |
A message at the bottom of the menu identifies if the tab is private (Available to just you) or public (Available to Everyone).
Hierarchy Explorer search
Searching for an HCO on the homepage respects the tab that you are on when you search.
Logs
Administrators can track changes to the Hierarchy Explorer widget tabs in the System Audit History.
Tracked changes:
-
Add private and public tabs.
-
Update private and public tabs
Editing hierarchies
Business users can now add, remove, and edit affiliations directly within the Hierarchy Explorer widget.
This enhancement is available by default. Administrators can enable editing for the widget and for specific hierarchies.
Benefits
-
Easily add accounts to the hierarchy - Add accounts to any level of the hierarchy. Previously, you had to jump to different accounts to find the correct affiliation.
-
Simplify custom hierarchy management - Business users can edit custom hierarchies directly within the widget, streamlining the management process.
Key highlights
-
Editing can be enabled for specific hierarchies.
-
Add accounts or remove accounts in any level of the hierarchy.
-
Edit relationships and accounts.
-
Make the changes directly within the hierarchy view to understand the impact.
-
Preview the changes as drafts before committing them.
-
Submit DCRs against the hierarchy directly from the widget.
Enable editing
Administrators can enable editing in the Hierarchy Explorer widget configuration.
-
In the Admin console, click Widgets & Portal > Network Widgets.
-
Select a Hierarchy Explorer configuration.
-
In the Editing Options section, select Enable Editing.
Enable editing for hierarchies
When editing is enabled for Hierarchy Explorer, it is available by default for the following hierarchies:
-
All Hierarchies
-
Ownership Hierarchy
Enable editing for custom hierarchies
To enable editing in the widget for custom hierarchies:
-
In the Admin console, click Data Model > Hierarchy Management.
-
On the Hierarchy Management page, select a hierarchy.
-
In the Editing Options section, select Enable hierarchy editing in Hierarchy Explorer.
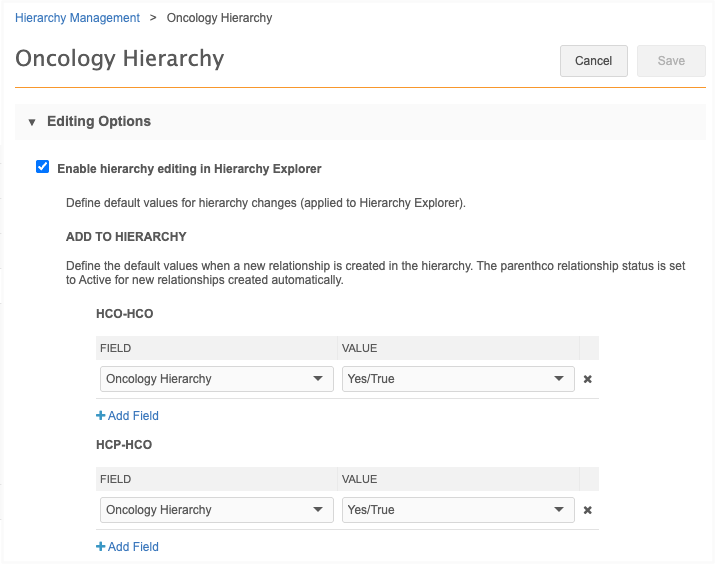
-
Add to Hierarchy / Remove from Hierarchy - Define the default field values that will be included in the DCR when users add or remove affiliations in the widget.
For example, set the Oncology Hierarchy field to Yes/True and the Relationship Type field value to Affiliation when users add HCO-HCO relationships.
-
Reference fields that are included in the in the Hierarchy Index file.
-
Save your changes.
Supported fields
System fields and the Hierarchy Type field does not display.
Note: When a new affiliation is added, the Parent HCO Status field is set to Active by default.
Define the fields for HCO-HCO and HCP-HCO relationships.
Example
Set the default value for the Oncology Hierarchy field to Yes/True when users add an HCO-HCO affiliation in the Hierarchy Explorer widget.
Add affiliations
If editing is enabled for the hierarchy, affiliations can be added at any level of the hierarchy.
-
Add an affiliation using one of the following methods:
-
On the Child HCOs or Child HCPs tab, click Add Affiliation.
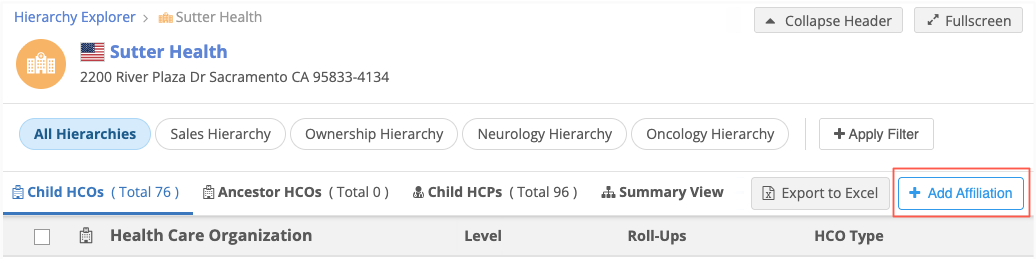
This creates a Level 1 affiliation.
-
On the Child HCOs tab, click Actions beside an HCO name and select Add Child HCO.
-
-
A row is created in the hierarchy. Begin typing the affiliation name in the Search field.
Results begin displaying accounts from your Network instance that match the keywords.
-
Select an HCO/HCP to add as an affiliation.
-
The HCO/HCP is added as a row on the tab. The Draft icon displays beside the account name.
Available actions:
-
Submit - Click to send a DCR so the affiliation can be added to the account.
-
Delete - Click the Trash icon to remove the draft affiliation.
-
-
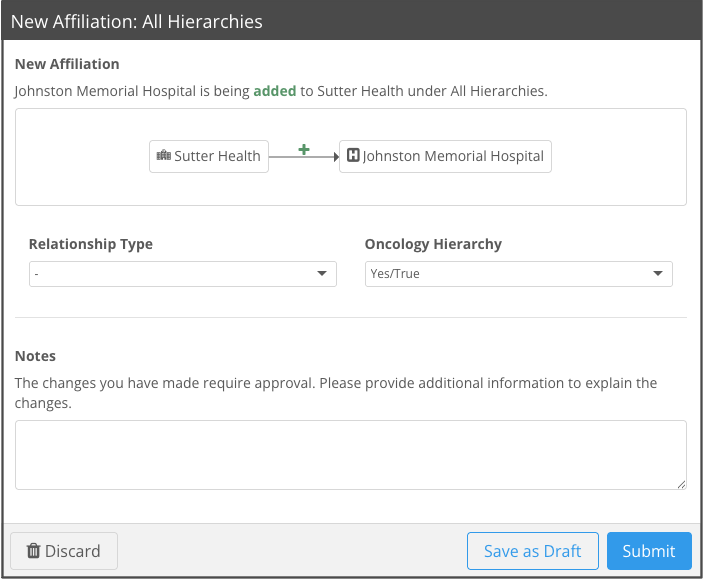
If you click Submit, the New Affiliation dialog displays.
Add the following details:
-
Fields - Add or change the field values that will be included on the DCR.
-
Notes - Add details to help the affiliation changes to be quickly approved.
Available actions:
-
Submit - Click to send a DCR so the affiliation can be added to the account.
-
Save as Draft - Click to keep the affiliation as a draft change.
Drafts are temporary. It is removed when you leave or refresh the page.
-
Delete - Click the Trash icon to remove the draft affiliation.
-
-
If you submitted the change, a DCR is created.
The HCO/HCP remains highlighted in green and displays a Pending Review
icon. Click the icon to display details and the task ID. 
Remove relationships from the hierarchy
Business users can remove HCO-HCO and HCP-HCO relationships.
To remove a relationship:
-
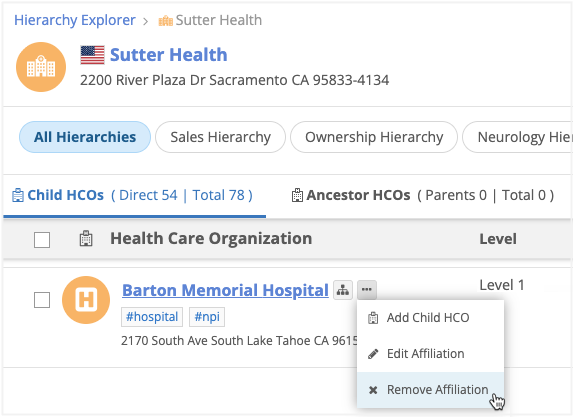
HCO-HCO relationship - On the Child HCOs tab, click Actions beside an HCO name and select Remove Affiliation.
or
HCP-HCO relationship - On the Child HCPs tab, click Actions beside an HCP name and select Remove Affiliation.
-
The Remove Affiliations dialog confirms that the affiliation is being removed from the focused HCO.
The relationship status field will be changed from Active to Inactive according to the rules defined in the hierarchy configuration.
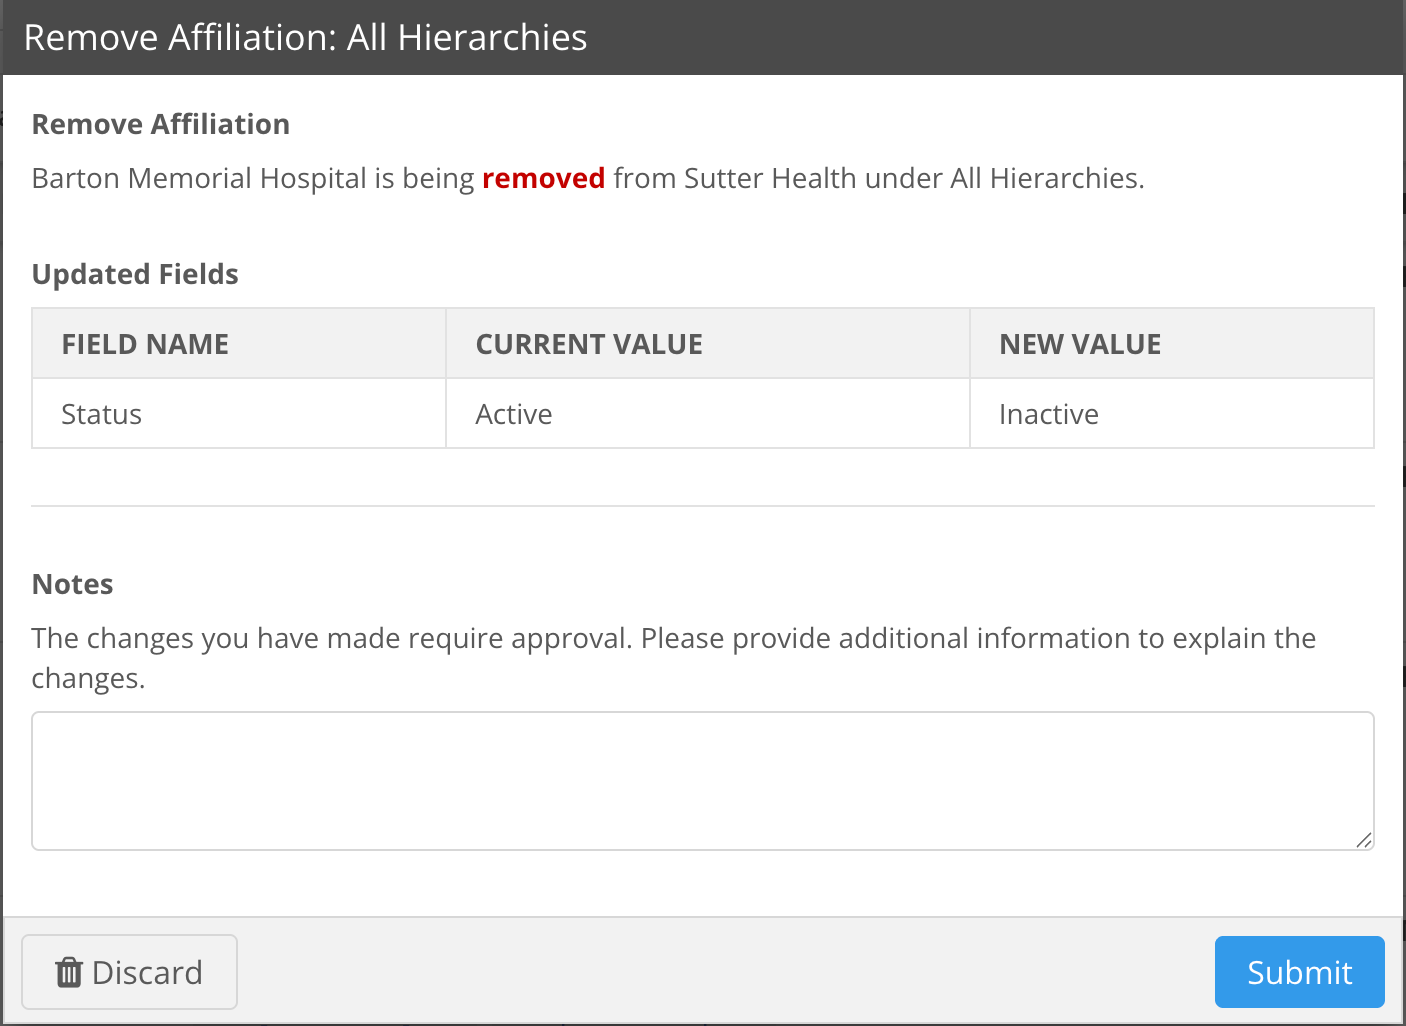
Available actions:
-
Discard - Click to return to the hierarchy without removing the affiliation.
-
Submit - Click to continue to remove the affiliation.
-
-
If you submitted the change, a DCR is created and sent to Network.
The HCO/HCP remains highlighted in red and displays a red Pending Review
 icon. Click the icon to display details and the task ID.
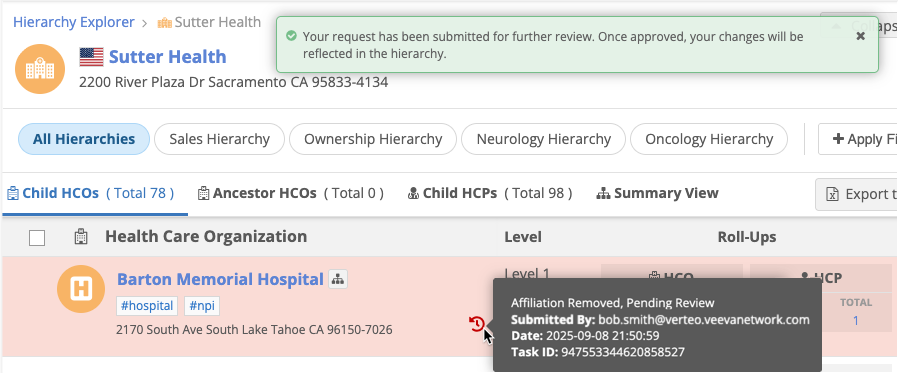
The relationship will be removed if the DCR is approved.
Edit relationships
Business users can edit HCO-HCO and HCP-HCO relationships.
-
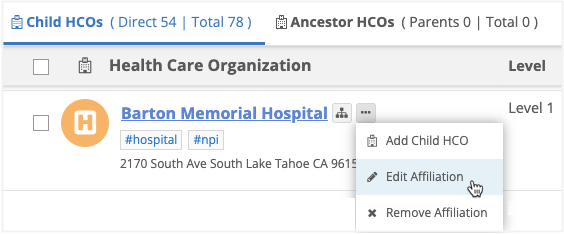
HCO-HCO relationship - On the Child HCOs tab, click Actions beside an HCO name and select Edit Affiliation.
or
HCP-HCO relationship - On the Child HCPs tab, click Actions beside an HCP name and select Edit Affiliation.
-
On the Edit Affiliation dialog, define the following details:
-
Fields - Add or change the field values that will be included on the DCR.
-
Notes - Add details to help the affiliation changes to be quickly approved.
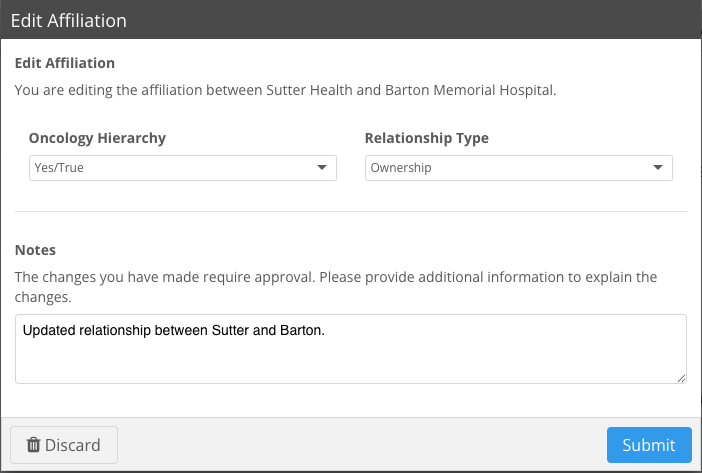
Available actions:
-
Discard - Click to return to the hierarchy without removing the affiliation.
-
Submit - Click to continue to remove the affiliation.
-
-
If you submitted the change, a DCR is created and sent to Network. The HCO remains highlighted in yellow and displays a yellow Pending Review
 icon. Click the icon to display details and the task ID.
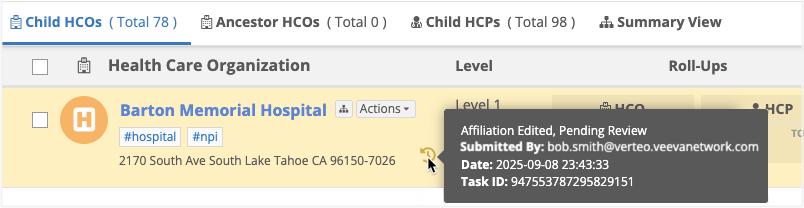
If the DCR is approved, the affiliation will be updated.
Editing account profiles
Business users can now edit accounts within Hierarchy Explorer. Changes are submitted as DCRs.
Enable editing
Administrators can enable editing in the Hierarchy Explorer widget configuration.
-
In the Admin console, click Widgets & Portal > Network Widgets.
-
Select a Hierarchy Explorer configuration.
-
In the Editing Options section, select Enable Editing.
Edit an account
-
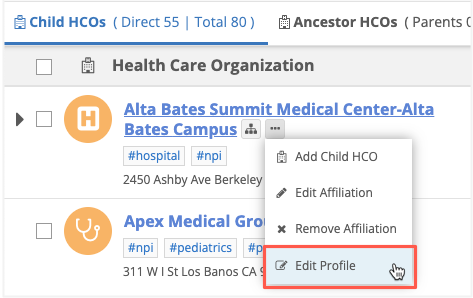
On the Child HCOs or Child HCPs tab, click Actions beside an HCO/HCP name and select Edit Profile.
The profile opens in edit mode.
-
Make any required changes to the account information, addresses, or licenses.
Note: Affiliations cannot be edited or removed on the account profile. The Parent Affiliations section is hidden in edit mode.
-
Save your changes.
-
The Confirm Changes dialog displays the fields that were changed. Click Submit.
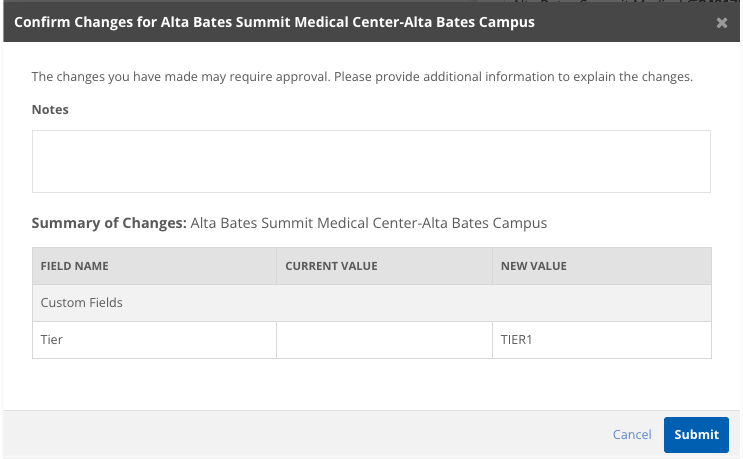
A DCR will be routed to the record owner to process the change.
Include relationship fields
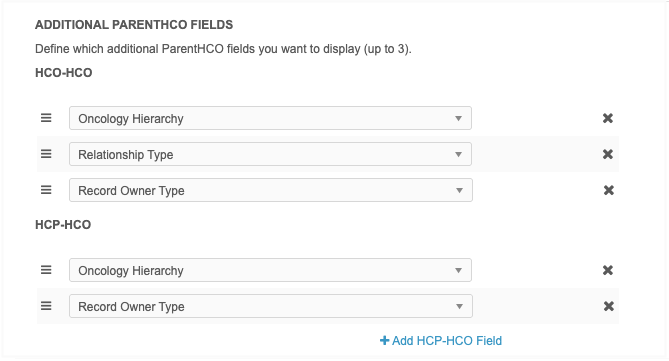
Administrators can include relationship fields for accounts to provide more details about their affiliations. Previously, only fields for HCOs and HCPs were supported on the respective account. Now you can add parent HCO fields, for example, you can add Relationship Type and Record Owner Type fields.
Supported fields
Reference fields can be added as fields.
Add fields
-
In the Admin console, click Widgets & Portal > Network Widgets.
-
Select a Hierarchy Explorer configuration.
-
In the Additional Fields Displayed section a heading is added for Additional ParentHCO Fields.
Fields can be added for HCO-HCO and HCP-HCO relationships.
-
Click Add HCO-HCO Field.
-
Select a field.
A maximum of three fields can be added for each relationship.
-
Save your changes.