How does it work?
The Network search widget is supported for internal applications; for example, expense systems, service applications, ERP applications, and event management applications.
Applications must meet the following requirements:
- The application is web-based.
-
Your Network instance uses single sign-on (SSO) authentication (every user must have a Network/SSO account).
Adding Network's search widget to your internal application has three steps:
- Configure the widget - Network administers set up the widget in their Network instance. When the configuration is saved, code snippets are generated.
-
Embed the widget - Web developers embed the generated code snippets into the internal application.
Note: When steps 1 and 2 have been completed, the search widget is fully functional for business users to search, download records, and create add requests to their Network instance.
- Define optional events - Events can be triggered when users perform an action in the search widget. Web developers can define events to customize the integration with your internal application. The following events can be defined:
- Select - Web developers define an event handler so that when users select a record the developer is returned the event entity data, which contains a JSON of the selected record. The developer can manipulate the JSON in order to add the record into their internal system.
- dcr-preSubmit - Web developers can define an event handler so they can retrieve the fields submitted by the widget user from the add request.
- dcr-submit - Web developers can define an event handler so they can retrieve the task ID of the submitted add request.
When these steps are complete, the search widget is embedded in your application and users can search for records, view profiles, and add those records to your internal application.
Embed the widget in your internal application
After administrators configure the widget in the Network instance and generate the code, web developers can add the code to your internal application.
There are two blocks of code required for the search widget.

Step 1 – – Include this code in your HTML page ensuring that the veeva-network-manifest.js script is loaded first. This part of the code loads the widget.
<script type="text/javascript" src="https://widgets.veevanetwork.com/veeva-network-manifest.js"></script>
<script type="text/javascript" src="https://widgets.veevanetwork.com/veeva-network-search-widget-loader.js"></script>
Step 2 – Include this code within the <body> of your HTML page. This part of the code initializes widget.
<veeva-network-search-widget
    widget-name="ServiceCloudA"
    auth-domain="verteo.veevanetwork.com"
    widget-id="MTAwMDI7OztzZXJ2aWNlY2xvdWRhX19j">
</veeva-network-search-widget>
The code reflects the values that you defined in the search widget configuration.
HTML Element
<veeva-network-search-widget>
This is the web component for the Network API that allows you to search and download Network data.
Properties
The following required properties are contained in this element:
widgetName- The name that the Network administrator defined in the Search Widget configuration in the Network instance.authDomain- The domain of your Network instance.widgetId- A code generated by Network that applies to the search widget configuration. If you make style changes to the widget in the Search Widget configuration in the Network instance and click Generate Code again, the widgetId does not change.
Note: Properties are written in camelCase, while corresponding attributes are written in kebab-case.
Optional attributes
The following attributes can also be added to the element:
-
closeable(boolean = false) - The ability to close the widget. Set this attribute to true to add a close (x) button on the top-right corner of the widget header. When the close button is clicked, an eventveeva-network:your_widget_name:close-widgetwill be invoked so you can add your owncloseevent listener.Example
<veeva-network-search-widget
...
closable
...>
<\veeva-network-search-widget>
-
holdInitialization(boolean = false) - Set this attribute to true to hold the initialization of the content of this widget. This is useful if you want to prevent the authentication flow that displays a new window for single sign-on when your page is loading so it's not as disruptive to your application. You can start the intialization of the content in the widget by calling astart()function later.Example
<veeva-network-search-widget
...
hold-initialization
...>
<\veeva-network-search-widget>
-
presetFilter(string = " ") - Scope this preset filter to an entity to limit the type of records that viewers can see in the search widget. For example, define a preset filter to limit the records in the search widget to pharmacies only, or active prescribers only. If the attribute is not scoped to an entity, it will be ignored during the search API call.Example
<veeva-network-search-widget
...
preset-filter="hco.hco_type__v=11:98,11:2&hco.hco_status__v=A"
...>
</veeva-network-search-widget>
This preset filter is scoped for the Health Care Organization (HCO) entity using the
hco_type__vfield. The scope is limited to pharmacies in hospitals (11:2) and other pharmacies (11:98). Administrators can provide the field names and reference codes required for this attribute.
-
showInDialog(boolean = false) - Set this attribute to true if you want to display the widget in a default dialog that Network provides. When this is true, it implies that bothholdInitializationandcloseableare also true. When you add astart()function, the dialog with the widget will open. You can add aclose()function to close the dialog.Note: You will need to create a button or link so users access the search widget from a dialog on the page.
Example button code
<veeva-network-search-widget
    id="searchWidget"
    widget-name="ServiceCloudA"
    auth-domain="verteo.veevanetwork.com"
    widget-id="MTAwMDI7OztzZXJ2aWNlY2xvdWRhX19j"
    show-in-dialog="true">
  </veeva-network-search-widget>

  <!-- Add the search widget -->
  <div class="container">

    <button id="openWidget">Network Search</button>

  </div>
Note that on some platforms the attribute value is required.
Example
<veeva-network-search-widget
...
show-in-dialog="true"
...>
<\veeva-network-search-widget>
Methods
Use the following methods with the appropriate attributes.
-
start()Use with:
-
holdInitialization- If true, start the initialization of the widget. -
showInDialog- If true, open the dialog window for the search widget.
-
-
close()Use with:
showInDialog- If true, close the dialog window for the search widget.
You can call it multiple times; the content of the widget will only be initialized once.
The close event,
veevanetwork:your_widget_name:close-widget, will be read regardless of the value ofshowInDialog.Each time the dialog is closed, the widget resets to the first page.
When these two blocks of code have been added to your internal website or application, your business users can access the search widget and search for the most up-to-date records in your Network instance and Veeva OpenData. If users need to complete a transaction on a record, they can click the Select button beside the record to download it to their Network instance.
Defining custom events
The search widget is completely functional for business users to view, download, and add records when the two provided code blocks from Network have been added to your internal application. However, you can customize the behavior of the widget to meet your business needs. For example, you can create events so users can download records to your internal application or submit add requests (if they cannot find the record they searched for).
Web developers can add custom code to create an event.
Event requirements
Events require the following information:
-
Event name - The name is in the following format:
'veeva-network:ServiceCloudA:select'
where:
- veeva-network is a predefined value. Do not change.
- ServiceCloudA is the name of the widget that was defined in the Network profile widget configuration for this example. Replace this with the name of your search widget.
-
select is the event name.
- Event entity data - The event entity data is provided in JSON format.
Creating download events
You can create an event so users can download records from the search widget to your internal application. By default, if the user clicks the Select button, the record is downloaded to their Network instance. Downloading the record to the internal application enables users to complete transactions on the record; for example, adding the HCP to an expense report.
Required events
One event must be created so users can download records:
- select - Downloads the record to your downstream system.
Event: select
The select event downloads the record to your downstream system.
Example event name
'veeva-network:ServiceCloudA:select'
Event entity data
The event entity data is provided in JSON format using the following value :
(ev) => {
           const { entity } = ev.detail.entity;
}
where:
- ev is the name of the event object. This value can be changed to your event object name.
-
ev.detail.entityprovides the JSON of the record that is the same object as the first object in the entities array returned from the Network Retrieve API. There is only one entity provided in the JSON.
For each search result that is downloaded, Network provides a JSON response that includes all of the field values for the entity and the associated child objects (addresses, licenses, parent HCO affiliations). Use the fields in the JSON response to help you define the requirements for the downloaded record; for example, creating a new record or account in your application.
Example JSON response
  {
  	"entityId": "505659322685034497",
  	"entityType": "HCP",
  	"metaData": {},
  	"entity": {
  		"attribute 1": "Value 1",
  		"attribute 2": "Value 2",
  		" ... ": " ... ",
  		"custom_keys__v": [{
  			"attribute 1": "Value 1",
  			"attribute 2": "Value 2",
  			" ... ": " ... "
  		}],
  		"addresses__v": [{
  			"attribute 1": "Value 1",
  			"attribute 2": "Value 2",
  			" ... ": " ... ",
  			"custom_keys__v": [{
  				"attribute 1": "Value 1",
  				"attribute 2": "Value 2",
  				" ... ": " ... "
  			}]
  		}],
  		"licenses__v": [{
  			"attribute 1": "Value 1",
  			"attribute 2": "Value 2",
  			" ... ": " ... ",
  			"custom_keys__v": [{
  				"attribute 1": "Value 1",
  				"attribute 2": "Value 2",
  				" ... ": " ... "
  			}]
  		}],
  		"parent_hcos__v": [{
  			"attribute 1": "Value 1",
  			"attribute 2": "Value 2",
  			" ... ": " ... ",
  			"custom_keys__v": [{
  				"attribute 1": "Value 1",
  				"attribute 2": "Value 2",
  				" ... ": " ... "
  			}]
  		}]
  	}
  }
A sample JSON response is provided in the "JSON response" section below.
For an example of a custom download event, see the "Case Study" section below.
Creating add request events
The search widget can be configured to allow users to submit add requests when they cannot find the record they searched for. Network administrators must enable the add request option in the search widget configuration in the Network UI. If this option is enabled, you can create events so users can create records and submit add requests. The add request will be routed to data stewards to validate and process, but users will be able to immediately action the record in the internal application.
Check with your administrator to see if the search widget supports add requests.
Required events
Three events must be created to support add requests:
- dcr-presubmit - Provides the task data.
- dcr-submitted - Provides a task ID.
- select - Provides the JSON for the record to be added.
Event: dcr-presubmit
The dcr-presubmit event provides the task data for the submitted add request.
Example event name
'veeva-network:ServiceCloudA:dcr-presubmit'
Event entity data
The event entity data for the dcr-presubmit event uses the following value :
(ev) => {
           const { eventdetails } = ev.detail;
}
where:
- ev is the name of the event object. This value can be changed to your event object name.
-
ev.detailprovides the JSON of the changes to the record.
Network provides a JSON response that includes all of the details for the add request, including the creator, requester notes, and all of the new field values for the record and the associated child objects (addresses, licenses, parent HCO affiliations).
Example JSON response
 {
  "entity_type": "HCP",
  "metadata": {
    "creator": "Jane.Doe@verteo.veevanetwork.com",
    "system": "ServiceCloud",
    "note": "New HCP",
    "source": "SearchWidget-ServiceCloud"
  },
  "create_unverified": true,
  "entity": {
    "first_name__v": "John",
    "last_name__v": "Smith",
    "hcp_type__v": "P",
    "hcp_status__v": "A",
    "ama_do_not_contact__v": "N",
    "pdrp_optout__v": "N",
    "fellow__v": "N",
    "grad_training__v": "N",
    "primary_country__v": "US",
    "custom_decimal__c": "1.23"
  }
}
Event: dcr-submitted
The dcr-submitted event provides the task ID for the submitted add request.
Example event name
'veeva-network:ServiceCloudA:dcr-submitted'
Event entity data
The event entity data for the dcr-submitted event uses the following value:
(ev) => {
           const { eventdetails } = ev.detail;
}
where:
- ev is the name of the event object. This value can be changed to your event object name.
-
ev.detailprovides the JSON for the task ID.
Network provides a JSON response that includes the task ID for the add request.
Example JSON response
{taskId: "934001685804876191"}
Event: select
Case Study - Creating a download event in Service Cloud™
This case study provides the example code used to create a download event that adds an account to Salesforce's Service Cloud application. There are many different ways that a download event can be created for a platform; this is just one example to display the capability of the search widget.
Scenario
The search widget has been embedded in Salesforce's Service Cloud application.
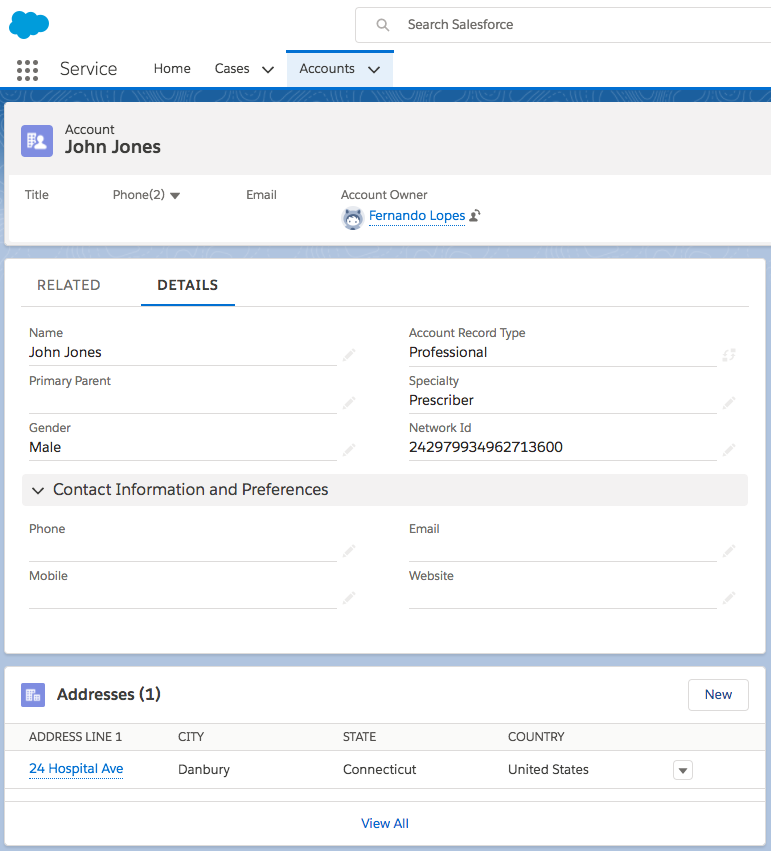
A call center agent, Fernando Lopes, searches for an HCP named John Jones. The widget searches the records in Fernando's Network instance and Veeva OpenData and displays the results. He finds John Jones in the search results and reviews the record details to ensure that this is the correct HCP.

Fernando clicks Select Account to download the record to his Network instance and create a Service Cloud account for John Jones.
Solution
For this scenario, Joseph, a Service Cloud system integrator, must add custom HTML code to create the download event so a Service Cloud account can be created for the HCP record.
Within the download event code, Joseph adds code to address the following requirements:
- Salesforce remote object - The event must contain the Salesforce remote object so an account and its linked address can be created.
- Field mappings - Map the Network fields in the search result's JSON response to the Service Cloud fields.
- Address - Link the address child object to the account (so that the Addresses section displays).
- Error message handling - Create error messages for the download event (failures and duplicates) so users have feedback if errors occurs.
On the Service Cloud page that contains the Network Search widget code, Joseph adds custom code to address all of the requirements.
The sections below detail each part of the code that is added. To review the entire HTML source (with comments) for the Service Cloud page that contains the search widget, see the "Search widget source code" section below.
Add the download event
Joseph adds the code to receive the download event within a <script> tag.
The event name is in the following format: 'veeva-network:<ServiceCloudA>:select' where:
- veeva-network is a predefined prefix. Do not change.
- ServiceCloudA is the name of the widget that was defined in the Network search widget configuration for this example.
- select is the predefined action name. Do not change.
Search_widget_code
<apex:page standardController="Account">Sales
			<!-- Include the script to load widget -->
			<script type="text/javascript" src="https://widgets.veevenetwork.com/dev/veeva-network-manifest.js"></script>
			<script type="text/javascript" src="https://widgets.veevenetwork.com/widget.vdmdev.com/dev/veeva-network-search-widget-loader.js"></script>
			<!--
				The Salesforce remote object must be included so that a new account and its linked address can be created.
				More information about remote object can be found in:
				https://developer.salesforce.com/docs/atlas.en-us.pages.meta/pages/pages_remote_objects_using.htm
			--><apex:remoteObjects><apex:remoteObjectModel name="Account"></apex:remoteObjectModel><apex:remoteObjectModel name="Address_vod__c"></apex:remoteObjectModel></apex:remoteObjects><!-- The styles for the visualforce page. Put them in a custom-style to make sure no styles leak to the widget --><custom-style>
			<style>
			html,
			html body.sfdcBody {
			height: 100%;
			padding: 0;
			margin: 0;
			box-sizing: border-box;
			border: 0;
			}

			html body.sfdcBody {
			background-image: url('https://na73.lightning.force.com/_slds/images/themes/oneSalesforce/banner-brand-default.png?cache=210.2'),
			linear-gradient(to top, rgba(32, 92, 159, 0), rgb(32, 92, 159));
			background-repeat: repeat;
			background-position: top left;
			padding: 0.75rem 0.75rem 0;
			}

			.container {
			width: 900px;
			height: 100%;
			min-height: 890px;
			box-sizing: border-box;
			border-top: 1px solid #333;
			border-top-left-radius: 0.25rem;
			border-top-right-radius: 0.25rem;
			margin: 0 auto;
			}
			</style>
			</custom-style><div class="container"><!-- The widget itself --><veeva-network-search-widget id="searchWidget" widget-name="ServiceCloudA" auth-domain="verteo.veevanetwork.com" widget-id="MTAwMDI7OztzZXJ2aWNlY2xvdWRhX19j"></veeva-network-search-widget></div>
			<script>
			const registerListeners = () => {
			const searchWidget = document.getElementById('searchWidget');
			// listen download entity event on search widget
			searchWidget.addEventListener(
			// event name format: veeva-network:your-widget-name:select// replace your-widget-name with the widget name you defined'veeva-network:ServiceCloudA:select',
			// This is the event handler.
			(ev) => {
			// The record data is in the event detail object.// ev.detail.entity has the same format as the entity// object format in the Veeva Network API retrieve entity callconst {
			entity
			} = ev.detail.entity;
			// This is the field mapping between Service Cloud and Network (Service Cloud field name: Network field name).const account = {
			FirstName: entity.first_name__v,
			LastName: entity.last_name__v,
			PersonEmail: entity.email_1__v,
			Specialty_1_vod__c: entity.specialty_1__v,
			NET_External_Id__c: entity.vid__v,
			Gender_vod__c: entity.gender__v
			};
			// declare a remote salesforce account objectconst salesforceAccount = new SObjectModel.Account();
			// Calling create method to actually create a new account in salesforce// with the information we have from the field mapping above.
			salesforceAccount.create(account, (err, results, ev) => {
			// if results is not empty , it means we successfully created salesforce accountif (results && results.length > 0) {
			// Now start working on addresses. Here we use Promise to// defer the redirection to account page until we successfully// create all the addresses on salesforcenew Promise((resolve, reject) => {
			// Get addresses from the downloaded recordconst addresses = entity.addresses__v;
			// If the record has addressesif (Array.isArray(addresses)) {
			// This is the count of calling create method on remote address object.// We will use it later to determine that we have finished iteration of// the addresses and their creations.
			let count = 0;
			// Iterate addresses
			addresses.forEach((addr) => {
			// Address field mappingconst address = {
			// This is where the address is linked to the account.// results[0] is the id of the account we just created on salesforce
			Account_vod__c: results[0],
			Name: addr.address_line_1__v,
			Address_line_2_vod__c: addr.address_line_2__v,
			City_vod__c: addr.locality__v,
			State_vod__c: addr.administrative_area__v,
			Country_vod__c: addr.country__v
			};
			// Declare a remote salesforce address objectconst salesforceAddress = new SObjectModel.Address_vod__c();
			// Calling create method to create a new address on the// account we just created in salesforce with the information we// have from the address field mapping above.
			salesforceAddress.create(address, (addrErr) => {
			// Add one to the count once the creation call responds
			count += 1;
			// if there is an error, log it in the consoleif (addrErr) {
			console.error(addrErr.message + '\n', addrErr);
			}
			// if we have finished all the creations of the addresses// resolve the Promise to go to the next stepif (count === addresses.length) {
			resolve();
			}
			});
			});
			}
			})
			// After addresses are created, go to account detail.
			.then(() => sforce.one.navigateToSObject(results[0]));
			// Error handling starts here.
			} else {
			// Error: failed to create salesforce account from the downloaded record.// log the error into consoleconsole.error(err.message + '\n', err);
			// Check if the error is because a duplicate value was found.const match = err.message.match(/^duplicate value found: .* with id: (.+)$/i);
			if (match) {
			// If it's duplicate error, redirect to the existing account.
			sforce.one.navigateToSObject(match[1]);
			}
			}
			});
			}
			);
			};
			if (document.attachEvent ? document.readyState === 'completed' : document.readyState !== 'loading') {
			registerListeners();
			} else {
			document.addEventListener('DOMContentLoaded', registerListeners);
			}
			</script>
			</apex:page>
Include the Salesforce remote object
In addition to the download event, the HTML file must include the Salesforce remote object so a new account and its linked address can be created in the Service Cloud application. For more information about the Salesforce remote object, see the Salesforce documentation.
Joseph adds the remote objects, Account and Address_vod__c, to the HTML before the code where he receives the download event.
<apex:remoteObjects >
    <apex:remoteObjectModel name="Account"></apex:remoteObjectModel>
    <apex:remoteObjectModel name="Address_vod__c"></apex:remoteObjectModel>
  </apex:remoteObjects>
Define the field mapping
During the handling of the download event, the Network field names can be mapped to the Service Cloud field names so that the values in the account are accurate. The mapping format is: Service Cloud field name: Network field name.
Within the download event code, Joseph adds the following code to map the field names following the event detail object, ev.detail.entity.
const account = {
    FirstName: entity.first_name__v,
    LastName: entity.last_name__v,
    PersonEmail: entity.email_1__v,
    Specialty_1_vod__c: entity.specialty_1__v,
    NET_External_Id__c: entity.vid__v,
    Gender_vod__c: entity.gender__v
          };
Link the address to the account
To ensure that the Service Cloud account has the address child object linked to it, Joseph adds code in the address iteration when handling the download event.
const address = {
   Account_vod__c: results[0],
   Name: addr.address_line_1__v,
   Address_line_2_vod__c: addr.address_line_2__v,
   City_vod__c: addr.locality__v,
   State_vod__c: addr.administrative_area__v,
   Country_vod__c: addr.country__v
       };
results[0] is the ID of the account that is being created in Service Cloud by the event code.
Error handling
Joseph adds error handling so business users have feedback if an issue occurs during the download event.
The else block handles the error when there is a failure trying to create a Salesforce account. The results variable provided in the callback of the create account API contains the information of the account created. If this variable is empty, then it means there is an error.
Secondly, Joseph identifies if it is a duplicate account error. If a business user downloads a record that has an existing account, the user will be automatically redirected to the existing account.
} else {
     console.error(err.message + '\n', err);
    // Check if the error is because a duplicate value was found.
    const match = err.message.match(/^duplicate value found: .* with id:           (.+)$/i);
      if (match) {
        // If it's duplicate error, redirect to the existing account.
                sforce.one.navigateToSObject(match[1]);
              }
            }
With the new download event defined, whenever a business user clicks the Select button an account will be created in Service Cloud.
Search widget source code
The entire code for the Service Cloud page that includes the search widget is defined below.
Note that the code includes comments to help you navigate through each code instruction and a <custom-style> tag that contains the existing style for the Service Cloud page.
If you use the code from this section, ensure that you update any values to reflect your specific search widget.
<apex:page standardController="Account">

    <!-- Include the script to load widget -->

    <script type="text/javascript" src="https://widgets.veevanetwork.com/dev/veeva-network-manifest.js"></script>
    <script type="text/javascript" src="https://widgets.veevanetwork.com/dev/veeva-network-search-widget-loader.js"></script>

    <!-- Include the Salesforce remote object so a new account and its linked address can be created.
    More information: https://developer.salesforce.com/docs/atlas.en-us.pages.meta/pages/pages_remote_objects_using.htm
  -->

  <apex:remoteObjects >
    <apex:remoteObjectModel name="Account"></apex:remoteObjectModel>
    <apex:remoteObjectModel name="Address_vod__c"></apex:remoteObjectModel>
  </apex:remoteObjects>


  <!-- Add the search widget -->
  <div class="container">

    <veeva-network-search-widget
      id="searchWidget"
      widget-name="ServiceCloudA"
      auth-domain="verteo.veevanetwork.com"
      widget-id="MTAwMDI7OztzZXJ2aWNlY2xvdWRhX19j">
    </veeva-network-search-widget>

  </div>

<!-- Add the event to download the record to Service Cloud and create a new account -->

  <script>
    const registerListeners = () => {
      const searchWidget = document.getElementById('searchWidget');
      // listen download entity event on search widget
      searchWidget.addEventListener(
        // The event name format is: veeva-network:your-widget-name:select
        // replace <your-widget-name> with your widget name.
        'veeva-network:ServiceCloudA:select',
        // This is the event handler.
        (ev) => {
          // The record data is in the event detail object.
          // ev.detail.entity has the same format as the entity
          // object format in the Veeva Network API retrieve entity call
          const { entity } = ev.detail.entity;

          // This is the field mapping between Service Cloud and Network.
          // The format is: Service Cloud field name: Network field name.
          const account = {
            FirstName: entity.first_name__v,
            LastName: entity.last_name__v,
            PersonEmail: entity.email_1__v,
            Specialty_1_vod__c: entity.specialty_1__v,
            NET_External_Id__c: entity.vid__v,
            Gender_vod__c: entity.gender__v
          };
          // Declare a remote salesforce account object
          const salesforceAccount = new SObjectModel.Account();
          // Calling create method to create new Salesforce account
          // using the information we have from the field mapping above.
          salesforceAccount.create(account, (err, results, ev) => {
            // If results is not empty, we created salesforce account.
            if (results && results.length > 0) {
              // Now start working on addresses. Here we use Promise to
              // defer the redirection to account page until we successfully
              // create all the addresses on salesforce
              new Promise((resolve, reject) => {
                // Get addresses from the downloaded record
                const addresses = entity.addresses__v;
                // If the record has addresses
                if (Array.isArray(addresses)) {
                  // This is the count of calling create method
                  // on remote address object.
                  // We will use it later to determine that we have finished
                  // iteration of the addresses and their creations.
                  let count = 0;
                  // Iterate addresses
                  addresses.forEach((addr) => {
                    //Address field mapping
                    const address = {
                      // This is where the address is linked to the account.
                      // results[0] is the ID of new Salesforce account.
                      Account_vod__c: results[0],
                      Name: addr.address_line_1__v,
                      Address_line_2_vod__c: addr.address_line_2__v,
                      City_vod__c: addr.locality__v,
                      State_vod__c: addr.administrative_area__v,
                      Country_vod__c: addr.country__v
                    };
                    // Declare a remote salesforce address object
                    const salesforceAddress = new SObjectModel.Address_vod__c();
                    // Calling create method to create a new address on the
                    // account we just created in salesforce with the
                    // info from the address field mapping above.
                    salesforceAddress.create(address, (addrErr) => {
                      // Add one to the count after create call responds.
                      count += 1;
                      // if there is an error, log it in the console
                      if (addrErr) {
                        console.error(addrErr.message + '\n', addrErr);
                      }
                      // If we have finished creating all addresses,
                      // resolve the Promise to go to next step
                      if (count === addresses.length) {
                        resolve();
                      }
                    });
                  });
                }
              })
              // After addresses are created, go to account detail.
              .then(() => sforce.one.navigateToSObject(results[0]));
            //Error handling starts here.
            } else {
              // Error: failed to create salesforce account from
              // the downloaded record.
              // Log the error into console
              console.error(err.message + '\n', err);
              // Check if the error is because a duplicate value was found.
              const match = err.message.match(/^duplicate value found: .* with id: (.+)$/i);
              if (match) {
                // If duplicate error, redirect to existing account.
                sforce.one.navigateToSObject(match[1]);
              }
            }
          });
        }
      );
    };

    if (document.attachEvent ? document.readyState === 'completed' : document.readyState !== 'loading') {
      registerListeners();
    } else {
      document.addEventListener('DOMContentLoaded', registerListeners);
    }
  </script>

</apex:page>
Opening the search widget in a popup
Web developers can configure the search widget so it opens in a popup window in their internal application instead of directly on the page.
Example popup code
Review the example code to see how this option can be configured.
<apex:page standardController="Account">

  <!-- Include the script to load widget -->
  <script type="text/javascript" src="https://widgets.veevanetwork.com/veeva-network-manifest.js"></script>
  <script type="text/javascript" src="https://widgets.veevanetwork.com/veeva-network-search-widget-loader.js"></script>

  <!-- These are the styles for the visualforce page. Put them in a custom-style to ensure no styles leak to the widget -->
  <custom-style>
    <style>
      .container {
        text-align: center;
      }
    </style>
  </custom-style>

  <!--
    Turn on popup mode:
      set show-in-dialog attribute to true or just add show-in-dialog attribute without setting a value.
      Note some environments (e.g. salesforce) require html attribute to have a value.

    Turn off popup mode:
      remove the show-in-dialog attribute.
  -->
  <veeva-network-search-widget
    id="searchWidget"
    widget-name="ServiceCloud"
    auth-domain="pmpush1.vdmdev.com"
    widget-id="NTE0Ozs7c2VydmljZWNsb3VkX19j"
    show-in-dialog="true">
  </veeva-network-search-widget>

  <!-- Add the search widget -->
  <div class="container">
    <button id="openWidget">open widget</button>
  </div>

  <script>
    const searchWidget = document.getElementById('searchWidget');
    const btn = document.getElementById('openWidget');
    btn.addEventListener('click', function () {
      searchWidget.start();
    });
  </script>

</apex:page>
JSON response
For each search result that is downloaded, Network provides a JSON response that includes all of the field values for the entity and the associated child objects (addresses, licenses, parent HCO affiliations). The JSON is the first object in the entities array returned from the Network Retrieve Entity API and is available using ev.detail.entity in the download event object.
Example JSON response
Note that the field values in this response use the reference aliases of the source system that was chosen during the search widget configuration.
{
"entityId": "242979976201110533",
"entityType": "HCP",
"metaData": {},
"entity": {
	"gender__v": "Male",
	"specialty_1__v": “Prescriber”,
	"hcp_type__v": "N",
	"master_vid__v": "242979976201110533",
	"first_name__v": "John",
	"record_owner_type__v": "VOD",
	"grad_training__v": "N",
	"record_delta_id__v": "930473391097610239",
	"last_name__v": "Jones",
	"sha_id__v": "209784225",
	"record_owner_name__v": "OpenData",
	"medical_degree_1__v": "RN",
	"fellow__v": "N",
	"kaiser__v": "N",
	"formatted_name__v": "John Jones",
	"primary_country__v": "United States",
	"created_date__v": "2017-04-28T16:12:59.000-05:00",
	"pdrp_optout__v": "N",
	"is_veeva_master__v": true,
	"hcp_status__v": "A",
	"ama_do_not_contact__v": "N",
	"status_update_time__v": "2017-04-28T16:12:59.000-05:00",
	"ams_id__v": "15873366",
	"modified_date__v": "2017-05-16T15:39:13.000-05:00",
	"record_state__v": "VALID",
	"verteo_id__c": "VSSW-0GE-TH3",
	"record_version__v": 0,
	"vid__v": "242979976201110533",
	"is_externally_mastered__v": false,
	"specialty_1_rank__v": 1,
	"custom_keys__v": [{
		"custom_key_entity_id__v": "242979976201110533",
		"custom_key_item_type__v": "Account",
		"custom_key_value__v": "001V000000PXmbTIAT",
		"modified_date__v": "2017-04-28T16:13:07.000-05:00",
		"vid__v": "930253893769625631",
		"custom_key_vid_key__v": "VCRM-00DV0000006tHq7MAE:Account:001V000000PXmbTIAT",
		"custom_key_source_type__v": "VCRM-00DV0000006tHq7MAE",
		"created_date__v": "2017-04-28T16:13:07.000-05:00",
		"custom_key_entity_type__v": "HCP",
		"custom_key_status__v": "A",
		"status_update_time__v": "2017-04-28T16:13:07.000-05:00"
	}, {
		"custom_key_entity_id__v": "242979976201110533",
		"custom_key_item_type__v": "Account",
		"custom_key_value__v": "001Q0000016Lp9SIAS",
		"modified_date__v": "2017-05-12T18:00:30.000-05:00",
		"vid__v": "930333588319567903",
		"custom_key_vid_key__v": "VCRM-00DQ000000GKl1iMAD:Account:001Q0000016Lp9SIAS",
		"custom_key_source_type__v": "VCRM-00DQ000000GKl1iMAD",
		"created_date__v": "2017-05-12T18:00:30.000-05:00",
		"custom_key_entity_type__v": "HCP",
		"custom_key_status__v": "A",
		"status_update_time__v": "2017-05-12T18:00:30.000-05:00"
	}, {
		"custom_key_entity_id__v": "242979976201110533",
		"custom_key_item_type__v": "Account",
		"custom_key_value__v": "001W000000RjMBZIA3",
		"modified_date__v": "2017-05-15T20:12:00.000-05:00",
		"vid__v": "930351092316766239",
		"custom_key_vid_key__v": "CRM:Account:001W000000RjMBZIA3",
		"custom_key_source_type__v": "CRM",
		"created_date__v": "2017-05-15T20:12:00.000-05:00",
		"custom_key_entity_type__v": "HCP",
		"custom_key_status__v": "A",
		"status_update_time__v": "2017-05-15T20:12:00.000-05:00"
	}, {
		"custom_key_entity_id__v": "242979976201110533",
		"custom_key_item_type__v": "Account",
		"custom_key_value__v": "001W000000RcjsvIAB",
		"modified_date__v": "2017-05-16T15:39:13.000-05:00",
		"vid__v": "930355682040283167",
		"custom_key_vid_key__v": "VCRM-00DW0000008xGqaMAE:Account:001W000000RcjsvIAB",
		"custom_key_source_type__v": "VCRM-00DW0000008xGqaMAE",
		"created_date__v": "2017-05-16T15:39:13.000-05:00",
		"custom_key_entity_type__v": "HCP",
		"custom_key_status__v": "A",
		"status_update_time__v": "2017-05-16T15:39:13.000-05:00"
	}, {
		"custom_key_entity_id__v": "242979976201110533",
		"custom_key_item_type__v": "HCP",
		"custom_key_value__v": "242979976201110533",
		"modified_date__v": "2017-04-28T16:13:00.000-05:00",
		"vid__v": "930253893256609824",
		"custom_key_vid_key__v": "MASTER__v:HCP:242979976201110533",
		"custom_key_source_type__v": "MASTER__v",
		"created_date__v": "2017-04-28T16:13:00.000-05:00",
		"custom_key_entity_type__v": "HCP",
		"custom_key_status__v": "A",
		"status_update_time__v": "2017-04-28T16:13:00.000-05:00"
	}, {
		"custom_key_entity_id__v": "242979976201110533",
		"custom_key_item_type__v": "Account",
		"custom_key_value__v": "001W000000RU9wdIAD",
		"modified_date__v": "2017-05-15T15:36:08.000-05:00",
		"vid__v": "930350007605657631",
		"custom_key_vid_key__v": "VCRM-00DW0000008xHNsMAM:Account:001W000000RU9wdIAD",
		"custom_key_source_type__v": "VCRM-00DW0000008xHNsMAM",
		"created_date__v": "2017-05-15T15:36:08.000-05:00",
		"custom_key_entity_type__v": "HCP",
		"custom_key_status__v": "A",
		"status_update_time__v": "2017-05-15T15:36:08.000-05:00"
	}],
	"licenses__v": [{
		"record_owner_type__v": "VOD",
		"best_state_license__v": "Y",
		"grace_period__v": "2016-04-30",
		"license_eligibility__v": "I",
		"record_delta_id__v": "930253893279973376",
		"anticipated_expiry_date__v": "2016-10-27",
		"record_owner_name__v": "OpenData",
		"expiration_date__v": "2016-04-30",
		"rxa_eligible__v": "I",
		"license_status_condition__v": "0",
		"dea_business_activity_code__v": "ZZ",
		"created_date__v": "2017-04-28T16:13:00.000-05:00",
		"is_veeva_master__v": true,
		"type_value__v": "PA",
		"license_degree__v": "RN",
		"effective_date__v": "1977-03-21",
		"license_number__v": "RN215307L",
		"status_update_time__v": "2017-04-28T16:13:00.000-05:00",
		"license_status__v": "A",
		"entity_type__v": "HCP",
		"body__v": "BON",
		"modified_date__v": "2017-04-28T16:13:00.000-05:00",
		"initial_board_license_date__v": "2014-06-20",
		"record_state__v": "VALID",
		"license_subtype__v": "U",
		"vid__v": "243244039892108289",
		"entity_vid__v": "242979976201110533",
		"is_externally_mastered__v": false,
		"type__v": "STATE",
		"custom_keys__v": [{
			"custom_key_entity_id__v": "243244039892108289",
			"custom_key_item_type__v": "LICENSE",
			"custom_key_value__v": "243244039892108289",
			"modified_date__v": "2017-04-28T16:13:00.000-05:00",
			"vid__v": "930253893256609823",
			"custom_key_vid_key__v": "MASTER__v:LICENSE:243244039892108289",
			"custom_key_source_type__v": "MASTER__v",
			"created_date__v": "2017-04-28T16:13:00.000-05:00",
			"custom_key_entity_type__v": "LICENSE",
			"custom_key_status__v": "A",
			"status_update_time__v": "2017-04-28T16:13:00.000-05:00"
		}]
	}],
	"addresses__v": [{
		"dpv_confirmed_indicator__v": "X",
		"nwk_primary_address__c": "Y",
		"postal_code_primary__v": “06810”,
		"address_line_1__v": “24 Hospital Ave“,
		"record_owner_type__v": "VOD",
		"premise__v": “24”,
		"cbsa__v": "25420",
		"record_delta_id__v": "930253893783617535",
		"record_owner_name__v": "OpenData",
		"thoroughfare_trailing_type__v": "Ln",
		"locality__v": “Danbury”,
		"delivery_address__v": “24 Hospital Ave“,
		"country__v": "United States",
		"created_date__v": "2017-04-28T16:13:00.000-05:00",
		"premise_number__v": “24”,
		"is_veeva_master__v": true,
		"thoroughfare__v": “Hospital Ave”,
		"status_update_time__v": "2017-04-28T16:13:00.000-05:00",
		"address_type__v": "U",
		"delivery_address_1__v": “24 Hospital Ave“,
		"sub_administrative_area__v": "Cumberland",
		"entity_type__v": "HCP",
		"address_verification_status__v": "V",
		"address_status__v": "A",
		"modified_date__v": "2017-04-28T16:13:07.000-05:00",
		"record_state__v": "VALID",
		"vid__v": "243244039892108291",
		"entity_vid__v": "242979976201110533",
		"postal_code__v": "06810-6099",
		"is_externally_mastered__v": false,
		"administrative_area__v": “Connecticut”,
		"formatted_address__v": “24 Hospital Ave Connecticut 06810-6099 United States",
		"latitude__v": 40.261007,
		"address_ordinal__v": 1,
		"thoroughfare_name__v": “Hospital”,
		"postal_code_secondary__v": “6099”,
		"longitude__v": -76.963044,
		"custom_keys__v": [{
			"custom_key_entity_id__v": "243244039892108291",
			"custom_key_item_type__v": "ADDRESS",
			"custom_key_value__v": "243244039892108291",
			"modified_date__v": "2017-04-28T16:13:00.000-05:00",
			"vid__v": "930253893255495711",
			"custom_key_vid_key__v": "MASTER__v:ADDRESS:243244039892108291",
			"custom_key_source_type__v": "MASTER__v",
			"created_date__v": "2017-04-28T16:13:00.000-05:00",
			"custom_key_entity_type__v": "ADDRESS",
			"custom_key_status__v": "A",
			"status_update_time__v": "2017-04-28T16:13:00.000-05:00"
		}, {
			"custom_key_entity_id__v": "243244039892108291",
			"custom_key_item_type__v": "Address_vod__c",
			"custom_key_value__v": "a01V0000005MgywIAC",
			"modified_date__v": "2017-04-28T16:13:08.000-05:00",
			"vid__v": "930253893783519263",
			"custom_key_vid_key__v": "VCRM-00DV0000006tHq7MAE:Address_vod__c:a01V0000005MgywIAC",
			"custom_key_source_type__v": "VCRM-00DV0000006tHq7MAE",
			"created_date__v": "2017-04-28T16:13:08.000-05:00",
			"custom_key_entity_type__v": "ADDRESS",
			"custom_key_status__v": "A",
			"status_update_time__v": "2017-04-28T16:13:08.000-05:00"
		}]
	}],
	"parent_hcos__v": [],
	"research_set__c": [],
	"training_set__c": []
}
}