Step 4: Embed the Affiliation widget
After administrators save the Affiliation widget configuration, Network generates the code snippets that are required for your web-based internal application.
Provide the code to your web developer to add the code to the application.
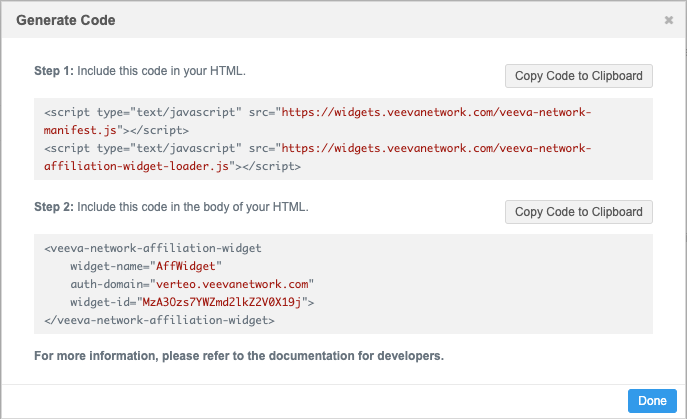
The process for embedding the widget is similar to the Search Widget and Profile Widget. There are no events that need to be defined for the Affiliation widget.
For more information, review the Network Widgets documentation in the Veeva Network Developer Online Help: https://developer.veevanetwork.com/.
Hosting website requirements
-
Production widgets - For security, the hosting website must use the HTTPS protocol. If the website does not use HTTPS, the widget cannot be accessed.
-
Sandbox widgets - Widgets that are created in your Sandbox instance can be hosted on websites that use the HTTP or HTTPS protocol. Allowing HTTP protocol for sandbox provides more flexibility to develop and test the widget integration (for example, on a local host server).
Integrating widgets without single sign-on
To allow your users to test the widget without using single sign-on, the widget can be configured to use demo mode. For details about the configuration, see Integrating widgets without single sign-on in the Veeva Network Developer Help.
Note: Demo mode is available in Sandbox instances only.
Enable demo mode
To enable demo mode for the widget, contact Veeva Support.
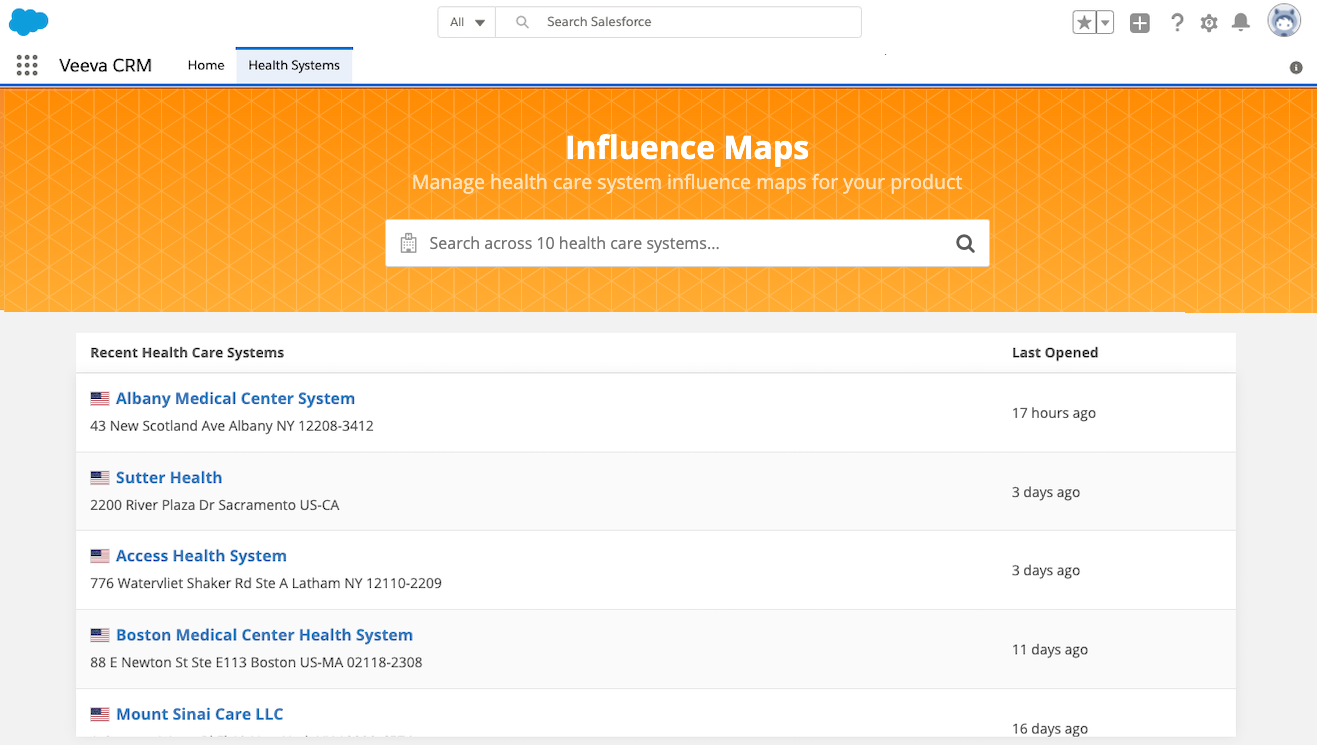
Embed the widget in Veeva CRM Online
The Affiliation widget can be used in your Veeva CRM Online application.
To embed the widget:
-
Create a Visualforce page.
For instructions, see the Salesforce™ documentation: https://help.salesforce.com/articleView?id=pages_creating.htm&type=5.
These Visualforce pages for Salesforce Lightning or Salesforce Classic can be used as a template.
Notes:
- The page references Sandbox scripts. To point to the Production scripts, remove "sandbox".
- Update the widget snippet with your own generated code.
Sample page for Salesforce Lightning
<apex:page standardController="Account">

    <!-- Include the script to load widget -->

   <script type="text/javascript" src="https://sandboxwidgets.veevanetwork.com/veeva-network-manifest.js"></script>
    <script type="text/javascript" src="https://sandboxwidgets.veevanetwork.com/veeva-network-affiliation-widget-loader.js"></script>


  <!-- These are the styles for the visualforce page. Put them in a custom-style to ensure no styles leak to the widget -->
  <custom-style>
    <style>
       html,
      html body.sfdcBody {
        height: 100%;
        padding: 0;
        margin: 0;
        box-sizing: border-box;
        border: 0;
      }

      html body.sfdcBody {
        background-image:
          url('https://na73.lightning.force.com/_slds/images/themes/oneSalesforce/banner-brand-default.png?cache=210.2'),
          linear-gradient(to top, rgba(32, 92, 159, 0), rgb(32, 92, 159));
        background-repeat: repeat;
        background-position: top left;
        padding: 0.02rem 0.02rem 0;
      }

      .container {
        height: 100%;
        box-sizing: border-box;
        border-top: 1px solid #333;
        border-top-left-radius: 0.25rem;
        border-top-right-radius: 0.25rem;
        margin: 0 auto;
      }

      .oRight .container {
        border: 1px solid #333;
        border-radius: 0.25rem;
      }

	#widgetEl {
        width: 100%;
        height: 100%;
        margin: 0;
        padding: 0;
      }

    </style>
  </custom-style>

  <!-- Add the affiliation widget -->
  <div class="container">

   <veeva-network-affiliation-widget
        id="widgetEl"
        auth-domain="verteo.veevanetwork.com"
        widget-name="AffiliationWidgetName"
        widget-id="NTE0Ozs7aGVhbHRoc3lzdGVtc19fYw=="></veeva-network-affiliation-widget>
    </div>


</apex:page>
Sample page for Salesforce Classic
<apex:page standardController="Account" sidebar="false"> <!-- Include the script to load widget --> <script type="text/javascript" src="https://sandboxwidgets.veevanetwork.com/veeva-network-manifest.js"></script> <script type="text/javascript" src="https://sandboxwidgets.veevanetwork.com/veeva-network-affiliation-widget-loader.js"></script> <!-- These are the styles for the visualforce page. Put them in a custom-style to ensure no styles leak to the widget --> <custom-style> <style> #widgetEl { width: 100%; height: 1000px; margin: 0; padding: 0; } .noSidebarCell { padding: 0px } </style> </custom-style> <div class="container"> <veeva-network-affiliation-widget id="widgetEl" auth-domain="verteo.veevanetwork.com" widget-name="AffWidget" widget-id="MzA3Ozs7YWZmd2lkZ2V0X19j" full-screen-mode = "true"> </veeva-network-affiliation-widget> </div> </apex:page> -
Create a Visualforce tab.
Follow the steps in the Salesforce documentation: https://help.salesforce.com/articleView?id=pages_tabs_create.htm&type=5.
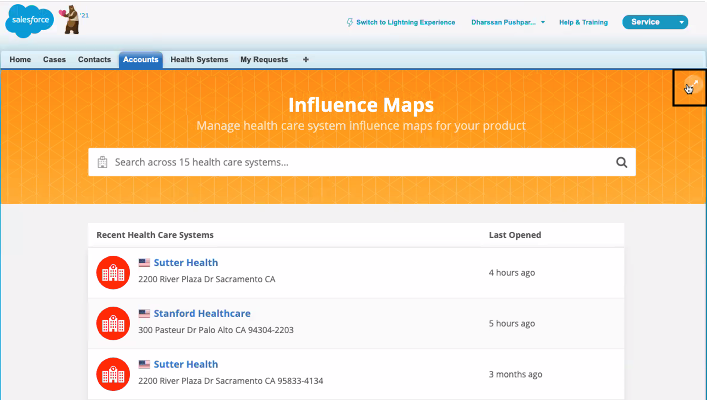
Full screen support for Salesforce Classic
The Affiliation widget can be viewed in full screen when it is embedded in Salesforce Classic™. Use the Full screen icon in the top right corner to expand the Affiliation widget.
Enable full screen mode
To support full screen mode, Web developers can add a new property to the generated Affiliation widget code that is embedded in your internal application.
Property
full-screen-mode="true"
Example code
Add the property to the end of the generated code.
<veeva-network-affiliation-widget
    widget-name="AffWidget"
    auth-domain="my.veevanetwork.com"
    widget-id="MTAwMDI7OztzZXJ2aWNlY2xvdWRhX19j"
    full-screen-mode="true">
</veeva-network-affiliation-widget>