Source subscriptions
Transforming inbound data
Network can now transform data before loading it into Network. Previously, transformation queries were available to use for data that you were exporting to downstream systems. Now you can use the transformation queries to pre-process data before it is processed and loaded during source subscription jobs.
This feature is enabled by default in your Network instance.
Examples of data transformations
Use transformation queries to pre-process inbound data. For example:
-
Process the output of a report
Example: Run a report to find HCPs that are flagged for opt out, but that are not opted out yet. The output of that query would then be the input file for the source subscription to opt out these HCPs.
-
Process dynamic attributes from Veeva CRM
Example: This requires pivoting the data that is coming from CRM (converting rows into columns).
-
Simplify data feeds and model maps
Example: If a source system provides a single file containing many entities, split the data into individual files so the model map can be simplified.
-
Define field values based on certain conditions
-
Split or concatenate fields
How transformation queries work
Use transformation queries for the following activities:
-
Transform files before they are loaded by source subscriptions.
-
Use a report to generate the input for your source subscription.
-
Join incoming source files loaded by source subscriptions with tables (custom tables, reporting tables, lookup tables) from the reporting database.
Note: If you use the query to read from the reporting database, all applicable records from all countries and with all record states will be included in the inbound file; data visibility profiles are not considered and records are not filtered by their record state.
Query process overview
Transformation queries are SQL based (SELECT statements). Test them in the SQL Query Editor, create the query on the Transformation Query page, and then link them to source subscriptions.
-
Upload source files as custom tables so you can test your query.
-
Write and test your query in the SQL Query Editor (Reports).
-
Create a transformation query (System Interfaces). Copy and paste the tested SQL query from the SQL Query Editor into the transformation query configuration.
-
Link the transformation query to a source subscription.
When the source subscription runs, the following process occurs:
-
Apply queries - Transformation queries preprocess the source files from the inbound FTP folder.
-
Process files - The source files and query output file are processed by the source subscription, as defined by the source subscription, and the data is loaded into Network.
-
Source file requirements
Source files are created as temporary tables when they are read by transformation queries during the subscription job.
The file names and their column headers must comply with the following requirements:
-
Supported characters - File names and column headers can contain alphanumeric characters (0-9, a-z, A-Z) and underscore (_) characters only.
-
File names must start with an alphabetic (a-z, A-Z) or underscore (_) character.
-
Column headers can start with a number (0-9).
-
-
Number of characters - File names and column headers must be between 1 and 100 characters.
-
SQL keywords
-
File names can be reserved SQL keywords (for example, order.csv and new.csv).
-
Column headers can be reserved SQL keywords but they must be in double quotes("") in the transformation query. (for example, select "select" from test_table__csv).
-
-
File format - Files must use delimited formats. Files with fixed length formatting will be skipped.
-
Headers - Column headers must be unique in each source file.
Validation
Source files are validated when the source subscription job runs.
-
If the column headers do not comply with the naming requirements, the job will fail.
-
Source files that uses a fixed length format are skipped by transformation queries.
Example data transformation scenario
We'll use the following example to walk through the steps for this feature.
Scenario
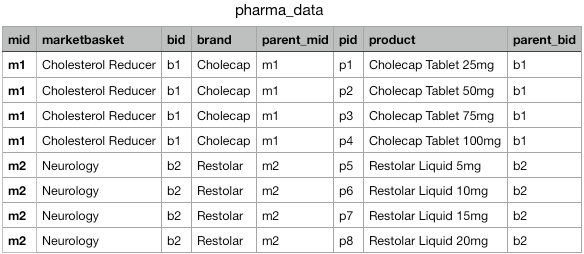
We need to split up a complex source file from our data provider, Pharma. The file contains multiple product entities (Market Basket, Brand, Product) in one row. We'll use transformation queries to create individual files for each entity so the model map is simplified in the source subscription.
Example file
Upload source files as custom tables
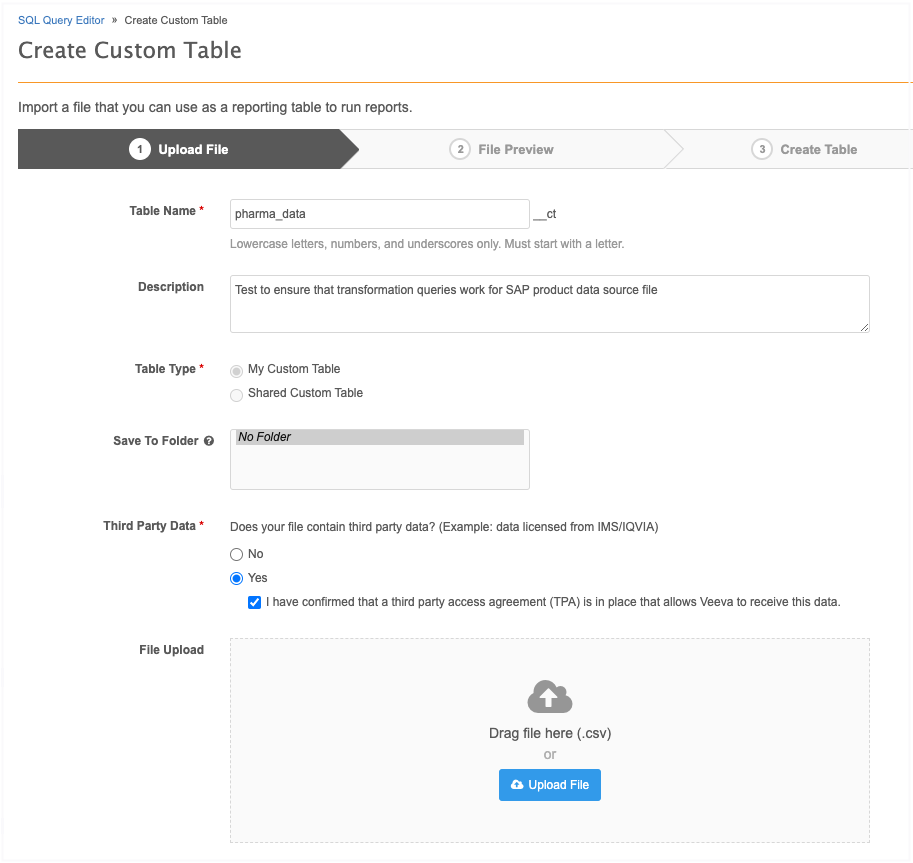
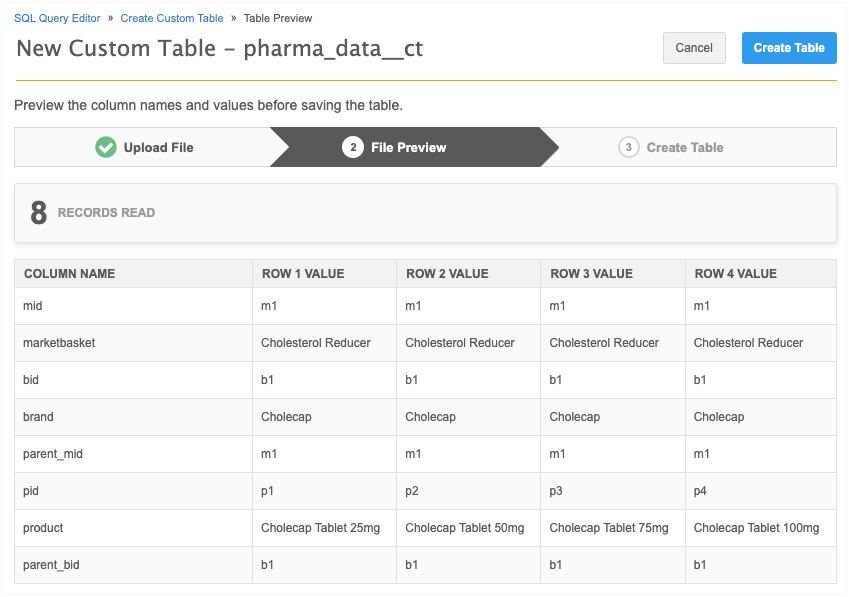
Transformation queries for inbound files cannot be tested until runtime because the inbound table doesn't exist yet. To test the query to ensure that it is valid, create a custom table based on the source file.
To create a custom table:
-
On the Network menu bar, click Reports > SQL Query Editor.
-
In the tree view, beside My Custom Tables, click Create > Custom Table.
-
On the Upload File step, define the required information and upload the sample file.
-
On the File Preview step, review the data. Click Create Table.
-
The table is added to the Custom Table section in the tree view.
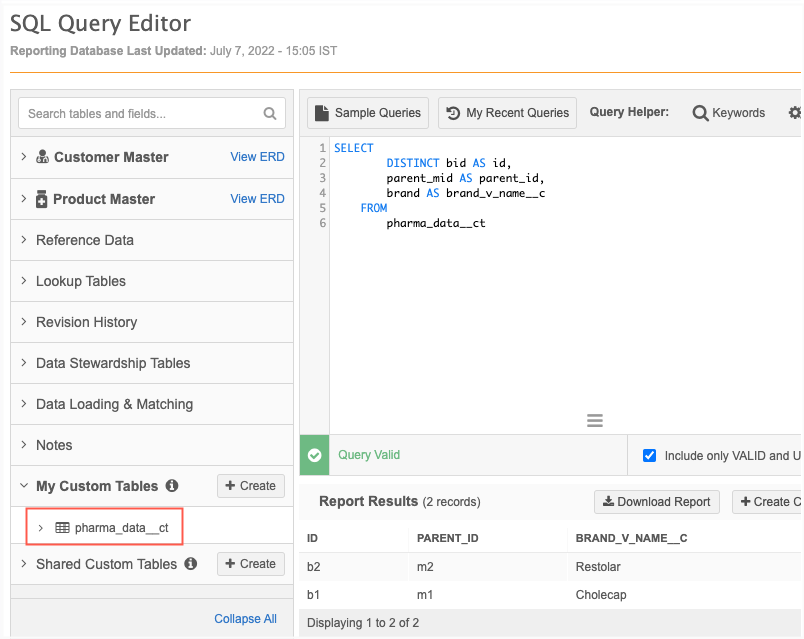
Write and test the transformation query
In the SQL Query Editor, write the transformation query. Use the custom table so the SQL syntax and field names can be validated and to ensure that it performs the data transformation as expected.
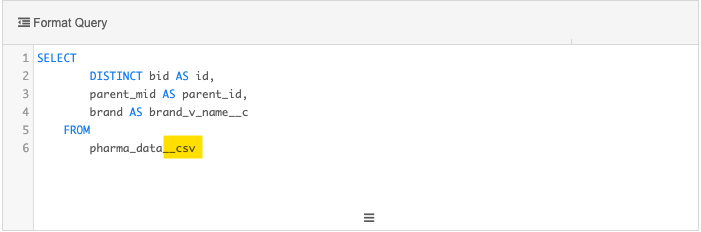
Example query
This query transforms the data in the incoming feed by creating a separate file for the Brand entity:
SELECT
        DISTINCT bid AS id,
        parent_mid AS parent_id,
        brand AS brand_v_name__c
    FROM
        pharma_data__ct
Note that instead of the source file name, pharma_data.csv, the query uses the custom table name, pharma_data_ct, to ensure that the query is valid. When we create the transformation query in the next step, we'll replace the custom table name with the source file name.
Create a transformation query
After the SQL query is tested, create the transformation query.
For our example scenario, we'll create a transformation query for each entity (Market Basket, Brand, and Product) that we want to separate from the pharma_data.csv file.
-
In the Admin console, click System Interfaces > Transformation Queries.
-
Click Add Query
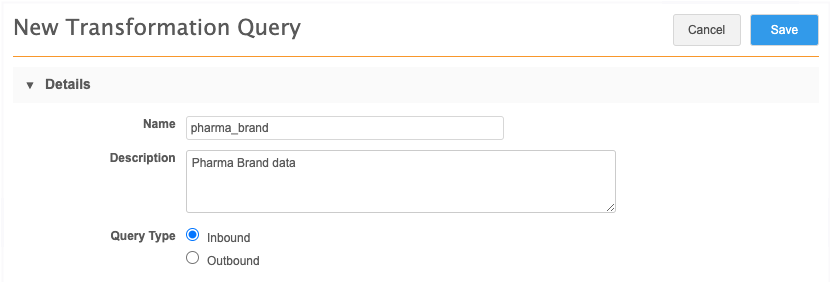
-
Type a Name and Description.
Using our example, we'll create the transformation query to separate the Brand entity data into its own file.
-
Choose the Inbound Query Type.
The Outbound query type is used to post-process data before it is exported using a target subscription.
Note: After the query is saved, the Query Type cannot be changed.
-
Paste the tested SQL query into the query box.
Query considerations
-
Table names - If you tested the query using a custom table, replace the __ct suffix on the table name with the __csv file extension if you want to pre-process a feed loaded by the source subscription. To read directly from a table in the reporting database, do not add the __csv extension.
Inbound queries can query from any table as long as it exists in reporting or ends with the __csv extension.
-
Unique column names - The source file must contain unique column names. Identical column names are valid in the SQL Query Editor for reports but must be changed here so the transformation query can be saved.
-
Record state - All record states are included in the results if the transformation query reads directly from the table in the reporting database. You can use a WHERE clause to filter records; for example, to only include valid records in the results, add WHERE record_state__v = VALID to your query.
-
Number and date fields - When transformation queries process data that is loaded by the source subscription, all fields are internally treated as varchar fields. So, if your transformation query is intended to aggregate numbers or to do calculations on number or data fields, use the CAST function to convert the data type from varchar to the correct data type. This prevents issues because the export file processing uses varchar as the data type. For more information about CAST, see SQL functions in the Veeva Network Online Help.
-
LIMIT clause - The LIMIT clause is not supported for transformation queries. If you want to limit the number of rows returned, wrap another query around the query that has the LIMIT clause.
-
-
Type a name for the transformation query output file. The file name is automatically appended with .csv.
Supported file naming conventions:
-
can contain numbers (0-9), letters (a-z, A-Z), and underscore (_) characters
-
must begin with a letter or underscore (_)
-
cannot contain more than 100 characters
-
cannot be any SQL keyword
-
cannot be reference.csv
Note: The query output file will not be saved to the inbound FTP folder where the source subscription reads the source files. It can be downloaded from the Job Details page after the source subscription job runs.
-
- Save your query.
When the transformation query is saved, Network validates the query; for example, to ensure that column names are unique, to check if the query contains the LIMIT clause, or if the table names and output files are valid. If warnings display, fix the issues and save your changes.
For our example, we'll create transformation queries for the Market Basket and Product entities also.
Market Basket query
SELECT
        DISTINCT mid AS id,
        marketbasket AS marketbasket_v_name__c
    FROM
        pharma_data__csv
Product query
SELECT
        DISTINCT pid AS id,
        product AS product_v_name__c,
        parent_bid AS parent_id
    FROM
        pharma_data__csv
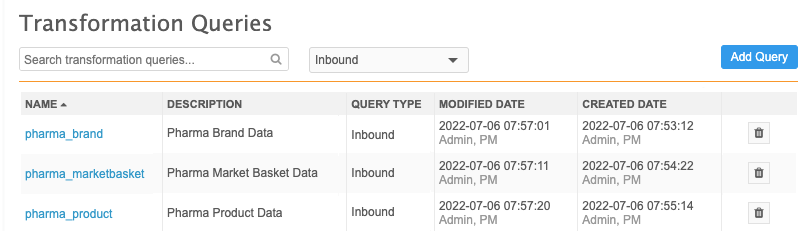
Saved transformation queries
After you save a transformation query, it is listed on the Transformation Queries page. Each query row contains the name, description, and the modified and created dates by user.
Edit transformation queries
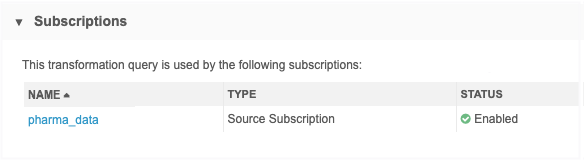
Click the transformation query to open it and view the details or make changes. The Query Type and Code cannot be edited.
The Subscriptions section displays any source subscriptions that use that transformation query.
Delete transformation queries
If the query is no longer needed or was created by mistake, click the Delete ![]() icon to remove it from your Network instance.
icon to remove it from your Network instance.
The dialog displays any linked subscriptions . Click Delete to confirm.
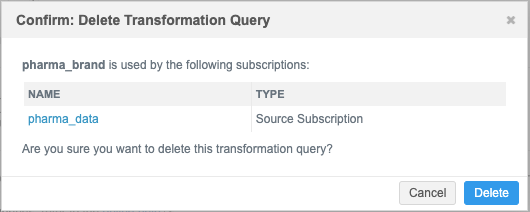
When a query is deleted, any related source subscriptions are also updated to remove the link to the query.
Configure source subscriptions to load files
After the transformation query is created, add it to a source subscription so you can pre-process the inbound files.
Create or edit a source subscription
-
In the Admin console, click System Interfaces > Source Subscriptions.
-
Open an existing subscription or click Add Subscription to create a new one.
Note: Transformation queries are supported for Classic Mode only. If you create a subscription using Wizard Mode, you can add it to the subscription after the configuration is saved.
-
Details section
-
Type a Name and Description for the subscription.
-
System - Choose the source system.
-
Status - The subscription is enabled by default.
-
-
Settings section
-
Apply Updates and Merge - Enable this option to update records based on data loaded by this subscription. If this option is not set, the subscription runs without changes to existing data. Transformation queries run during the parse stage of the job, so you can clear this option to test your subscription and transformation queries and view the results in the job log.
-
Accept all of the other default options in this section.
For detailed information about the settings in these sections see the Add a source subscription topic in the Veeva Network Online Help.
-
-
Source Files section
-
Network FTP Path - Identify the inbound folder where the source files are located.
Note: If the transformation query reads directly from the reporting database, you still need to specify an inbound folder, but it will be empty.
-
File Definitions - Click Add File to provide the following information about each file that you want to process through the source subscription.
Note: Include all of the source files that will be processed by transformation queries (even if it isn't used by the model map) so Network knows which delimiter and text qualifier to use when parsing the file.
-
File name - The name of the file. Do not include the .csv extension.
-
Alias - The simplified name of the file that is used to reference it in the model map.
-
Key Columns - Type the keys from the source system, delimited by commas (,).
-
Text Qualifier: Select a qualifier to use for the beginning and end of text.
-
Format: Choose Delimited. Files with Fixed Length formats are not supported for data transformations; they will be skipped during the job
-
Delimiter: Select the delimiter that is used to separate text in the source file.
-
Header Row?: Select the checkbox to indicate that a comma separated list of headers exist for the header row.
-
Example file definitions
In this example, we've added definitions for the source file (pharma_data.csv) and a file for each of the output files for entities (Market Basket, Brand, Product) that we want created from the transformation queries.
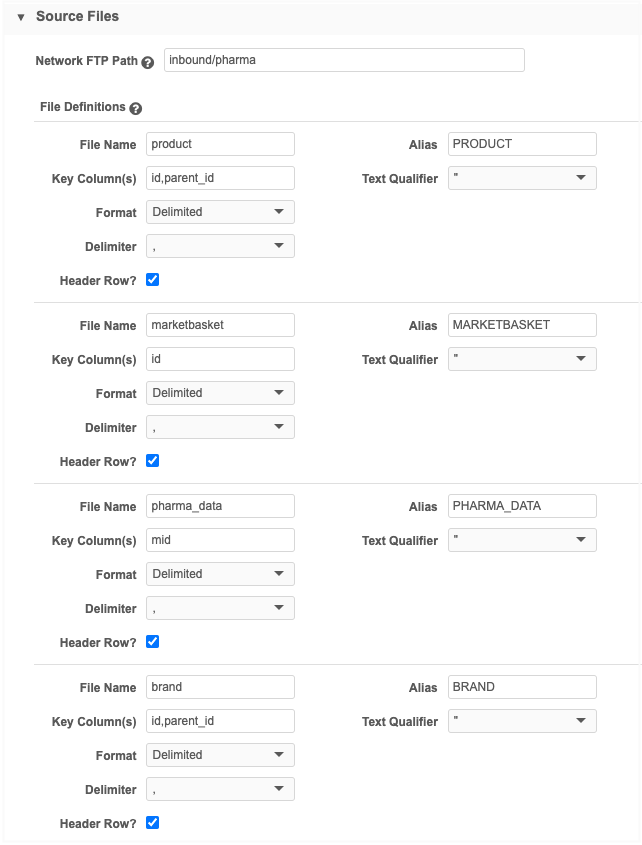
If the output file is not used in the model map (for example, if the output file of the first transformation query is the input file for the next transformation query) the file definitions for the query output files are not mandatory.
If the file definitions for the output file are not defined, double quotes (") are used as the default text qualifier and comma (,) is used as the default delimiter.
-
-
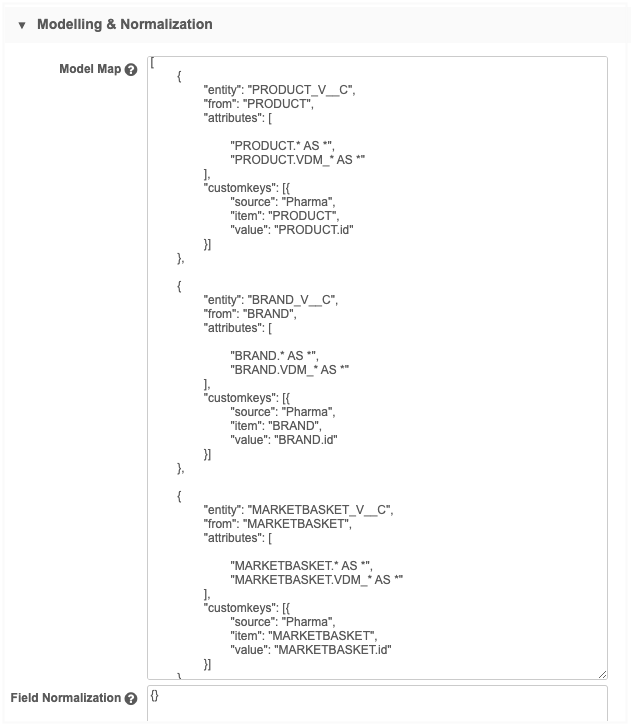
Modelling & Normalization - Add a model map and any field normalizations. The transformation query output files are used in the model map; the original source file is not.
Example model map
-
Network Expression Rules - Add any NEX rules that you want to apply to the subscription job.
-
Match Configuration - Define any match rules by country for this subscription.
-
Transformation Queries section - Click Add Query to add a transformation query to the subscription. Only inbound queries display in the list.
You can apply multiple queries to each subscription. The queries will always run in sequence as they are listed in the subscription. Change the order of the queries using the Handle
 icon.
icon.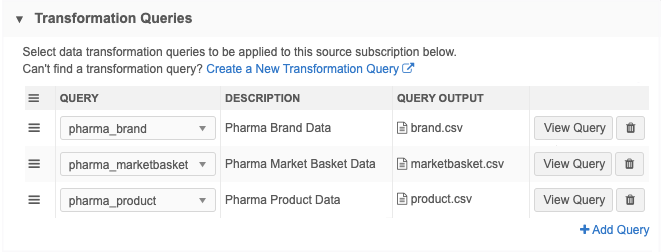
-
Job Trigger Configuration - Optionally add a schedule and any emails or jobs that should be triggered for this subscription. For example, you can trigger a target subscription to export the data to your downstream system.
-
Advanced properties (optional) - Transformation queries make all column headers lower case. For example, if your source file has a column "AMS_id", then this column will change to "ams_id" when processed and outputted by a transformation query. This can be relevant for key columns since they are case sensitive by default. To avoid data loading issues, click Advanced Mode and add the following advanced property to force all incoming column headers to be lower case:
"parser.attribute.rules": "network:force_lowercase_attributes"
-
Save your changes.
Data Flow View
After you save a source subscription, a new Data Flow View is added to the Details section to visualize all of the steps of the job.
Click the Data Flow View thumbnail to open the view.
These stages of the job are defined:
-
Start - Indicates if the job has been triggered by another job.
-
Files in Inbound Folder - The file path of the inbound folder. Click the link to open the File Explorer in a new tab.
-
Apply Transformation Queries - Details about each query that is applied to the subscription. If there are multiple queries, they are listed in the order that they run. Click the query name to open the transformation query configuration. Click View Query to see the query. This step does not display if transformation queries are not applied.
-
Import Files - The file definitions for each file that is loaded. The Import Options section defines the options that are set in the source subscription configuration.
-
End - Indicates if this job triggers email notification or another job.
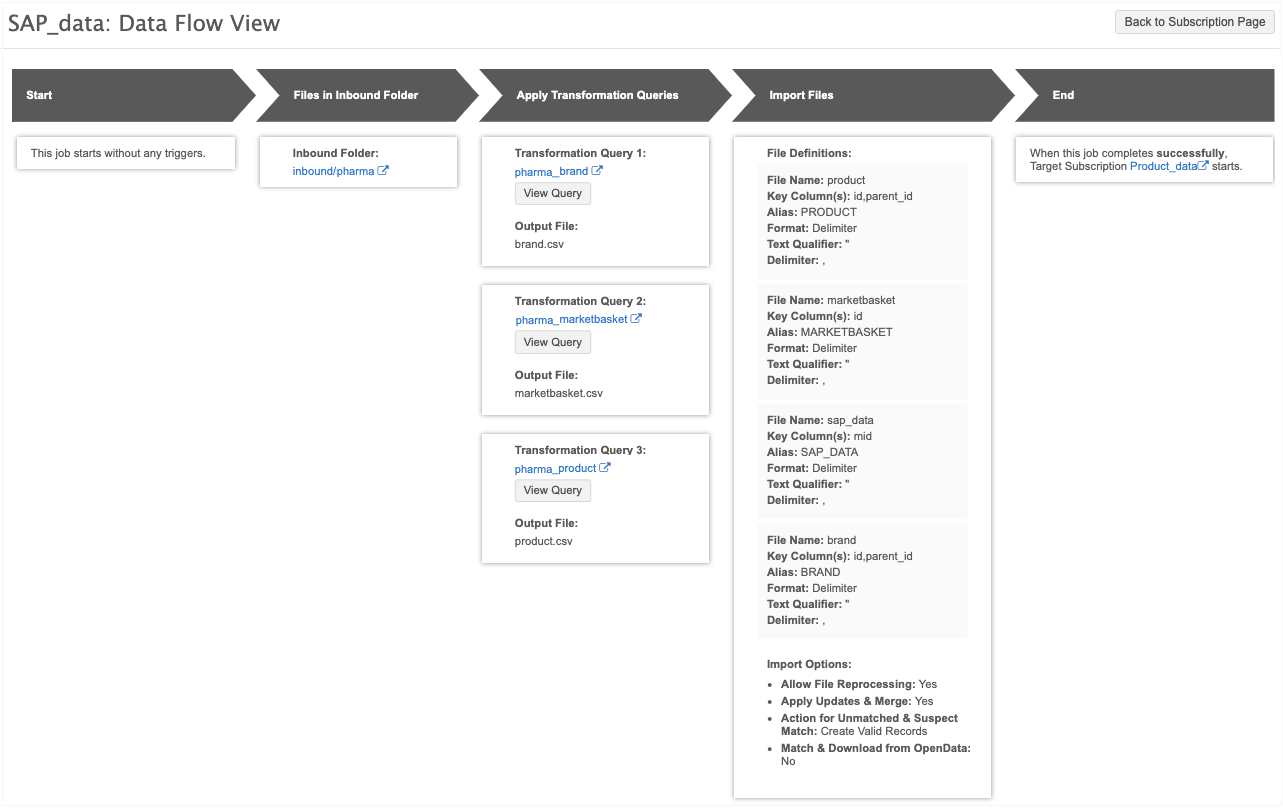
To return to the job configuration, click Back to Subscription Page.
Unsaved changes
If you have made changes to the source subscription configuration, the Data Flow View does not reflect those changes until the subscription is saved. A message displays if you open the view before saving the subscription.
Job details
After a source subscription completes, review the Job Details page.
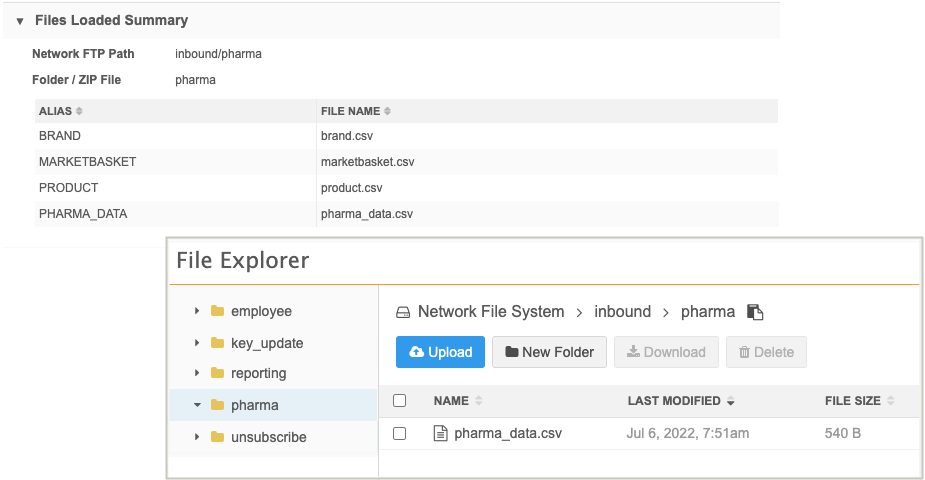
Files Loaded Summary
This section displays the files that were processed during the job. The query output files are listed in this section but they are not added to the inbound FTP folder with the original source file. You can download the output files in the Transformation Queries section on the Job Details page.
Example
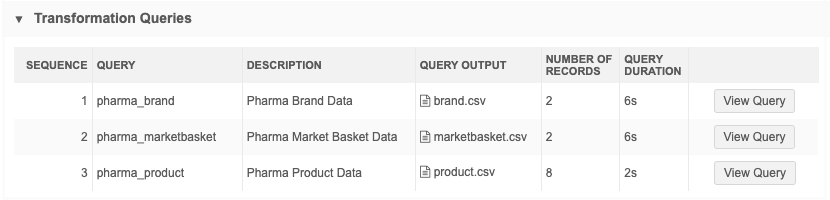
Transformation Queries
This section displays if one or more queries was applied to the job. If multiple transformation queries were applied, they display in the sequence that they ran.
Details
-
Query - The transformation query name.
-
Description - A description of the query.
-
Output File - The file created by the query. Click the file name to download it.
-
Number of Records - The number of records that were returned by the transformation query.
-
Query Duration - The runtime of the query during the job. For example, 2s means that the query runtime was 2 seconds.
-
View Query - Click to display a snapshot of the query that was applied when this job ran. It might be different than the query that is currently saved in Network. Viewing the query as it was at run-time can help you to troubleshoot any issues that might have occurred.
Job errors
Source subscriptions fail if the transformation query creates a runtime error because of an invalid or incorrect SQL statement. An error is logged to help you to troubleshoot.
Example
If the source file names have unsupported characters or duplicate column names, an Unknown column error occurs.

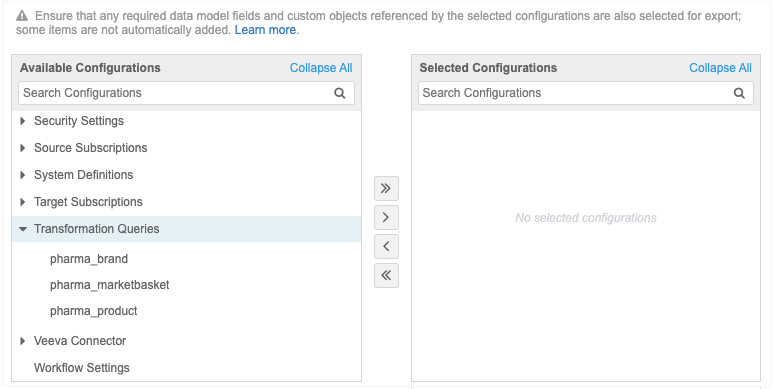
Exporting configurations
Administrators can move transformation queries to target environments using export packages (Settings > Configuration Export). For example, you might create and test transformation queries in your Sandbox instance and then move them to your Production instance.
When you create a package, expand the Transformation Queries category and choose the queries that you want to add to the package.
Source file column headers
Administrators and data managers can use a new property rule to format the column headers that are loaded to use either lowercase (default) or uppercase letters. Currently, the column headers for source subscriptions are case-sensitive which can cause data loading issues.
This feature is not enabled by default.
Formatting case for column headers
To add case formatting to column headers:
-
Open the source subscription configuration and click Advanced Mode.
-
In the Module Properties field, add the following property:
"parser.attribute.rules": "network:force_lowercase_attributes"
or
"parser.attribute.rules": "network:force_uppercase_attributes"
- Save your changes.
When the subscription runs and the files are loaded, the column header values will be formatted to lowercase or uppercase letters.
Considerations for attributes
If you reference column headers in the source subscription configuration (for example, in NEX rules, Model Map, Field Normalization, or Transformation Queries sections), manually edit those references so they use the same case as the column headers in the file (uppercase or lowercase).