File explorer
Smart tables
Use smart tables to open, view, and augment .csv files directly from File Explorer. This enables you to share and view files within Network. Smart tables are helpful for users who do not have robust reporting and Network data model knowledge. You can easily add Network data in bulk to the file and download the changes. For example, if a file contains a list of Veeva IDs (VIDs) but you need more data to analyze the content, you can add Network fields to the file to view that data.
This feature is enabled by default in your Network instance if the File Explorer feature is enabled.
Note: Users must have FTP access to use the File Explorer.
View smart tables
Smart tables are supported for .csv files. You can open these files directly from File Explorer.
-
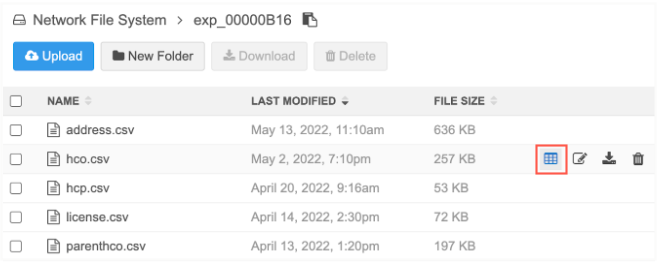
Beside any .csv file, click the Table
 icon. The icon displays only on .csv file.
 You can also double-click on a file to open it.
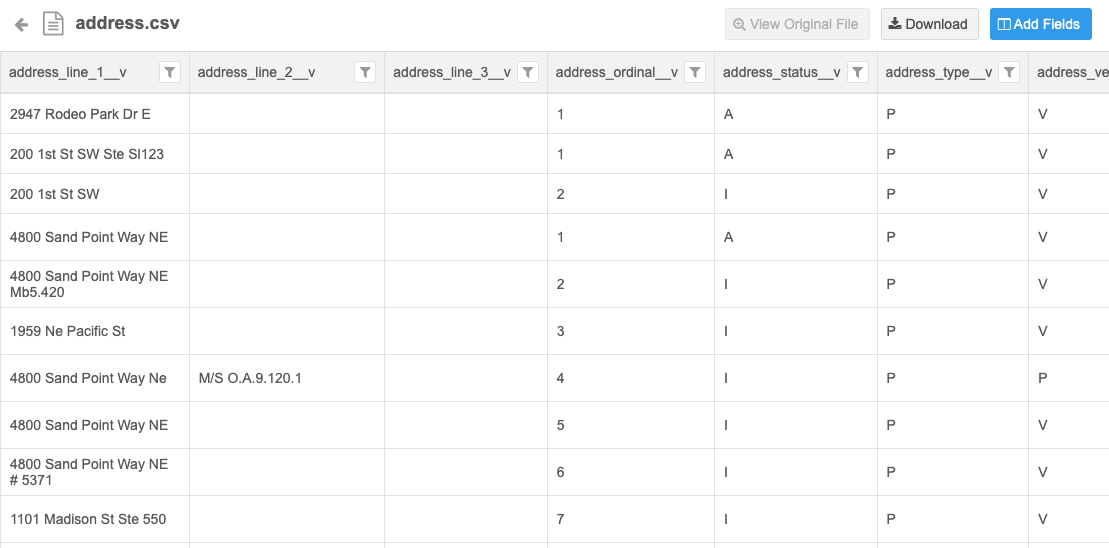
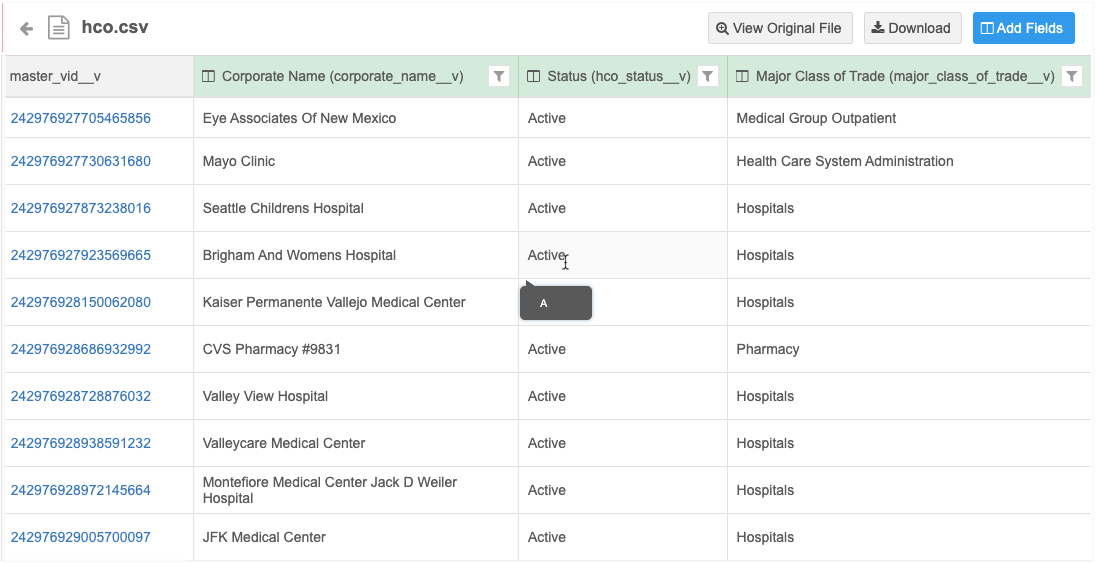
The file loads and displays all the file columns and the first 1000 rows. The first row in the file displays as a header row for the smart table.
The name of the file displays at the top of the table. Click the Back arrow to return to the File Explorer.
If the .csv file is empty or the file cannot be read, a message displays.
Sorting and filtering columns
Smart tables can be sorted by one column at a time. Columns can be sorted in ascending or descending order.
You can also filter the column by searching for specific data; for example, in a Specialty column, you can search for a specific specialty and filter the column. You can filter the smart table on multiple columns. The Filter ![]() icon in the column header is highlighted to identify sorted and filtered columns.
icon in the column header is highlighted to identify sorted and filtered columns.

The first 1000 rows are displayed in the smart table view, but any sort or filter is applied to the entire column. You can download the file to view all the sorted or filtered data.
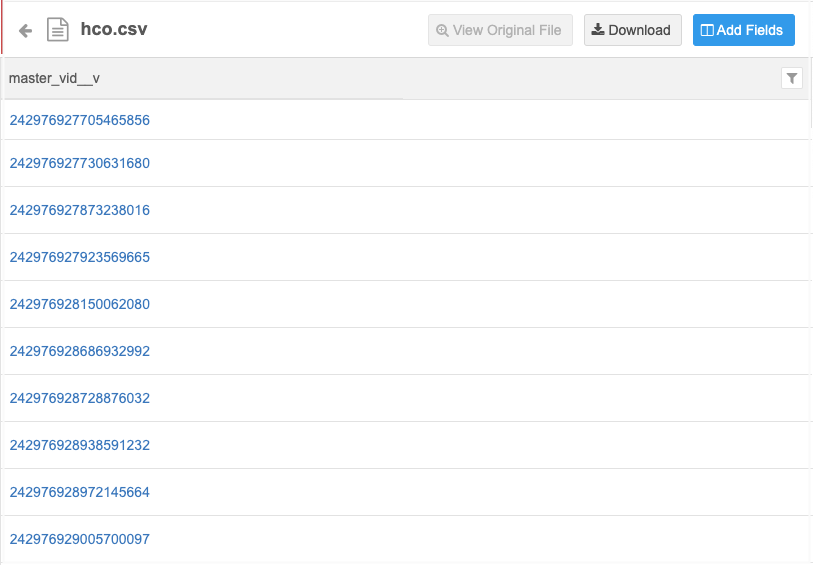
VID columns
Network tries to identify records based on fields that contain 18-digit numbers, which is typically a Veeva ID (VID) field. The VID value will display as a hyperlink. For example, for an address file, the entity_vid__v column contains an 18-digit number so Network identifies this as a VID field and adds a link so you can navigate directly to the profile page.
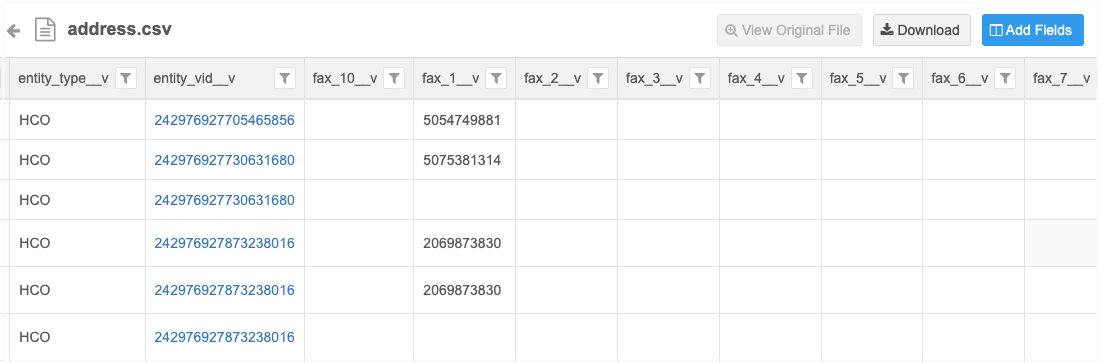
If the link to the record doesn't work or you do not have access to the profile, an error displays. For example, if you click a VID in the vid__v column of an address file, no record will be found. Instead, click a VID in the entity_vid__v column to open the associated HCP or HCO record.
Add fields to smart tables
You can extend the smart table with Network data. For example, if you receive a file that is a list of Veeva IDs, it would be helpful to see more information about each record without clicking the VID link and navigating to each record profile. In this case, you can add fields to view more relevant Network data for these records.
Note: Any changes that you make to the smart table are available locally. They can be downloaded, but they are not saved to the file in File Explorer.
Network uses the VID columns to map the Network fields that can be joined to the file. For example, when Network identifies a VID column as an HCO object, the HCO fields are available to add to the file. If a VID column isn't identified, default field mappings are not available.
Add fields
To add fields to the smart table:
-
Click Add Fields.
-
In the Update Fields dialog, you can see the object and the VID column that is used to identify the fields that you can add to the file.
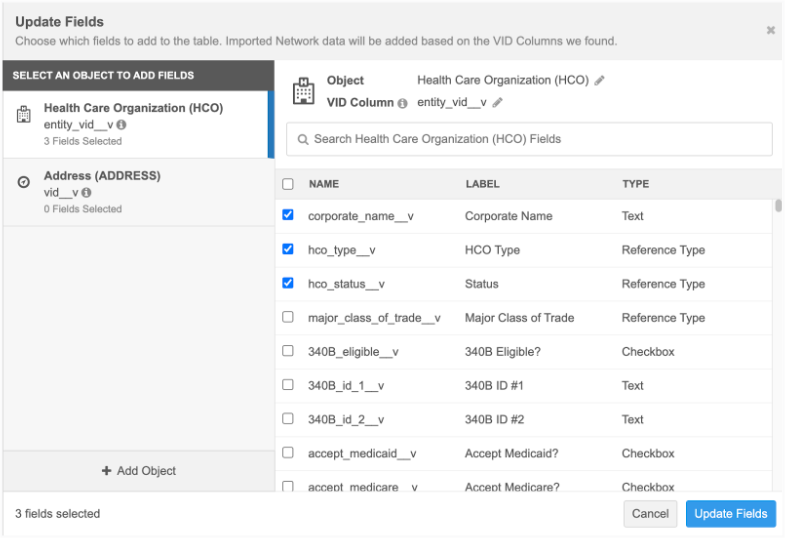
Only fields that are enabled are available. Disabled fields, set fields (for example, Set of Licenses), and restricted fields are not available for smart tables.
-
Select the fields that you want to add.
The order of the fields are prioritized by their usefulness and relevance. For example, for HCO objects, the Corporate Name, HCO Type, HCO Status, and Major Class of Trade display at the beginning of the list. Then, the remaining fields are listed alphabetically. You can also use the Search field to find fields.
As you select fields, the count displays under the object in the left pane. The total count of selected fields for all objects displays at the bottom of the dialog.
-
Click Update Fields to add the selected fields to the smart table.
The new columns are added and highlighted in green. Network populates the columns with the field data.
New columns
Fields are added alphabetically after the original columns but some fields are prioritized. The prioritized fields are added (if selected) and then the remaining fields display in alphabetical order. Main object fields display before sub-object fields.
Prioritized fields
| Display Order | HCP Fields | HCO Fields | Address Fields |
|---|---|---|---|
| 1 | first_name__v | corporate_name__v | address_line_1__v |
| 2 | last_name__v | hco_type__v | address_line_2__v |
| 3 | formatted_name__v | hco_status__v | address_line_3__v |
| 4 | hcp_type__v | major_class_of_trade__v | locality__v |
| 5 | hcp_status__v | administrative_area__v | |
| 6 | specialties 1-10 (specialty_1__v, specialty_2__v, ...) | postal_code__v | |
| 7 | country__v |
Field data considerations
-
The column is populated with data that corresponds to the field and record (using the VID).
-
The data that is available in the reporting database is added to the smart table. Field data is not calculated when it is added.
- The data that displays is based on the Report Results permission in your user account. If the permission is Restricted, the data is limited by your assigned data visibility profile.
- Data can be added for invalid records.
-
When reference type fields are added, the label displays in the column. Hover over the label to view the reference code.
-
A maximum of 40 reference type fields across all objects can be added to a smart table.
Remove fields
To remove fields:
-
Click Add Fields and clear the selected fields.
-
Click Update Fields to save your changes.
The columns are removed from the smart table.
Add a new object
There might be cases where there are additional objects in the file, but they were not added to the smart table. This typically happens because only the first 50 rows of the VID columns are used to look up Network objects. For example, if you have a file of addresses and Network identifies HCO objects only but you know that some of the addresses belong to HCP objects, you might need to add the HCP object to the file.
Add the object so you can add the fields associated with the object to the smart table.
To add an object:
-
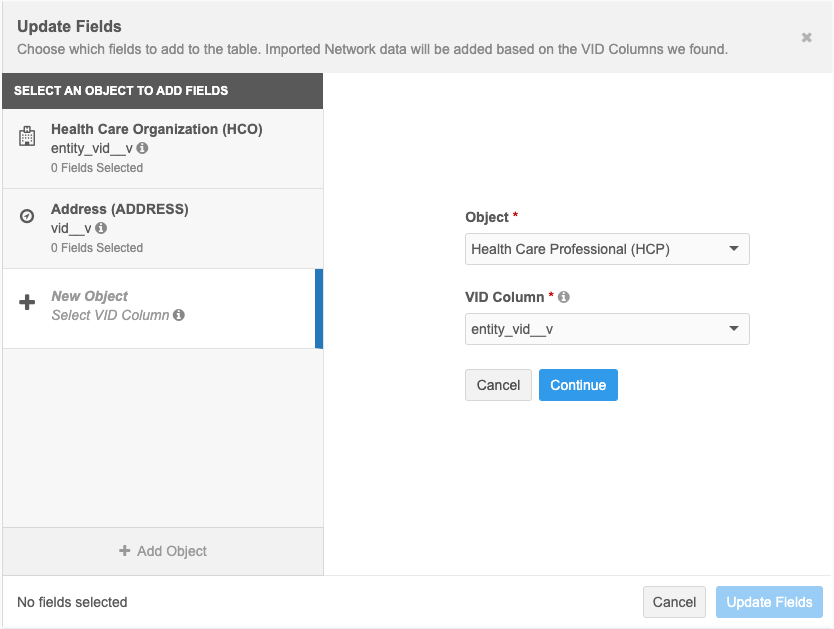
In the Update Fields dialog, click Add Object.
-
Expand the Object list and select the object.
All enabled objects in your Network instance are supported in smart tables.
-
Expand the VID Column list and select the column that contains VID values. Network uses this field to join to the object table and identify all the fields.
All fields (columns), except empty headers, from the original file display in the list
You can add an object more than once but each Object/VID Column mapping must be unique. An object cannot be added and mapped to the same VID column.
-
Click Continue.
-
When the object is added, select the fields to add to the smart table.
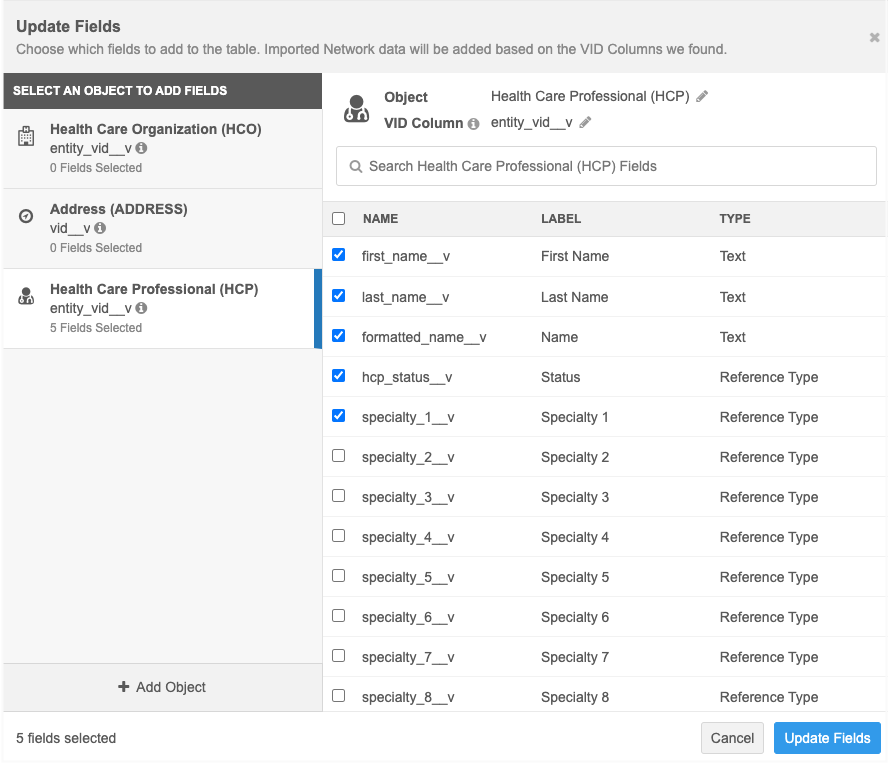
You can also edit the Object and VID Column fields to change the object type and ID field.
-
Click Update Fields to view the new object fields (columns) in the smart table.
Remove objects
To remove an object, click the Trash icon that displays when you hover over the object. The object and fields are removed from the file preview.
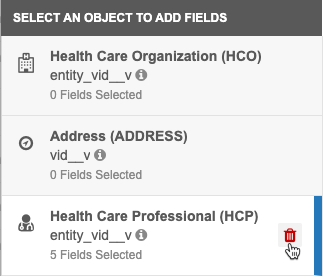
Click Update Fields to save the changes. The object and fields are removed from the smart table.
Download smart tables
You can download the smart table to your local directory as a .csv file. Any changes that you made are downloaded; for example, if you sorted a column or added columns, those updates are included in the downloaded file.
-
To download the smart table, click Download.
-
In the Download Table dialog, choose the file format and the type of reference field values to export. If you export reference values as labels, the user's language is selected by default.
-
Click Download Table.
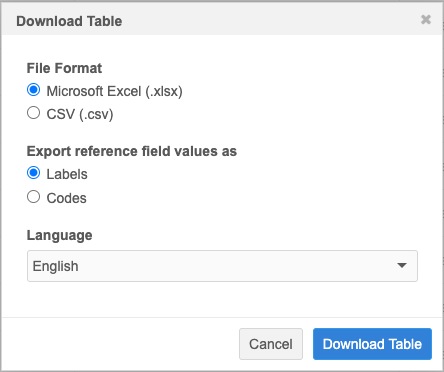
Large files can take time to download.
View original file
After you have made changes to the smart table, you can remove them.
-
At the top of the smart table, click View Original File.
This button is dimmed until changes are made to the smart table.
-
In the View Original File pop-up, you can download the modified file to retain the changes locally before you revert to the original file.
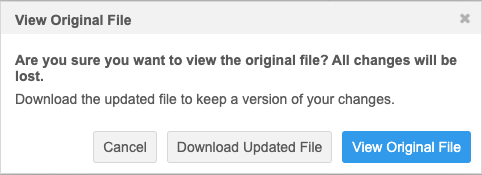
You can also click the Back arrow beside the file name to exit the file and return to the File Explorer.