Configuring single sign-on in Network MDM
Only Network MDM administrators can set up single sign-on for a Network MDM instance.
Process overview
To configure SSO, you must complete the following tasks:
- Obtain IdP information
- Enable SSO for your Network MDM instance
- Enter IdP details in Network MDM instance
- Register Network MDM as an service provider for your IdP
- Create the SSO security policy
- Provision users to use SSO
- Obtain IdP Information
Required details
You need the following information from your identity provider:
| Required Information | Details |
|---|---|
| Identity Provider Certificate | Contains the public key for your identity provider in X.509 certificate format. |
| Issuer | Used to identify the issuer of SAML assertions. It may be the Server URL of the identity provider. |
| Identity Provider Login URL | The redirect login URL for Network MDM that is typically generated by the identity provider when registering Network MDM as a service provider. |
| Identity Provider Logout URL (optional) | The URL of the page that Network MDM should redirect the user to when logging out of Network MDM. By default, Network MDM will redirect to a static page with a logout message. |
| User IDs | These must to be mapped to Network MDM user names. |
| SP-Initiated Request URL | The request URL for HTTP binding. |
Enable single sign-on
-
In the Admin console, click Admin > Settings > SSO Settings.
-
Click Edit.
-
Choose Enable SAML for Single Sign-On.
Enter IdP details
Define the required settings using information provided by your Identity Provider.
Required settings
- SAML User ID Type: - Choose Network User Name or Federation ID. Learn about these options below.
- Issuer IdP Certificate - Upload the certificate file provided by the IdP.
- Identity Provider Login URL - Type the redirect login URL for Network MDM.
-
Identity Provider Relay State URL: RelayState is a parameter that defines where identity providers (idPs) send users after they authenticate. By default, the URL is automatically generated but you can define a custom URL. Custom relay state URLs must contain {NetworkToken}.
Example custom URL
https://verteo.myidp.com/app/veevanetwork832101_mynetwork_1/exkfi8zpxwlK9gIK70h7/sso/saml?returnurl={NetworkToken}Network uses the custom URL during authentication and replaces {NetworkToken} with a specific URL or token to direct the user to the correct place.
- Enable SAML SP-Initiated Single Sign-On: (Optional) Select the checkbox to enable service provider-initiated single sign-on.
Optional settings
- Identity Provider Logout URL
- SP-Initiated Request URL
Microsoft ADFS example
The following is an example of setting up SSO with Microsoft® Active Directory® Federated Service (ADFS).
The example includes the issuer and the IDP URL that can be found in ADFS.
Issuer
http://adfs.verteo.com/adfs/services/trust
IDP URL:
https://adfs.verteo.com/adfs/ls/IdpInitiatedSignOn.aspx?loginToRp=verteo.veevanetwork.com
In order to pass relaystate correctly to ADFS from Network MDM, a custom relaystate URL must be provided. This is an example of how this can be done through Network MDM.
Custom RelayState URL:
https://adfs.verteo.com/adfs/ls/idpinitiatedsignon.aspx?RelayState=RPID=verteo.veevanetwork.com&RelayState={NetworkToken}

Note: You must set SAML User ID Type to Federation ID in order to use Auto-Creation of User Accounts.
Auto-creation of user accounts
New users can be automatically created when they try to access Network MDM so Administrators don't have to manually create individual accounts.
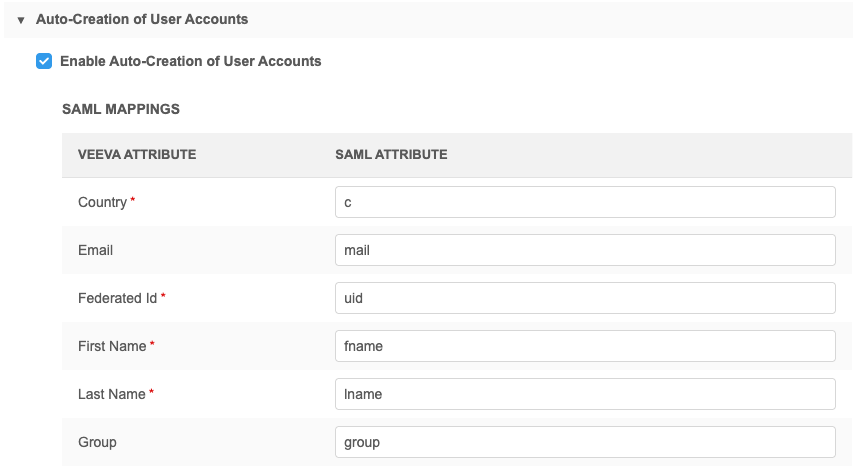
Use the settings in this section to map Network MDM attributes to the SAML attributes so users can be automatically created. These settings are only available if the SAML User ID Type is set to Federation ID.
SAML mappings
Map the SML attribute for the defined Network MDM attribute.
Mappings
There are two options for defining the mappings to automatically create users.
Review the details to understand which method works best for your business needs.
| Mapping Option | Method | Recommended Use | User Types Created | Maintenance |
|---|---|---|---|---|
| Use Country and DVP mappings |
Define the mappings between countries and DVPs. This is the default option that has not changed. |
Limited number of users in just one or a few regions. | Standard Users | Administrators might need to manually update user permissions and modify user types. |
| Use a mapping file (Groups/Country support) | Use the provided templates to upload a .csv file to map your SSO groups and countries to Network MDM settings. | Many users that are located in global regions. |
Standard Users
Portal Users Data Stewards |
User creation rules will automatically configure the country, DVP, and user types as defined in the uploaded file. |
See details for each mapping option in the sections below.
Timezone & Locale
Define a default time zone and locale for new users.
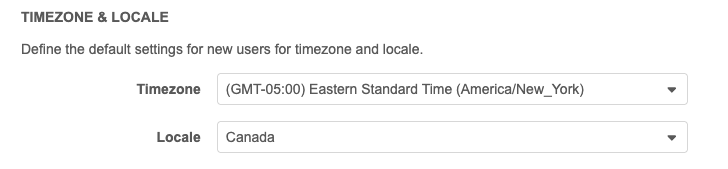
Important: If you use a mapping file for auto-created users, this timezone and locale apply only if the settings are blank in the file.
Use country and DVP mappings
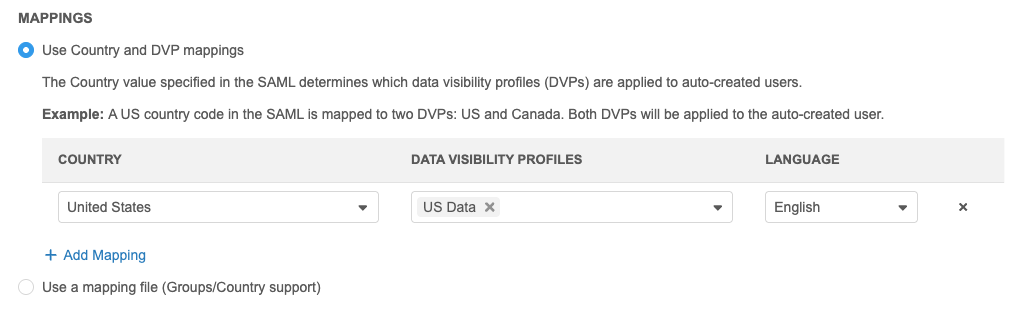
You can define mappings between countries and data visibility profiles (DVPs) for automatically created users. Users are created as Standard users.
For example, if a mapping exists for the US to the data visibility profiles for the US and Canada, automatically created users will have both data visibility profiles.
To define mappings:
- In the Mappings section, choose Use Country and DVP mappings.
- Click Add Mapping.
- Country list - Choose a country.
- Data Visibility Profiles list - Select one or more data visibility profiles.
-
Language list - Select a language for the mapping.
Use a mapping file (Groups/Country support)
To upload a file of mappings, complete the following steps.
-
In the Mappings section, select Use a mapping file (Groups/Country Support).
-
Click Upload Group Mappings.
-
In the dialog, click Download Template.
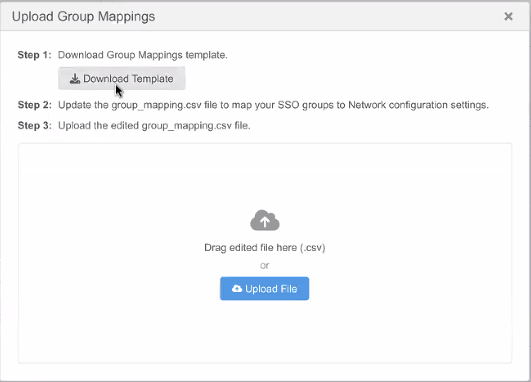
A compressed file called SSO Mapping Template.zip is downloaded to your local computer.
It contains three files:
File Name Description Group Mapping Instructions.txt A plain text document that provides the instructions for defining your mappings. network_configurations.xlsx An inventory of the available configurations in your Network MDM instance (DVPs, User Groups, User Types, Inbox Task Groups, Timezones, Locales, and Languages).
Use these values to populate the sso_mapping.csv file.
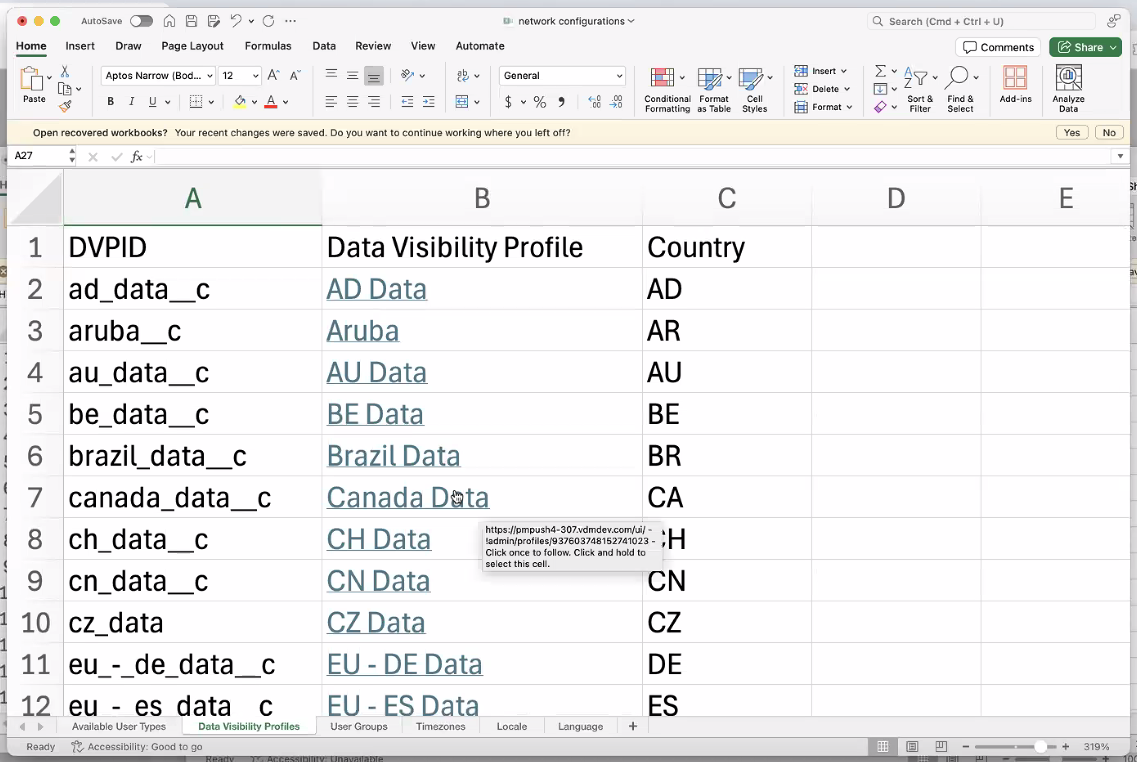
Click the links to navigate directly to the configuration in Network MDM.
sso_mapping.csv An empty file containing the column headers for the mappings.
Define the mappings in this file and then upload to Network MDM
-
Open the sso_mappings.csv to define the mappings that Network MDM will use to automatically create users.
Add values for the following columns.
Column Value Details Example SSO_GROUP Group name from your SSO provider. Required if SSO_COUNTRY is empty. 91568a03-7e6b-4354-bd27-3930e7462fef SSO_COUNTRY Country (ISO 2-digit code) from your SSO provider. Required if SSO_GROUP is empty.
The value must match a country value in Network MDM.
FR NETWORK_USER_TYPE User type that will be set for these users.
Available options: DS (Data Steward), SU (Standard User), PU (Portal User)
Optional
Use the UserTypeID column from the network_configurations.xlsx file.
PU NETWORK_DVPS Data Visibility Profile (DVP) that users will be mapped to. Required
Use the DVPID column from the network_configurations.xlsx file. It includes all DVPs defined in your Network MDM instance.
Multiple values are supported. Use double semi-colons (;;) to separate each value.
canada_data__c NETWORK_USER_GROUPS Custom Network MDM user groups to assign to users. Optional
Use the UserGroupID column from the network_configurations.xlsx file. It includes all custom groups that have been created in your instance.
Multiple values are supported. Use double semi-colons (;;) to separate each value.
Marketing_Users__c;;KAM_Group__c NETWORK_LOCALE Network MDM locale to assign to users. Optional
Use the LocaleID column from the network_configurations.xlsx file. It includes all locales available in Network MDM.
en_CA NETWORK_TIMEZONE Timezone to assign to users. Optional
Use the TimeZoneID column from the network_configurations.xlsx file. It includes all timezones available in Network MDM.
America/Toronto NETWORK_LANGUAGE Language to assign to users. Required
Use the LanguageID column from the network_configurations.xlsx file. It includes all languages available in Network MDM.
en NETWORK_INBOX_TASK_GROUPS Inbox task groups to assign to Data Steward users. Applies to Data Steward (DS) users only.
The user must have access to data for the country. Ensure that the DVP for that country is also assigned to the user type in the NETWORK_DVPS column.
The Data Loading inbox task group cannot be included. It applies to Admins and Data Manager users only.
canada_ds__c;;data_stewards__c APPLY_TO_EXISTING_USERS Indicate the configurations to apply to existing SSO users when they log into Network MDM. Applies only to NETWORK_DVPS and NETWORK_USER_GROUPS.
Use double semi-colons (;;) to separate each value.
NETWORK_USER_GROUPS;;NETWORK_DVPS Example sso_mapping.csv file

Tip: Additional columns can be included in the file. In this example the Group_info column is added to help describe the SSO group.
-
When the mapping is complete, click Upload File to add the mappings in the .csv file to your SSO configuration.
The file is validated to ensure it contains the required information and it is in the expected format.
-
File format - .csv
-
Required columns - SSO_GROUP or SSO_COUNTRY, NETWORK_DVPS, and NETWORK_LANGUAGE.
-
Values - Values in the SSO_COUNTRY and NETWORK_ columns must match to the values defined in Network MDM. Use the network_configurations.xlsx file for all accepted values.
If you see validation errors, click Download Error File to view the issues. Make the changes and upload the updated file.
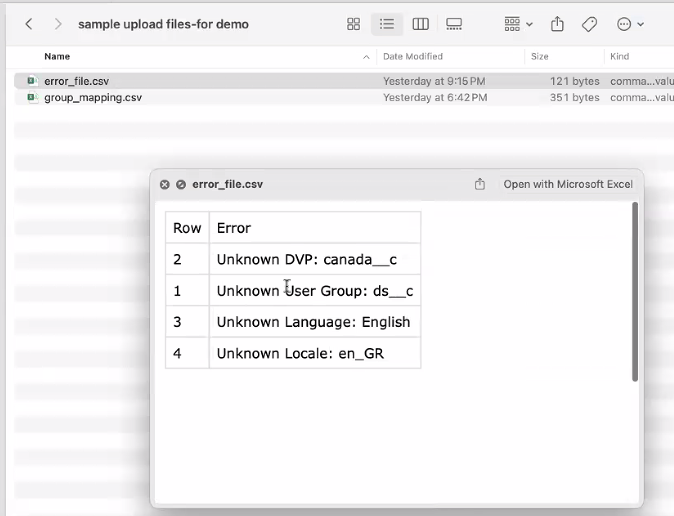
-
-
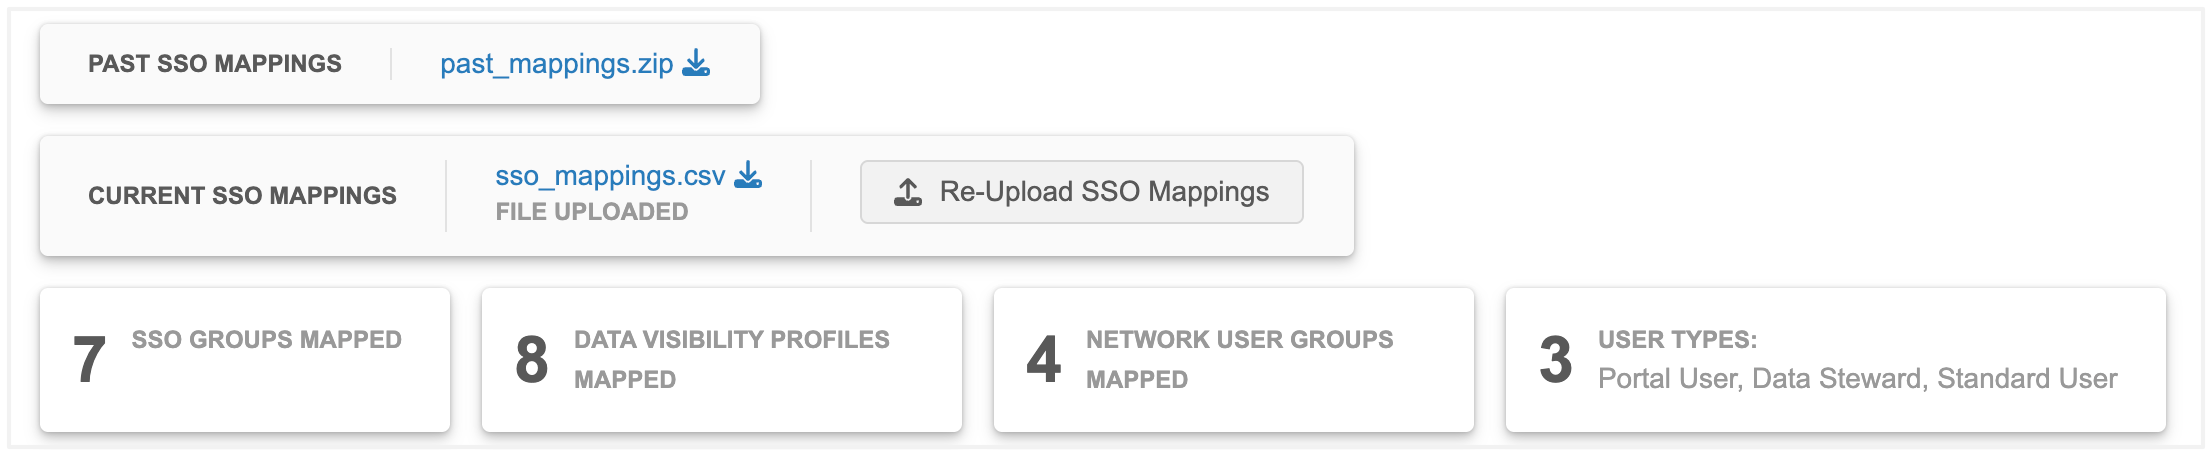
When the file is uploaded successfully, the mapping results display a count of each mapped setting: SSO Groups, DVPs, Inbox Task Groups, User Groups, and User Types.
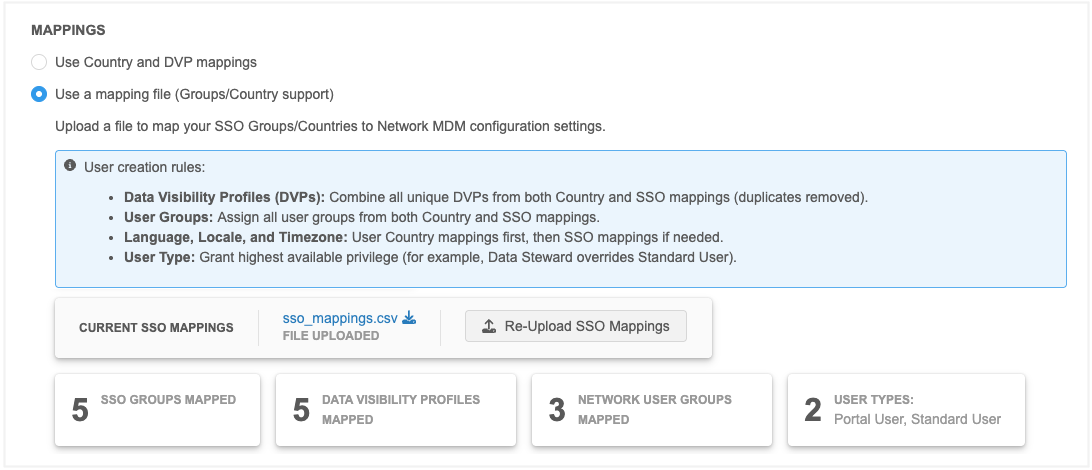
The mapping file that you uploaded displays in the Current SSO Mappings section. The file can be downloaded any time by clicking the sso_mappings.csv file name.
-
Save your changes. The uploaded file will not be applied until the SSO configuration is saved.
Mapping rules
If the file includes Country and Group mappings, there are rules to understand which configuration will be applied when users are automatically created.
-
DVPs - A combination of all unique DVPs from the SSO_Country and SSO_Group mapping columns are applied.
-
User Groups - All user groups are applied.
-
Inbox Task Groups - Applied to Data Steward (DS) users only. If the DS user does not have access to the country through their DVP, do not assign them to the inbox task group.
For example, do not assign them to an inbox task group for Mexico if they have DVPs for only the US and Canada.
-
Language, Locale, and Timezone - Apply the first matching settings found in the mappings. If none are defined, apply the default settings in the SSO configuration.
-
User Type - The user type with the highest privilege wins (for example, Data Steward overrides Standard User, Standard User overrides Portal User). If no user type is defined, the user will be created as a Standard User.
Additional rules
-
If a row contains SSO_Group and SSO_Country values, the settings will apply only to users that have both. to both.
-
If a row contains SSO_Group only, its settings will apply to any user matching that group, regardless of the country.
-
If a row contains SSO_Country only, its settings will apply to any user matching that country regardless of their SSO group.
Updating the mappings
The mapping file can be updated at any time.
-
Click Re-Upload SSO Mappings.
-
In the dialog, choose to download the template or to download and edit your existing mapping file.
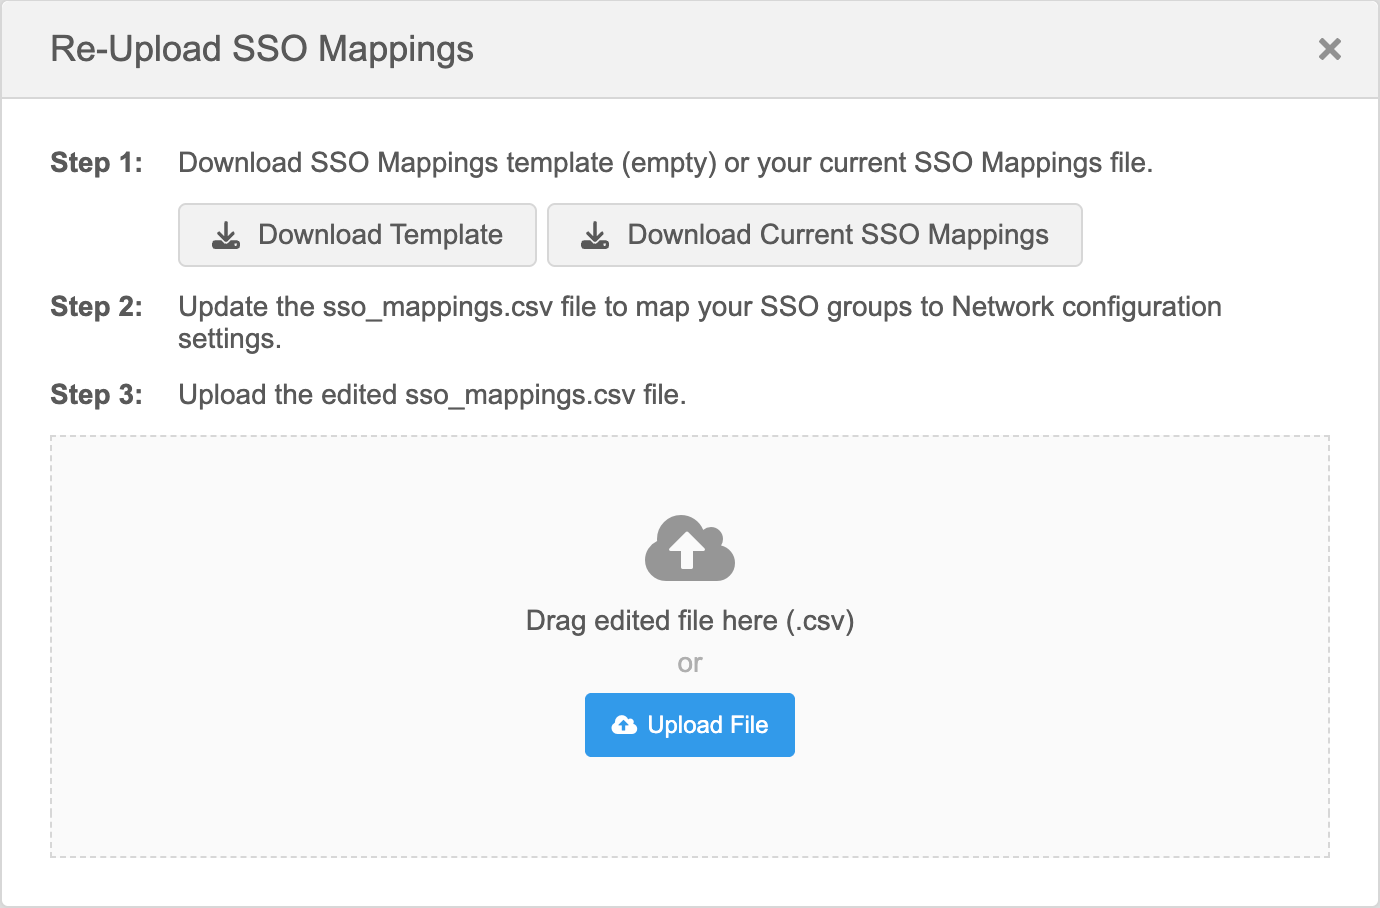
-
Upload the new or updated mapping file.
-
When the validated file is successfully uploaded, the displayed mappings reflect the new mappings.
-
Your previous mapping file can be downloaded in the Past SSO Mappings section.
-
Save your changes.
Test the SSO configuration
After you have uploaded the mappings, you can test the SSO configuration to understand the Network MDM settings that will be applied to a user.
-
When the Single Sign-On Settings page is in read-only mode, click Test User Settings.
-
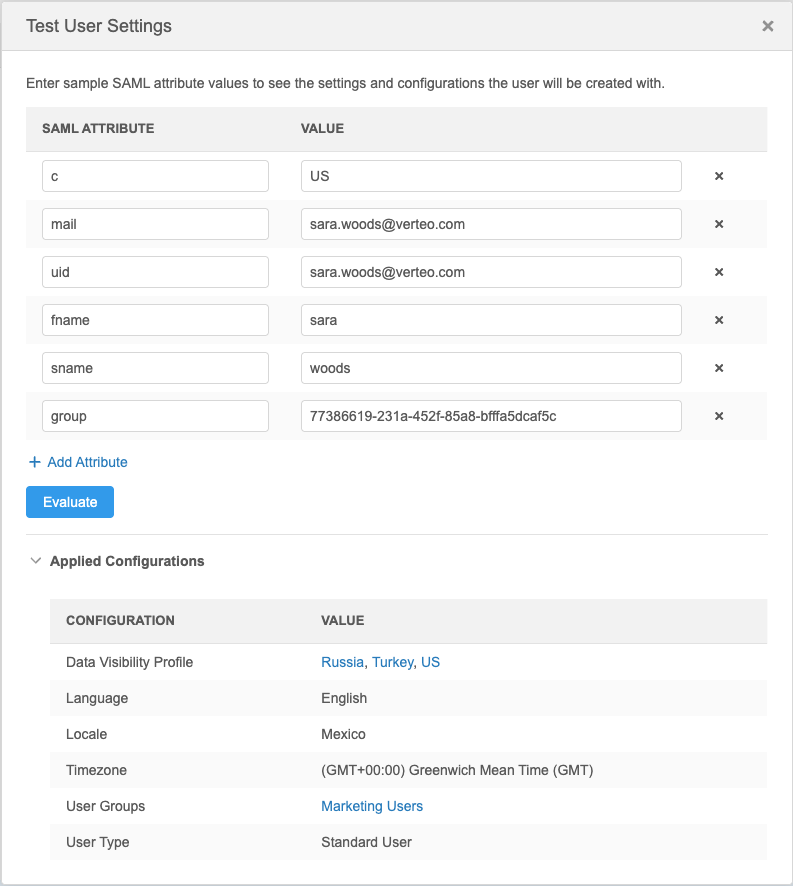
In the dialog, add the SAML attribute mappings. For the group field, add a group from your uploaded mappings file.
Click Add Attribute to include multiple groups.
-
Click Evaluate.
-
The Applied Configurations section displays the settings that will be applied to the user:
-
Data Visibility Profile
-
Language
-
Locale
-
Timezone
-
User Groups
-
User Type
-
Inbox Task Group
-
Logs
Administrators can track the SSO mapping changes in the System Audit Log (Logs).
Identity provider button
You can define and enable a login button for the specified identity provider. This feature is available if at least one user in the Network instance is using a SAML security policy.
-
In the Identity Provider Button section, select Use Custom Login Button.

- Select a logo image to appear to the right of the button text.
- Select the fill color of the button, the border color, and text color.
The Network MDM login page will display an additional button to log into the identity provider.

Register Network MDM as an SP in your IdP
Your identity provider may need the following information:
| Network public certificate file | This contains the public key information for Network MDM. |
| Entity ID |
This is a unique name to identify Network MDM to your IdP. Typically, this is your Network MDM domain name.
Example: verteo.veevanetwork.com |
| Destination URL |
This is the SAML ACS endpoint in Network MDM. It is a generated field displayed on the Admin > Settings > Single Sign-on Settings page.
The field is called Network SSO Login URL. |
| Postback URL | This also uses Network SSO Login URL. |
| Service Provider SAML Attributes | Network MDM accepts a single attribute called “uid” for passing the user name to be used for SSO. The value you pass depends on the SAML User ID Type setting you have chosen (Network User Name or Federated ID). |