Exporting from search
DM
DS
ST
You can export search results to a .csv file so the data can be referenced offline or redistributed.
Enable export from search
This feature is enabled by default in your Network MDM instance. The Export button displays in the search results when any record is selected.
Administrators can remove the feature:
-
In the Admin console, click Settings > General Settings.
-
Click Edit.
-
In the Search category, clear the Export From Search setting.
-
Save your changes.
Refresh your browser. The Export button will not display when records are selected in the search results.
Prerequisites
The data visibility profile assigned to your user account must have the following permission set to True:
-
Can export from Search
Administrators can set this permission in data visibility profiles.
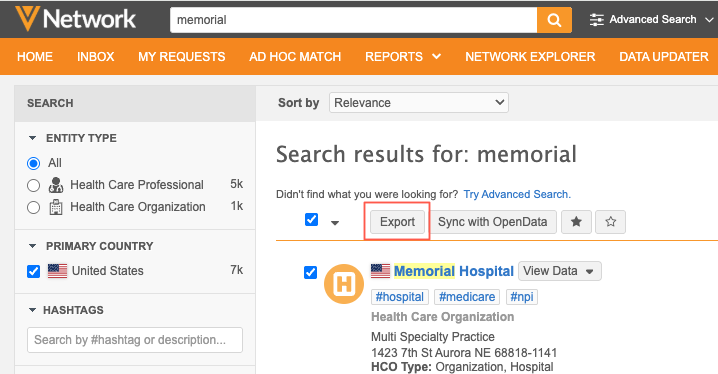
Export search results
After you search for an entity, perform the following steps to export the results:
-
Select one or more of the records in the search results, or click the checkbox to select all. By default, the checkbox selects all records on the current page.
Click the down arrow to change the selection to All or None.
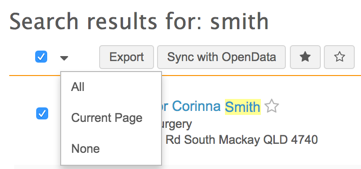
Note: Only 500 records can be exported at one time. If you choose All and more than 500 records are selected, an error occurs.
- Click Export.
-
Click OK to confirm the export.
A message displays at the top of the page indicating that the export is in progress. When it completes, a file is saved to your local file system.
- If the selected records include multiple object types (HCOs, HCPs, custom objects), a .zip file is downloaded.
- If the records include only one object type, one .csv file is downloaded.
- Open the .csv file in a spreadsheet application to view the results.

Exported data
Exports include the following data:
- Data model fields - All fields from the global data model are exported. As new fields are added, they are automatically included in new exports.
-
Sub-objects - Two license, address, and Parent HCO records are exported.
Exported sub-objects
To separate the two sub-objects of each type in the exported file, a number is appended to the field (column header):
-
fields for first sub-object - Appended with -1 (for example, address_type__v-1)
-
fields for second sub-object - Appended with -2 (for example, address_type__v-2)
Rules
The following rules (in order) determine which two licenses, addresses, and Parent HCOs are included in the export.
Addresses
| Order | Rule | Logic | Related Field |
|---|---|---|---|
| 1 | Ordinal | Sort by the listed ordinal in ascending order | address_ordinal__v |
| 2 | Status | Choose Active (A) addresses before Inactive (I) addresses | address_status__v |
| 3 | Address Type | Choose records set to Professional (P) before Professional and Preferred Mail (B) before Mail only (M) before Address (U) | address_type__v |
Licenses
| Order | Rule | Logic | Related Field |
|---|---|---|---|
| 1 | Best State License | Choose records where this field is set to Yes/True (Y), followed by records where it is set to No/False (N). | best_state_license__v |
| 2 | Status | Choose Active (A) licenses before Inactive (I) licenses before Status Unknown (X). | license_status__v |
| 3 | Date | Choose licenses based on most recent modified date. | modified_date__v |
Parent HCOs
| Order | Rule | Logic | Related Field |
|---|---|---|---|
| 1 | Primary Relationship | Choose records where this field is set to Yes/True (Y), followed by records where it is set to No/False (N) | is_primary_relationship__v |
| 2 | Status | Choose Active (A) Parent HCOs before Inactive (I) Parent HCOs. | parent_hco_status__v |
| 3 | Date | Choose Parent HCOs based on most recent modified date. | modified_date__v |