Building reports with SQL queries
DM
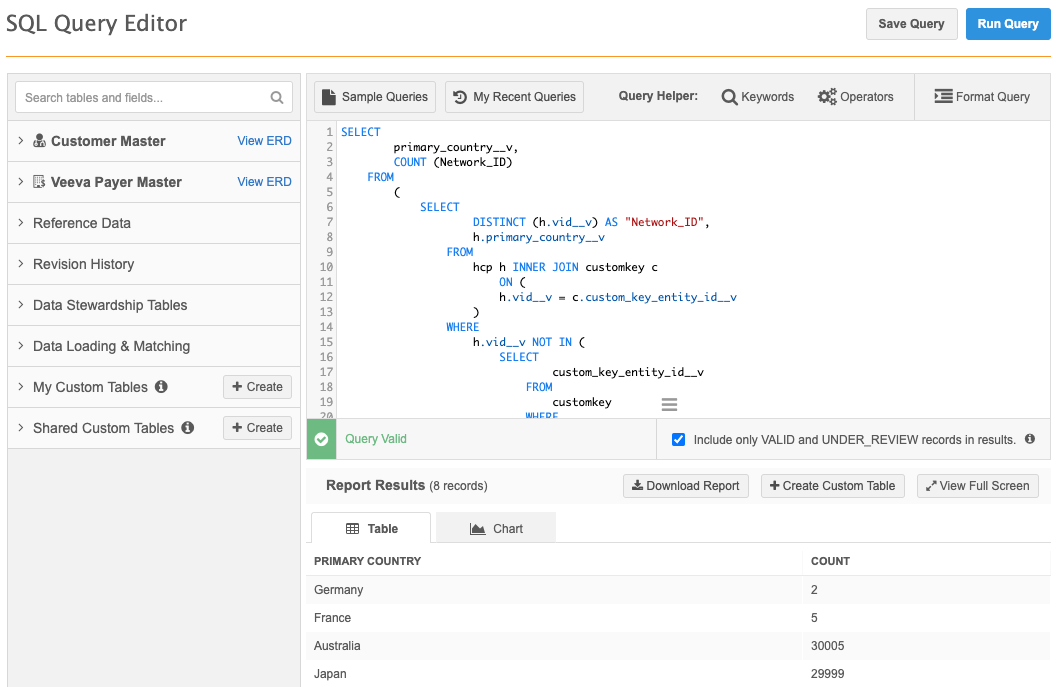
The SQL query editor enables administrators and data managers to build reports using SQL, for even more flexibility. The page contains a tree view of the data domains and additional reporting tables available to you to query against in your Network instance. The tree view gives you the visibility to see your data model and reporting structure to help you create queries.
Veeva standard objects and custom objects are supported for SQL queries.
You can find SQL queries for all of the Network samples in the Online Help. Refer to the SQL Reference for information on supported SQL, syntax, and more examples.
-
To begin building a report using SQL queries, on the Network menu bar, click REPORTS > SQL Query Editor.
Entity-level updates are immediately exported to the reporting database. This means that you can report on updated data as soon as changes are made in Network.
Understanding the reporting structure
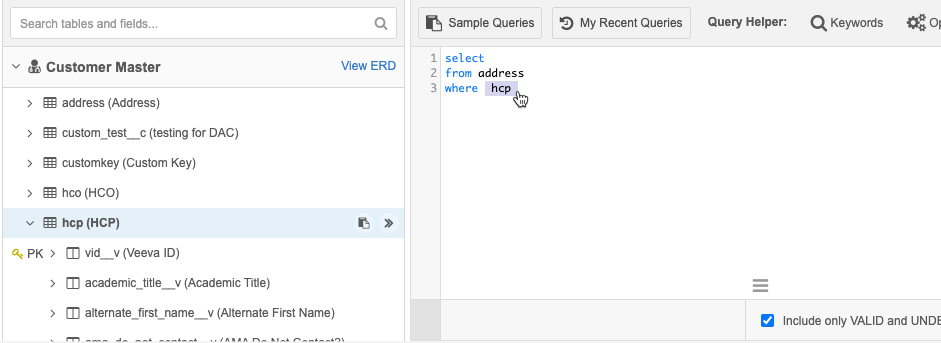
The tree view in the left pane contains data domains and reporting table categories in your Network instance. Each domain and category can be expanded so you can view its tables, fields, field metadata, and reference codes. Use the tree view to become familiar with the data model structure and to help you build your query by understanding the fields that can be joined.
For more information, see Reporting tree view.
Loading existing queries
You can load the following existing queries into the SQL Query Editor:
Sample Queries - Contains samples you can use to report on all object types, change requests, matches, logs, jobs, and custom keys. Includes basic and aggregate queries that you can use to form or augment your own queries.
My Recent Queries - Contains the last 50 queries that you have run from the SQL Query Editor only.
To load either of these into the editor:
- Click the Sample Queries or My Recent Queries button at the top of the editor. Sample queries are categorized generally by object, process, log, and job.
- At the top of the dialog listing the queries, you can begin typing to match an existing query. Sample queries match on the query title and description. Recent queries match against the SQL used in the query.

- Click the Preview Query button to look at the query's contents without selecting or loading it. When the query preview is open, you can click Hide Query to close it.
- Click a radio button to select the query you want to load.
- Click the Insert Selected Query button to load the query into the editor.
Note: Inserted queries do not overwrite existing editor contents; the sample or recent query is inserted at the cursor position.
Working in the query editor
The editor provides the following controls and functionality to assist in creating and editing your queries:
- the tree view displays your data model and reporting structure to help you create queries by inserting tables, fields, and reference codes.
- the Query Helper, which enables you to quickly search for and insert valid SQL components, and to properly format your query
- automatic code validation
- the hamburger icon
 to resize the editor window
 - a checkbox to specify that only records that are valid and under review should be included in results
Inserting elements using the tree view
Use the search bar or expand the data domains and reporting categories to see the tables, fields, and reference codes that you can insert into your query.
- Tables - Each data domain or reporting category is organized by table name.
-
Fields - All of the fields available in your Network instance can be used in the query.
 Using sets of fields
In your reports, you can specify a field set so you don't have to list fields individually. For example, if you wanted to refine your query using HCP focus areas, you can specify All HCP Focus Areas in the basic report builder or
hcp_focus_areasin the SQL editor; this value includes all 36 fields (hcp_focus_area_1__vtohcp_focus_area_36__v) in that set.The following table contains all of the groups you can specify, along with their corresponding SQL field names and the individual fields that are included.
Field Set SQL Field Name Data Model Fields All Accreditations
hco_accreditations hco_accreditation_area_1__vtohco_accreditation_10__v(Note: These fields are not considered a set for Japan).
All Address Lines address_lines address_line_1__vtoaddress_line_3__vAll Alternate Names alternate_names alternate_name_1__vtoalternate_name_10__vAll Credentials credentials credentials_1__vtocredentials_5__vAll Delivery Address Lines delivery_addresses delivery_address_line_1__vtodelivery_address_line_3__vAll Emails emails email_1__vtoemail_10__vAll Faxes faxes fax_1__vtofax_10__vAll HCO Focus Areas hco_focus_areas hco_focus_area_1__vtohco_focus_area_10__vAll HCP Focus Areas hcp_focus_areas hcp_focus_area_1__vtohcp_focus_area_36__vAll Medical Degrees medical_degrees medical_degree_1__vtomedical_degree_5__vAll National IDs national_ids national_id__vtonational_id_5__vAll Phones phones phone_1__vtophone_10__vAll Specialties specialties specialty_1__vtospecialty_10__vAll URLs URLs URL_1__vtoURL_2__vTip: Using the EXPLODE AS expression, you can specify a single field (for example,
specialties) to represent multiple fields (for example,specialty_1__v,specialty_2__v, and so on). The results will include values from all fields in the group. For an example, see HCP number of specialties. - Reference codes - Reference type fields can be expanded to display the codes. If more than 10 codes exist for a field, a link displays. Click the link to view a pop-up that contains the list of available codes.
Drag and drop
You can drag and drop tables, fields, and reference codes anywhere in the query box. When the table, field, or reference code is inserted, it remains highlighted so it's obvious where it was inserted. Spaces are automatically added before and after the item you drop into the query. After dropping an item into the query box, press the right-arrow key to continue writing your query.
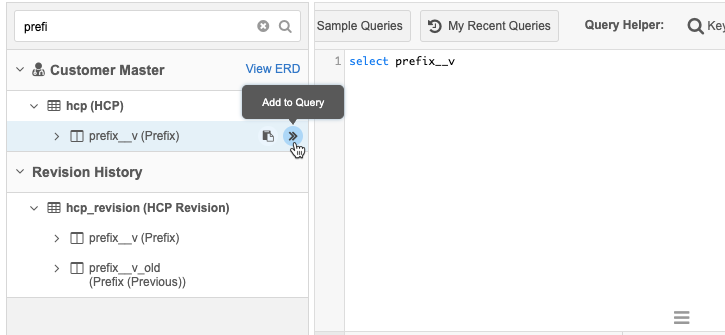
Add to Query button
- Position the cursor where you want to insert the element.
-
Hover over the element you need from the tree view; for example, Fields. The Add to Query button displays. You can also press Ctrl-Space to activate the Query Helper.
-
Click the Add to Query button to insert the element.
Note: If there are more than ten reference codes for the reference type, click the link to display the full list in a pop-up. Each pop-up contains a search bar so you can quickly find a code. Click the code to insert it into the query.
Inserting SQL elements using the Query Helper
The Query Helper enables you to easily insert the following types of SQL elements for your query:
- Keywords and Operators - contain all available SQL keywords and operators. See the SQL reference for more information.
To insert an element:
- Position the cursor where you want to insert the element.
- Select the element you need from the top of the editor; for example, Keywords. You can also press Ctrl-Space to activate the Query Helper.
- A pop-up window displays all of the available values for that element.
- Expand sections and scroll through the pop-up window, or begin typing to refine its contents.
- Select an item from the list to insert it in the editor.
As you type, notice that validation errors may appear until you've finished selecting an element from the list.
Formatting a query
Click the Format Query link at the top of the editor or press Ctrl-m to properly indent your code.
Refining results for specific record types
When you build a report using SQL queries, you might want to limit results to exclude invalid, candidate, or opted-out records.
Invalid records
Select the Include only VALID and UNDER_REVIEW records in results checkbox at the bottom of the editor to hide invalid records. Specifically, this hides records with a state of INVALID, DELETED, or MERGED_INTO from the results.
Candidate records
If you do not want candidate records in your result set, you must include records with a candidate field value of NULL (not just those with a candidate field value of False). For example:
WHERE (candidate_record__v IS NULL OR candidate_record__v <> 't')
Opted-out records
If you do not want opted-out HCPs in your result set, you must include records with an opted-out field value of NULL (not just records with an opted-out field).
For example, for Veeva OpenData opted-out records:
WHERE (data_privacy_opt_out__v IS NULL OR data_privacy_opt_out__v <> 'Y')
For customer opted-out records:
WHERE (data_privacy_opt_out__c IS NULL OR data_privacy_opt_out__c <> 'Y')
Validation
As you type your query, an icon appears to the lower left indicating whether or not your code is valid. Note that until you finish complete sections of code, the icon will appear as an x.
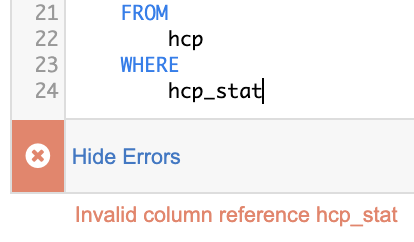
Once you have completed a successful section of code, any errors will resolve as a green check mark, indicating that the code is valid. You can click the Hide Errors link to hide these messages.
Errors on queries with large lists
If your query contains a large list of data, errors might occur because the query takes too long to build. To avoid this issue, add your data to a lookup table and query against the lookup table. For more information, see Reporting on large lists.
Best practices
The following best practices will help you optimize your queries and ensure accurate reporting of Network data.
Adding comments
Add comments to your query for explanations and to comment out lines while you work on a query.
Comments can be added using one of the following formats:
- Begin the comment with two hyphens (--)
-- <comment>
- Open the comment with a slash and asterisk (/*) and close the comment with an asterisk and slash (*/)
/*
<comment>
*/
Using double quotes
To ensure that queries can be validated, use double quotes (") around fields if they contain the following characters:
- Numbers - If your query uses a data model field that starts with a number (for example,
340B_eligible__v) and it is referenced by a table alias or a period (.), add double quotes (") around the field so it can be validated. For example, the following queries will be validated:- SELECT 340B_eligible__v FROM hco; (no table alias or period used)
- SELECT hco."340B_eligible__v" FROM hco; ( period used)
- SELECT h."340B_eligible__v" FROM hco as h; (table alias used)
-
Periods - If you use a data model field that contains a period (.); for example,
address.deleted, add double quotes (") around the field so it can be validated. This applies anywhere you reference the field in the query: statements, clauses, and so on. For example:SELECT "address.deleted" FROM job_stats_summary WHERE "address.deleted" = '2'
-
SQL Operators - If your query uses a field that is also a SQL operator; for example, is from the
reference_langtable (is is the reference language code for Icelandic), add double quotes (") around the field so the query can be validated. This applies anywhere that you reference the field in the query: statements, clauses, and so on. For example:SELECT fr, "is" FROM reference_lang WHERE reference_lang."is" IS NOT NULL
Querying decimal type fields
Use the CAST() SQL function when you report on decimal type fields to ensure that the value is rounded to the correct decimal in the results and the downloaded file.
Example
SELECT
vid__v,
CAST(product_price__c AS DECIMAL (10,2)) AS price
FROM product__c
Error messages
Error messages for advanced ad hoc queries display detail from the data warehouse to help you troubleshoot the issue. A query might validate and run, but an error could occur.
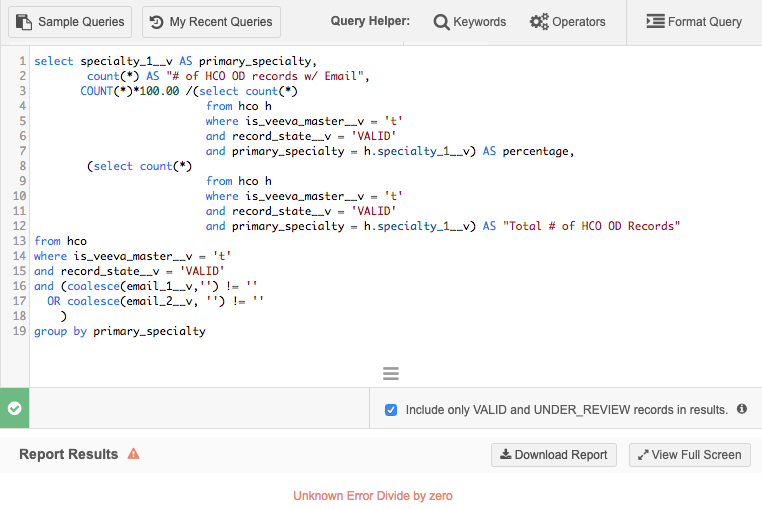
Example
The following query validates and runs, but an error occurs because the query is trying to divide by zero. The Unknown Error message includes the error details from the data warehouse: Divide by zero.
Saving the report
Click Save at the top of the report page to save the report to the reports list. When you save the report, the report's configuration page appears, where you can schedule, share, modify the query, and configure other options.
For more information on configuring report options, see Configuring report options.