Unique Checkbox primary addresses


Unique Checkbox is a primary type field configuration that you can assign to an address object. Using the Unique Checkbox configuration, you can create multiple primary type custom fields; for example, you might create primary custom fields based on therapeutic areas, so different HCPs can have primary addresses for oncology, pediatrics, and cardiology.
Unique Checkbox primary addresses are managed by Network users; the primary setting does not move from the address unless it is changed by a user. This provides flexibility if you rely on a static primary in a fiscal quarter for your business processes like territory alignment and compensation. However, there are configuration options that you can choose to allow Network to recalculate primary addresses for specific conditions to ensure that a record always has a primary.
On the profile page, primary indicators display when a Unique Checkbox field is set for an address. The name of the field and the primary badge displays.

Supported records
The Unique Checkbox primary field can be used on all Network and custom sub-objects and relationship objects.
This topic is specific to addresses because there are field options that are only available for the address object. For Unique Checkbox information for the other supported objects, see Unique Checkbox primary fields.
Address objects can be locally managed or managed by Veeva OpenData.
Process for Unique Checkbox primary addresses
To use this configuration to support your business processes, create the field and update your existing addresses in your Network instance.
- Create a Unique Checkbox primary field - Create a custom field that uses the Unique Checkbox configuration.
- Set an active and valid primary on existing records - Set a primary on existing addresses in your Network instance. Use the Data Updater or source subscriptions to update your address records.
- Edit primary addresses - Users can update the primary address field on the record profile. It can also be updated through data loading using the Data Updater or source subscription features.
- Network calculates primary - If you have chosen any of the calculation options, Network will calculate the primary address over time for that specific condition; for example, whenever specific changes are made to an address.
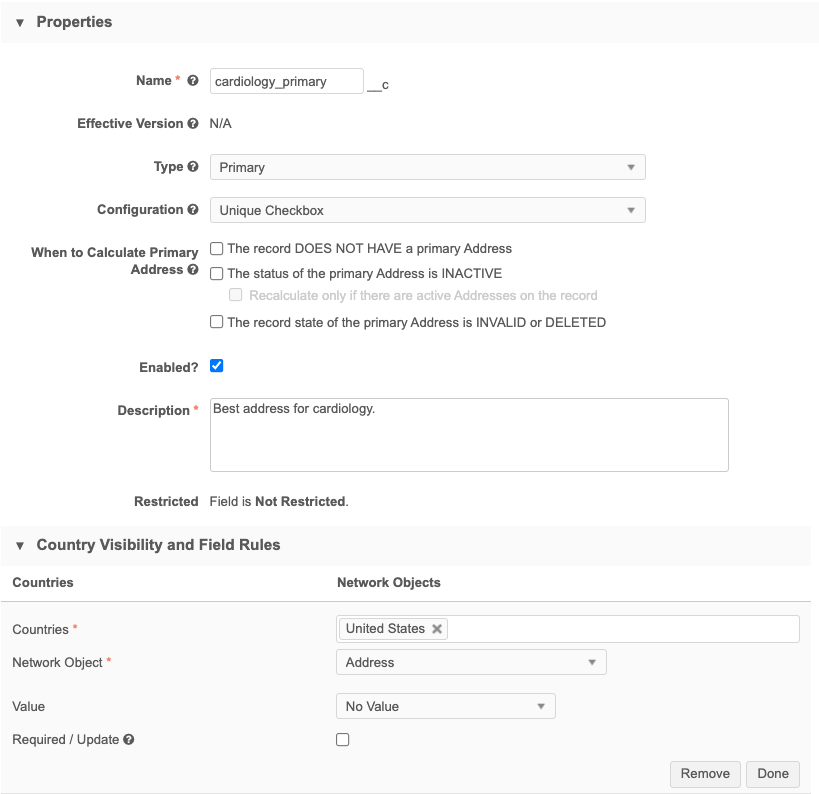
Create a Unique Checkbox primary address field
To create a primary type field:
- In the Admin console, click Data Model and select the Customer Master domain.
- Click the Address object.
-
In the Fields section, click Add Field.
- Type a Name and Description.
- In the Type field, select Primary.
- In the Configuration list, select Unique Checkbox.
- The Enabled? checkbox is selected by default.
-
In the Country Visibility and Field Rules section, select the countries that this primary address field applies to. Choose the Address object.
The following options are available for Unique Checkbox configurations:
- Value - Choose a Default Value for the field. This value displays on the profile.
-
Required / Update - Select this checkbox to make it a required field.
-
When to Calculate Primary Address - This setting called displays in the Properties section when Address is selected as the object; it does not display for any other object type.
Beside When to Calculate Primary Address, you can select any combination of these options to allow Network to calculate the primary for specific situations:
-
The record DOES NOT HAVE a primary address - For records that do not have a primary address defined (the field has no value (-) or the value is set to Unknown or No/False) Network will set a primary. Only valid, under review, and active addresses are considered.
-
The status of the primary address is INACTIVE - For primary addresses where the address status is Inactive, Network will recalculate a primary address.
If there are no active addresses on the record, a primary is not calculated so the record will not have a primary address.
-
Recalculate only if there are active addresses on the record - Network only recalculates the primary if there are active addresses on the record. If there are no active addresses, Network keeps the primary on the address that was last active.
This option ensures that the record has a primary address even if the address is inactive.
-
- The record state of the primary address is INVALID or DELETED - For primary address records that have been reviewed and are considered invalid, Network will recalculate a primary address.
By default, none of these options are selected, so the primary setting will not move from an address that uses the Unique Checkbox configuration. Multiple primary address fields can be created using the Unique Checkbox configuration, so you can define primary addresses with each specific behavior to support your business needs.
For more information about these options, and examples of Network's primary calculation, see the "Understanding how Network calculates primary for address updates" section below.
-
-
Primary Address Recalculation Logic - This section displays if any of the calculate options have been selected. When Network recalculates a primary address, specific fields are matched against the existing address to find the best primary.
Use custom logic to specify the fields that you want Network to consider during the primary address recalculation. This ensures that the address that is the most relevant for your business purposes is selected as primary. For example, using Network's standard logic, an address that is outside of the sales territory could be calculated as the new primary because the standard recalculation logic does not consider postal codes.
Note: Recalculation logic runs when the existing primary address defined on a record becomes disqualified.
Choose one of the options:
-
Use standard logic - Standard logic considers the following fields: source rank, address rank, last updated date and time, and the highest (newest) Veeva ID.
-
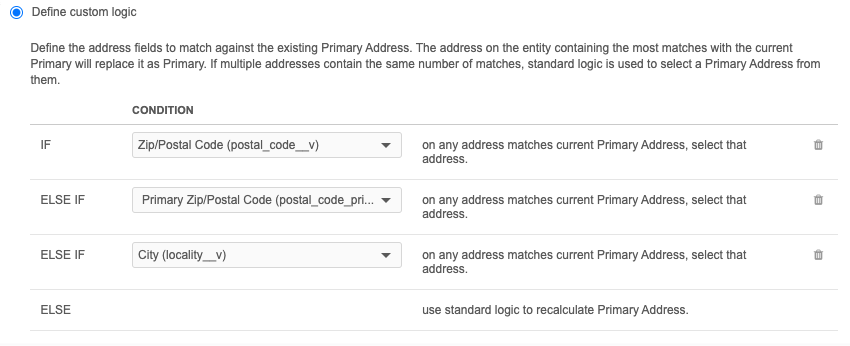
Define custom logic - Define the fields that you want Network to use for recalculating a primary. This is selected by default.

Using standard logic
Network recalculates primary addresses using the following conditions (in this order) to match against any existing primary address:
-
Source rank - The rank on the primary field is the same or higher than the existing primary address (rank of 1 is highest).
-
Address rank - The address ordinal value that is the lowest.
-
Date and time - The address where the primary field was last updated.
-
Veeva ID - The newest (highest) address entity ID.
Exclude addresses
Network automatically excludes records that are Invalid and Inactive. You can define additional address criteria to exclude from the primary address recalculation. A maximum of three custom exclude criteria can be added. For example, exclude all addresses that are the Mail Only type.
-
To exclude addresses, click Add Field. Expand the list to choose the Field and then select or type the field Value to exclude.
Standard logic recalculation
When Network recalculates the primary address using standard logic, the following steps are taken:
-
Run Inactive/Invalid logic - Exclude addresses that are Inactive or Invalid.
-
Run the exclude logic - Remove any addresses for primary consideration based on the exclude criteria you have defined.
-
Run the standard condition logic - Network recalculates the best primary address based on the order of the standard conditions: source rank, address rank, last updated date and time, and the highest (newest) Veeva ID
 Example - Standard logic recalculation
Address data Current Primary Address 1 Address 2 Address 3 City Fort York Fort York Fort York Fort York Postal Code 45678 45678 45678 45678 Address Type Professional Professional Professional Mail Only Address Status Active Active Active Inactive Source Rank 3 3 3 3 Address Rank (ordinal) 2 2 1 1 Date/Time 2022-01-12 10:53:06 2022-04-10 09:22:11 2022-05-12 15:03:25 2022-02-08 02:44:11 Veeva ID 243244003745596484 932184542274324385 932926364920187752 243244003745529263 Result
Address 2 is recalculated as the primary address because it has the lowest ranked ordinal.
The addresses all had the same source ranking (3), so Network used the next condition (address ordinal) to find the best primary address.
Note that Address 3 was excluded because it is Inactive.
Using custom logic
If you select Define custom logic, Network uses the fields that you define to recalculate primary addresses. For example, to ensure that the new primary address is located in the same sales territory, add postal code as a condition to match to the current primary address.
A maximum of three conditions can be defined. Networks matches the conditions you define to the current primary to recalculate the new primary address.
To define custom logic:
-
In the Condition section, expand the list and choose an address field.
-
To add another field to match on, click Add Condition. Select the field.
A maximum of three conditions can be defined.
-
To exclude address criteria from the recalculation logic click Add field. Define the Field and Value that you want to exclude. A maximum of three custom exclude criteria can be added. Invalid and Inactive addresses are automatically excluded.
Custom logic recalculation
When Network recalculates the primary address using custom logic, the following steps are taken:
-
Run Inactive/Invalid logic - Remove addresses that are Inactive or Invalid.
-
Run the exclude logic - Remove any addresses for primary consideration based on the exclude criteria you have defined.
-
Run the custom condition logic - If the first condition is met, then the address with the condition is the new primary address. If multiple addresses match the conditions, the address with the most matches is the new primary address. If the condition is not met, move on to the next condition.
-
Run standard logic - If multiple addresses match the current primary with the same number of matches, Network uses the standard logic conditions as a tie-breaker to recalculate the new primary address. Only the addresses that matched the custom conditions are considered.
 Examples - Custom logic recalculation
Example 1
The custom logic conditions match on the following fields:
-
Postal code - Supports 9-digit postal codes.
-
Primary postal code - Supports 5-digit postal codes.
Tip: When you use postal code as a condition, define a condition for both the
postal_code__vandprimary_postal_code__vfields to ensure that Network considers 5-digit and 9-digit postal codes. -
City
Address data Current Primary Address 1 Address 2 Address 3 City Fort York Fort York Fort York Fort York Postal Code 45678-1234 45678-1234 45673-9865 45678-5462 Postal Code Primary 45678 45678 45673 45678 Address Status Active Active Active Inactive Source Rank 3 3 3 3 Address Rank (ordinal) 2 2 1 1 Date/Time 2022-01-12 10:53:06 2022-04-10 09:22:11 2022-05-12 15:03:25 2022-02-08 02:44:11 Veeva ID 243244003745596484 932184542274324385 932926364920187752 243244003745529263 Result
Address 1 is recalculated as the primary address.
-
Postal code is the same
-
City is the same
Note that Address 3 was excluded because it is Inactive.
Example 2
This example uses the same custom logic conditions as Example 1 but it has a different outcome because multiple addresses match the custom conditions.
The conditions match on the following fields:
-
Postal code - Supports 9-digit postal codes.
-
Primary postal code - Supports 5-digit postal codes.
-
City
Address data Current Primary Address 1 Address 2 Address 3 Address 4 City Fort York Fort York Fort York Fort York Fort York Postal Code 45678-1234 45678-1234 45678-1234 45678-5462 45670-5476 Postal Code Primary 45678 45678 45678 45678 45670 Address Status Active Active Active Inactive Active Source Rank 3 3 3 3 3 Address Rank (ordinal) 2 2 3 1 1 Date/Time 2022-01-12 10:53:06 2022-04-10 09:22:11 2022-05-12 15:03:25 2022-02-08 02:44:11 2022-04-30 12:45:06 Veeva ID 243244003745596484 932184542274324385 932926364920187752 243244003745529263 243244003745596476 Result
Address 1 is recalculated as the primary address.
Address 1 tied with Address 2 because they matched to the current primary on the custom conditions:
-
Postal code is the same
-
City is the same
The standard logic ran to break the tie. Address 1 was selected because it had a lower address rank.
Note that Address 3 was excluded because it is Inactive.
Supported fields
The following fields are available to use as conditions or to use to exclude addresses:
-
Active address fields
System fields (
created_date__v,vid__v,record_state__v, and so on) are not supported
-
- Labels - Cthe Language and the Label for the custom field. The label displays on the profile page.
- Save your changes.
The primary field will now display on address objects on the profile page.
Set an active and valid primary on existing records
After you create a primary field, ensure that a primary is set on existing records to support your business processes. Unique Checkbox primaries must be explicitly set because they will not be added or moved unless Network recalculates the primary to avoid duplicates. If you have chosen any of the Unique Checkbox options to allow Network to recalculate a primary, those changes will occur over time as records undergo changes and primary calculation is triggered.
To ensure that all existing records in your Network instance have a primary right now, use the Data Updater to set the field. Use reporting to identify the records that do not have an active and valid primary.
Step 1: Run a report to identify the objects in your Network instance
The report finds objects that have the following situations:
- no primary is available on a record
- inactive or invalid objects have been set to primary
To create a report to find these objects:
- On the Network menu bar, click Reports > SQL Query Editor.
-
In the text box, type the SQL query below.
Replace the object references (address) with the applicable object and the primary field name,
oncology_primary__c, with the name of your primary custom field.Note: The
address_ordinal__vfield is only available on the address object. Remove this condition for non-address primary fields.SELECT address.entity_vid__v, vid__v, address_ordinal__v, oncology_primary__c /*Displaying the Oncology Primary located on the Rank 1 Address*/ FROM address INNER JOIN ( SELECT entity_vid__v FROM address WHERE ( oncology_primary__c IS NULL OR oncology_primary__c <> 'Y' ) AND entity_vid__v NOT IN ( SELECT entity_vid__v FROM address WHERE address_status__v = 'A' AND record_state__v IN ( 'VALID', 'UNDER_REVIEW' ) AND oncology_primary__c = 'Y' ) GROUP BY entity_vid__v ) entity_with_no_primary ON address.entity_vid__v = entity_with_no_primary.entity_vid__v WHERE address_ordinal__v = 1 - Click Run.
This query extracts all of the active and valid records. The objects can be set to primary in the subscription file.
Considerations for address report results:
Values in the address_ordinal__v field are maintained by Veeva OpenData for OpenData addresses or by the record owner for non-OpenData addresses.
- If there are multiple objects on the same entity with
address_ordinal__v = 1, both addresses will be in the report. - If none of the addresses on the entity have
address_ordinal__v = 1, the entity won't be displayed in the report.
Step 2: Set a primary on active and valid objects
Use the Data Updater to set the objects that you want to be primary - this could be the object that has been recently updated or the object that has the highest Veeva ID (VID). For addresses, typically the rank 1 addresses are set to primary.
-
Create a .csv file that contains the fields below.
vid_v oncology_primary__c 9988776655 Y -
Create a Data Updater job that includes this .csv file.
Note: For address jobs, the Verify and clean address option must not be enabled.
- Run the Data Updater job.
After the job runs, the records will be updated with a primary.
Setting a primary address
Users can set an address as primary on the Profile page. For example, a Field Services Manager who manages territories and compensation can edit an address to assign a primary field for specific therapeutic areas.
To assign a primary:
- Click the object summary card to expand the object details.
- Find the primary field name, click the Value field, and choose Yes/True from the list.
- Click Apply to save your update and submit a data change request to local data stewards for review.
Note: After the primary value has been set for a field, any update to the primary field value other than Y (Yes/True) or N (No/False) will be disregarded. For example, if the value is changed to U (Unknown), that change is disregarded.
Example
On this HCP record:
- On 755 Memorial Pkwy, the Primary badge displays because this address is set as the HCP's Global Primary Address (Network Calculated primary field).
- A Field Services Manager edits the record to set 3701 Doty Rd as the HCP's primary address for Oncology (Unique Checkbox primary field).
- The Oncology Primary Address field value is set to Yes/True.

A data change request (DCR) is sent to local data stewards. When the DCR is accepted, the profile page updates to display the primary tag below the address.
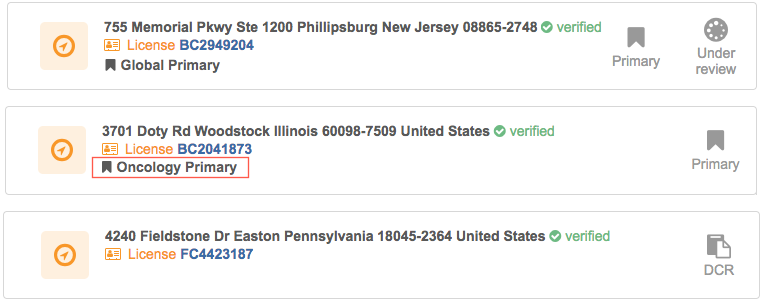
Now, the primary address is aligned to a field rep's territory so when they make a sales call to the HCP at 3701 Doty Rd they will be compensated accordingly.
Other ways primary can be set on records
A primary can be set on an object using the following Network features:
- Change request API
- Data change requests
- Merge and unmerge
- Data Updater
- Veeva OpenData updates (subscriptions, downloads, sync)
Duplicate primaries in the Network UI
All users can edit Unique Checkbox and Network Calculated primary fields on record profiles. If the primary field is updated, a data change request is created and sent to local data stewards to accept or reject the change.
To ensure that a field is set to primary on only one object, Network changes the primary value if a field is set to Yes/True multiple times on a record.
This is the only situation where Network will move the primary on a Unique Checkbox configuration that doesn't use any of the Network calculation options.
Example
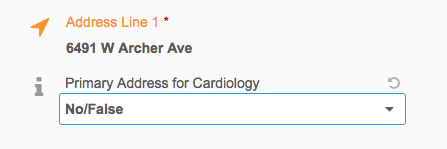
On an HCP record, the Primary Address for Cardiology field is set to Yes/True for 6941 W Archer Ave.

A user edits the record and sets the same primary field to Yes/True for 1180 W Wilson St Ste E.
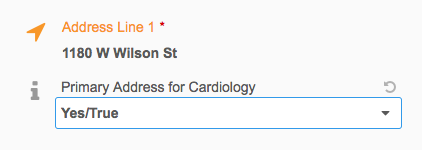
To ensure that there's only one Primary Address for Cardiology defined on the record, Network automatically toggles the field value to No/False on the 6941 W Archer Ave address.
The same behavior occurs on data change requests.
Triggers for Network calculation
If you chose any of the options to allow primary to be moved, Network calculates the primary when those changes occur during specific events.
Events
Network will calculate a primary if the address fields (listed below) are changed during the following events:
- New address object is added or specific fields (listed below) on an existing address are changed using source subscriptions, data change requests, or the Network API
- Merging records manually using Find Suspect Match
- Merging records in bulk through source subscriptions
- Unmerging records
- Downloading records from Veeva OpenData (using OpenData subscriptions or the Ad Hoc Download or Download from OpenData buttons on a record).
- Syncing a record with Veeva OpenData (using the Sync with OpenData button).
Understanding how Network calculates primary for address updates
Network will calculate the primary for addresses that are added or updated depending on the options that you have selected for a Unique Checkbox primary address field. Any combination of the options can be selected.
Review the sections below to understand how primary is calculated when addresses are added or updated using the following actions:
- source subscriptions
- updates on the profile page
- updates in data change requests
- change request API
Each example includes a number (for example, A1, D2, and so on) in the Workflow Example column to refer to a diagram. You can refer to the diagram in the Workflows section below to see how Network decides whether a primary should be calculated based on the address and the options that are enabled for the primary field.
If you choose not to select any of the primary options, you control which address is primary. After you define an address as the primary, the flag will not move unless you explicitly move it by submitting a change. Network will not calculate a primary if a primary is defined on a record.
When this option is selected:
- You can control what address is primary. You can define the primary on any address (active, valid, inactive, invalid, deleted, and so on).
- Network calculates primary only if a record does not have a primary defined. Only valid and active addresses are considered.
Examples
Review the examples in the table below to understand when a primary is calculated if this option is selected or not. In the examples, address1, address2, and so on represent different addresses.
These examples refer to the following diagrams in the Workflows section below:
- No source primary (A1, A2, B1, B2, C1, C2)
- One source primary only, no Network primary (G, H,)
- One source, non-matching Network primary (M, N)
- Multiple source primaries only (R, S)
- Multiple matching source and Network primaries (Y)
| In Network | Change submitted | Summary of Data | Results | Workflow Example |
|---|---|---|---|---|
| address1: primary=no value status=Active state=VALID |
address1: primary=Y status=Active state=VALID |
A1, A2 | ||
| address1: primary=no value status=Active state=VALID |
address2: primary=no value status=Active state=VALID |
address1: primary=no value status=Active state=VALID source=SAP ordinal=1 address2: primary=no value status=Active state=VALID source=SAP ordinal=2 |
address1: primary=Y status=Active state=VALID address2: primary=no value status=Active state=VALID |
A1, A2 |
| address1: primary=N status=Active state=VALID address2: primary=N status=Active state=VALID address3: primary=no value status=Active state=VALID |
address1: primary=N status=Active state=VALID address2: primary=N status=Active state=VALID address3: primary=Y status=Active state=VALID |
A1, A2 | ||
| address1: primary=N status=Active state=VALID address2: primary=N status=Active state=VALID address3: primary=no value status=Inactive state=VALID |
address1: primary=N status=Active state=VALID address2: primary=N status=Active state=VALID address3: primary=no value status=Inactive state=VALID |
A1, A2 | ||
| address1: primary=Y status=Active state=VALID address2: primary=N status=Active state=VALID |
address1: primary=Y status=Active state=VALID address2: primary=N status=Active state=VALID |
G | ||
| address1: primary=N status=Active state=VALID |
address2: primary=Y status=Active state=VALID |
address1: primary=N status=Active state=VALID address2: primary=Y status=Active state=VALID |
G | |
| address1: primary=N status=Active state=VALID address2: primary=N status=Active state=VALID |
address1: primary=Y status=Active state=VALID |
address1: primary=Y status=Active state=VALID address2: primary=N status=Active state=VALID |
G | |
| address1: primary=Y status=Active state=VALID |
address1: primary=N status=Active state=VALID |
address1: primary=N status=Active state=VALID |
B1, B2 | |
| address1: primary=Y status=Inactive state=VALID |
address1: primary=Y status=Inactive state=VALID |
H | ||
| address1: primary=Y status=Active state=INVALID |
address1: primary=Y status=Active state=INVALID |
H | ||
| address1: primary=Y status=Inactive state=INVALID |
address1: primary=Y status=Inactive state=INVALID |
H | ||
| address1: primary=Y status=Active state=VALID |
address1: status=Inactive |
address1: primary=Y status=Inactive state=VALID |
C1, C2 | |
| address1: primary=Y status=Active state=VALID |
address1: state=INVALID |
address1: primary=Y status=Active state=INVALID |
C1, C2 | |
| address1: primary=Y status=Active state=VALID |
address2: primary=Y status=Active state=VALID |
address2: primary=Y status=Active state=VALID |
M | |
| address1: primary=Y status=Active state=VALID |
address2: primary=Y status=Inactive state=INVALID |
address1: primary=N status=Active state=VALID address2: primary=Y status=Inactive state=INVALID |
N | |
| address1: primary=Y status=Active state=VALID address2: primary=Y status=Active state=VALID |
address1: primary=Y source=Change Request source rank=1 ordinal=1 address2: primary=Y source=Change Request source rank=1 ordinal=2 |
address1: primary=Y status=Active state=VALID address2: primary=N status=Active state=VALID |
R | |
| address1: primary=Y status=Inactive state=INVALID address2: primary=Y status=Inactive state=INVALID |
address1: primary=Y source=SAP source rank=1 ordinal=1 address2: primary=Y source=SAP source rank=1 ordinal=2 |
address1: primary=Y status=Inactive state=INVALID address2: primary=N status=Inactive state=INVALID |
S | |
| address1: primary=Y status=Active state=VALID address2: primary=Y status=Active state=INVALID address3: primary=Y status=I state=VALID address4: primary=Y status=I state=INVALID |
address1: primary=Y status=Active state=VALID address2: primary=N status=Active state=INVALID address3: primary=N status=Inactive state=VALID address4: primary=N status=Inactive state=INVALID |
R | ||
| address2: primary=Y status=Active state=VALID |
address1: primary=Y status=Active state=VALID address2: primary=Y status=Active state=INVALID address3: primary=Y status=Inactive state=VALID address4: primary=Y status=Inactive state=INVALID |
address1: primary=N status=Active state=VALID address2: primary=Y status=Active state=INVALID address3: primary=N status=Inactive state=VALID address4: primary=N status=Inactive state=INVALID |
Y |
When this option is selected:
- Network calculates primary only if the address is inactive. Only valid and active addresses are considered.
Examples
Review the examples in the table below to understand when a primary is calculated if this option is selected or not. In the examples, address1, address2, and so on represent different addresses.
These examples refer to the following diagrams in the Workflows section below:
- One source primary only, no Network primary (K, I)
- One source, non-matching Network primary (O1, P)
- Multiple source, non-matching Network primary (T, U1, V)
- Multiple matching source and Network primaries (W, X)
- One matching source and Network primary (D1, D1, E1, E2)
| In Network | Change submitted | Summary of Data | Results | Workflow Example |
|---|---|---|---|---|
| address1: primary=Y status=Inactive state=VALID |
address1: primary=N status=Inactive state=VALID |
K | ||
| address1: primary=Y status=Active state=INVALID |
address1: primary=Y status=Active state=INVALID |
I | ||
| address1: primary=Y status=Active state=VALID |
address1: status=Inactive |
address1: primary=N status=Inactive state=VALID |
F1, F2 | |
| address1: primary=Y status=Active state=VALID |
address1: primary=Y status=Inactive state=VALID |
address1: primary=Y status=Inactive state=VALID |
D1, D2 | |
| address1: primary=Y status=Inactive state=VALID address2: primary=no value status=Active state=VALID |
address1: primary=Y status=Active state=VALID address3: primary=no value status=Active state=VALID |
address1: primary=Y status=Active state=VALID address2: primary=no value status=Active state=VALID address3: primary=no value status=Active state=VALID |
E1, E2 | |
| address1: primary=Y status=Active state=VALID address2: primary=N status=Active state=VALID |
address3: primary=Y status=Active state=VALID address4: primary=N status=Active state=VALID |
address1: primary=N status=Active state=VALID address2: primary=N status=Active state=VALID address3: primary=Y status=Active state=VALID address4: primary=no value status=Active state=VALID |
P | |
| address1: primary=Y status=Inactive state=VALID address2: primary=N status=Active state=VALID |
address3: primary=Y status=Inactive state=VALID address4: primary=no value status=Active state=VALID |
address2: primary=N status=Active state=VALID source=SAP source rank=1 address4: primary=no value status=Active state=VALID source=MedPro source rank=2 |
address1: primary=N status=Inactive state=VALID address2: primary=Y status=Active state=VALID address3: primary=N status=Inactive state=VALID address4: primary=no value status=Active state=VALID, |
O1 |
| address1: primary=Y status=Active state=VALID |
address2: primary=Y status=Active state=VALID address3: primary=Y status=Active state=INVALID address4: primary=Y status=Inactive state=VALID address5: primary=Y status=Inactive state=INVALID |
address1: primary=N status=Active state=VALID address2: primary=Y status=Active state=VALID address3: primary=N status=Active state=INVALID address4: primary=N status=Inactive state=VALID address5: primary=N status=Inactive state=INVALID |
T | |
| address1: primary=Y status=Active state=VALID address2: primary=N status=Active state=VALID |
address3: primary=Y status=Inactive state=VALID address4: primary=Y status=Inactive state=VALID |
address1: primary=Y status=Active state=VALID address2: primary=N status=Active state=VALID address3: primary=N status=Inactive state=VALID address4: primary=N status=Inactive state=VALID |
V | |
| address1: primary=Y status=Inactive state=VALID address2: primary=N status=Active state=VALID |
address3: primary=Y status=Inactive state=VALID address4: primary=Y status=Inactive state=VALID address5: primary=no value status=Active state=VALID |
address2: primary=N status=Active state=VALID source=SAP source rank=1 address5: primary=no value status=Active state=VALID source=Concur source rank=2 |
address1: primary=Y status=Inactive state=VALID address2: primary=N status=Active state=VALID source=SAP source rank=1 address3: primary=Y status=Inactive state=VALID address4: primary=Y status=Inactive state=VALID address5: primary=no value status=Active state=VALID source=Concur source rank=2 |
U1 |
| address1: primary=Y status=Active state=VALID address2: primary=no value status=Active state=VALID |
address1: primary=Y status=Inactive state=INVALID address3: primary=Y status=Active state=INVALID address4: primary=Y status=Active state=INVALID |
address3: primary=Y status=Active state=INVALID source=SAP source rank=1 address4: primary=Y status=Active state=INVALID source=Concur source rank=2 |
address1: primary=N status=Inactive state=INVALID address2: primary=no value status=Active state=VALID address3: primary=Y status=Active state=INVALID address4: primary=N status=Active state=INVALID |
X |
| address1: primary=Y status=Active state=VALID address2: primary=no value status=Active state=VALID address3: primary=no value status=Active state=VALID |
address1: primary=Y status=Inactive state=VALID address4: primary=Y status=Inactive state=VALID address5: primary=Y status=Inactive state=VALID address6: primary=no value status=Active state=VALID |
address2: primary=no value status=Active state=VALID, source=SAP source rank=1 address3: primary=no value status=Active state=VALID source=Concur source rank=2 address6: primary=no value status=Active state=VALID source=MedPro source rank=3 |
address1: primary=N status=Inactive state=VALID address2: primary=no value status=Active state=VALID address3: primary=no value status=Active state=VALID address4: primary=N status=Inactive state=VALID address5: primary=N status=Inactive state=VALID address6: primary=no value status=Active state=VALID |
W |
When this option is selected:
- Network calculates primary only if the address is inactive and there is another active address on the record. Only valid and active addresses are considered. If no other address is active, the existing primary address remain as primary.
Examples
Review the examples in the table below to understand when a primary is calculated if this option is selected or not. In the examples, address1, address2, and so on represent different addresses.
These examples refer to the following diagrams in the Workflows section below:
- One source primary only, no Network primary (K, I)
- One source, non-matching Network primary (O1, P)
- Multiple source, non-matching Network primary (T, U2, V)
- Multiple matching source and Network primaries (W, X)
- One matching source and Network primary (D1, D1, E1, E2)
| In Network | Change submitted | Summary of Data | Results | Workflow Example |
|---|---|---|---|---|
| address1: primary=Y status=Inactive state=VALID |
address1: primary=Y status=Inactive state=VALID |
K | ||
| address1: primary=Y status=Active state=INVALID |
address1: primary=Y status=Active state=INVALID |
I | ||
| address1: primary=Y status=Aactive state=VALID |
address1: status=Inactive |
address1: primary=Y status=Inactive state=VALID |
F1, F2 | |
| address1: primary=Y status=Active state=VALID |
address1: primary=Y status=Inactive state=VALID |
address1: primary=Y status=Inactive state=VALID |
D1, D2 | |
| address1: primary=Y status=Inactive state=VALID address2: primary=no value status=Active state=VALID |
address1: primary=Y status=Active state=VALID address3: primary=no value status=Active state=VALID |
address1: primary=Y status=Active state=VALID address2: primary=no value status=Active state=VALID address3: primary=no value status=Active state=VALID |
E1, E2 | |
| address1: primary=Y status=Active state=VALID address2: primary=N status=Active state=VALID |
address3: primary=Y status=Active state=VALID address4: primary=N status=Active state=VALID |
address1: primary=N status=Active state=VALID address2: primary=N status=Active state=VALID address3: primary=Y status=Active state=VALID address4: primary=No Value status=Active state=VALID |
P | |
| address1: primary=Y status=Inactive state=VALID address2: primary=N status=Active state=VALID |
address3: primary=Y status=Inactive state=VALID address4: primary=no value status=Active state=VALID |
address2: primary=N status=Active state=VALID source=SAP source rank=1 address4: primary=no value status=Active state=VALID source=MedPro source rank=2 |
address1: primary=N status=Inactive state=VALID address2: primary=Y status=Active state=VALID address3: primary=N status=Inactive state=VALID address4: primary=no value status=Active state=VALID, |
O1 |
| address1: primary=Y status=Active state=VALID |
address2: primary=Y status=Active state=VALID address3: primary=Y status=Active state=INVALID address4: primary=Y status=Inactive state=VALID address5: primary=Y status=Inactive state=INVALID |
address1: primary=N status=Active state=VALID address2: primary=Y status=Active state=VALID address3: primary=N status=Active state=INVALID address4: primary=N status=Inactive state=VALID address5: primary=N status=Inactive state=INVALID |
T | |
| address1: primary=Y status=Active state=VALID address2: primary=N status=Active state=VALID |
address3: primary=Y status=Inactive state=VALID address4: primary=Y status=Inactive state=VALID |
address1: primary=Y status=Active state=VALID address2: primary=N status=Active state=VALID address3: primary=N status=Inactive state=VALID address4: primary=N status=Inactive state=VALID |
V | |
| address1: primary=Y status=Inactive state=VALID address2: primary=N status=Active state=VALID |
address3: primary=Y status=Inactive state=VALID address4: primary=Y status=Inactive state=VALID address5: primary=no value status=Active state=VALID |
address2: primary=N status=Active state=VALID source=SAP source rank=1 address5: primary=no value status=Active state=VALID source=Concur source rank=2 |
address1: primary=N status=Inactive state=VALID address2: primary=Y status=Active state=VALID source=SAP source rank=1 address3: primary=N status=Inactive state=VALID address4: primary=N status=Inactive state=VALID address5: primary=no value status=Active state=VALID source=Concur source rank=2 |
U2 |
| address1: primary=Y status=Active state=VALID address2: primary=no value status=Active state=VALID |
address1: primary=Y status=Inactive state=INVALID address3: primary=Y status=Active state=INVALID address4: primary=Y status=Active state=INVALID |
address3: primary=Y status=Active state=INVALID source=SAP source rank=1 address4: primary=Y status=Active state=INVALID source=Concur source rank=2 |
address1: primary=N status=Inactive state=INVALID address2: primary=no value status=Active state=VALID address3: primary=Y status=Active state=INVALID address4: primary=N status=Active state=INVALID |
X |
| address1: primary=Y status=Active state=VALID address2: primary=no value status=Active state=VALID address3: primary=no value status=Active state=VALID |
address1: primary=Y status=Inactive state=VALID address4: primary=Y status=I state=VALID address5: primary=Y status=Inactive state=VALID address6: primary=no value status=Active state=VALID |
address2: primary=no value status=Active state=VALID, source=SAP source rank=1 address3: primary=no value status=Active state=VALID source=Concur source rank=2 address6: primary=no value status=Active state=VALID source=MedPro source rank=3 |
address1: primary=N status=Inactive state=VALID address2: primary=Y status=Active state=VALID address3: primary=no value status=Active state=VALID address4: primary=N status=Inactive state=VALID address5: primary=N status=Inactive state=VALID address6: primary=no value status=Active state=VALID |
W |
When only this option is selected:
- Network calculates primary only if the address is invalid. Only valid and active addresses are considered.
Examples
Review the examples in the table below to understand when a primary is calculated if this option is selected or not. In the examples, address1, address2, and so on represent different addresses.
These examples refer to the following diagrams in the Workflows section below:
- One source primary only, no Network primary (J, L)
- One source, non-matching Network primary (Q)
| In Network | Change submitted | Summary of Data | Results | Workflow Example |
|---|---|---|---|---|
| address1: primary=Y status=Active state=INVALID |
address1: primary=N status=Active state=INVALID |
L | ||
| address1: primary=Y status=Inactive state=VALID |
address1: primary=Y status=Active state=VALID |
J | ||
| address1: primary=Y status=Active state=INVALID address2: primary=N status=Active state=VALID |
address3: primary=Y status=Active state=INVALID address4: primary=no value status=Active state=VALID |
address2: primary=N status=Active state=VALID source=SAP source rank=1 address4: primary=no value status=Active state=VALID source=MedPro source rank=2 |
address1: primary=N status=Active state=INVALID address2: primary=Y status=Active state=VALID address3: primary=N status=Active state=INVALID address4: primary=no value status=Active state=VALID |
Q |
Understanding how Network calculates primary for OpenData updates
Network's primary calculation when addresses are downloaded from or synced with Veeva OpenData depend on the options that you have selected for a primary address field. Any combination of options can be selected.
Review the sections below to understand how primary is calculated when addresses are added or updated using the following actions:
- Downloading records from Veeva OpenData (using OpenData subscriptions or the Ad Hoc Download or Download from OpenData buttons).
- Syncing a record with Veeva OpenData (using the Sync with OpenData button).
If you choose not to select any of the primary options, you control which address is primary. After you define the primary, it will not move unless you explicitly move it. Network will not calculate a primary if a primary is not defined on a record.
Examples
Review the examples in the table below to understand when a primary is calculated if this option is selected or not. In the examples, address1, address2, and so on represent different addresses.
These examples refer to the following diagrams in the Workflows section below:
- Veeva OpenData Sync (A)
| Your Network instance before sync | Veeva OpenData master instance | Your Network instance after sync | Workflow Example |
|---|---|---|---|
| hcp1: John Smith address1: status=Active state=VALID address2: status=Active state=VALID |
hcp1: John Smith address1: primary=no value status=Active state=VALID address2: primary=no value status=Active state=VALID |
A | |
| hcp1: John Smith address1: primary=no value status=Active state=VALID address2: primary=no value status=Active state=VALID |
hcp1: John Smith
address3: status=Active state=VALID |
hcp1: John Smith
address1: primary=no value status=Active state=VALID address2: primary=no value status=Active state=VALID |
A |
When only this option is selected:
- You can control what address is primary. You can define the primary on any address (active, valid, inactive, invalid, deleted, and so on).
- Network calculates primary only if a record does not have a primary defined. Only valid and active addresses are considered.
Examples
Review the examples in the table below to understand when a primary is calculated if this option is selected or not. In the examples, address1, address2, and so on represent different addresses.
These examples refer to the following diagrams in the Workflows section below:
- Veeva OpenData Sync (B, C, D)
| Your Network instance before sync | Veeva OpenData master instance | Summary of data source = OpenData source rank = 1 time = 3pm |
Your Network instance after sync | Workflow Example |
|---|---|---|---|---|
| hcp1: John Smith
address1: status=Active state=VALID address2: status=Active state=VALID |
address1: status=Active state=VALID ordinal=1 address2: status=Active state=VALID ordinal=2 |
hcp1: John Smith
address1: primary=Y status=Active state=VALID address2: primary=no value status=Active state=VALID |
B | |
| hcp1: John Smith
address1: primary=Y status=Active state=VALID address2: primary=no value status=Active state=VALID |
hcp1: John Smith
address3: status=Active state=VALID |
address1: status=Active state=VALID ordinal=1 address2: status=Active state=VALID ordinal=2 address3: status=Active state=VALID ordinal=3 |
hcp1: John Smith
address1: primary=Y status=Active state=VALID address2: primary=no value status=Active state=VALID address3: primary=no value status=Active state=VALID |
B |
| hcp1: John Smith
address1: primary=N status=Active state=VALID address2: primary=N status=Active state=VALID |
hcp1: John Smith
address1: status=Inactive |
hcp1: John Smith
address1: primary=N status=Inactive state=VALID address2: primary=Y status=Active state=VALID |
B | |
| hcp1: John Smith
address1: primary=N status=Active state=VALID address2: primary=N status=Active state=VALID |
hcp1: John Smith
address1: state=INVALID |
hcp1: John Smith
address1: primary=N status=Active state=INVALID address2: primary=Y status=Active state=VALID |
B | |
| hcp1: John Smith
address1: primary=Y status=Active state=VALID address2: primary=N status=Active state=VALID |
hcp1: John Smith
address3: status=Active state=VALID |
hcp1: John Smith
address1: primary=Y status=Active state=VALID address2: primary=N status=Active state=VALID address3: primary=no value status=Active state=VALID |
C | |
| hcp1: John Smith
address1: primary=Y status=Inactive state=VALID address2: primary=N status=Active state=VALID |
hcp1: John Smith
address3: status=Active state=VALID |
hcp1: John Smith
address1: primary=Y status=Inactive state=VALID address2: primary=N status=Active state=VALID address3: primary=no value status=Active state=VALID |
D |
When only this option is selected:
- Network calculates primary only if the address is inactive. Only valid and active addresses are considered.
Examples
Review the examples in the table below to understand when a primary is calculated if this option is selected or not. In the examples, address1, address2, and so on represent different addresses.
These examples refer to the following diagrams in the Workflows section below:
- Veeva OpenData Sync (E, F)
| Your Network instance before sync | Veeva OpenData master instance | Summary of data source = OpenData source rank = 1 time = 3pm |
Your Network instance after sync | Workflow Example |
|---|---|---|---|---|
| hcp1: John Smith
address1: primary=Y status=Inactive state=VALID address2: primary=N status=Active state=VALID |
hcp1: John Smith
address3: status=Active state=VALID |
hcp1: John Smith
address3: status=Active state=VALID |
hcp1: John Smith
address1: primary=N status=Inactive state=VALID address2: primary=Y status=Active state=VALID address3: primary=no value status=Active state=VALID |
F |
| hcp1: John Smith
address1: primary=Y status=Inactive state=VALID address2: primary=N status=Active state=VALID |
hcp1: John Smith
address1: status=Active address3: status=Active state=VALID |
hcp1: John Smith
address1: primary=Y status=Active state=VALID address2: primary=N status=Active state=VALID address3: primary=no value status=Active state=VALID |
E | |
| hcp1: John Smith
address1: primary=Y status=Active state=VALID address2: primary=N status=Active state=VALID |
hcp1: John Smith
address1: status=Inactive address3: status=Active state=VALID |
address2: status=Active state=VALID ordinal=1 address3: status=A state=VALID ordinal=2 |
hcp1: John Smith
address1: primary=N status=Inactive state=VALID address2: primary=Y status=Active state=VALID address3: primary=no value status=A state=VALID |
F |
When only this option is selected:
- Network calculates primary only if the address is invalid. Only valid and active addresses are considered.
Examples
Review the examples in the table below to understand when a primary is calculated if this option is selected or not. In the examples, address1, address2, and so on represent different addresses.
These examples refer to the following diagrams in the Workflows section below:
- Veeva OpenData Sync (G, H)
| Your Network instance before sync | Veeva OpenData master instance | Summary of data source = OpenData source rank = 1 time = 3pm |
Your Network instance after sync | Workflow Example |
|---|---|---|---|---|
| hcp1: John Smith
address1: primary=Y status=Active state=VALID address2: primary=N status=Active state=VALID |
hcp1: John Smith
address1: status=Inactive address3: status=Active state=VALID |
hcp1: John Smith
address1: primary=Y status=Inactive state=VALID address2: primary=N status=Active state=VALID address3: primary=no value status=Active state=VALID |
G | |
| hcp1: John Smith
address1: primary=Y status=Inactive state=VALID address2: primary=N status=Active state=VALID address3: primary=no value status=Active state=VALID |
hcp1: John Smith
address1: state=INVALID address3: status=Active state=VALID |
address2:
status=Active state=VALID ordinal=1 address3: status=Active state=VALID ordinal=2 |
hcp1: John Smith
address1: primary=N status=Active state=INVALID address2: primary=Y status=Active state=VALID address3: primary=no value status=Active state=VALID |
H |
Understanding how Network calculates primary for merge and unmerge
Merge
A primary is calculated by Network if neither the merge winner nor the loser contributed a primary and the The record DOES NOT HAVE a primary address option is enabled.
If the winning record contributes a primary address, the winner's address remains primary after the merge. However, if the winner's primary is inactive/invalid and the loser contributed a primary, the loser's address becomes primary after the merge. ]If the loser's address is inactive/invalid, Network will calculate a primary from all the active and valid addresses on the merged entity.
If the winner did not contribute a primary and the loser contributed a primary, the loser's address will remain primary after the merge. However, if the loser's address is inactive/invalid, Network will calculate a primary from all the active and valid addresses on the merged entity.
Unmerge
When records are unmerged from each other, any fields that were set as primary on the original records are recovered.
A primary is calculated in the following situations:
- None of the source views contributed a primary and the following option is on: The record DOES NOT HAVE a primary address.
- An inactive address is primary in the source views and the following option is on: The status of the primary address is INACTIVE.
- An invalid address is primary in the source views and the following option is on: The status of the primary address is INVALID or DELETED.
Workflows
These workflows illustrate how Network determines if a primary should be calculated based on the addresses and the options that you have selected for the primary field. The letters in the purple circles; for example, ![]() , correspond to the examples in the tables above, so you can follow the decision points.
, correspond to the examples in the tables above, so you can follow the decision points.
Tip: Right-click on the image to open it in a new browser tab so you can zoom in on the details.
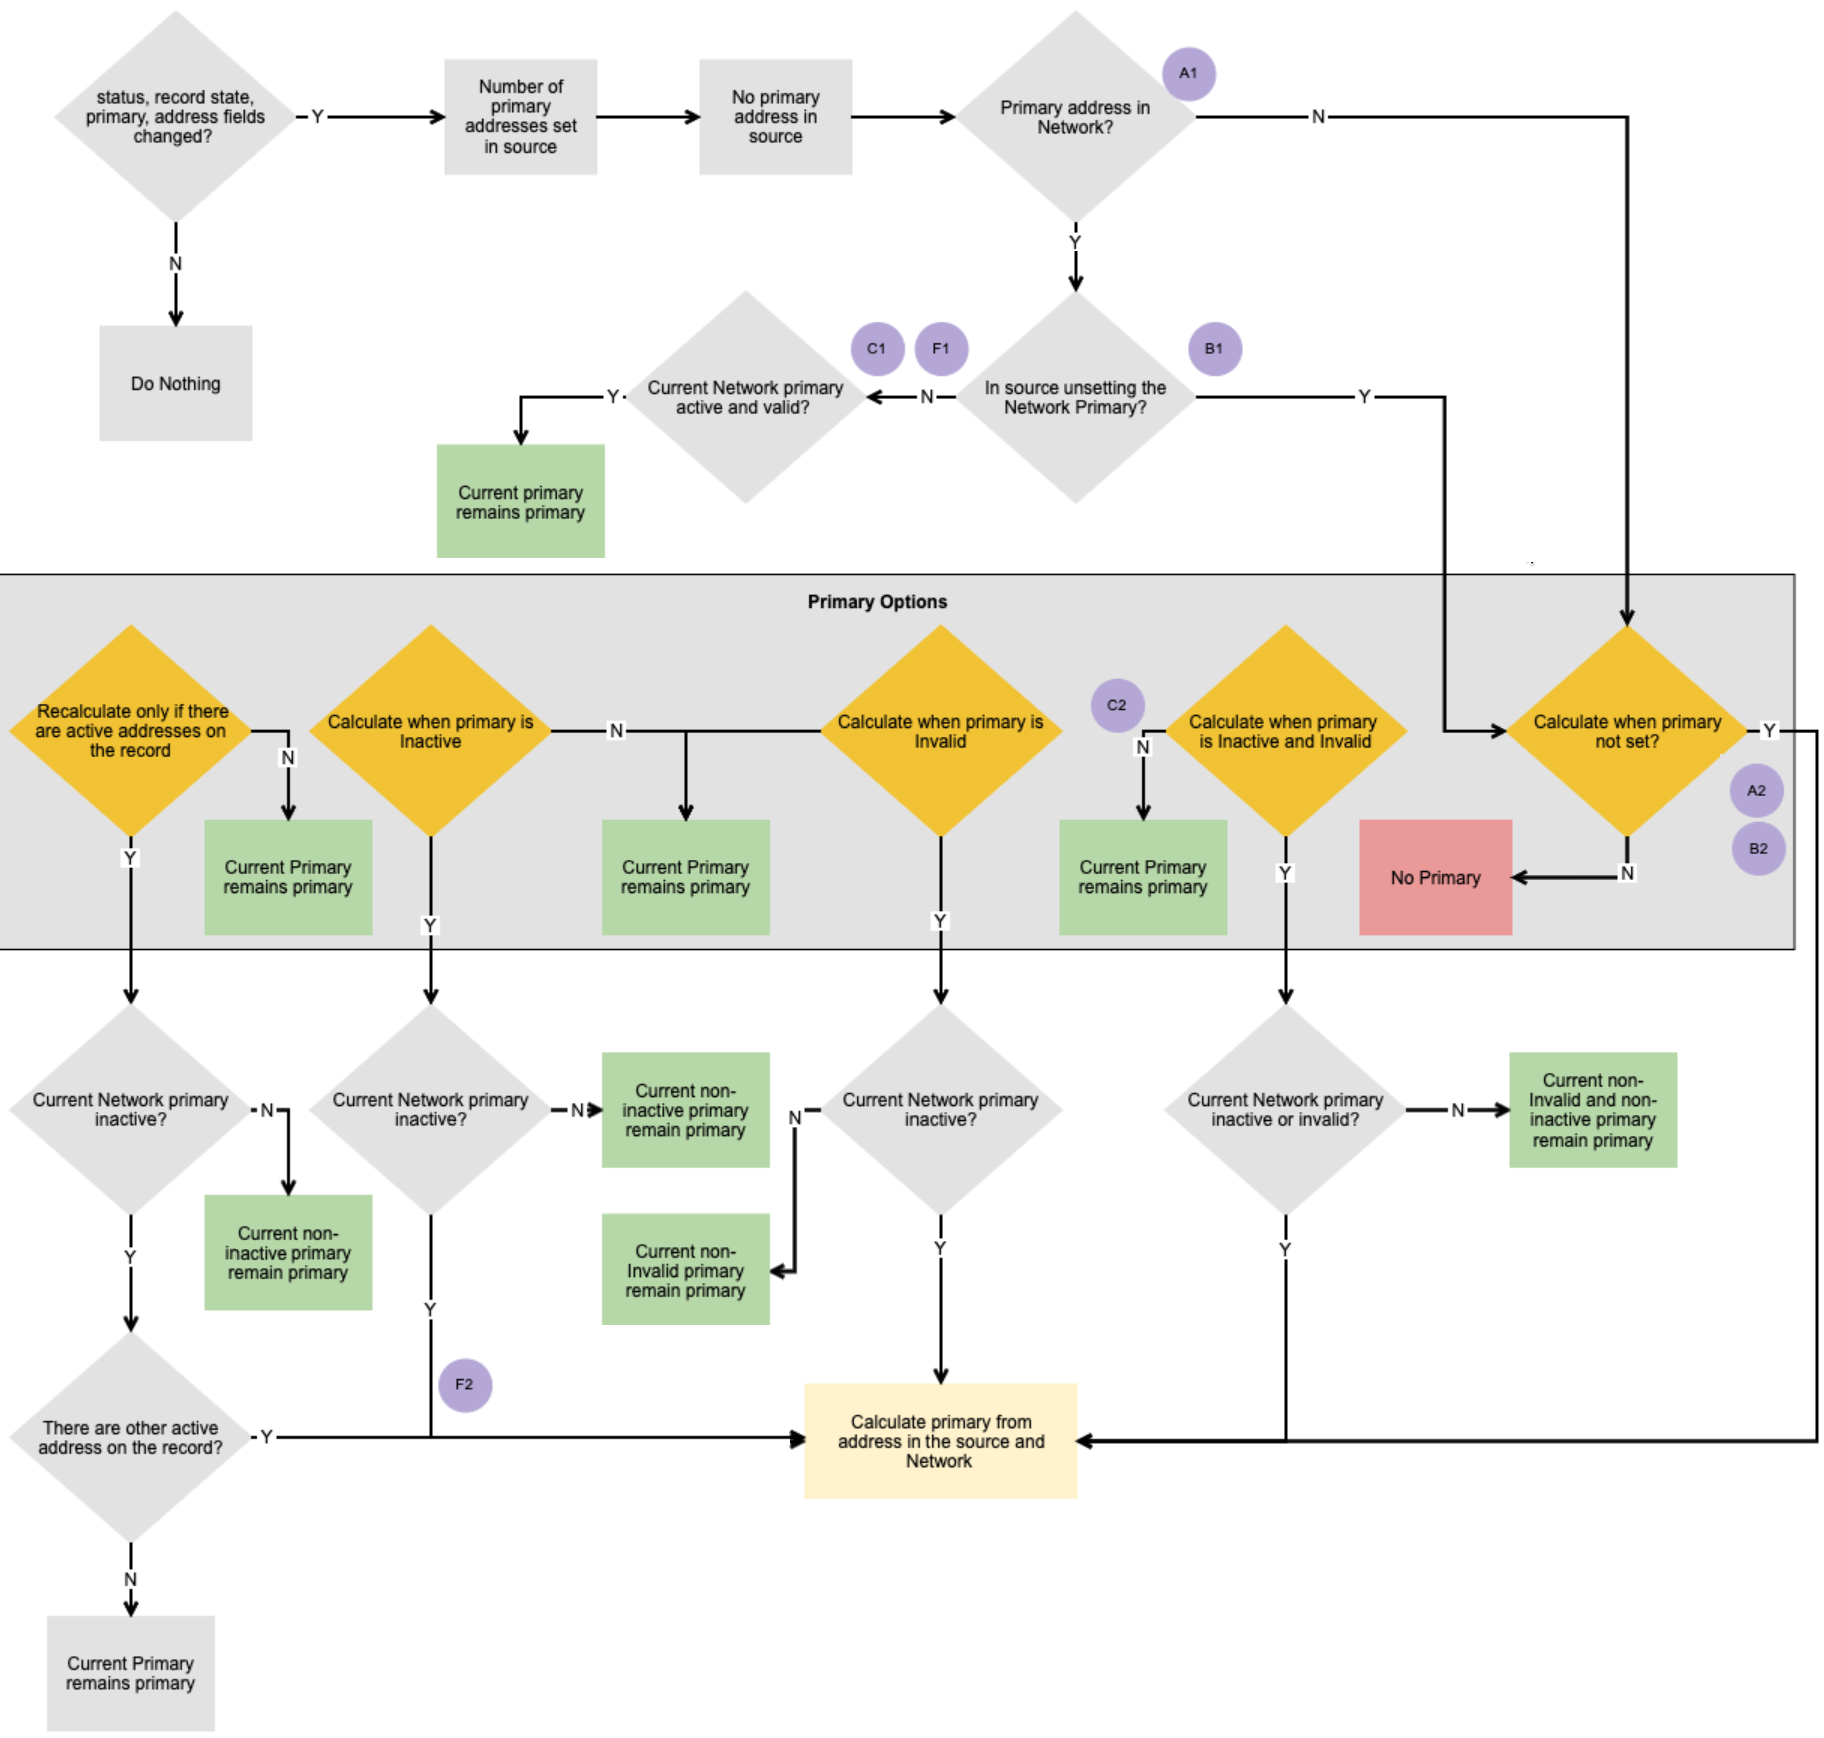
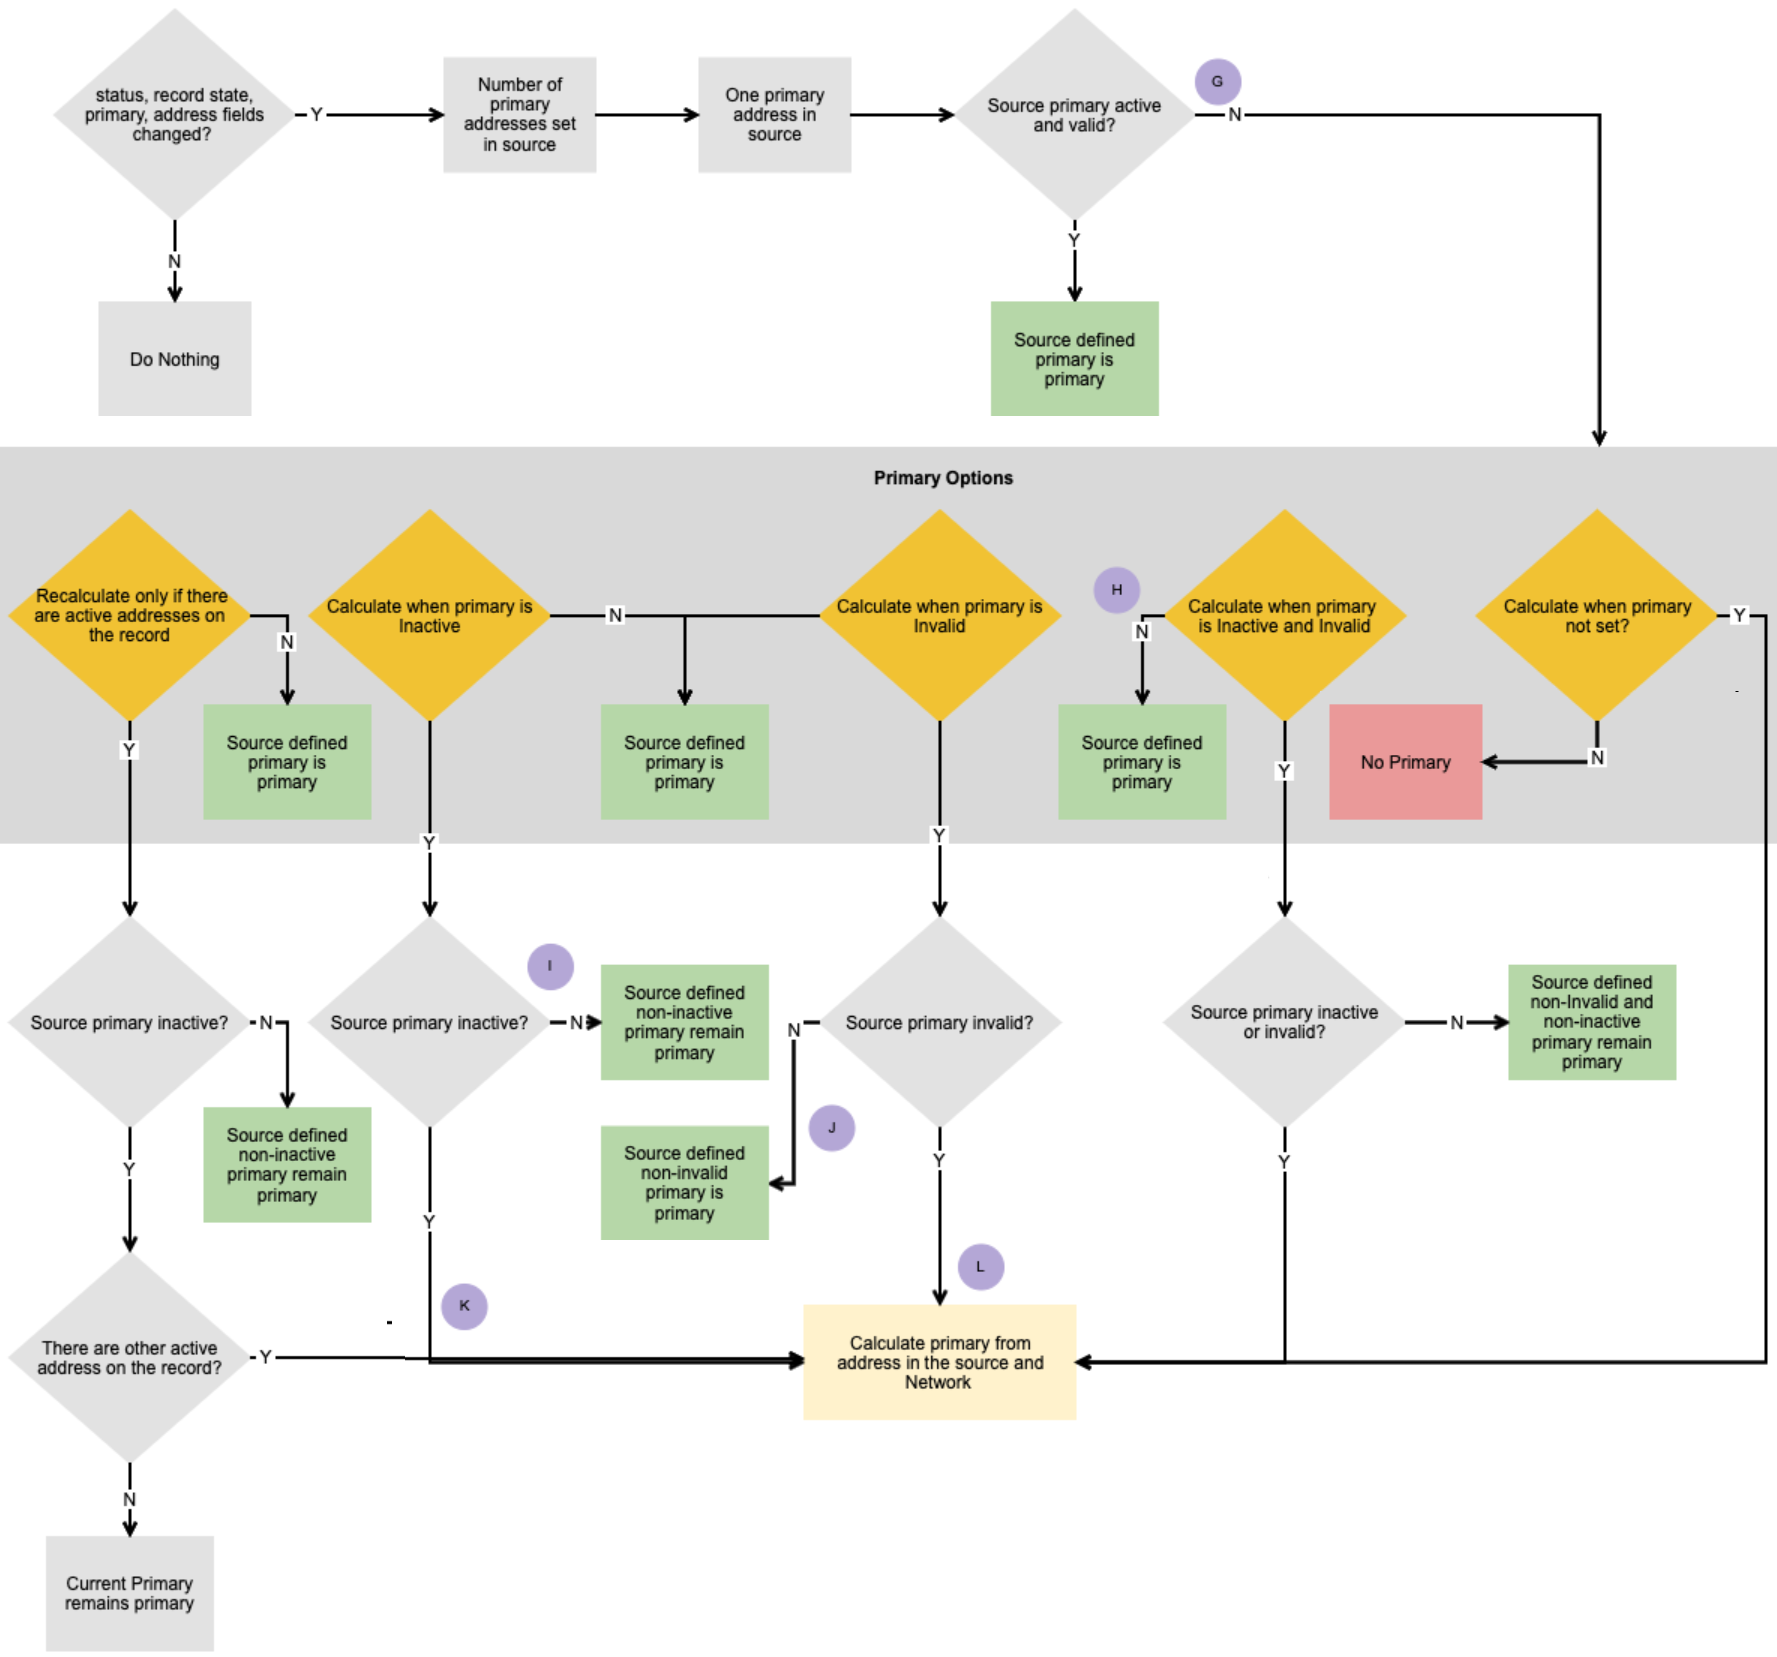
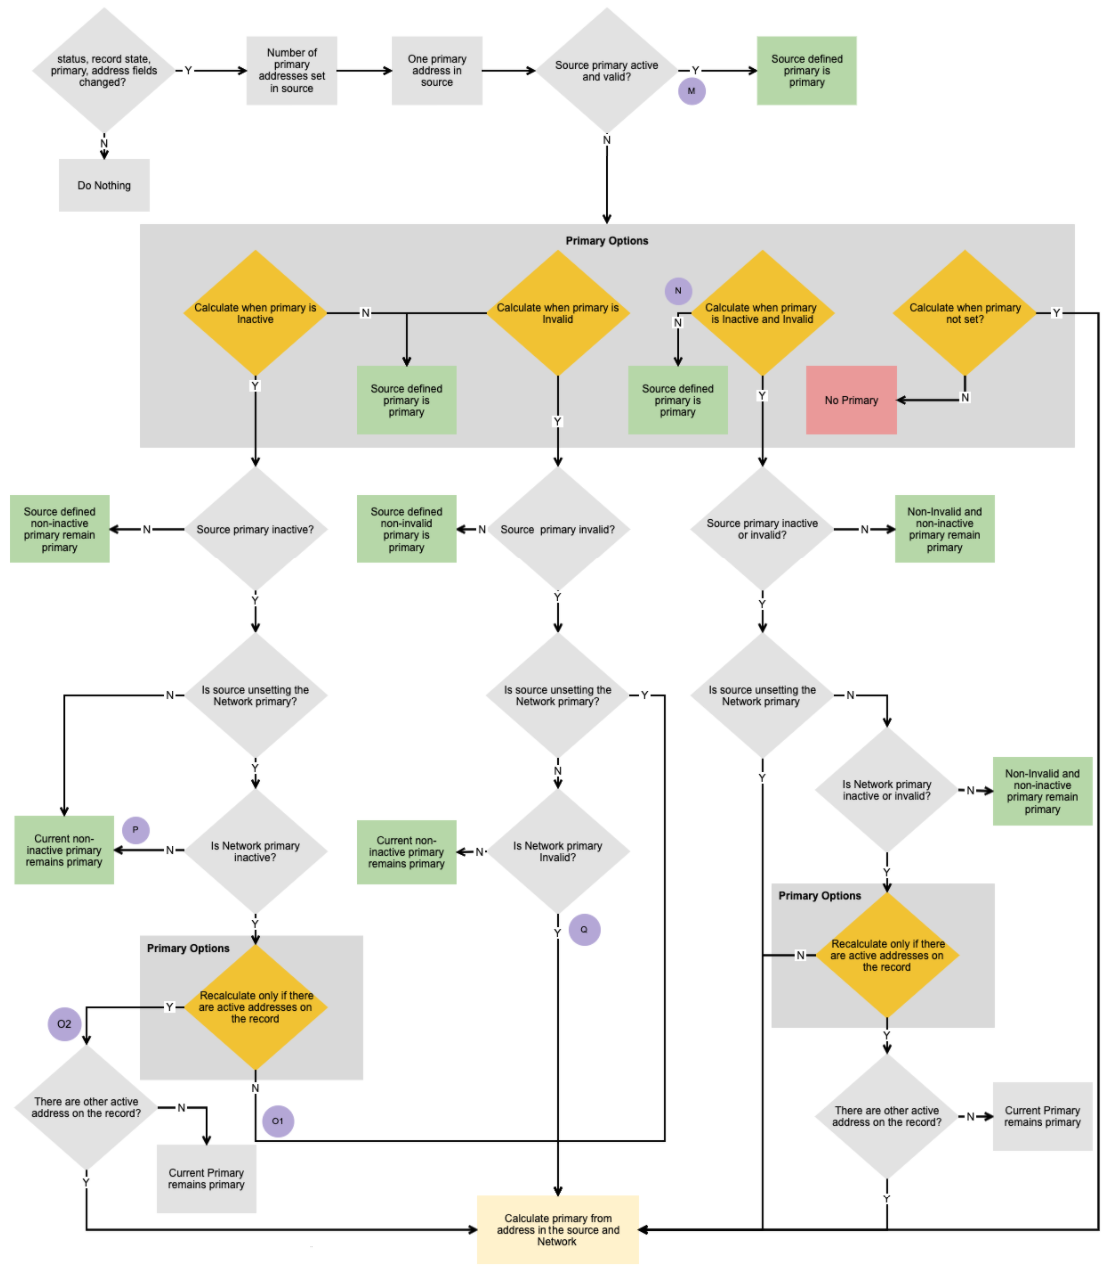
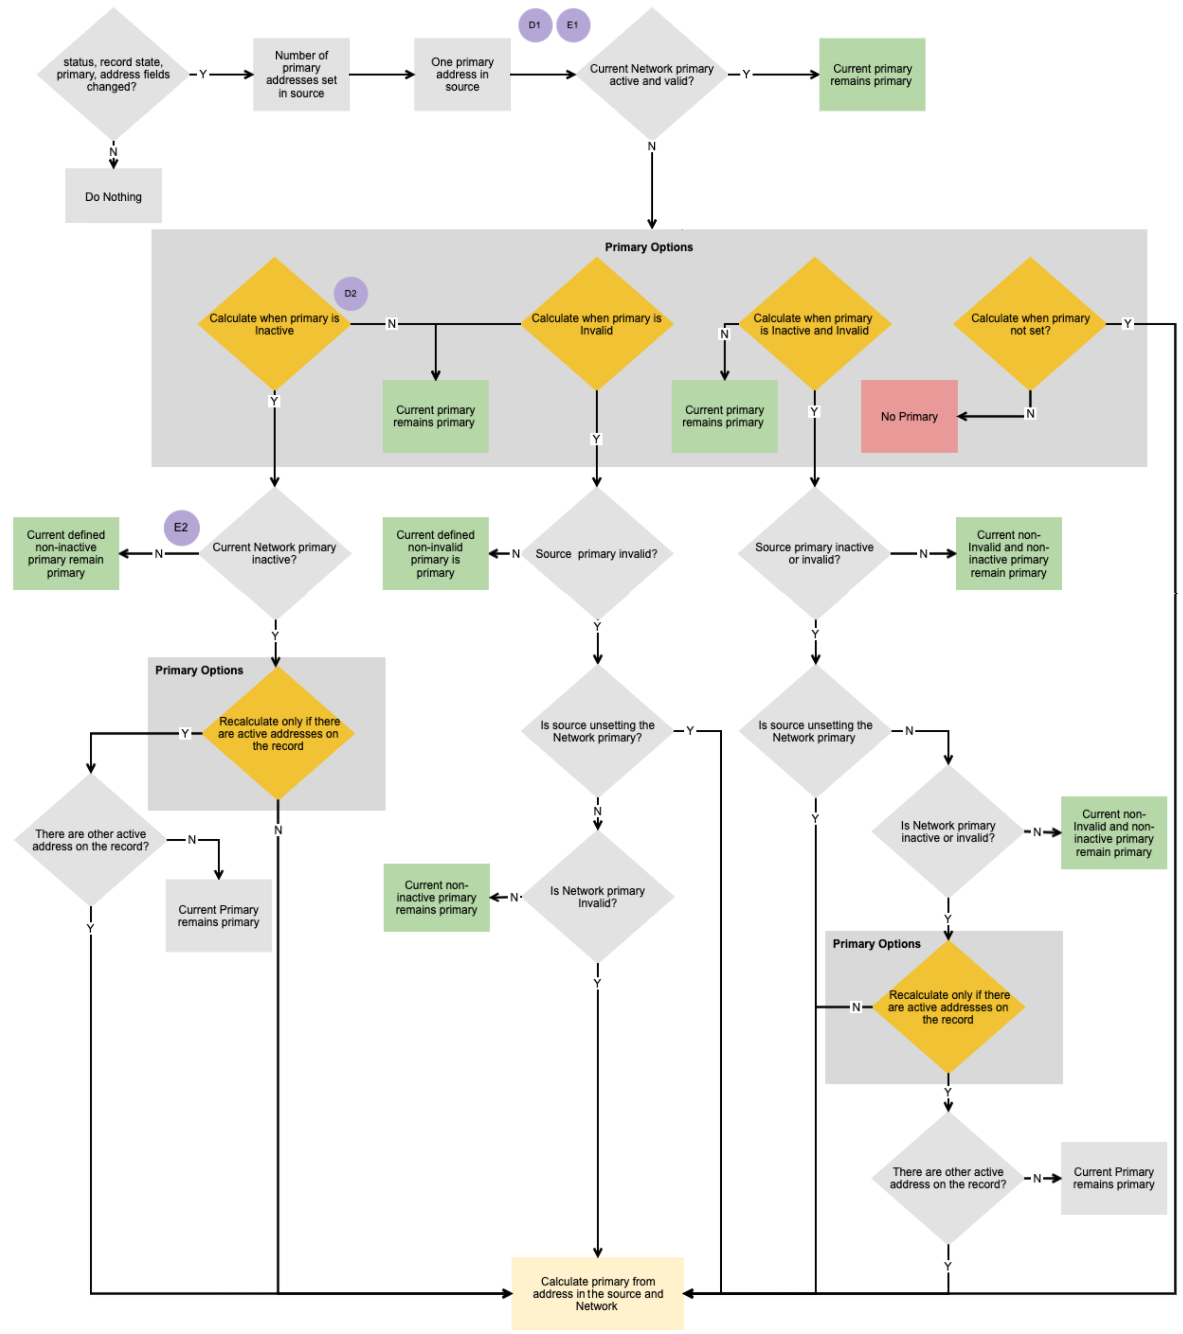

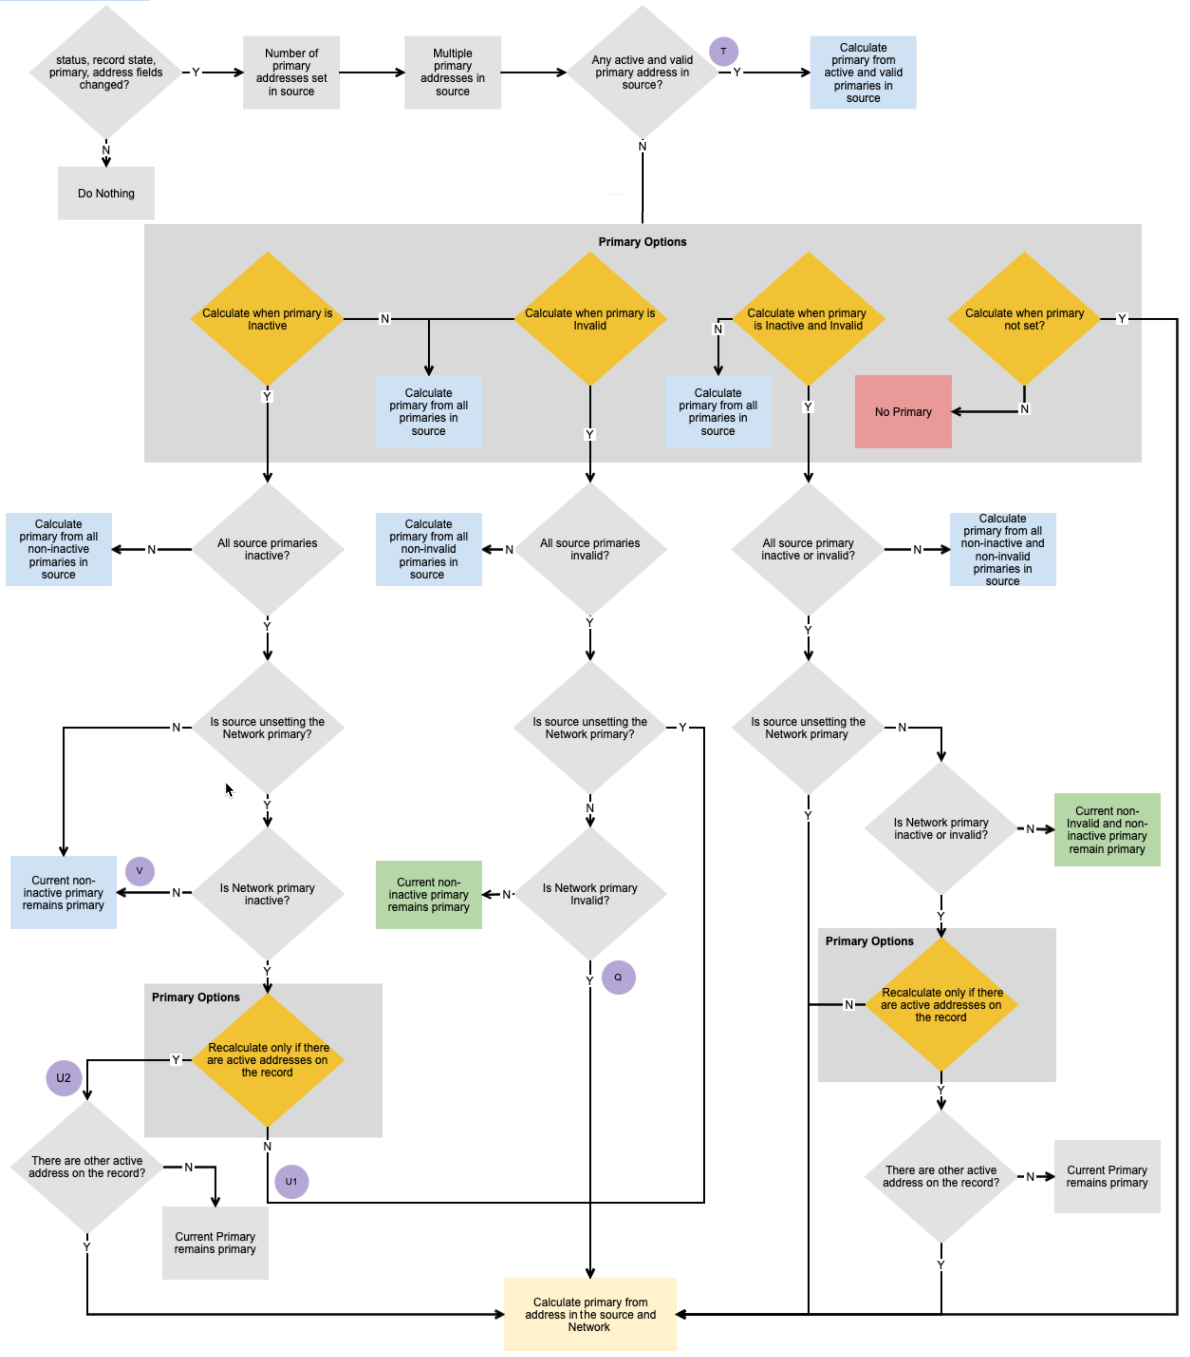


Calculating primary from addresses in the source and Network
If Network has to calculate a primary, only active and valid addresses on the record are considered in the calculation. Addresses where the primary flag is set to "N" in the current change are filtered out from the calculation. If there are multiple addresses to consider, the following criteria are used as tie-breakers until one primary can be found:
- Source rank on the primary field
- Address rank
- Latest time that the primary field was last updated. This is stored internally.
- Highest Veeva ID (VID).

Impact to downstream systems
Depending on the options that you select for Network calculation, it might impact other business processes.
Changes to incentive compensation
The primary flag will move from an inactive or invalid address in a fiscal quarter if you enable the configuration options. This means that any sales data with the previous primary address that is now inactive or invalid address will not be available in downstream systems where only primary addresses are exported. As a result, sales reps may not get compensated for sampling an HCP at the previous primary address.