Inactivating custom keys
DM
Custom keys must be unique but after record merges or other data processes an active custom key might exist on the "wrong" entity. You can inactivate the custom key on that entity so you can use the same key on another entity. Inactivating keys is also useful if custom keys were incorrectly created during an integration.
Custom keys can be inactivated using source subscriptions or using the Network MDM API.
Source subscription
Use a source subscription to load a .csv file that will inactivate the custom keys.
Create the file
Create a .csv file named entity.csv and add the custom keys that you need to inactivate.
The file must contain the following columns:
-
entity_vid__v - The Network ID of the entity that owns the key. For example, this might be the merge winner.
-
entity_type__v - The entity type.
-
vid__v - The Network ID of the custom key.
-
custom_key_status__v - The key status. The value in this column must be I (Inactive).
Sample file

Create the subscription
To create the source subscription:
-
In the Admin console, click System Interfaces > Source subscriptions.
-
Click Add Subscription > Use Classic Mode.
-
Type a Name and Description for the subscription.
-
Choose the System.
-
In the Source Files section, define the FTP Path.
-
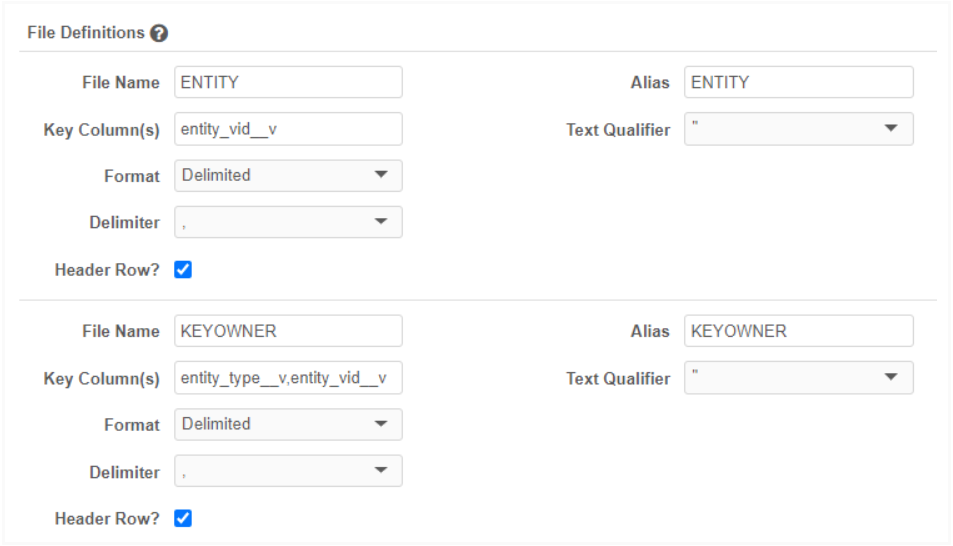
Below the File Definitions heading, click Add File. Add these file definitions to the subscription.
File definitions
-
In the Modelling & Normalization section, copy and paste this model map to the Model Map field.
Model map
[
    {
        "entity": "HCP",
        "from": "KEYOWNER WHERE KEYOWNER.entity_type__v = 'HCP'",
        "attributes": [
            "KEYOWNER.VDM_* AS *",
            "KEYOWNER.entity_vid__v as vid__v"
        ]
    },
    {
        "entity": "HCO",
        "from": "KEYOWNER WHERE KEYOWNER.entity_type__v = 'HCO'",
        "attributes": [
            "KEYOWNER.VDM_* AS *",
            "KEYOWNER.entity_vid__v as vid__v"
        ]
    },
    {
        "entity" : "CUSTOMKEY",
        "from": "ENTITY JOIN KEYOWNER ON ENTITY.entity_vid__v = KEYOWNER.entity_vid__v",
        "attributes": [
			"ENTITY.VDM_* AS *",
			"ENTITY.vid__v as vid__v",
			"ENTITY.custom_key_status__v as custom_key_status__v",
            "KEYOWNER.VDM_ENTITY_ID AS VDM_FKENTITY_ID"
        ]
    }
]
Note: Network Expression Rules and Match Configuration are not required for this subscription.
-
In the Job Schedule section, choose Manual, so you can start the job when the configuration is complete.
-
Click Advanced Mode and add the following advanced property to the Module Properties field:
"native.group.ENTITY.alias.KEYOWNER": "entity_vid__v",
-
Save the subscription.
-
Click Start Job to run the subscription.
Note: In the Settings section, accept the default selections.
When the subscription runs, the custom key status will be set to Inactive.
Network MDM API
Administrators and Integration Users can use the API to inactivate custom keys.
For more details, see the Disassociate custom key and Batch disassociate custom key API details in the Veeva Network MDM API Reference: https://developer.veevanetwork.com/api/#disassociate-custom-key.