Creating Vault data components
DM
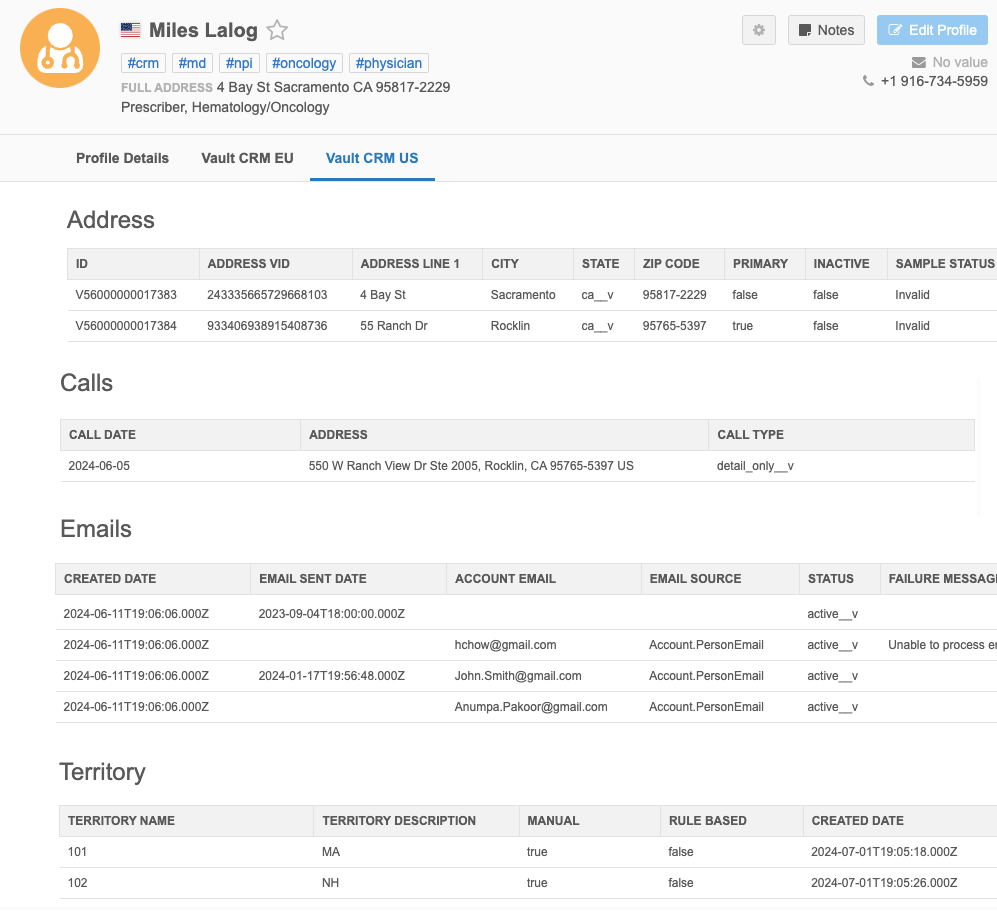
Data components can display data from Vault (including Vault CRM). When you open the data component, the data from Vault is dynamically retrieved and displayed for the record that you are viewing in the Network UI.
Vault data component support
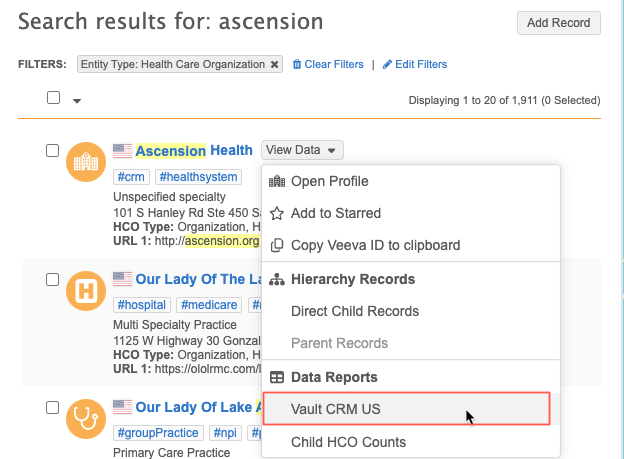
Vault data can display in the following areas in the Network UI:
-
Profile page
-
Add requests and change requests
-
Search results (View Data menu)
Create a Vault data component
Administrators and Data Managers can add data components to display specific data from Vault.
-
In the Admin console, click Widgets & Portal > Data Components.
-
Click Add Data Component.
-
In the New Data Component popup, select Vault.
Click Add Data Component.
-
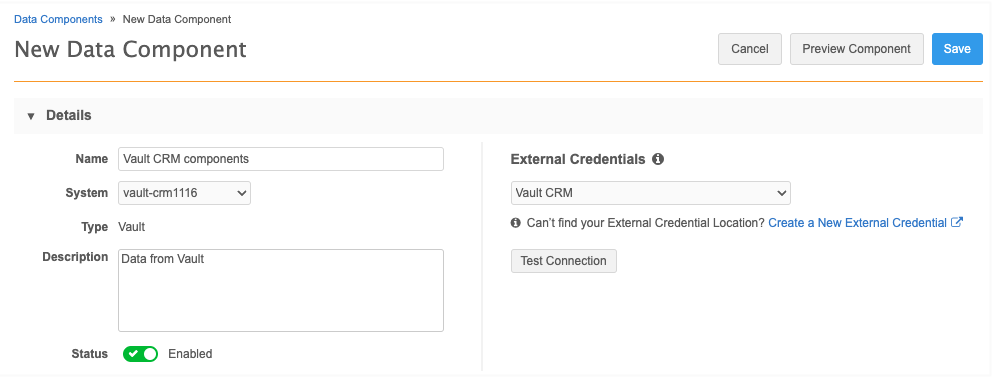
In the Details section, define the following:
-
Name - The unique name that will be used for the component on the profile and data change requests.
-
System - The Network source system.
-
Type - This is read-only. Vault is the type by default.
-
Description - A meaningful description that is used on the Data Components list page only.
-
Status - The data component is Enabled by default.
-
External Credentials - Expand the list and select the Vault that you want to connect to retrieve the data.
If the Vault isn't listed, click Create a New External Credential to define new credentials for the Vault.
Click Test Connection to ensure that you can connect to the Vault.
-
-
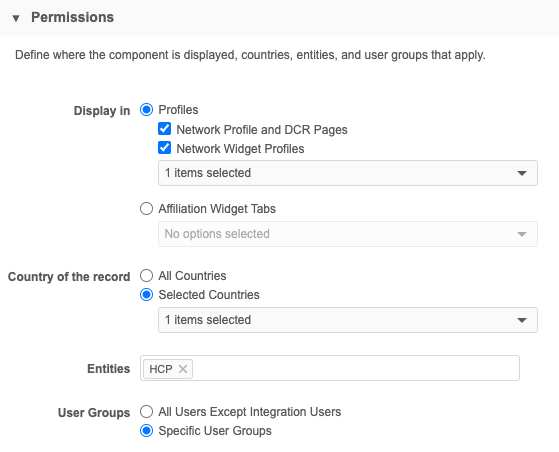
In the Permissions section, specify where the components display, the records that the data component will display on, and the users that will have access to it.
-
Display in - Choose where to display the data component.
-
Profiles (default) - The data component will display in the Network UI on record profiles, add and change requests, and in search results (View Data menu). You can also choose to display them on Network widget profiles.
-
Network Profile and DCR pages - The component will display in the Network UI on record profiles, on DCRs, and in search results (View data menu).
-
Network Widget Profiles - Display data components for HCP and HCO data on widgets.
In the list, select the widgets that the data component should be applied to. The widgets are grouped by widget type.
Widgets that are not enabled are dimmed in the list.
-
-
Affiliation Widget Tabs - Display on the tabs in the Affiliation widget. Choose this option if you want to display data for multiple accounts.
If this option is selected, at least one widget must be selected.
-
-
Country of the record
-
All Countries (default) - All countries that you have set up in your Network instance.
-
Selected Countries - Limit the component to specific countries. For example, you might want this component to apply only to specific countries in Europe.
Expand the list to select the countries. Only the countries that are defined in your Network instance display in the list.
-
-
Entities - By default, HCP is defined. Click the field to add entities.
Veeva standard objects and custom objects are supported for the Network UI.
-
User Groups - Define the users that can access the data component.
-
All Users Except Integration Users (default).
-
Specific User Groups - Choose to enable the option to define different groups.
-
The results that display for each data component query are based on the following settings:
-
-
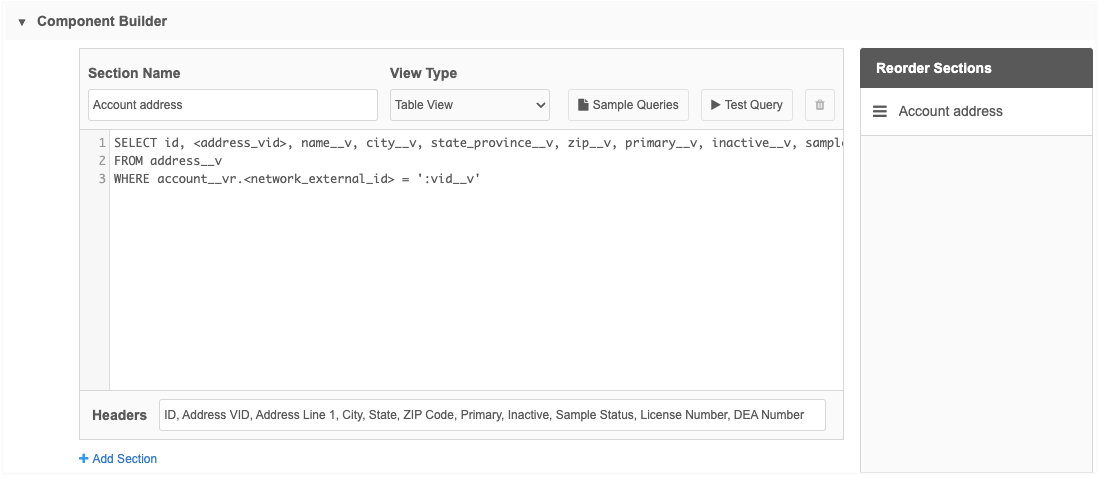
In the Component Builder section, use a VQL query to retrieve specific data from Vault.
Write your own query or click Sample Queries to use a predefined query.
Each query that you define in the Component Builder is contained in a Section. When users view data components, the data displays under the section name that you define.
Example
Use the Addresses sample query so Data Stewards can see address data from Vault CRM to help them validate primary address changes in DCRs.
To define a query:
-
In the section, write a VQL query or click Sample Queries to use a predefined query.
Note: See the "Sample Queries" section below for queries that you can use.
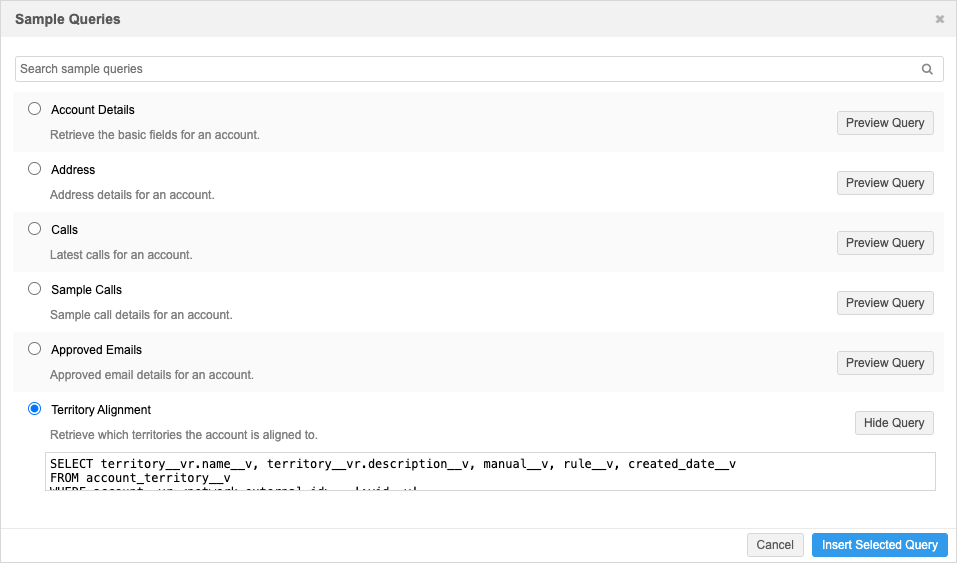
If you click Sample Queries:
-
In the Sample Queries dialog, select a query; for example, the Territory Alignment query so users can view the territories for an account.
-
Click Preview Query to see the fields that are used for the query.
-
Click Insert Selected Query to add it to your section. The query is inserted into the section query box.
About queries
Data component queries use fields from the Vault object.
-
Placeholders
Some sample queries have a placeholder for a field enclosed in angle brackets (<>). Replace it with the appropriate Vault field.
Example
Replace <network_external_id> with the Vault field that contains the Network ID:
veeva_network__id__v. -
VID variable
The Network field
vid__vis included in the queries as a dynamic variable (:vid__v). When the data component is opened on a profile, the variable is swapped with the Network ID of that record.
-
-
In the Section Name field, type a name for this data; for example, Addresses. This name will be the heading in the data component.
-
Choose the View Type. This is the format the data will be presented in the Data Components dialog that users view.
There are two view types:
-
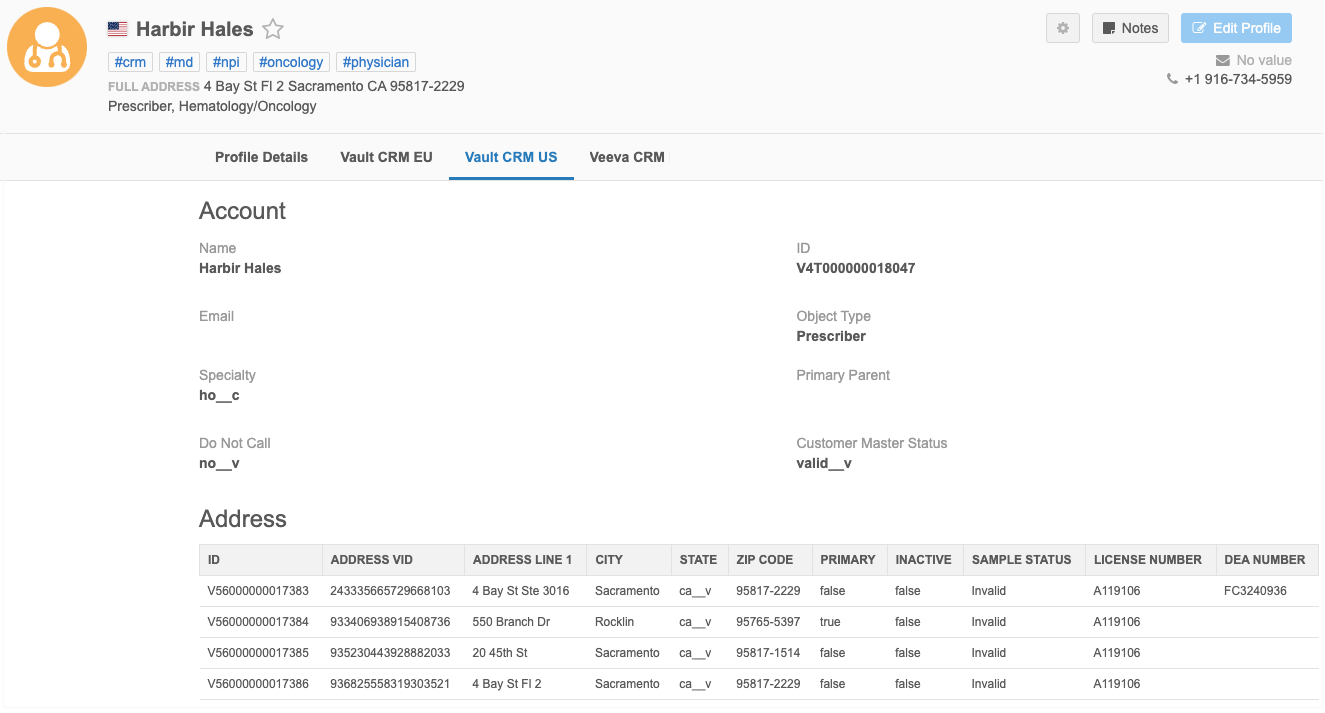
Details View - Use to display a single result; for example, account details.
If you use the Details View and the query returns more than one result, only the first result will display.
-
Table View - Use when you expect to return multiple results for an account. For example, address data or call data for an HCP.
Example
In this example, the Account section uses the Details view. The Address section uses the Table View.
-
-
The Headers field contains a comma-separated list of the field names for the data. When you use a sample query, the headers are automatically populated but they can be changed.
If no headers are defined, the column name is returned from the VQL query.
-
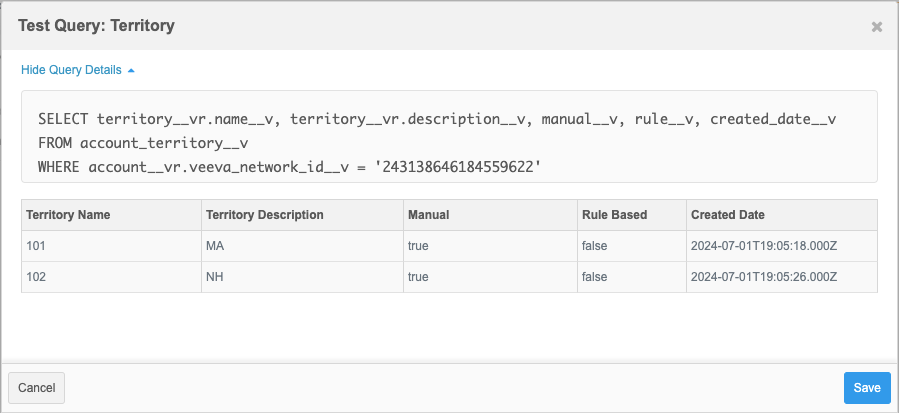
Click Test Query to preview the results to ensure that this is the data you want to retrieve from Vault.
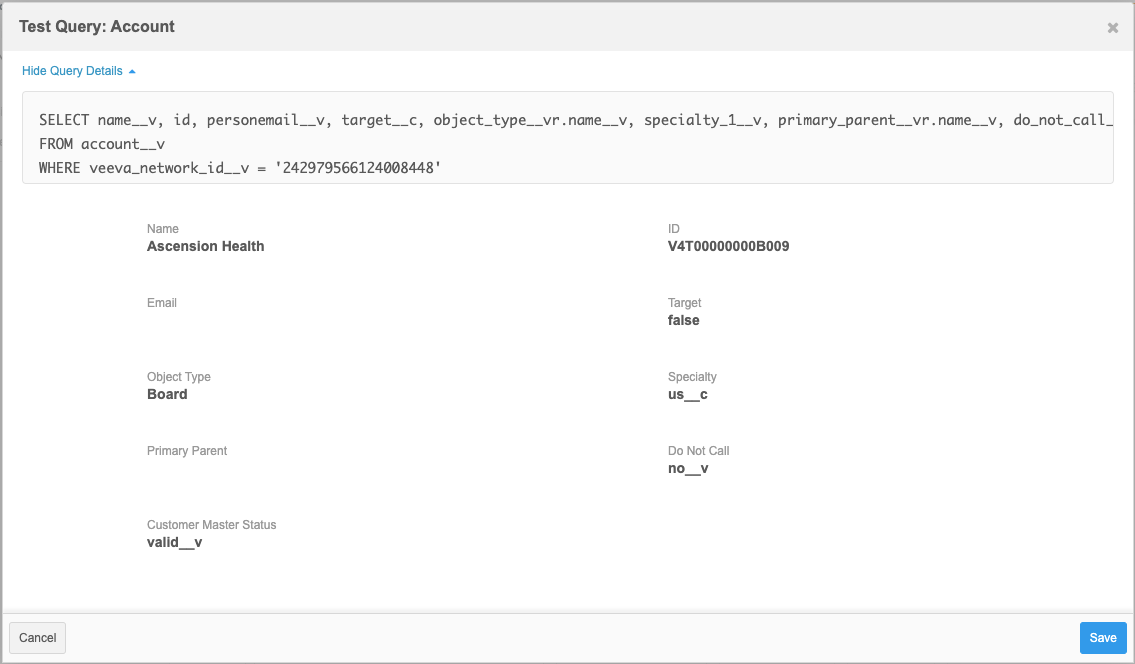
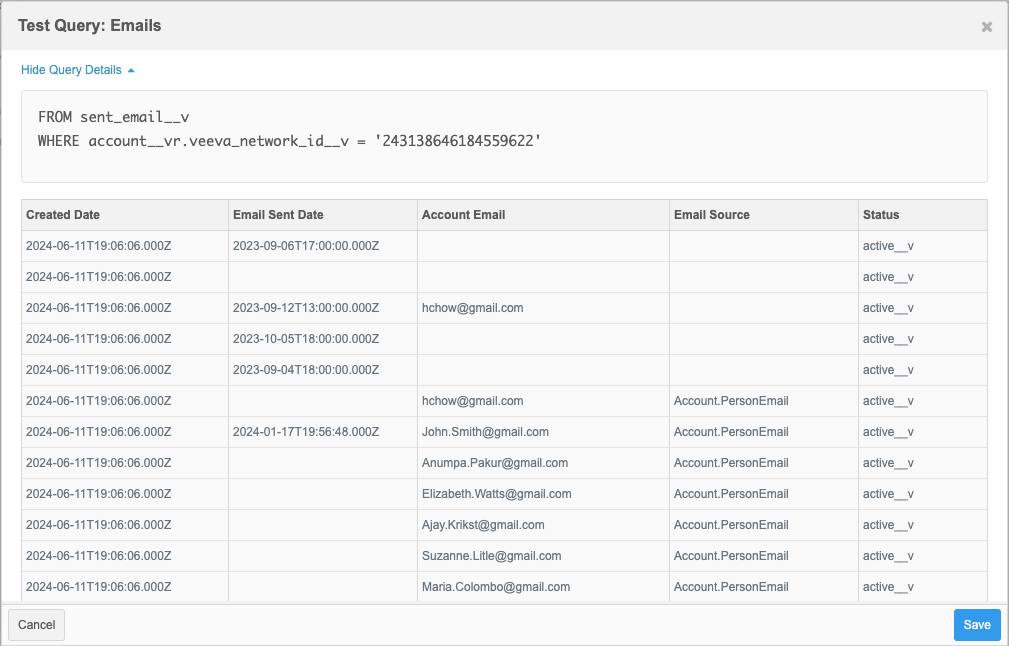
In the dialog, type a Network ID from a main entity (for example, HCP or HCO) so you can see the results. The Test Query dialog displays the query and the results.
Note: Your user permissions are used to test the query; not the country and user group permissions defined in the component. For example, if you use a Network ID for a record in Spain but your data visibility profile permissions only include France and Germany, a permission error displays.
Notice that the Network field that was the variable; for example,
vid__v, is replaced with the Network ID that you specified in the Query Details section.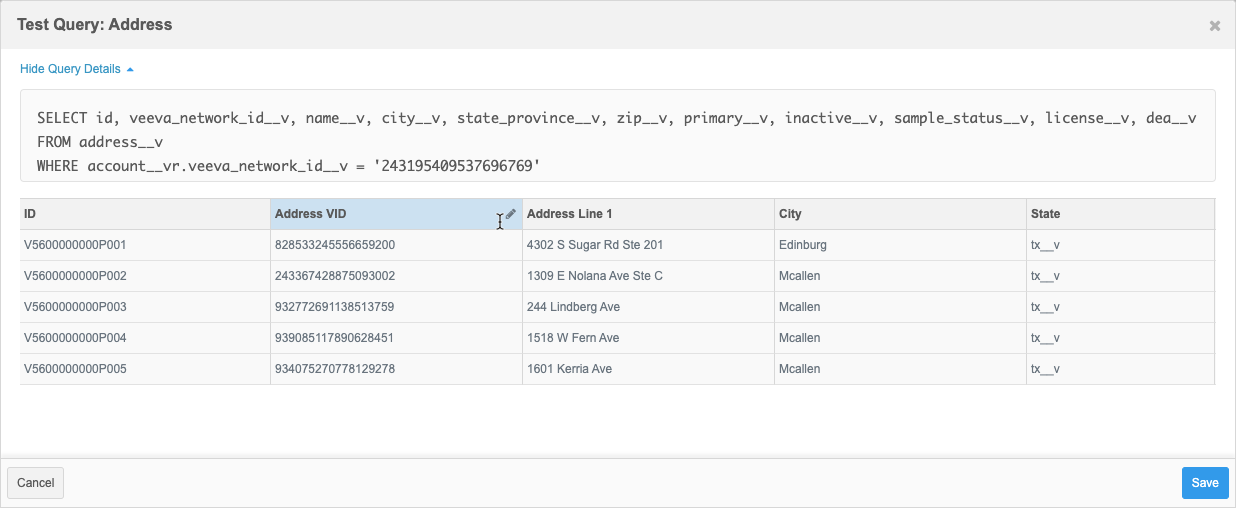
Tip: You can edit the headers. Saving the changes updates the Headers field in the section.
Close the dialog to continue.
-
-
To add more sections, click Add Section.
-
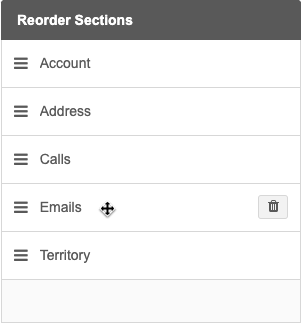
In the Reorder Sections pane, all sections that you have defined are listed.
-
Use the Handle
 icon to move the section to a different position in the Data Component.
 -
Use the Delete
 icon to remove the section from the data component.
-
-
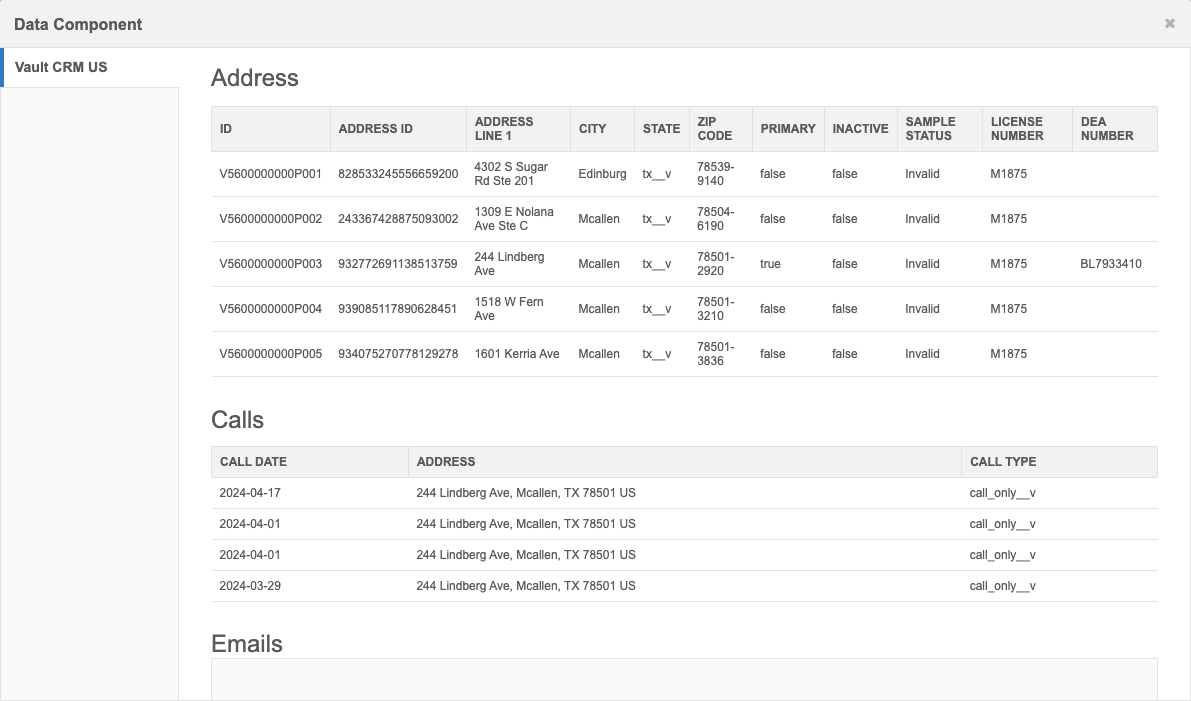
Click Preview Component to see how the Data Component will display for Network users. Enter a Veeva ID so you can preview the data for a record.
Note: Your user permissions are used to preview the data component; not the country and user group permissions defined in the component. For example, if you use a Veeva ID for a record in Spain but your data visibility profile permissions only include France and Germany, a permission error displays.
The preview displays the component, all sections, and any data available for each section.
-
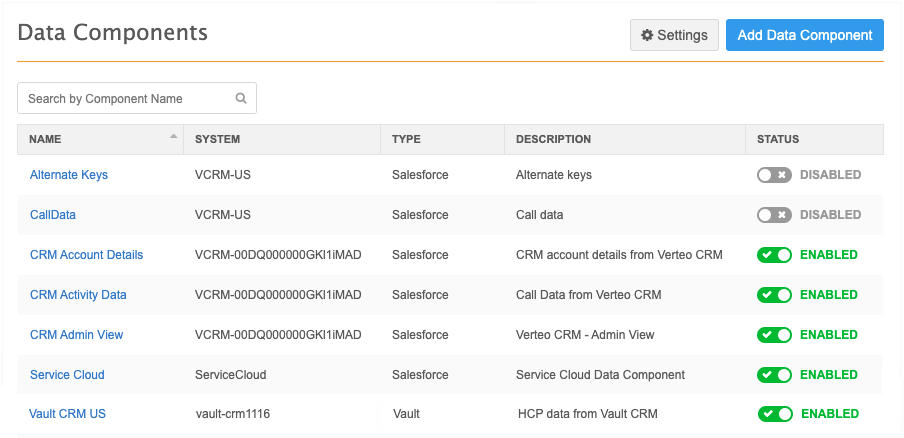
Save your changes.
The component will be added to the Data Component page.
Preview the data component
After a data component configuration is saved, you can preview the entire component.
-
Click Preview Component
-
In the dialog, add the Veeva ID of an HCP, HCO, or custom object record.
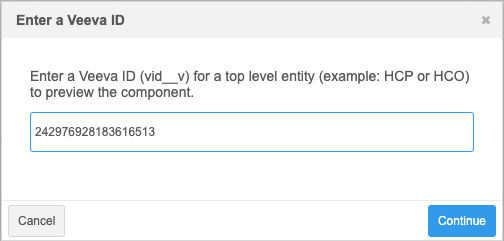
-
Click Continue.
The data component displays with the data returned from the report.

Note: User permissions are applied to the Admin or Data Manager user that is testing the query. For example, if you do not have access to records in France through your data visibility profile and you try to test the data component with a VID of an HCO in France, you will see a message that there is no record with this Veeva ID.
Clone a Vault data component
To create a similar Vault data component, you can clone an existing data component.
-
In a data component configuration, click Clone.
-
A New Data Component page displays with all of the settings and the same queries of the existing data component.
-
Type a Name for this data component and make any required changes to the settings.
-
Click Save.
Use query variables
When you create a VQL query for a data component, use variable syntax to make the results of the query relevant to each profile.
The variables are fields on the entity.
Example
vid__v =:vid__v
When the data component is opened on a profile, the variable is swapped with the Veeva ID of that record.
vid__v =243243646072128514
Set variables
Use a variable to define a set of VIDs to query for a data component. Use variables for components that will display on Affiliation widget views.
Using tabs on the Influence Map, you can see the Vault data for all accounts that display on the view.
For example, you can see the account details for all HCOs on a view.
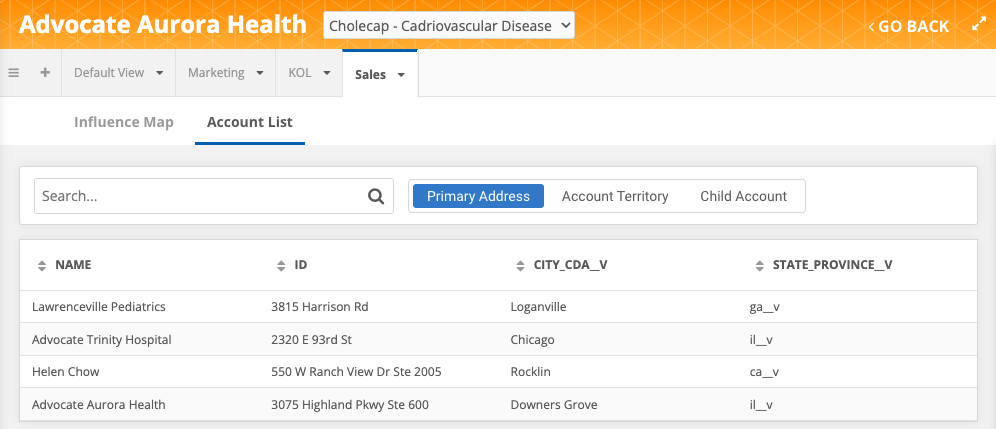
The data component will display all of the values from the set on the page it was opened on.
Set syntax
:qset(<Network field name>)
or
:set(<Network field name>)
Example VQL query
SELECT call_date__v, address__v, ship_to_address_text__v, call_type__v
FROM call2__v
WHERE account__vr.veeva_network_id__v CONTAINS :set(vid__v)
ORDER BY call_date__v DESC
Set limits
A maximum of 150 VIDs can be returned for a set.
Sample query 1 - Account details
Description: Retrieve the basic fields for an account.
Query
SELECT name__v, id, personemail__v, target__c, object_type__vr.name__v, specialty_1__v, primary_parent__vr.name__v, do_not_call__v, customer_master_status__v
FROM account__v
WHERE veeva_network_id__v = ':vid__v'
Important: For all sample queries, change the <network_external_id> placeholder to the ID field in Vault: veeva_network_id__v.
Headers: Name, ID, Email, Object Type, Specialty, Primary Parent, Do Not Call, Customer Master Status
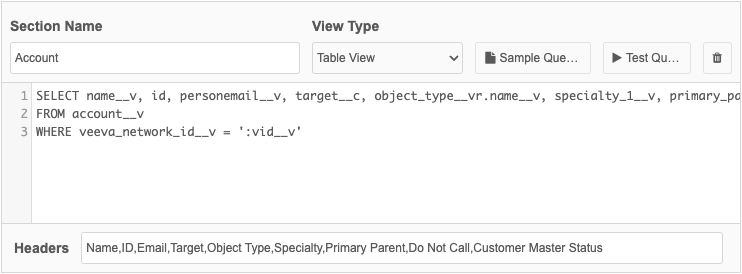
Example results
Sample query 2 - Address
Description: Address details for an account.
Query
SELECT id, veeva_network_id__v, name__v, city__v, state_province__v, zip__v, primary__v, inactive__v, sample_status__v, license__v, dea__v
FROM address__v
WHERE account__vr.veeva_network_id__v = ':vid__v'
Headers: ID, Address VID, Address Line 1, City, State, ZIP Code, Primary, Inactive, Sample Status, License Number, DEA Number
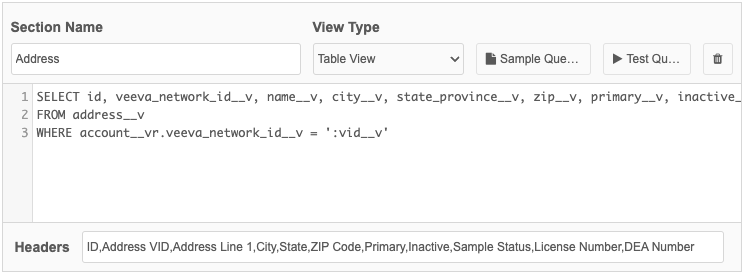
Example results
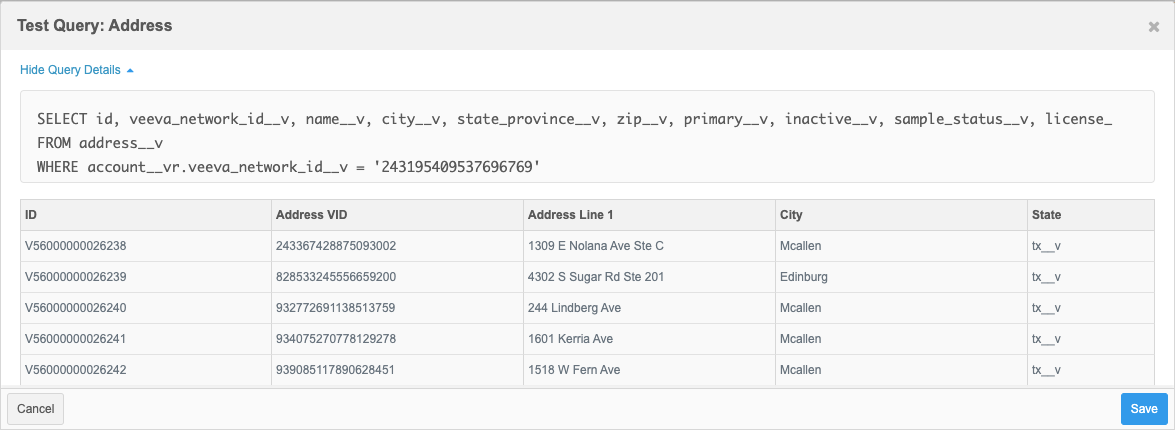
Sample query 3 - Calls
Description: Latest calls for an account.
Query
SELECT call_date__v, address__v, call_type__v
FROM call2__v
WHERE account__vr.veeva_network_id__v = ':vid__v'
ORDER BY call_date__v desc
Headers: Call Date, Address, Call Type
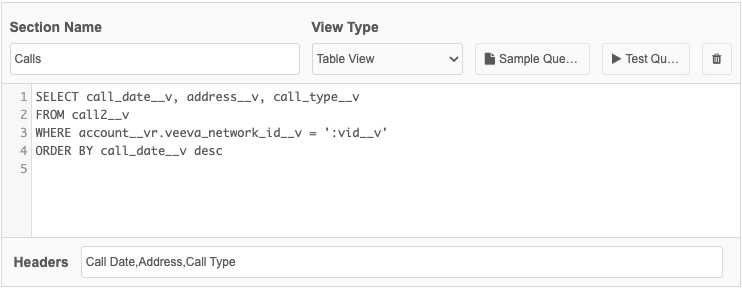
Example results
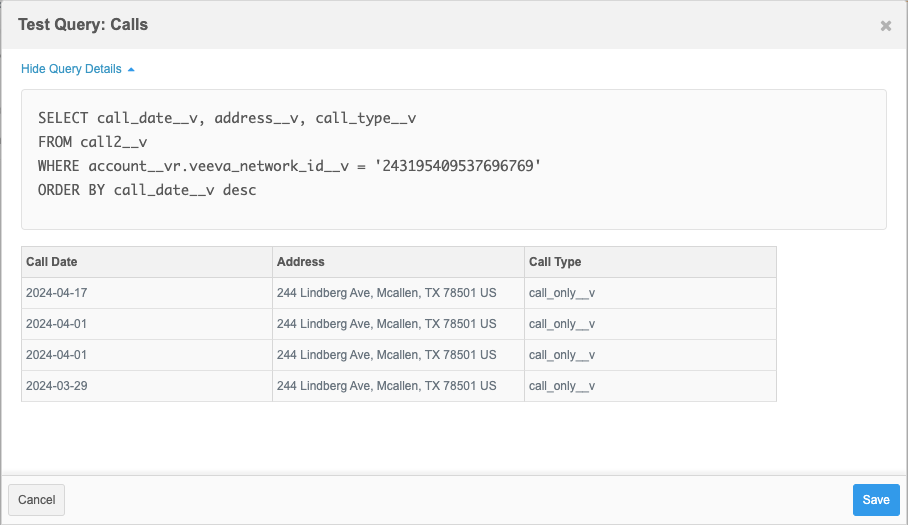
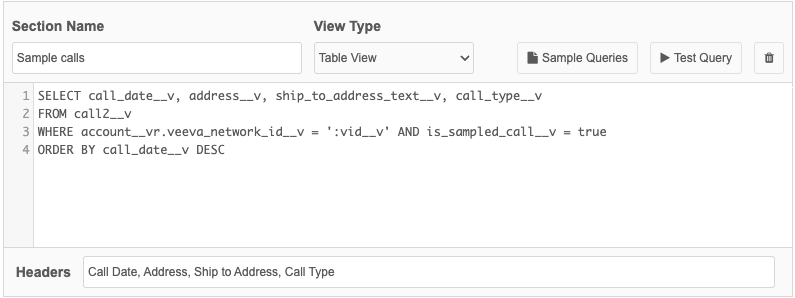
Sample query 4 - Sample Calls
Description: Sample call details for an account.
Query
"SELECT call_date__v, address__v, ship_to_address_text__v, call_type__v
FROM call2__v
WHERE account__vr.veeva_network_id__v = ':vid__v' AND is_sampled_call__v = true
ORDER BY call_date__v DESC"
Headers: Call Date, Address, Ship to Address, Call Type
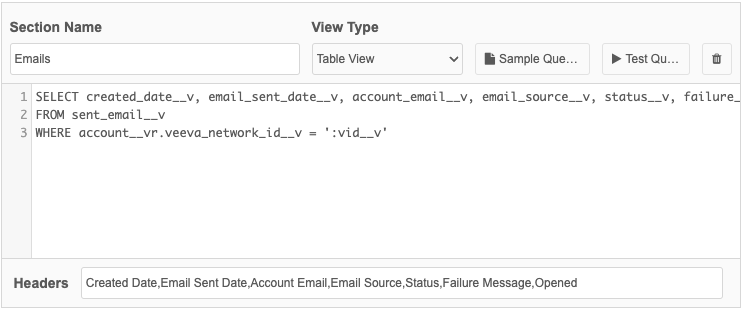
Sample query 5 - Emails
Description: Email details for an account.
Query
SELECT created_date__v, email_sent_date__v, account_email__v, email_source__v, status__v, failure_msg__v, opened__v
FROM sent_email__v
WHERE account__vr.veeva_network_id__v = ':vid__v'
Headers: Created Date, Email Sent Date, Account Email, Email Source, Status, Failure Message, Opened
Example results
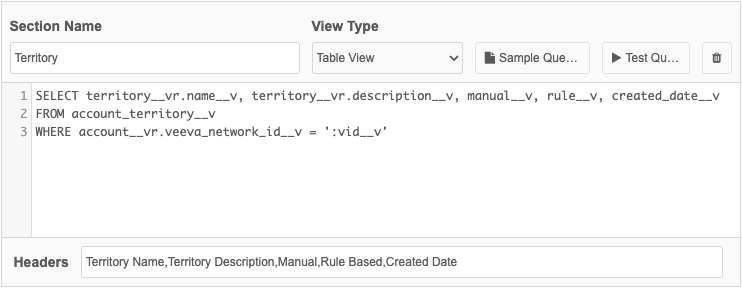
Sample query 6 - Territory Alignment
Description: Retrieve which territories the account is aligned to.
Query
"select territory__vr.name__v, territory__vr.description__v, manual__v, rule__v, created_date__v
from account_territory__v
where account__vr.veeva_network_id__v = ':vid__v'
Headers: Territory Name, Territory Description, Manual, Rule Based, Created Date
Example results
